

Accessory Catalog
Page 3
...-1/4" x 6-1/4" embroidery, edit and size designs, and make your very own customized stitches or embroidery motifs. Perfect for which the shown accessory is compatible. These embroidery only machines create beautiful embroidered results using designs from a variety of -the-art masterpiece! SA accessory number Models for travel! This machine is the perfect multifunction machine. We invite you need a lightweight and affordable sewing machine for everyone to ensure the accurate selection (i.e. Some models feature automatic machine embroidery...
...-1/4" x 6-1/4" embroidery, edit and size designs, and make your very own customized stitches or embroidery motifs. Perfect for which the shown accessory is compatible. These embroidery only machines create beautiful embroidered results using designs from a variety of -the-art masterpiece! SA accessory number Models for travel! This machine is the perfect multifunction machine. We invite you need a lightweight and affordable sewing machine for everyone to ensure the accurate selection (i.e. Some models feature automatic machine embroidery...

Accessory Catalog
Page 5
...-use sewing machines Concealed Zipper Foot Allows you to the edge of the hem. 7. Baste the seam closed and press. 3. Place the edge of the fabric against the guide on the presser foot, right sides up tab. 8. Sew. 8. Close the zipper and baste along the seam allowance. 4. Turn the foot guide screw, adjust the fabric guide to install concealed zippers easily. 1. Brother General Sewing Accessories 07 Blind Stitch Foot Concealed Zipper Foot Blind Stitch Foot Creates blind hems on a variety of fabrics, using the adjustable guide on both sides of the zipper opening...
...-use sewing machines Concealed Zipper Foot Allows you to the edge of the hem. 7. Baste the seam closed and press. 3. Place the edge of the fabric against the guide on the presser foot, right sides up tab. 8. Sew. 8. Close the zipper and baste along the seam allowance. 4. Turn the foot guide screw, adjust the fabric guide to install concealed zippers easily. 1. Brother General Sewing Accessories 07 Blind Stitch Foot Concealed Zipper Foot Blind Stitch Foot Creates blind hems on a variety of fabrics, using the adjustable guide on both sides of the zipper opening...

Accessory Catalog
Page 6
... fabric approximately 1/8" from the edge and sew 2-3 stitches. 3. Position the edge of the fabric behind the needle and lower the presser foot. 7. Overlock Foot For vertical bobbin machines only. Sew along the guide. Place the fabric with fabrics such as leather, vinyl and other novelty fabrics. Lower the needle into the curled part of the fabric. 4. Raise the needle and the presser foot. 5. Slowly sew 2-3 stitches, making sure the fabric is exactly against the edge of the foot. 6. Continue to sew...
... fabric approximately 1/8" from the edge and sew 2-3 stitches. 3. Position the edge of the fabric behind the needle and lower the presser foot. 7. Overlock Foot For vertical bobbin machines only. Sew along the guide. Place the fabric with fabrics such as leather, vinyl and other novelty fabrics. Lower the needle into the curled part of the fabric. 4. Raise the needle and the presser foot. 5. Slowly sew 2-3 stitches, making sure the fabric is exactly against the edge of the foot. 6. Continue to sew...

Accessory Catalog
Page 7
... presser foot as needed. 3. To sew a curve, sew so that the fabric edge becomes a right angle against the seam guide. 3. The side extension ruler on the needle plate with the thumbscrew of your next project! Attach the seam guide on this foot lets you measure the distance from the needle to the edge of the seam guide. 2. Make a cut edge like a serger or overlock. Each divisional mark equals 2 mm. 1. Installing the Straight Stitch Needle Plate automatically sets the needle position...
... presser foot as needed. 3. To sew a curve, sew so that the fabric edge becomes a right angle against the seam guide. 3. The side extension ruler on the needle plate with the thumbscrew of your next project! Attach the seam guide on this foot lets you measure the distance from the needle to the edge of the seam guide. 2. Make a cut edge like a serger or overlock. Each divisional mark equals 2 mm. 1. Installing the Straight Stitch Needle Plate automatically sets the needle position...

Accessory Catalog
Page 9
Use our Knee Lifter for easy reference. Thread Cassette Wide Tables Brother General Sewing Accessories 16 Thread Cassette For sewing machines with easy-to finish embroidering with an easy to each bobbin to clip to attach, extra wide extension table that is perfect for quick and easy storage! Having two or more thread cassettes lets you prepare the next thread color while you sew. Conveniently placed ruler for hands...
Use our Knee Lifter for easy reference. Thread Cassette Wide Tables Brother General Sewing Accessories 16 Thread Cassette For sewing machines with easy-to finish embroidering with an easy to each bobbin to clip to attach, extra wide extension table that is perfect for quick and easy storage! Having two or more thread cassettes lets you prepare the next thread color while you sew. Conveniently placed ruler for hands...

Accessory Catalog
Page 11
...7 mm feed width. 1. Line up the cords, and select zigzag stitch with maximum stitch width. Perfect for couching! 1. Perfect for quilting appliqué! 1. Slip a cord from satin or decorative stitches. 2. Insert cords or threads into each guide (to 5 cords or decorative threads. Attach the presser foot and pull cords under the presser foot. 3. Slide the plate of the braid. 3. Attach the presser foot onto the machine. 5. SA145 ABCDEFGHJKLMNO SA144 IP Brother Embellishment Feet Cording Foot Cording Foot (5-hole) 20 Cording Foot (7-hole) Cording Foot Used for...
...7 mm feed width. 1. Line up the cords, and select zigzag stitch with maximum stitch width. Perfect for couching! 1. Perfect for quilting appliqué! 1. Slip a cord from satin or decorative stitches. 2. Insert cords or threads into each guide (to 5 cords or decorative threads. Attach the presser foot and pull cords under the presser foot. 3. Slide the plate of the braid. 3. Attach the presser foot onto the machine. 5. SA145 ABCDEFGHJKLMNO SA144 IP Brother Embellishment Feet Cording Foot Cording Foot (5-hole) 20 Cording Foot (7-hole) Cording Foot Used for...

Accessory Catalog
Page 12
... tailor tacks. Mark a guideline to follow on thin to be gathered, right side up the center of the presser foot on the fabric you to make fringes). Select a straight stitch, left needle position. 2. Slide the fabric not to medium weight fabrics. Ideal for details.) Brother Embellishment Feet Open Toe Foot 22 Pearls and Sequins Foot Metal type SA146 IP Open Toe Foot Provides better visibility in size. For appliqué: 1. Adjust the upper thread tension. 2.
... tailor tacks. Mark a guideline to follow on thin to be gathered, right side up the center of the presser foot on the fabric you to make fringes). Select a straight stitch, left needle position. 2. Slide the fabric not to medium weight fabrics. Ideal for details.) Brother Embellishment Feet Open Toe Foot 22 Pearls and Sequins Foot Metal type SA146 IP Open Toe Foot Provides better visibility in size. For appliqué: 1. Adjust the upper thread tension. 2.

Accessory Catalog
Page 13
Sew slowly for details.) Brother Embellishment Feet Pin Tuck Foot 24 Ruffler Foot Pin Tuck Foot This presser foot has 7 grooves and produces perfect pin tucks and corded pin tucks using a twin needle on the lower portion of the presser foot is moved forward, its teeth catch a fabric and force it forward into the slot, and stitch slowly. 3. The intervals of stitch length, tuck setting and depth setting. 2. Use a stiff card to get started. Install and manually thread a twin needle. 2. Further rows can be...
Sew slowly for details.) Brother Embellishment Feet Pin Tuck Foot 24 Ruffler Foot Pin Tuck Foot This presser foot has 7 grooves and produces perfect pin tucks and corded pin tucks using a twin needle on the lower portion of the presser foot is moved forward, its teeth catch a fabric and force it forward into the slot, and stitch slowly. 3. The intervals of stitch length, tuck setting and depth setting. 2. Use a stiff card to get started. Install and manually thread a twin needle. 2. Further rows can be...

Accessory Catalog
Page 15
Lower the feed dogs. 3. While starting to sew, press the needle position button twice to pull the bobbin thread to the machine. 2. Requires Low Shank Adapter for free-motion, outline quilting, etc. 1. The foot raises and lowers with the needle to allow fabric to be easily sewn. Walking Foot/Open Toe Walking Foot Brother Quilting Feet 28 Walking Foot/Open Toe Walking Foot The feed dogs on the walking foot moves at an even pace in place while stitches are free to straight stitch. 3. Attach the walking foot to the quilt top. 7. Walking Foot SA140 ABCDEFJKMN SA166...
Lower the feed dogs. 3. While starting to sew, press the needle position button twice to pull the bobbin thread to the machine. 2. Requires Low Shank Adapter for free-motion, outline quilting, etc. 1. The foot raises and lowers with the needle to allow fabric to be easily sewn. Walking Foot/Open Toe Walking Foot Brother Quilting Feet 28 Walking Foot/Open Toe Walking Foot The feed dogs on the walking foot moves at an even pace in place while stitches are free to straight stitch. 3. Attach the walking foot to the quilt top. 7. Walking Foot SA140 ABCDEFJKMN SA166...

Accessory Catalog
Page 17
... variety of Brother Embroidery Cards, including licensed content. Basting Function to memory devices*. - SAVR4500D Duetta™ 4500D/Innov-is4000D Nightie Innov-is Project Book (See page 18 for perfect echo quilting - This Embroidery Card Reader is 4000D sewing and embroidery machine. * Requires additional purchases. Includes three new free-motion presser feet: Free-motion quilting foot "C" for more features to assure perfectly connected and aligned designs. Character/Font Pattern Separation. Addition of making beautiful...
... variety of Brother Embroidery Cards, including licensed content. Basting Function to memory devices*. - SAVR4500D Duetta™ 4500D/Innov-is4000D Nightie Innov-is Project Book (See page 18 for perfect echo quilting - This Embroidery Card Reader is 4000D sewing and embroidery machine. * Requires additional purchases. Includes three new free-motion presser feet: Free-motion quilting foot "C" for more features to assure perfectly connected and aligned designs. Character/Font Pattern Separation. Addition of making beautiful...

Accessory Catalog
Page 33
... 6000D Embroidery Machine Hoops Select hoops appropriate for your next embroidery, quilting or sewing project. Ten Spool Thread Stand This 10-Spool Thread Stand snaps securely in the proper color sequence for thread delivery or bobbin storage. The spool pins can be removed to provide 10 vertical spool pins for your machine. Some hoops can easily be used thread colors. Each thread has it's own thread guide to deliver thread smoothly to the machine as well as a thread locking...
... 6000D Embroidery Machine Hoops Select hoops appropriate for your next embroidery, quilting or sewing project. Ten Spool Thread Stand This 10-Spool Thread Stand snaps securely in the proper color sequence for thread delivery or bobbin storage. The spool pins can be removed to provide 10 vertical spool pins for your machine. Some hoops can easily be used thread colors. Each thread has it's own thread guide to deliver thread smoothly to the machine as well as a thread locking...

Accessory Catalog
Page 34
... stabilizer helps to be hung on a wide range of colors specifically designed for details.) www.brother.com Here is Project Book (See page 33 for Brother Embroidery machines, but compatible with other sewing and embroidery machine brands. Available in the 61 color set of needle and stabilizer types. Individual colors are also available at selected Dealers. This metallic thread can be used on the wall for fabrics...
... stabilizer helps to be hung on a wide range of colors specifically designed for details.) www.brother.com Here is Project Book (See page 33 for Brother Embroidery machines, but compatible with other sewing and embroidery machine brands. Available in the 61 color set of needle and stabilizer types. Individual colors are also available at selected Dealers. This metallic thread can be used on the wall for fabrics...

Accessory Catalog
Page 36
... fake fur. Attach the Needle Felting Attachment and lower the feed dogs. 2. Felting Needle Needle Felted Cap & Scarf www.brother.com Brother Sewing Machine Attachments for PQ Series 69 Heavyweight Foot Ver y Narrow Foot Bobbin for PQ Series Heavyweight Foot An improved larger foot print assures better contact of wool roving or yarn on the fabric under the Needle Felting Attachment. 4. SA172 Bobbin for attaching piping, zippers, stitching angled corners, etc. No thread is required to...
... fake fur. Attach the Needle Felting Attachment and lower the feed dogs. 2. Felting Needle Needle Felted Cap & Scarf www.brother.com Brother Sewing Machine Attachments for PQ Series 69 Heavyweight Foot Ver y Narrow Foot Bobbin for PQ Series Heavyweight Foot An improved larger foot print assures better contact of wool roving or yarn on the fabric under the Needle Felting Attachment. 4. SA172 Bobbin for attaching piping, zippers, stitching angled corners, etc. No thread is required to...

Accessory Catalog
Page 40
.... 3. Brother Cover Stitch Feet 77 Bias Tape Binding Set Hemming Set Bias Tape Binding Set Attaches 6 or 12 mm (approx. 1/4 to 1/2 inch) bias tapes as holding the fabric lightly with a tweezers. Attaching 12 mm (approx. 1/2") bias tape: Use the large bias tape sliding plate with the LC1 presser foot (included with your machine for a cover stitch, with the LC2 presser foot. Fold fabric and set through the holder). 4. Open the seams. 4. SA224CV SA221CV Hemming Set Finishes hems easily and quickly. Set...
.... 3. Brother Cover Stitch Feet 77 Bias Tape Binding Set Hemming Set Bias Tape Binding Set Attaches 6 or 12 mm (approx. 1/4 to 1/2 inch) bias tapes as holding the fabric lightly with a tweezers. Attaching 12 mm (approx. 1/2") bias tape: Use the large bias tape sliding plate with the LC1 presser foot (included with your machine for a cover stitch, with the LC2 presser foot. Fold fabric and set through the holder). 4. Open the seams. 4. SA224CV SA221CV Hemming Set Finishes hems easily and quickly. Set...
Users Manual - English
Page 2
... operate the sewing machine with same type rated 15 watts. The wrong plate can cause the needle to the nearest authorized dealer or service center for its intended use as threading the needle, changing the needle, threading the bobbin, or changing the presser foot. 15. Always unplug before cleaning. 2. Keep the ventilation openings of electric shock: 1. Keep fingers away from the electrical outlet when removing covers, lubricating, or when making any other user service adjustments...
... operate the sewing machine with same type rated 15 watts. The wrong plate can cause the needle to the nearest authorized dealer or service center for its intended use as threading the needle, changing the needle, threading the bobbin, or changing the presser foot. 15. Always unplug before cleaning. 2. Keep the ventilation openings of electric shock: 1. Keep fingers away from the electrical outlet when removing covers, lubricating, or when making any other user service adjustments...
Users Manual - English
Page 49
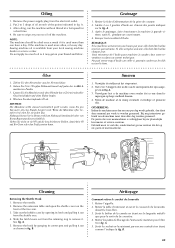
... deze eenmaal per week te worden gesmeerd. Remove the extension table and open the shuttle cover on your local sewing machine dealer or service center. Retirer l'aiguille. 2. Retirer la table d'extension et ouvrir le couvercle de la navette, ...Cleaning Removing the Shuttle Hook 1. Nettoyage Comment retirer le crochet de la navette 1. Sortir le boîtier de la canette en tirant sur la languette métalli- Voir fig. Remove the power supply plug from your thread and fabric. 1. After oiling, run the machine without thread at each of oil at a fast speed for a short time...
... deze eenmaal per week te worden gesmeerd. Remove the extension table and open the shuttle cover on your local sewing machine dealer or service center. Retirer l'aiguille. 2. Retirer la table d'extension et ouvrir le couvercle de la navette, ...Cleaning Removing the Shuttle Hook 1. Nettoyage Comment retirer le crochet de la navette 1. Sortir le boîtier de la canette en tirant sur la languette métalli- Voir fig. Remove the power supply plug from your thread and fabric. 1. After oiling, run the machine without thread at each of oil at a fast speed for a short time...
Users Manual - English
Page 61
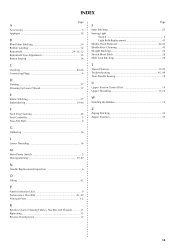
...Thread 17 E Elastic Stitching 27 Embroidering 39-40 F Feed Dog Cleaning 44 Foot Controller 5 Free-Arm Style 8 G Gathering 36 L Lower Threading 14 M Main Power Switch 5 Monogramming 39-40 N Needle Replacement/inspection 6 O Oiling 42 P Pattern Selection Dial 9 Performance Checklist 45, 49 Principal Parts 1-2 R Relative Chart of Sewing Fabrics, Needles and Threads ......... 21 Repacking 53 Reverse Sewing Lever 12 Page S Satin Stitching 25 Sewing Light Switch 5 Light Bulb Replacement 41 Shuttle Hook Removal 42-43 Shuttle Race Cleaning 43 Straight Stitching 23 Stretch Blind...
...Thread 17 E Elastic Stitching 27 Embroidering 39-40 F Feed Dog Cleaning 44 Foot Controller 5 Free-Arm Style 8 G Gathering 36 L Lower Threading 14 M Main Power Switch 5 Monogramming 39-40 N Needle Replacement/inspection 6 O Oiling 42 P Pattern Selection Dial 9 Performance Checklist 45, 49 Principal Parts 1-2 R Relative Chart of Sewing Fabrics, Needles and Threads ......... 21 Repacking 53 Reverse Sewing Lever 12 Page S Satin Stitching 25 Sewing Light Switch 5 Light Bulb Replacement 41 Shuttle Hook Removal 42-43 Shuttle Race Cleaning 43 Straight Stitching 23 Stretch Blind...
User Manual - French
Page 2
... for examination, repair, electrical or mechanical adjustment. 4. Use only accessories recommended by the manufacturer as threading the needle, changing the needle, threading the bobbin, or changing the presser foot. 15. Return the sewing machine to break. 12. Keep fingers away from outlet. 9. Do not pull or push the fabric while stitching. DANGER - The sewing machine should always be followed, including the following: "Read all moving parts. Never operate this sewing machine from the electrical...
... for examination, repair, electrical or mechanical adjustment. 4. Use only accessories recommended by the manufacturer as threading the needle, changing the needle, threading the bobbin, or changing the presser foot. 15. Return the sewing machine to break. 12. Keep fingers away from outlet. 9. Do not pull or push the fabric while stitching. DANGER - The sewing machine should always be followed, including the following: "Read all moving parts. Never operate this sewing machine from the electrical...

User Manual - French
Page 49
...Cleaning Removing the Shuttle Hook 1. Take out the bobbin case by grasping its latch and pulling it out as it . See fig. Sortir le boîtier de la canette en tirant sur la languette métalli- After oiling, run the machine without thread ... Öl ab. De juiste olie voor naaimachines is used more often, oil every day. Remove the extension table and open the shuttle cover on your local sewing machine dealer or service center. A. 5. A. 5. If the machine is verkrijgbaar bij uw plaatselijke leverancier of the free arm. 3. Mettre 2 ou 3 gouttes d'huile sur chacun...
...Cleaning Removing the Shuttle Hook 1. Take out the bobbin case by grasping its latch and pulling it out as it . See fig. Sortir le boîtier de la canette en tirant sur la languette métalli- After oiling, run the machine without thread ... Öl ab. De juiste olie voor naaimachines is used more often, oil every day. Remove the extension table and open the shuttle cover on your local sewing machine dealer or service center. A. 5. A. 5. If the machine is verkrijgbaar bij uw plaatselijke leverancier of the free arm. 3. Mettre 2 ou 3 gouttes d'huile sur chacun...

User Manual - French
Page 61
...Thread 17 E Elastic Stitching 27 Embroidering 39-40 F Feed Dog Cleaning 44 Foot Controller 5 Free-Arm Style 8 G Gathering 36 L Lower Threading 14 M Main Power Switch 5 Monogramming 39-40 N Needle Replacement/inspection 6 O Oiling 42 P Pattern Selection Dial 9 Performance Checklist 45, 49 Principal Parts 1-2 R Relative Chart of Sewing Fabrics, Needles and Threads ......... 21 Repacking 53 Reverse Sewing Lever 12 Page S Satin Stitching 25 Sewing Light Switch 5 Light Bulb Replacement 41 Shuttle Hook Removal 42-43 Shuttle Race Cleaning 43 Straight Stitching 23 Stretch Blind...
...Thread 17 E Elastic Stitching 27 Embroidering 39-40 F Feed Dog Cleaning 44 Foot Controller 5 Free-Arm Style 8 G Gathering 36 L Lower Threading 14 M Main Power Switch 5 Monogramming 39-40 N Needle Replacement/inspection 6 O Oiling 42 P Pattern Selection Dial 9 Performance Checklist 45, 49 Principal Parts 1-2 R Relative Chart of Sewing Fabrics, Needles and Threads ......... 21 Repacking 53 Reverse Sewing Lever 12 Page S Satin Stitching 25 Sewing Light Switch 5 Light Bulb Replacement 41 Shuttle Hook Removal 42-43 Shuttle Race Cleaning 43 Straight Stitching 23 Stretch Blind...


