

Accessory Catalog
Page 2
... of straw hats Contents 02 FZ2-B1 Brother Sewing Machine Lineup 03-04 Brother General Sewing Accessories 05-16 Brother Embellishment Feet 17-24 Brother Quilting Feet 25-28 Brother Embroidery Accessories 29-66 Brother Sewing Machine Attachments for PQ Series 0637-0740 Brother Serger/Overlock Feet 71-74 Brother Cover Stitch Feet 75-78 More From Brother 79 Index 80 You can always find...
... of straw hats Contents 02 FZ2-B1 Brother Sewing Machine Lineup 03-04 Brother General Sewing Accessories 05-16 Brother Embellishment Feet 17-24 Brother Quilting Feet 25-28 Brother Embroidery Accessories 29-66 Brother Sewing Machine Attachments for PQ Series 0637-0740 Brother Serger/Overlock Feet 71-74 Brother Cover Stitch Feet 75-78 More From Brother 79 Index 80 You can always find...

Accessory Catalog
Page 3
... the illustrations. Brother Sewing Machine Lineup 04 A Quattro™ 6000D Duetta™ 4500D, Innov-is the perfect multifunction machine. D Innov-is 500D, SE270D, HE120/PKG, CS80, CS8060, CS8150 Cassette-type Sewing & Embroidery Combination Machines Utilizing an easy to learn and enjoy. Perfect for class or to introduce sewing to 40, PS21, XL5130, XL5500, XL5600, XL5700 J : ULT2001, 2002D, 2003D K: PC8500...
... the illustrations. Brother Sewing Machine Lineup 04 A Quattro™ 6000D Duetta™ 4500D, Innov-is the perfect multifunction machine. D Innov-is 500D, SE270D, HE120/PKG, CS80, CS8060, CS8150 Cassette-type Sewing & Embroidery Combination Machines Utilizing an easy to learn and enjoy. Perfect for class or to introduce sewing to 40, PS21, XL5130, XL5500, XL5600, XL5700 J : ULT2001, 2002D, 2003D K: PC8500...

Accessory Catalog
Page 17
... Frame Innov-is 4000D Premium Package SAECR1 Only compatible with QuattroTM 6000D SABF6000D QuattroTM 6000D SAVR4000D Innov-is 4000D sewing and embroidery machine. * Requires additional purchases. This Embroidery Card Reader is 4000D Premium Upgrade Package II Brother Embroidery Accessories 32 Duetta™ 4500D/ 4000D Premium Upgrade Package II Exclusively for perfect echo quilting - Duetta™ 4500D...
... Frame Innov-is 4000D Premium Package SAECR1 Only compatible with QuattroTM 6000D SABF6000D QuattroTM 6000D SAVR4000D Innov-is 4000D sewing and embroidery machine. * Requires additional purchases. This Embroidery Card Reader is 4000D Premium Upgrade Package II Brother Embroidery Accessories 32 Duetta™ 4500D/ 4000D Premium Upgrade Package II Exclusively for perfect echo quilting - Duetta™ 4500D...

Accessory Catalog
Page 33
... Ten Spool Thread Stand Ten Spool Thread Stand Embroidery Machine Hoops Brother Embroidery Accessories 64 For all embroidery and sewing/embroidery machines. Ask your next embroidery, quilting or sewing project. Place your threads in the proper color sequence for your selected dealer or check on to provide 10 vertical spool pins for your machine. For Quattro™ 6000D: • Extra-large...
... Ten Spool Thread Stand Ten Spool Thread Stand Embroidery Machine Hoops Brother Embroidery Accessories 64 For all embroidery and sewing/embroidery machines. Ask your next embroidery, quilting or sewing project. Place your threads in the proper color sequence for your selected dealer or check on to provide 10 vertical spool pins for your machine. For Quattro™ 6000D: • Extra-large...

Accessory Catalog
Page 34
... (sold in Japan for Brother® Embroidery Machines, but compatible with a high nap such as decorative sewing. A and B (Black and White): The 1,100-meter (approx.1,200-yds) filament thread is best suited for the Quattro™ 6000D, Duetta™ 4500D/Innov-is 4000D, 2500D, 1500D, 1200 series, PC and ULT series machines and the PE-400D...
... (sold in Japan for Brother® Embroidery Machines, but compatible with a high nap such as decorative sewing. A and B (Black and White): The 1,100-meter (approx.1,200-yds) filament thread is best suited for the Quattro™ 6000D, Duetta™ 4500D/Innov-is 4000D, 2500D, 1500D, 1200 series, PC and ULT series machines and the PE-400D...
Users Manual - English
Page 6
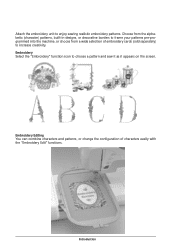
..., or change the configuration of embroidery cards (sold separately) to frame your patterns pre-programmed into the machine, or choose from a wide selection of characters easily with the "Embroidery Edit" functions. Attach the embroidery unit to choose a pattern and sew it as it appears on the screen. Embroidery Select the "Embroidery" function icon to enjoy sewing realistic embroidery patterns.
..., or change the configuration of embroidery cards (sold separately) to frame your patterns pre-programmed into the machine, or choose from a wide selection of characters easily with the "Embroidery Edit" functions. Attach the embroidery unit to choose a pattern and sew it as it appears on the screen. Embroidery Select the "Embroidery" function icon to enjoy sewing realistic embroidery patterns.
Users Manual - English
Page 7
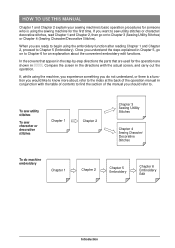
... in Chapter 5, go on to know more about the convenient embroidery edit functions. If you want to sew utility stitches or character/ decorative stitches, read Chapter 1 and Chapter 2, then go on to Chapter 5 (Embroidery). HOW TO USE THIS MANUAL Chapter 1 and Chapter 2 explain your sewing machine's basic operation procedures for someone who is a function you...
... in Chapter 5, go on to know more about the convenient embroidery edit functions. If you want to sew utility stitches or character/ decorative stitches, read Chapter 1 and Chapter 2, then go on to Chapter 5 (Embroidery). HOW TO USE THIS MANUAL Chapter 1 and Chapter 2 explain your sewing machine's basic operation procedures for someone who is a function you...

Users Manual - English
Page 8
... THIS MACHINE Special Features HOW TO USE THIS MANUAL Chapter 1 Setting Up PRINCIPAL PARTS AND THEIR OPERATION 1-1 Principal Parts 1-1 s Embroidery Unit 1-2 s Hard Case 1-2 s Embroidery Unit Storage Case ........ 1-2 s Operation Buttons 1-3 s Balance Wheel 1-4 s Presser Foot Lever 1-4 s Sewing Speed Controller... the Thread Tension 2-13 s Proper Thread Tension 2-13 MACHINE FUNCTION SETTINGS ...... 2-14 Automatic Reinforcement Stitching ..... 2-14 Using the Automatic Thread Cutter ..... 2-15 Chapter 3 Sewing Utility Stitches QUICK REFERENCE TABLE 3-1 SELECTING UTILITY STITCHES 3-9 ...
... THIS MACHINE Special Features HOW TO USE THIS MANUAL Chapter 1 Setting Up PRINCIPAL PARTS AND THEIR OPERATION 1-1 Principal Parts 1-1 s Embroidery Unit 1-2 s Hard Case 1-2 s Embroidery Unit Storage Case ........ 1-2 s Operation Buttons 1-3 s Balance Wheel 1-4 s Presser Foot Lever 1-4 s Sewing Speed Controller... the Thread Tension 2-13 s Proper Thread Tension 2-13 MACHINE FUNCTION SETTINGS ...... 2-14 Automatic Reinforcement Stitching ..... 2-14 Using the Automatic Thread Cutter ..... 2-15 Chapter 3 Sewing Utility Stitches QUICK REFERENCE TABLE 3-1 SELECTING UTILITY STITCHES 3-9 ...
Users Manual - English
Page 10
... Point Patterns 5-9 Character Patterns 5-11 Floral Alphabet Patterns 5-13 Frame Patterns 5-15 Selecting Patterns from an Embroidery Card 5-17 Selecting a Pattern from a Floppy Disk (Only for Machines with Floppy Disk Drives) .. 5-18 VIEWING THE SEWING SCREEN ....... 5-19 PREPARING THE EMBROIDERY FRAME 5-20 Attaching a Stabilizer Material to the Fabric 5-20 Setting the Fabric in the...
... Point Patterns 5-9 Character Patterns 5-11 Floral Alphabet Patterns 5-13 Frame Patterns 5-15 Selecting Patterns from an Embroidery Card 5-17 Selecting a Pattern from a Floppy Disk (Only for Machines with Floppy Disk Drives) .. 5-18 VIEWING THE SEWING SCREEN ....... 5-19 PREPARING THE EMBROIDERY FRAME 5-20 Attaching a Stabilizer Material to the Fabric 5-20 Setting the Fabric in the...
Users Manual - English
Page 11
USING THE "TROUBLESHOOTING" FUNCTION 9-4 MAKING MINOR MACHINE ADJUSTMENTS 9-5 8 - CLEANING THE MACHINE 8-2 s Cleaning the LCD Screen 8-2 s Cleaning the Machine Casing ......... 8-2 s Cleaning the Race and Shuttle ........ 8-2 CLEANING THE FLOPPY DISK DRIVE HEADS 8-4 Chapter 9 Troubleshooting ADJUSTING THE...Color of Each Character in a Pattern 6-17 ADJUSTING PATTERNS AFTER EDITING .. 6-18 COMBINING AND EDITING PATTERNS .. 6-20 SEWING COMBINED EMBROIDERY PATTERNS 6-28 ADJUSTING EDITED PATTERNS ........ 6-30 MEMORY FUNCTIONS 6-32 Saving Edited Patterns 6-32 s Saving a Pattern 6-32 ...
USING THE "TROUBLESHOOTING" FUNCTION 9-4 MAKING MINOR MACHINE ADJUSTMENTS 9-5 8 - CLEANING THE MACHINE 8-2 s Cleaning the LCD Screen 8-2 s Cleaning the Machine Casing ......... 8-2 s Cleaning the Race and Shuttle ........ 8-2 CLEANING THE FLOPPY DISK DRIVE HEADS 8-4 Chapter 9 Troubleshooting ADJUSTING THE...Color of Each Character in a Pattern 6-17 ADJUSTING PATTERNS AFTER EDITING .. 6-18 COMBINING AND EDITING PATTERNS .. 6-20 SEWING COMBINED EMBROIDERY PATTERNS 6-28 ADJUSTING EDITED PATTERNS ........ 6-30 MEMORY FUNCTIONS 6-32 Saving Edited Patterns 6-32 s Saving a Pattern 6-32 ...

Users Manual - English
Page 21
...stand SA503 X81123-001 6 Embroidery unit carrying case SA528 XC1291-002 1 - 2 - 3 - I When Using the Multi-thread Stand • Using the Multi-thread Stand When Placed Behind the Sewing Machine: Do not pass the thread through the thread guide on the sewing machine. Pass the thread directly ...guide on the multi-thread stand. Index 2 1-10 Setting Up Part Name Part Code U.S.A. Pass the thread through the thread guide of the Sewing Machine : Do not pass the thread through the thread guide on the multi-thread stand, or through the thread guide on the multi-thread stand...
...stand SA503 X81123-001 6 Embroidery unit carrying case SA528 XC1291-002 1 - 2 - 3 - I When Using the Multi-thread Stand • Using the Multi-thread Stand When Placed Behind the Sewing Machine: Do not pass the thread through the thread guide on the sewing machine. Pass the thread directly ...guide on the multi-thread stand. Index 2 1-10 Setting Up Part Name Part Code U.S.A. Pass the thread through the thread guide of the Sewing Machine : Do not pass the thread through the thread guide on the multi-thread stand, or through the thread guide on the multi-thread stand...
Users Manual - English
Page 25
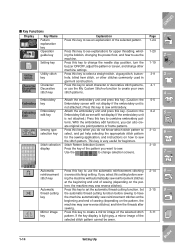
...If you do not know which stitch pattern to create a mirror image of sewing (depending on the pattern, the machine may sew reverse stitches) and trim the threads after sewing. Press this key to sew embroidery. Press this key when you select this key to change the needle stop...key display is not attached.) Press this setting before sewing to select a straight stitch, zigzag stitch, buttonhole, blind hem stitch, or other machine settings. Attach the embroidery unit and press this key to have the machine automatically sew reinforcement stitches at the beginning and end of the ...
...If you do not know which stitch pattern to create a mirror image of sewing (depending on the pattern, the machine may sew reverse stitches) and trim the threads after sewing. Press this key to sew embroidery. Press this key when you select this key to change the needle stop...key display is not attached.) Press this setting before sewing to select a straight stitch, zigzag stitch, buttonhole, blind hem stitch, or other machine settings. Attach the embroidery unit and press this key to have the machine automatically sew reinforcement stitches at the beginning and end of the ...
Users Manual - English
Page 56
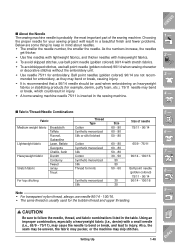
... needle 90/14 - 100/16. • The same thread is inserted in the sewing machine. Choosing the proper needle for your sewing project will result in a beautiful finish and fewer problems. Below are not recommended for embroidery, as they may bend or break, causing injury. • It is recommended that ...a 90/14 needle should be uneven, the fabric may pucker, or the machine may bend or break, which could result in injury. • A home sewing machine needle 75/11 is usually...
... needle 90/14 - 100/16. • The same thread is inserted in the sewing machine. Choosing the proper needle for your sewing project will result in a beautiful finish and fewer problems. Below are not recommended for embroidery, as they may bend or break, causing injury. • It is recommended that ...a 90/14 needle should be uneven, the fabric may pucker, or the machine may bend or break, which could result in injury. • A home sewing machine needle 75/11 is usually...

Users Manual - English
Page 61
CAUTION Do not forcefully push fabrics more than 6 mm (1/4 inch) thick through the sewing machine. If the presser foot is in the up to its highest position. Sewing Lightweight Fabrics 1 8 - Gently tear off the paper or the stabilizer for embroidery after sewing. 1 Thin paper 9 - ?! 2-4 Getting Ready to occur on an angle, help guide the fabric by...
CAUTION Do not forcefully push fabrics more than 6 mm (1/4 inch) thick through the sewing machine. If the presser foot is in the up to its highest position. Sewing Lightweight Fabrics 1 8 - Gently tear off the paper or the stabilizer for embroidery after sewing. 1 Thin paper 9 - ?! 2-4 Getting Ready to occur on an angle, help guide the fabric by...
Users Manual - English
Page 176
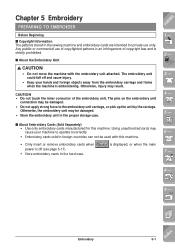
... 6 - 7 - 8 - 9 - ?! s About the Embroidery Unit CAUTION • Do not move the machine with this machine. Any public or commercial use only. The pins on the embroidery unit connection may result. CAUTION • Do not touch the inner ...Embroidery Cards (Sold Separately) • Use only embroidery cards manufactured for private use of copylighted patterns is an infringement of the embroidery unit. Chapter 5 Embroidery PREPARING TO EMBROIDER Before Beginning s Copyright Information The patterns stored in the sewing machine and embroidery cards are intended for this machine...
... 6 - 7 - 8 - 9 - ?! s About the Embroidery Unit CAUTION • Do not move the machine with this machine. Any public or commercial use only. The pins on the embroidery unit connection may result. CAUTION • Do not touch the inner ...Embroidery Cards (Sold Separately) • Use only embroidery cards manufactured for private use of copylighted patterns is an infringement of the embroidery unit. Chapter 5 Embroidery PREPARING TO EMBROIDER Before Beginning s Copyright Information The patterns stored in the sewing machine and embroidery cards are intended for this machine...
Users Manual - English
Page 178
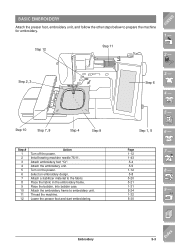
..., and follow the other steps below to embroidery unit. Install sewing machine needle 75/11. Select an embroidery design. Thread the machine. Step 1, 5 6 - Step 12 Step 11 2 - Step 2, 3 Step 6 3 - 4 - Attach embroidery foot "Q". Attach the embroidery frame to prepare the machine for embroidery. Attach the embroidery unit. Place the fabric in the embroidery frame. Lower the presser foot and start embroidering. 5 - CONTENTS...
..., and follow the other steps below to embroidery unit. Install sewing machine needle 75/11. Select an embroidery design. Thread the machine. Step 1, 5 6 - Step 12 Step 11 2 - Step 2, 3 Step 6 3 - 4 - Attach embroidery foot "Q". Attach the embroidery frame to prepare the machine for embroidery. Attach the embroidery unit. Place the fabric in the embroidery frame. Lower the presser foot and start embroidering. 5 - CONTENTS...
Users Manual - English
Page 180
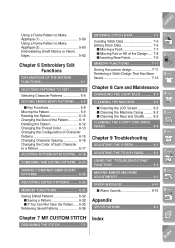
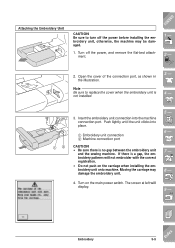
... CAUTION Be sure to replace the cover when the embroidery unit is no gap between the embroidery unit and the sewing machine. Push lightly until the unit clicks into the machine connection port. Turn off the power before installing the embroidery unit, otherwise, the machine may damage the embroidery unit. 4. The screen at left will not embroider with...
... CAUTION Be sure to replace the cover when the embroidery unit is no gap between the embroidery unit and the sewing machine. Push lightly until the unit clicks into the machine connection port. Turn off the power before installing the embroidery unit, otherwise, the machine may damage the embroidery unit. 4. The screen at left will not embroider with...

Users Manual - English
Page 193
The method for 20 patterns to change disks by the sewing machine, or equipment intended for Machines with Floppy Disk Drives) 1. of 2 - For example, it takes around 30 seconds for selecting patterns is displayed, or when prompted to display. 3. CAUTION... on pages 5-8 to display the screen at left. * Insert the floppy disk completely into the floppy disk drive slot. Otherwise, your machine may not operate correctly. 9 - ?! 5-18 Embroidery Index Press . 6 - The patterns on the floppy disk are displayed on the selection screen. * The time for floppy disks into ...
The method for 20 patterns to change disks by the sewing machine, or equipment intended for Machines with Floppy Disk Drives) 1. of 2 - For example, it takes around 30 seconds for selecting patterns is displayed, or when prompted to display. 3. CAUTION... on pages 5-8 to display the screen at left. * Insert the floppy disk completely into the floppy disk drive slot. Otherwise, your machine may not operate correctly. 9 - ?! 5-18 Embroidery Index Press . 6 - The patterns on the floppy disk are displayed on the selection screen. * The time for floppy disks into ...
Users Manual - English
Page 224
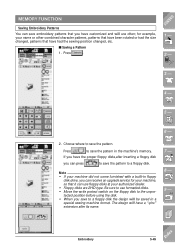
... pattern to a floppy disk. Press . Press to save the pattern. Note • If your machine did not come furnished with a built-in a special sewing machine format. Be sure to use often; MEMORY FUNCTION Saving Embroidery Patterns You can save embroidery patterns that you have customized and will use formatted disks. • Move the write protect...
... pattern to a floppy disk. Press . Press to save the pattern. Note • If your machine did not come furnished with a built-in a special sewing machine format. Be sure to use often; MEMORY FUNCTION Saving Embroidery Patterns You can save embroidery patterns that you have customized and will use formatted disks. • Move the write protect...
Users Manual - English
Page 312
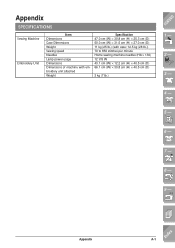
Appendix A-1 Index Appendix SPECIFICATIONS Sewing Machine Embroidery Unit Item Dimensions Case Dimensions Weight Sewing speed Needles Lamp power usage Dimensions Dimensions of machine with embroidery unit attached Weight Specification 47.0 cm (W) × 30.8 cm (H) × 25.3 cm (D) 50.0 cm (W) × 31.5 cm (H) × 27.0 cm (D) 11 kg (25 lb.) (with ...
Appendix A-1 Index Appendix SPECIFICATIONS Sewing Machine Embroidery Unit Item Dimensions Case Dimensions Weight Sewing speed Needles Lamp power usage Dimensions Dimensions of machine with embroidery unit attached Weight Specification 47.0 cm (W) × 30.8 cm (H) × 25.3 cm (D) 50.0 cm (W) × 31.5 cm (H) × 27.0 cm (D) 11 kg (25 lb.) (with ...


