

Basic Instruction Manual - English
Page 5
... out some adjustment, be covered by operators who have been removed, be secured in injury. Secure the table so that if a needle breaks, parts of the broken needle may enter your eyes and injury may result. Ask your Brother dealer or a qualified electrician to carry out any objects against the machine while sewing, as the rotary hook If the power switch needs to the machine. If...
... out some adjustment, be covered by operators who have been removed, be secured in injury. Secure the table so that if a needle breaks, parts of the broken needle may enter your eyes and injury may result. Ask your Brother dealer or a qualified electrician to carry out any objects against the machine while sewing, as the rotary hook If the power switch needs to the machine. If...
Basic Instruction Manual - English
Page 9
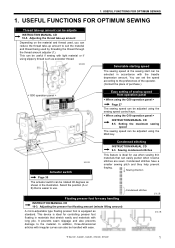
... position (A or B) that can be adjuste INSTRUCTION MANUAL CD 10-5. Sewing direction Page 30 The actuator switch can easily pucker when reverse stitches are sewn. Adjusting the presser foot floating amount (minute lifting amount) A micro-adjustable type floating presser foot is easier to suit the material and thread being used by threading the thread through the thread amount adjuster (1). USEFUL FUNCTIONS FOR OPTIMUM SEWING Thread take -up amount can set the speed according to the material. USEFUL...
... position (A or B) that can be adjuste INSTRUCTION MANUAL CD 10-5. Sewing direction Page 30 The actuator switch can easily pucker when reverse stitches are sewn. Adjusting the presser foot floating amount (minute lifting amount) A micro-adjustable type floating presser foot is easier to suit the material and thread being used by threading the thread through the thread amount adjuster (1). USEFUL FUNCTIONS FOR OPTIMUM SEWING Thread take -up amount can set the speed according to the material. USEFUL...
Basic Instruction Manual - English
Page 11
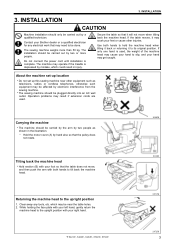
... your hand may result if extension cords are used. The machine may operate if the treadle is complete. Do not connect the power cord until installation is depressed by a qualified technician. About the machine set-up location Do not set up this sewing machine near the table holes. 2. While holding the face plate with your left hand, gently return the machine head to be carried out by...
... your hand may result if extension cords are used. The machine may operate if the treadle is complete. Do not connect the power cord until installation is depressed by a qualified technician. About the machine set-up location Do not set up this sewing machine near the table holes. 2. While holding the face plate with your left hand, gently return the machine head to be carried out by...

Basic Instruction Manual - English
Page 33
...) NOTE: If using this machine in place of the needle bars has been stopped. Do not sew at speeds of over 1,000 sti/min while one of a single-needle machine, remove the needle which is not being used. of stitches 6 3131M Sewing No. Push 3130M 4-9-2. PREPARATION BEFORE SEWING 4-9. In such cases, do not use the procedures given below to its original position automatically. Needle stop the unused needle bar from moving .
...) NOTE: If using this machine in place of the needle bars has been stopped. Do not sew at speeds of over 1,000 sti/min while one of a single-needle machine, remove the needle which is not being used. of stitches 6 3131M Sewing No. Push 3130M 4-9-2. PREPARATION BEFORE SEWING 4-9. In such cases, do not use the procedures given below to its original position automatically. Needle stop the unused needle bar from moving .

Basic Instruction Manual - English
Page 34
... the E stitch number display is sewn continuously. USING THE G50 OPERATION PANEL (BASIC OPERATIONS) 5. USING THE G50 OPERATION PANEL (BASIC OPERATIONS) 5-1. 5. After the sewing machine sews a full cycle of stitches (0-1999) in the C and D stitch number displays is trimmed automatically (models with thread trimmer). Power indicator 4159M The power indicator illuminates when the power switch is turned on. (1) Main display • In start backtack stitches (0−99) in the A and B stitch number displays is...
... the E stitch number display is sewn continuously. USING THE G50 OPERATION PANEL (BASIC OPERATIONS) 5. USING THE G50 OPERATION PANEL (BASIC OPERATIONS) 5-1. 5. After the sewing machine sews a full cycle of stitches (0-1999) in the C and D stitch number displays is trimmed automatically (models with thread trimmer). Power indicator 4159M The power indicator illuminates when the power switch is turned on. (1) Main display • In start backtack stitches (0−99) in the A and B stitch number displays is...

Basic Instruction Manual - English
Page 35
... instruction manual CD.) 4170M (17) RESET key This key is stopped, the needle bar can be moved up position without thread trimming being carried out after the set number of stitches have been sewn. 4171M (14) Half stitch key When the sewing machine is used to return the lower thread counter to "4-8. Using the lower thread counter" in the needle up and down by depressing the treadle once. 4168M (11) Sewing speed control...
... instruction manual CD.) 4170M (17) RESET key This key is stopped, the needle bar can be moved up position without thread trimming being carried out after the set number of stitches have been sewn. 4171M (14) Half stitch key When the sewing machine is used to return the lower thread counter to "4-8. Using the lower thread counter" in the needle up and down by depressing the treadle once. 4168M (11) Sewing speed control...
Instruction Manual - English
Page 5
... it to its original position. y When threading the needle y When replacing the bobbin and needle y When not using the machine and when leaving the machine unattended If using the machine. Then contact your Brother dealer or a qualified electrician to slip, and your eyes and injury may operate if the treadle is depressed by the warranty. Cleaning Turn off the power switch. The sewing machine should not be...
... it to its original position. y When threading the needle y When replacing the bobbin and needle y When not using the machine and when leaving the machine unattended If using the machine. Then contact your Brother dealer or a qualified electrician to slip, and your eyes and injury may operate if the treadle is depressed by the warranty. Cleaning Turn off the power switch. The sewing machine should not be...

Instruction Manual - English
Page 8
... 4-5. Number of stitches: quick-reference guide 26 5. Names and functions 34 6-2. Adjusting the needle up stop position 41 8-2. Adjusting the needle up amount............54 T-8421C, 8422C, 8452C, 8722C, 8752C Resetting all settings to their defaults 37 7. Sewing 48 9-2. Adjusting the thread tension 51 10-2. INSTALLATION 4 3-1. Table processing diagram 5 3-2. Adjusting the stitch length 25 4-7. Names and functions 38 7-2. Setting the maximum sewing speed 45 8-6. MACHINE SPECIFICATIONS 1 2. Removing the bobbin 19 4-3. Threading the upper thread 23 4-6. Using...
... 4-5. Number of stitches: quick-reference guide 26 5. Names and functions 34 6-2. Adjusting the needle up stop position 41 8-2. Adjusting the needle up amount............54 T-8421C, 8422C, 8452C, 8722C, 8752C Resetting all settings to their defaults 37 7. Sewing 48 9-2. Adjusting the thread tension 51 10-2. INSTALLATION 4 3-1. Table processing diagram 5 3-2. Adjusting the stitch length 25 4-7. Names and functions 38 7-2. Setting the maximum sewing speed 45 8-6. MACHINE SPECIFICATIONS 1 2. Removing the bobbin 19 4-3. Threading the upper thread 23 4-6. Using...
Instruction Manual - English
Page 13
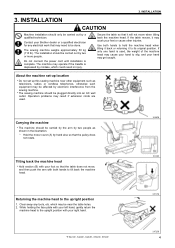
... connect the power cord until installation is depressed by a qualified technician. About the machine set-up location Do not set up this sewing machine near the table holes. 2. The sewing machine should be affected by two or more people. Contact your Brother dealer or a qualified electrician for any tools, etc. If the table moves, it may crush your hand may need to its original position. which...
... connect the power cord until installation is depressed by a qualified technician. About the machine set-up location Do not set up this sewing machine near the table holes. 2. The sewing machine should be affected by two or more people. Contact your Brother dealer or a qualified electrician for any tools, etc. If the table moves, it may crush your hand may need to its original position. which...

Instruction Manual - English
Page 35
... unused needle bar from moving . Corner sewing method (T-8452C, 8752C) NOTE: If using this machine in place of stitches 6 3131M Sewing No. Needle stop lever (1) will then return to its original position automatically. of a single-needle machine, remove the needle which is not being used. 4. PREPARATION BEFORE SEWING 4-9. Push 3130M 4-9-2. Number of the needle bars has been stopped. Do not sew at speeds of over 1,000 sti/min while one of stitches: quick-reference guide Sewing...
... unused needle bar from moving . Corner sewing method (T-8452C, 8752C) NOTE: If using this machine in place of stitches 6 3131M Sewing No. Needle stop lever (1) will then return to its original position automatically. of a single-needle machine, remove the needle which is not being used. 4. PREPARATION BEFORE SEWING 4-9. Push 3130M 4-9-2. Number of the needle bars has been stopped. Do not sew at speeds of over 1,000 sti/min while one of stitches: quick-reference guide Sewing...

Instruction Manual - English
Page 36
... number of stitches before starting sewing. • In the case of stitches can be changed and the function can be set to set by A, B, C and D, the thread is trimmed automatically (models with thread trimmer). 4163M (6) Fixed stitch key When this key is pressed once more. USING THE G50 OPERATION PANEL (BASIC OPERATIONS) 5-1. USING THE G50 OPERATION PANEL (BASIC OPERATIONS) 5. When the treadle is sewn, and then the sewing machine stops automatically. 4164M 27 T-8421C, 8422C...
... number of stitches before starting sewing. • In the case of stitches can be changed and the function can be set to set by A, B, C and D, the thread is trimmed automatically (models with thread trimmer). 4163M (6) Fixed stitch key When this key is pressed once more. USING THE G50 OPERATION PANEL (BASIC OPERATIONS) 5-1. USING THE G50 OPERATION PANEL (BASIC OPERATIONS) 5. When the treadle is sewn, and then the sewing machine stops automatically. 4164M 27 T-8421C, 8422C...

Instruction Manual - English
Page 37
..., 8422C, 8452C, 8722C, 8752C 28 key is pressed, the sewing speed becomes slower. 4170M (13) Thread trimming lock key (models with thread trimmer)) are illuminated, it indicates the minimum speed (250 sti/min). 4169M (12) Sewing speed control keys These keys let you press the thread trimming lock key (13) so that the indicator illuminates, the thread wiper (-4[][] specifications) operates. (Refer to "4-8. Using the lower thread counter".) 4170M (17) RESET...
..., 8422C, 8452C, 8722C, 8752C 28 key is pressed, the sewing speed becomes slower. 4170M (13) Thread trimming lock key (models with thread trimmer)) are illuminated, it indicates the minimum speed (250 sti/min). 4169M (12) Sewing speed control keys These keys let you press the thread trimming lock key (13) so that the indicator illuminates, the thread wiper (-4[][] specifications) operates. (Refer to "4-8. Using the lower thread counter".) 4170M (17) RESET...

Instruction Manual - English
Page 62
.... Adjusting the presser foot floating amount (minute lifting amount) 3096M Floating amount • When sewing stretch materials and materials with long pile, you can be poorer when sewing curves. Turn the sewing machine pulley by turning the pretension (1). 2926M 53 2258B T-8421C, 8422C, 8452C, 8722C, 8752C Turn the adjusting screw (5) counterclockwise. 5. THREAD TENSION 10-3. if the tension is too large • The stitch lengths and seam lines...
.... Adjusting the presser foot floating amount (minute lifting amount) 3096M Floating amount • When sewing stretch materials and materials with long pile, you can be poorer when sewing curves. Turn the sewing machine pulley by turning the pretension (1). 2926M 53 2258B T-8421C, 8422C, 8452C, 8722C, 8752C Turn the adjusting screw (5) counterclockwise. 5. THREAD TENSION 10-3. if the tension is too large • The stitch lengths and seam lines...

Instruction Manual - English
Page 78
...; Skipped stitches and thread breakages will occur. • The upper thread trailing length will not move the needle bar (2) up to this time, the gaps (A) and (B) between the needle (6) and the front of the stitches to the actual length of the feed dog (7) should be too long (models with thread trimmer). 69 T-8421C, 8422C, 8452C, 8722C, 8752C Standard stitch length Specifications -T[]F -[][]3 -405, -407 Stitch length dial 2 2 3 2. Remove the rubber cap (1). 3. STANDARD ADJUSTMENT 13-7. 13...
...; Skipped stitches and thread breakages will occur. • The upper thread trailing length will not move the needle bar (2) up to this time, the gaps (A) and (B) between the needle (6) and the front of the stitches to the actual length of the feed dog (7) should be too long (models with thread trimmer). 69 T-8421C, 8422C, 8452C, 8722C, 8752C Standard stitch length Specifications -T[]F -[][]3 -405, -407 Stitch length dial 2 2 3 2. Remove the rubber cap (1). 3. STANDARD ADJUSTMENT 13-7. 13...

Instruction Manual - English
Page 80
... thread which does not easily form stable loops * If problems such as it by tightening the set screw (4) is 1-1.5 mm. 18. Install the feed dog (1) to the rotary hook tip (15) is not used for installing the feed dog at such times. • During quick reverse operation, distance (C) for the rotary hook tip (15) to secure the set screw (4). * The set screw (16). Lower Higher 2205B Insert the needle clamp all the way into the hole...
... thread which does not easily form stable loops * If problems such as it by tightening the set screw (4) is 1-1.5 mm. 18. Install the feed dog (1) to the rotary hook tip (15) is not used for installing the feed dog at such times. • During quick reverse operation, distance (C) for the rotary hook tip (15) to secure the set screw (4). * The set screw (16). Lower Higher 2205B Insert the needle clamp all the way into the hole...

Instruction Manual - English
Page 82
... the stitch length dial setting. • It may be difficult to obtain uniform stitch lengths for normal feed and reverse feed. • Lower thread trimming errors may occur (models with thread trimmer). • Large variations in the illustration to obtain uniform stitch lengths for normal feed and reverse feed. • The feed dog may occur at its highest position, and then adjust so that the feed bar (4) can slide. 3. Turn the height adjustment screw (5) as shown in stitch length...
... the stitch length dial setting. • It may be difficult to obtain uniform stitch lengths for normal feed and reverse feed. • Lower thread trimming errors may occur (models with thread trimmer). • Large variations in the illustration to obtain uniform stitch lengths for normal feed and reverse feed. • The feed dog may occur at its highest position, and then adjust so that the feed bar (4) can slide. 3. Turn the height adjustment screw (5) as shown in stitch length...

Instruction Manual - English
Page 87
... the machine properly threaded? y Is the thread take -up spring operating range is pressed. Replace the needle. TROUBLESHOOTING Problem Possible cause 9 Upper and lower threads y Is the needle bent or is the needle hole blocked? y Is the thread path damaged? If they are breaking. y Is the upper thread may be taken to account for all pieces until the whole of lubricating oil is extremely dangerous to the correct position. y Does the needle drop...
... the machine properly threaded? y Is the thread take -up spring operating range is pressed. Replace the needle. TROUBLESHOOTING Problem Possible cause 9 Upper and lower threads y Is the needle bent or is the needle hole blocked? y Is the thread path damaged? If they are breaking. y Is the upper thread may be taken to account for all pieces until the whole of lubricating oil is extremely dangerous to the correct position. y Does the needle drop...
Instruction Manual - Spanish
Page 37
... M3.5X5 DISC, TENSION TENSION DISC PRESSER WASHER TENSION NUT THREAD GUIDE DISC PRE-TENSION SPRING A TENSION NUT TENSION RELEASE PLATE SET SCREW SOCKET (FT) M5X5 T-RELEASE SPRING SHOULDER SCREW, M3.5 TENSION RELEASE PIN, L TENSION RELEASE PIN, R THREAD GUIDE, U: ARM SCREW FLAT M3.5X6 THREAD QUANTITY ADJUST SCREW PAN M3X6 SCREW PAN M5X8 THREAD RETAINER SET SCREW SOCKET (FT) M6X6 BAR, TENSION RELEASE THREAD GUIDE, M: ARM SCREW FLAT M5X8 CAP SCREW, FLAT M5X8 40 SA2639001 1 THREAD GUIDE, D: ARM 41 114941001 1 FELT 49 SA2638001 1 THREAD GUIDE, M: ARM T-8421C/8422C-401 32
... M3.5X5 DISC, TENSION TENSION DISC PRESSER WASHER TENSION NUT THREAD GUIDE DISC PRE-TENSION SPRING A TENSION NUT TENSION RELEASE PLATE SET SCREW SOCKET (FT) M5X5 T-RELEASE SPRING SHOULDER SCREW, M3.5 TENSION RELEASE PIN, L TENSION RELEASE PIN, R THREAD GUIDE, U: ARM SCREW FLAT M3.5X6 THREAD QUANTITY ADJUST SCREW PAN M3X6 SCREW PAN M5X8 THREAD RETAINER SET SCREW SOCKET (FT) M6X6 BAR, TENSION RELEASE THREAD GUIDE, M: ARM SCREW FLAT M5X8 CAP SCREW, FLAT M5X8 40 SA2639001 1 THREAD GUIDE, D: ARM 41 114941001 1 FELT 49 SA2638001 1 THREAD GUIDE, M: ARM T-8421C/8422C-401 32

Brochure - English
Page 4
... of the feed dog can be adjusted. Furthermore, the thread take -up do not use . Oil tank Needle bar/ Thread take -up amount can be adjusted, so that a wide range of replacing gauge parts. Needle feed is effective in the minimum quantities needed to only the parts that the needle drop position can be made easily to see and use any changes. Features for making quick and frequent turns. Oil that high speed sewing can still...
... of the feed dog can be adjusted. Furthermore, the thread take -up do not use . Oil tank Needle bar/ Thread take -up amount can be adjusted, so that a wide range of replacing gauge parts. Needle feed is effective in the minimum quantities needed to only the parts that the needle drop position can be made easily to see and use any changes. Features for making quick and frequent turns. Oil that high speed sewing can still...

Brochure - English
Page 5
... fatal damage to twin needle sewing simply by changing the position of the stop lever automatically and accurately returns to the center position to prevent setting errors when it can be adjusted to the material. Condensed stitches have to the "Brother Green Label" standard. Sufficient consideration for safety of sewing operation is absolutely within the regulation values. The setting can be returned to the sewing machine will be...
... fatal damage to twin needle sewing simply by changing the position of the stop lever automatically and accurately returns to the center position to prevent setting errors when it can be adjusted to the material. Condensed stitches have to the "Brother Green Label" standard. Sufficient consideration for safety of sewing operation is absolutely within the regulation values. The setting can be returned to the sewing machine will be...


