
Users Manual - English
Page 2
... cleaning. The machine should be left unattended while plugged in this manual. 3. WARNING - Never operate this machine if it has a damaged cord or plug, if it is not working properly, if it to ensure that they do not play with any opening. 6. Return the machine to the symbol "{" position which represents off, then remove plug from outlet. 9. Do not use as threading needle, changing needle, threading bobbin, or changing presser foot...
... cleaning. The machine should be left unattended while plugged in this manual. 3. WARNING - Never operate this machine if it has a damaged cord or plug, if it is not working properly, if it to ensure that they do not play with any opening. 6. Return the machine to the symbol "{" position which represents off, then remove plug from outlet. 9. Do not use as threading needle, changing needle, threading bobbin, or changing presser foot...
Users Manual - English
Page 4
... authorized Brother dealer. Remember to turn off the power switch and unplug the cord when: • Operation is completed • Replacing or removing the needle or any assemblies, the presser feet, needle, or other parts • A power failure occurs during use • Maintaining the machine • Leaving the machine unattended 3. For a longer service life 1. Do not store anything on the needle while sewing. Do not use or store the machine near...
... authorized Brother dealer. Remember to turn off the power switch and unplug the cord when: • Operation is completed • Replacing or removing the needle or any assemblies, the presser feet, needle, or other parts • A power failure occurs during use • Maintaining the machine • Leaving the machine unattended 3. For a longer service life 1. Do not store anything on the needle while sewing. Do not use or store the machine near...
Users Manual - English
Page 5
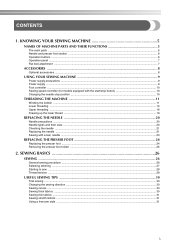
...31 Sewing stretch fabrics ...31 Using a free-arm style ...31 3 KNOWING YOUR SEWING MACHINE 5 NAMES OF MACHINE PARTS AND THEIR FUNCTIONS 5 The main parts ...5 Needle and presser foot section ...6 Operation buttons ...6 Operation panel ...7 Flat bed attachment ...7 ACCESSORIES ...8 Optional accessories ...8 USING YOUR SEWING MACHINE 9 Power supply precautions ...9 Power supply ...9 Foot controller ...10 Sewing speed controller (for models equipped with the start/stop button 10 Changing the needle stop position ...10 THREADING THE MACHINE 11 Winding the bobbin ...11 Lower threading ...14...
...31 Sewing stretch fabrics ...31 Using a free-arm style ...31 3 KNOWING YOUR SEWING MACHINE 5 NAMES OF MACHINE PARTS AND THEIR FUNCTIONS 5 The main parts ...5 Needle and presser foot section ...6 Operation buttons ...6 Operation panel ...7 Flat bed attachment ...7 ACCESSORIES ...8 Optional accessories ...8 USING YOUR SEWING MACHINE 9 Power supply precautions ...9 Power supply ...9 Foot controller ...10 Sewing speed controller (for models equipped with the start/stop button 10 Changing the needle stop position ...10 THREADING THE MACHINE 11 Winding the bobbin ...11 Lower threading ...14...
Users Manual - English
Page 7
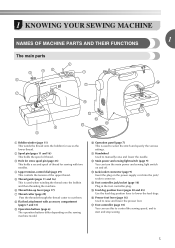
e Thread guide (pages 11 and 16) This is used when winding the thread onto the bobbin and then threading the machine. c Hole for extra spool pin (page 23) This holds a second spool of the upper thread. d Upper tension-control dial (page 29) This controls the tension of thread for sewing with accessory compartment (pages 7 and 31) i Operation buttons (page 6) The operation buttons differ depending on the power supply cord into the jack/ socket connector. h Flat bed attachment with two needles. p Presser foot lever (page 16...
e Thread guide (pages 11 and 16) This is used when winding the thread onto the bobbin and then threading the machine. c Hole for extra spool pin (page 23) This holds a second spool of the upper thread. d Upper tension-control dial (page 29) This controls the tension of thread for sewing with accessory compartment (pages 7 and 31) i Operation buttons (page 6) The operation buttons differ depending on the power supply cord into the jack/ socket connector. h Flat bed attachment with two needles. p Presser foot lever (page 16...
Users Manual - English
Page 8
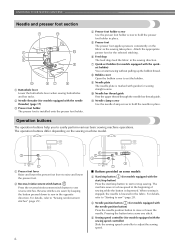
.... e Presser foot The presser foot applies pressure consistently on the sewing machine model. k Needle clamp screw Use the needle clamp screw to raise or lower the needle. a Presser foot lever Raise and lower the presser foot lever to set bobbin (for models equipped with guides for sewing straight seams. j Needle bar thread guide Pass the upper thread through the needle bar thread guide. h Bobbin cover Open the bobbin cover to raise and lower the presser foot. The operation buttons differ depending on the fabric as the sewing takes place. e Sewing speed controller (for models...
.... e Presser foot The presser foot applies pressure consistently on the sewing machine model. k Needle clamp screw Use the needle clamp screw to raise or lower the needle. a Presser foot lever Raise and lower the presser foot lever to set bobbin (for models equipped with guides for sewing straight seams. j Needle bar thread guide Pass the upper thread through the needle bar thread guide. h Bobbin cover Open the bobbin cover to raise and lower the presser foot. The operation buttons differ depending on the fabric as the sewing takes place. e Sewing speed controller (for models...
Users Manual - English
Page 10
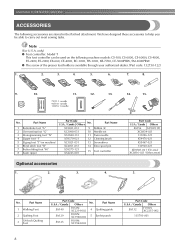
... accessories to help you be used on machine) 6 Blind stitch foot "R" 7 Button fitting foot "M" 8 Seam ripper Part Code U.S.A. / Canada Others No. Part Name XC2691-031 9 Bobbin (4) XC3098-031 10 Needle set X53840-331 11 Twin needle X59370-021 12 Cleaning brush XC3021-031 13 Screwdriver XC4051-031 14 Extra spool pin X59375-121 X54243-001 15 Foot controller Optional accessories 1. 2. 3. 4. only) ● Foot controller: Model T This foot controller can be able to carry out most sewing tasks. Part Name 1 Buttonhole foot "A" 2 Overcasting foot "G" 3 Monogramming...
... accessories to help you be used on machine) 6 Blind stitch foot "R" 7 Button fitting foot "M" 8 Seam ripper Part Code U.S.A. / Canada Others No. Part Name XC2691-031 9 Bobbin (4) XC3098-031 10 Needle set X53840-331 11 Twin needle X59370-021 12 Cleaning brush XC3021-031 13 Screwdriver XC4051-031 14 Extra spool pin X59375-121 X54243-001 15 Foot controller Optional accessories 1. 2. 3. 4. only) ● Foot controller: Model T This foot controller can be able to carry out most sewing tasks. Part Name 1 Buttonhole foot "A" 2 Overcasting foot "G" 3 Monogramming...
Users Manual - English
Page 12
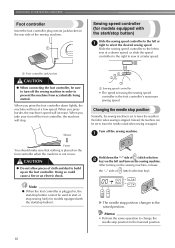
... foot controller's maximum sewing speed. Sewing speed controller (for models equipped with the start /stop button) Slide the sewing speed controller to the left and turn off the sewing machine in order to sew at a low speed. When you take your foot off the sewing machine. Slower a Sewing speed controller • The speed set to the lowered position. 10 Changing the needle stop . Hold down lightly, the machine will increase. X The needle stop position to leave the needle in use. Memo • Perform the same operation...
... foot controller's maximum sewing speed. Sewing speed controller (for models equipped with the start /stop button) Slide the sewing speed controller to the left and turn off the sewing machine in order to sew at a low speed. When you take your foot off the sewing machine. Slower a Sewing speed controller • The speed set to the lowered position. 10 Changing the needle stop . Hold down lightly, the machine will increase. X The needle stop position to leave the needle in use. Memo • Perform the same operation...
Users Manual - English
Page 14
... bobbin a few times. Note ● If the sewing machine is to be used to the left and remove the bobbin. Cut the thread, slide the bobbin winder shaft k to start or stop sewing (only for models equipped with the start/stop button) to break. If you follow the instructions carefully. Then stop button) to wind the thread around the bobbin and cause the needle to start. Trim the excess thread above the bobbin. Press the foot controller...
... bobbin a few times. Note ● If the sewing machine is to be used to the left and remove the bobbin. Cut the thread, slide the bobbin winder shaft k to start or stop sewing (only for models equipped with the start/stop button) to break. If you follow the instructions carefully. Then stop button) to wind the thread around the bobbin and cause the needle to start. Trim the excess thread above the bobbin. Press the foot controller...
Users Manual - English
Page 15
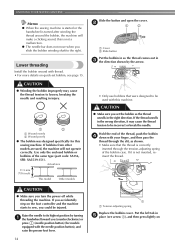
... the start /stop button cannot be used to be operated using the cutter built into the notch in the bobbin or the needle may break the needle. Slide the sewing speed controller back to its k original position (for models equipped with the sewing speed controller). a Slit in a "Winding the bobbin" to pass the thread around the bobbin five or six times. c While holding the thread that the spring on the sewing machine. CAUTION ● Not winding the bobbin properly...
... the start /stop button cannot be used to be operated using the cutter built into the notch in the bobbin or the needle may break the needle. Slide the sewing speed controller back to its k original position (for models equipped with the sewing speed controller). a Slit in a "Winding the bobbin" to pass the thread around the bobbin five or six times. c While holding the thread that the spring on the sewing machine. CAUTION ● Not winding the bobbin properly...
Users Manual - English
Page 16
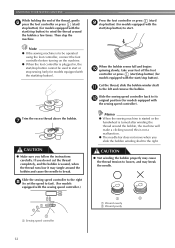
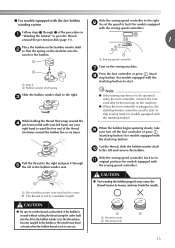
... right direction. Use only the enclosed bobbin or bobbins of the bobbin case. Hold the end of the thread, push the bobbin d down with the needle position button), and raise the presser foot lever. 14 1 a Tension-adjusting spring Replace the bobbin cover. Actual size 11.5 mm (7/16 inch) This model Other models • Only use bobbins that the thread is not a malfunction. ● The needle bar does not move when you set bobbin, see arrow a), and then press lightly on quick-set the bobbin...
... right direction. Use only the enclosed bobbin or bobbins of the bobbin case. Hold the end of the thread, push the bobbin d down with the needle position button), and raise the presser foot lever. 14 1 a Tension-adjusting spring Replace the bobbin cover. Actual size 11.5 mm (7/16 inch) This model Other models • Only use bobbins that the thread is not a malfunction. ● The needle bar does not move when you set bobbin, see arrow a), and then press lightly on quick-set the bobbin...
Users Manual - English
Page 17
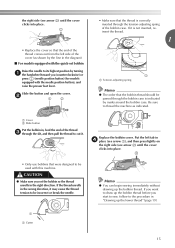
... thread. 1 1 a Tension-adjusting spring Memo ● The order that the thread is correctly inserted through the bobbin case is indicated by turning a the handwheel toward you start to sew, follow to its highest position by marks around the bobbin case. If you want to be used with the needle position button), and raise the presser foot lever. If it may cause the thread tension to draw up the bobbin thread. Slide the button and open the cover...
... thread. 1 1 a Tension-adjusting spring Memo ● The order that the thread is correctly inserted through the bobbin case is indicated by turning a the handwheel toward you start to sew, follow to its highest position by marks around the bobbin case. If you want to be used with the needle position button), and raise the presser foot lever. If it may cause the thread tension to draw up the bobbin thread. Slide the button and open the cover...
Users Manual - English
Page 19
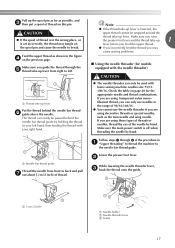
... figure d on the spool pin and cause the needle to left hand, then feeding the thread with your left . Lower the presser foot lever. Check the table on this pin. a 5 cm (2 inch) a Needle holder b Needle threader lever c Guide 17 CAUTION ● If the spool of thread. Feed the upper thread as the twin needle and wing needle. a Needle bar thread guide Thread the needle from right to break. Make sure you guide the thread through 6 of the procedure in a "Upper threading" to thread the machine to back and pull...
... figure d on the spool pin and cause the needle to left hand, then feeding the thread with your left . Lower the presser foot lever. Check the table on this pin. a 5 cm (2 inch) a Needle holder b Needle threader lever c Guide 17 CAUTION ● If the spool of thread. Feed the upper thread as the twin needle and wing needle. a Needle bar thread guide Thread the needle from right to break. Make sure you guide the thread through 6 of the procedure in a "Upper threading" to thread the machine to back and pull...
Users Manual - English
Page 35
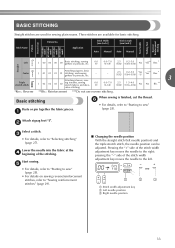
... sewing stretch fabrics and deco- 0.0 (0) 0.0-7.0 (0-1/4) 2.5 (3/32) 1.5-4.0 (1/16-3/16) No No Rfc.** rative stitching *Rev.: Reverse **Rfc.: Reinforcement ***Do not use reverse stitching. Start sewing. pressing the "-" side of the stitch width adjustment key moves the needle to "Sewing reinforcement stitches" (page 29). ■ Changing the needle position With the straight stitch (left . Application Stitch Width [mm (inch.)] Stitch Length [mm (inch.)] Auto Manual Auto Manual Straight Pattern Presser Foot 70 stitches model 60 stitches model 50 stitches model 40 stitches model...
... sewing stretch fabrics and deco- 0.0 (0) 0.0-7.0 (0-1/4) 2.5 (3/32) 1.5-4.0 (1/16-3/16) No No Rfc.** rative stitching *Rev.: Reverse **Rfc.: Reinforcement ***Do not use reverse stitching. Start sewing. pressing the "-" side of the stitch width adjustment key moves the needle to "Sewing reinforcement stitches" (page 29). ■ Changing the needle position With the straight stitch (left . Application Stitch Width [mm (inch.)] Stitch Length [mm (inch.)] Auto Manual Auto Manual Straight Pattern Presser Foot 70 stitches model 60 stitches model 50 stitches model 40 stitches model...
Users Manual - English
Page 38
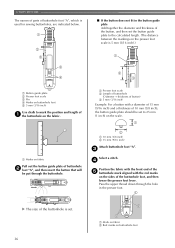
... the buttonhole foot, and then lower the presser foot lever. UTILITY STITCHES The names of parts of buttonhole foot "A", which is used for sewing buttonholes, are indicated below. 1 2 5 ■ If the button does not fit in the presser foot. 1 X The size of the buttonhole is 5 mm (3/16 inch).) 1 3 4 A a Button guide plate b Presser foot scale c Pin d Marks on buttonhole foot e 5 mm (3/16 inch) Use chalk to 25 mm (1 inch) on buttonhole foot 36 Pass the upper thread down through the buttonhole. A 2 3 a Presser foot scale b Length of buttonhole...
... the buttonhole foot, and then lower the presser foot lever. UTILITY STITCHES The names of parts of buttonhole foot "A", which is used for sewing buttonholes, are indicated below. 1 2 5 ■ If the button does not fit in the presser foot. 1 X The size of the buttonhole is 5 mm (3/16 inch).) 1 3 4 A a Button guide plate b Presser foot scale c Pin d Marks on buttonhole foot e 5 mm (3/16 inch) Use chalk to 25 mm (1 inch) on buttonhole foot 36 Pass the upper thread down through the buttonhole. A 2 3 a Presser foot scale b Length of buttonhole...
Users Manual - English
Page 40
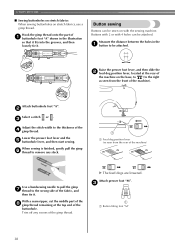
... presser foot lever, and then slide the b feed dog position lever, located at the top end of the gimp thread. b Select a stitch or . Trim off any slack. Attach buttonhole foot "A". a Feed dog position lever (as seen from the rear of the machine) Use a handsewing needle to pull the gimp g thread to remove any excess of the buttonhole. X The feed dogs are lowered. Button sewing Buttons can be sewn on stretch fabrics, use a gimp thread. UTILITY STITCHES ■ Sewing buttonholes on stretch fabrics When sewing buttonholes on with 4 holes can be attached...
... presser foot lever, and then slide the b feed dog position lever, located at the top end of the gimp thread. b Select a stitch or . Trim off any slack. Attach buttonhole foot "A". a Feed dog position lever (as seen from the rear of the machine) Use a handsewing needle to pull the gimp g thread to remove any excess of the buttonhole. X The feed dogs are lowered. Button sewing Buttons can be sewn on stretch fabrics, use a gimp thread. UTILITY STITCHES ■ Sewing buttonholes on stretch fabrics When sewing buttonholes on with 4 holes can be attached...
Users Manual - English
Page 41
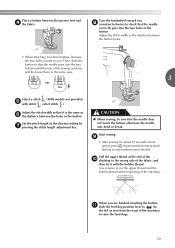
... low speed, press (reverse/reinforcement stitch button) to cut the upper thread and the bobbin thread at the end of the j stitching to the wrong side of the fabric, and then tie it with stitch , select stitch .) Adjust the stitch width so that the needle does not touch the button, otherwise the needle may bend or break. Use scissors to sew reinforcement stitches. When you are finished attaching the button, k slide the feed dog position lever to...
... low speed, press (reverse/reinforcement stitch button) to cut the upper thread and the bobbin thread at the end of the j stitching to the wrong side of the fabric, and then tie it with stitch , select stitch .) Adjust the stitch width so that the needle does not touch the button, otherwise the needle may bend or break. Use scissors to sew reinforcement stitches. When you are finished attaching the button, k slide the feed dog position lever to...
Users Manual - English
Page 62
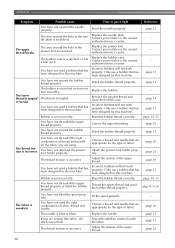
... fitted the spool properly. Replace the presser foot. Only use a bobbin that has been designed for this machine. Reset the bobbin thread correctly. Replace the needle. Adjust the tension of fabric, thread and needle. If you are sewing thin fabric, the stitch is scratched. The thread tension is incorrect. Contact your retailer or the nearest authorised service center. Wind the bobbin thread properly. Reset the bobbin thread correctly. Thread the upper thread and wind the bobbin thread properly. The area around the hole in the needle plate is...
... fitted the spool properly. Replace the presser foot. Only use a bobbin that has been designed for this machine. Reset the bobbin thread correctly. Replace the needle. Adjust the tension of fabric, thread and needle. If you are sewing thin fabric, the stitch is scratched. The thread tension is incorrect. Contact your retailer or the nearest authorised service center. Wind the bobbin thread properly. Reset the bobbin thread correctly. Thread the upper thread and wind the bobbin thread properly. The area around the hole in the needle plate is...
Users Manual - English
Page 63
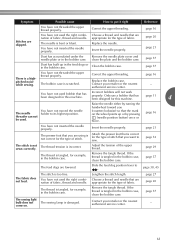
... needle is damaged. Insert the needle properly. page 20 page 21 Dust has accumulated under the Remove the needle plate cover and needle plate or in the bobbin case, clean the bobbin case. Only use a bobbin that you want to sew. page 21 The presser foot that has been designed for the type of fabric, thread and needle. Adjust the tension of stitch that the mark on . Choose a thread and needle that are appropriate for this machine. page 57 The sewing light bulb...
... needle is damaged. Insert the needle properly. page 20 page 21 Dust has accumulated under the Remove the needle plate cover and needle plate or in the bobbin case, clean the bobbin case. Only use a bobbin that you want to sew. page 21 The presser foot that has been designed for the type of fabric, thread and needle. Adjust the tension of stitch that the mark on . Choose a thread and needle that are appropriate for this machine. page 57 The sewing light bulb...

Users Manual - English
Page 64
... the bobbin winder shaft is pressed Two or four beeps sound. ■ If the machine locks up , an error message appears on the operation panel. The reverse/reinforcement stitch button or needle position button was pressed (or the start /stop button was pressed if the foot controller is not connected) while the buttonhole lever is being used, the machine may be malfunctioning. Follow the instructions indicated in the LCD while the sewing machine...
... the bobbin winder shaft is pressed Two or four beeps sound. ■ If the machine locks up , an error message appears on the operation panel. The reverse/reinforcement stitch button or needle position button was pressed (or the start /stop button was pressed if the foot controller is not connected) while the buttonhole lever is being used, the machine may be malfunctioning. Follow the instructions indicated in the LCD while the sewing machine...
Users Manual - English
Page 65
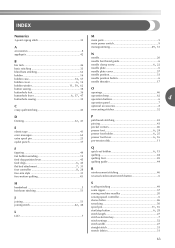
...point zigzag stitch 32 main parts 5 main power switch 9 A , monogramming 49 51 accessories 8 appliqués 42 N needle 20 B bar tack 46 basic stitching 33 blind hem stitching 34 bobbin 14 , bobbin case 14 57 , bobbin cover 6 14 bobbin , winder 11 59, 62 button sewing 38 needle bar thread guide 6 , needle clamp screw 6 22 needle plate 6 needle plate cover 57 needle position 33 needle position button 6 needle threader 17 O buttonhole foot 36 openings 46 buttonhole , lever 6 37, 47 buttonhole sewing 35 operation beep 62 operation buttons 6 4 operation...
...point zigzag stitch 32 main parts 5 main power switch 9 A , monogramming 49 51 accessories 8 appliqués 42 N needle 20 B bar tack 46 basic stitching 33 blind hem stitching 34 bobbin 14 , bobbin case 14 57 , bobbin cover 6 14 bobbin , winder 11 59, 62 button sewing 38 needle bar thread guide 6 , needle clamp screw 6 22 needle plate 6 needle plate cover 57 needle position 33 needle position button 6 needle threader 17 O buttonhole foot 36 openings 46 buttonhole , lever 6 37, 47 buttonhole sewing 35 operation beep 62 operation buttons 6 4 operation...


