
Users Manual - English
Page 8
...Attaching the Embroidery Foot 120 Attaching the embroidery foot ...120 Removing the embroidery foot ...122 Attaching the Embroidery Unit 123 Embroidery unit precautions ...123 Attaching the embroidery unit ...123 Removing the embroidery unit ...125 Preparing the Fabric ...126 Attaching a stabilizer material to the fabric 126 Setting the fabric in the embroidery frame ...127 Attaching the Embroidery Frame 130 Attaching the embroidery...150 APPENDIX 151 Care and Maintenance ...152 Cleaning the machine surface ...152 Cleaning the race ...152 Troubleshooting ...154 Error messages ...159 Adjusting the ...
...Attaching the Embroidery Foot 120 Attaching the embroidery foot ...120 Removing the embroidery foot ...122 Attaching the Embroidery Unit 123 Embroidery unit precautions ...123 Attaching the embroidery unit ...123 Removing the embroidery unit ...125 Preparing the Fabric ...126 Attaching a stabilizer material to the fabric 126 Setting the fabric in the embroidery frame ...127 Attaching the Embroidery Frame 130 Attaching the embroidery...150 APPENDIX 151 Care and Maintenance ...152 Cleaning the machine surface ...152 Cleaning the race ...152 Troubleshooting ...154 Error messages ...159 Adjusting the ...

Users Manual - English
Page 12
...upper thread tension with this thread guide when winding the bobbin thread and threading the machine. j Flat bed attachment (page 46) Remove the flat bed attachment when sewing cylindrical pieces such as sleeve cuffs. k Thread cutter (page 56) Pass the ...threads through the thread cutter to thread the needle. Names of Machine Parts and Their Functions The names of the various parts of the machine parts. e LCD (liquid crystal display) (touch panel) (page 18) Setting for the embroidery...
...upper thread tension with this thread guide when winding the bobbin thread and threading the machine. j Flat bed attachment (page 46) Remove the flat bed attachment when sewing cylindrical pieces such as sleeve cuffs. k Thread cutter (page 56) Pass the ...threads through the thread cutter to thread the needle. Names of Machine Parts and Their Functions The names of the various parts of the machine parts. e LCD (liquid crystal display) (touch panel) (page 18) Setting for the embroidery...

Users Manual - English
Page 13
... foot holder (page 45) The presser foot is being used. Do not cover the air vent while the sewing machine is installed onto the presser foot holder. g Power supply jack (page 17) Insert the plug on the end...section Right-side/rear view a Buttonhole lever (page 86) Lower the buttonhole lever when sewing buttonholes and bar tacks. Attach the appropriate presser foot for sewing straight seams. e Needle plate cover (page 152) Remove the needle plate cover to clean...(counterclockwise) to raise and lower the needle to thread the needle. c Embroidery card slot (page 138) Insert the...
... foot holder (page 45) The presser foot is being used. Do not cover the air vent while the sewing machine is installed onto the presser foot holder. g Power supply jack (page 17) Insert the plug on the end...section Right-side/rear view a Buttonhole lever (page 86) Lower the buttonhole lever when sewing buttonholes and bar tacks. Attach the appropriate presser foot for sewing straight seams. e Needle plate cover (page 152) Remove the needle plate cover to clean...(counterclockwise) to raise and lower the needle to thread the needle. c Embroidery card slot (page 138) Insert the...

Users Manual - English
Page 15
... LCD. d Next page key Displays the next page when there are items that are not displayed on using the sewing machine. g Embroidery key Press this key to get help on the LCD. Displays simple explanations of setting upper thread / bobbin winding / setting bobbin thread / needle replacement / embroidery unit attachment / embroidery frame attachment / embroidery foot attachment / presser foot replacement. 13
... LCD. d Next page key Displays the next page when there are items that are not displayed on using the sewing machine. g Embroidery key Press this key to get help on the LCD. Displays simple explanations of setting upper thread / bobbin winding / setting bobbin thread / needle replacement / embroidery unit attachment / embroidery frame attachment / embroidery foot attachment / presser foot replacement. 13

Users Manual - English
Page 20
... according to be used c Stitches d Stitch settings and twin needle sewing e Stitch width f Stitch length g Number of the selected stitch h Number of the sewing machine. GETTING READY LCD (Liquid Crystal Display) Operation Selected stitch, pattern settings and messages are explained in "Selecting an embroidery pattern" (page 137). For details, refer to "Error messages" (page... side of the LCD, and make operations by directly touching the icons with your finger or a touch pen. Viewing the LCD When the power is attached.
... according to be used c Stitches d Stitch settings and twin needle sewing e Stitch width f Stitch length g Number of the selected stitch h Number of the sewing machine. GETTING READY LCD (Liquid Crystal Display) Operation Selected stitch, pattern settings and messages are explained in "Selecting an embroidery pattern" (page 137). For details, refer to "Error messages" (page... side of the LCD, and make operations by directly touching the icons with your finger or a touch pen. Viewing the LCD When the power is attached.

Users Manual - English
Page 23
... the item to be referred on each topic, refer to the item 1 selection screen. Press (Sewing machine help screen appears. bobbin winding / setting bobbin thread / needle replacement / embroidery unit attachment / Example: Upper threading embroidery frame attachment / embroidery foot attachment / presser foot replacement on b the display panel. Checking machine operating Press (Next page key) to switch to the previous page.
... the item to be referred on each topic, refer to the item 1 selection screen. Press (Sewing machine help screen appears. bobbin winding / setting bobbin thread / needle replacement / embroidery unit attachment / Example: Upper threading embroidery frame attachment / embroidery foot attachment / presser foot replacement on b the display panel. Checking machine operating Press (Next page key) to switch to the previous page.
Users Manual - English
Page 45
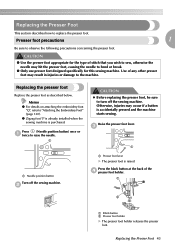
... is purchased. CAUTION ● Use the presser foot appropriate for this sewing machine. Presser foot precautions 1 Be sure to "Attaching the Embroidery Foot" (page 120). c a a Needle position button Turn off the sewing machine. z Zigzag foot "J" is already installed when the sewing machine is accidentally pressed and the machine starts sewing. a CAUTION z Before replacing the presser foot, be sure to turn...
... is purchased. CAUTION ● Use the presser foot appropriate for this sewing machine. Presser foot precautions 1 Be sure to "Attaching the Embroidery Foot" (page 120). c a a Needle position button Turn off the sewing machine. z Zigzag foot "J" is already installed when the sewing machine is accidentally pressed and the machine starts sewing. a CAUTION z Before replacing the presser foot, be sure to turn...
Users Manual - English
Page 47
...holder screw. Removing and attaching the ■ Attaching the presser foot holder presser foot holder Raise the presser foot lever. c a d b a Screwdriver b Presser foot holder c Presser foot holder screw d Presser bar X The presser foot is accidentally pressed and the machine starts sewing. ab a Screwdriver b... use the presser foot holder, such as the b left hand. embroidery foot, optional free-motion open toe quilting foot "O" and optional walking foot. Use the screwdriver to turn off the sewing machine. a X The presser foot is loose, the needle may break or...
...holder screw. Removing and attaching the ■ Attaching the presser foot holder presser foot holder Raise the presser foot lever. c a d b a Screwdriver b Presser foot holder c Presser foot holder screw d Presser bar X The presser foot is accidentally pressed and the machine starts sewing. ab a Screwdriver b... use the presser foot holder, such as the b left hand. embroidery foot, optional free-motion open toe quilting foot "O" and optional walking foot. Use the screwdriver to turn off the sewing machine. a X The presser foot is loose, the needle may break or...
Users Manual - English
Page 119
Embroidering Neatly 118 Attaching the Embroidery Foot 120 Attaching the Embroidery Unit 123 Preparing the Fabric 126 Attaching the Embroidery Frame 130 Selecting Embroidery Patterns 132 Embroidering...139 Editing and Saving Patterns 143 4 EMBROIDERY The steps for embroidering are described in this chapter.
Embroidering Neatly 118 Attaching the Embroidery Foot 120 Attaching the Embroidery Unit 123 Preparing the Fabric 126 Attaching the Embroidery Frame 130 Selecting Embroidery Patterns 132 Embroidering...139 Editing and Saving Patterns 143 4 EMBROIDERY The steps for embroidering are described in this chapter.
Users Manual - English
Page 120
..., such as denim, use a 90/14 home sewing machine needle. To check the fabric thickness, attach the embroidery frame to the embroidery unit, and use them for embroidery. The needle may break or bend. ■ Other Embroidery frames "small" and "large" are too thick....fabrics with the fabric hanging off the table where the sewing machine is purchased. Note z Always use embroidery thread designed for embroidery to the fabric to break. ■ Stabilizer material (option) Attach a stabilizer material for embroidery machines. z When replacing the needle, refer to "Setting the...
..., such as denim, use a 90/14 home sewing machine needle. To check the fabric thickness, attach the embroidery frame to the embroidery unit, and use them for embroidery. The needle may break or bend. ■ Other Embroidery frames "small" and "large" are too thick....fabrics with the fabric hanging off the table where the sewing machine is purchased. Note z Always use embroidery thread designed for embroidery to the fabric to break. ■ Stabilizer material (option) Attach a stabilizer material for embroidery machines. z When replacing the needle, refer to "Setting the...
Users Manual - English
Page 121
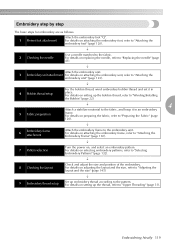
...and position of the embroidery. For details on attaching the embroidery unit, refer to the embroidery unit. For details on preparing the fabric, refer to "Preparing the Fabric" (page 126). ↓ 6 Embroidery frame attachment Attach the embroidery frame to "Attaching the embroidery unit" (page 123).... ↓ 4 Bobbin thread setup For the bobbin thread, wind embroidery bobbin thread and set it in place. For details on ...
...and position of the embroidery. For details on attaching the embroidery unit, refer to the embroidery unit. For details on preparing the fabric, refer to "Preparing the Fabric" (page 126). ↓ 6 Embroidery frame attachment Attach the embroidery frame to "Attaching the embroidery unit" (page 123).... ↓ 4 Bobbin thread setup For the bobbin thread, wind embroidery bobbin thread and set it in place. For details on ...
Users Manual - English
Page 122
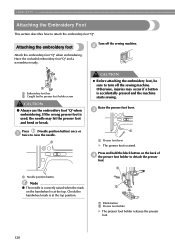
... a button is at the top position. Have the included embroidery foot "Q" and a screwdriver ready. a CAUTION z Before attaching the embroidery foot, be sure to detach the presser foot. Press and hold the black button on the handwheel is accidentally pressed and the machine starts sewing. Turn off the sewing machine. c a a Presser foot lever X The presser foot is correctly...
... a button is at the top position. Have the included embroidery foot "Q" and a screwdriver ready. a CAUTION z Before attaching the embroidery foot, be sure to detach the presser foot. Press and hold the black button on the handwheel is accidentally pressed and the machine starts sewing. Turn off the sewing machine. c a a Presser foot lever X The presser foot is correctly...
Users Manual - English
Page 123
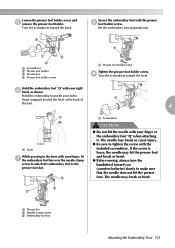
...foot holder screw a a Presser foot holder screw Tighten the presser foot holder screw. a Presser bar b Needle clamp screw c Embroidery foot bar Attaching the Embroidery Foot 121 Set the embroidery foot perpendicular. Loosen the presser foot holder screw and e remove the presser foot holder. c b a a Screwdriver CAUTION ●...bend. ● Before sewing, always turn the handwheel toward you (counterclockwise) slowly to make sure that the needle does not hit the presser foot. If the screw is loose, the needle may break or bend. Hold the embroidery foot with your index ...
...foot holder screw a a Presser foot holder screw Tighten the presser foot holder screw. a Presser bar b Needle clamp screw c Embroidery foot bar Attaching the Embroidery Foot 121 Set the embroidery foot perpendicular. Loosen the presser foot holder screw and e remove the presser foot holder. c b a a Screwdriver CAUTION ●...bend. ● Before sewing, always turn the handwheel toward you (counterclockwise) slowly to make sure that the needle does not hit the presser foot. If the screw is loose, the needle may break or bend. Hold the embroidery foot with your index ...
Users Manual - English
Page 124
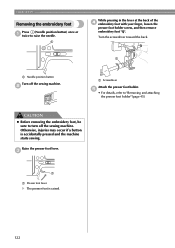
... foot lever X The presser foot is accidentally pressed and the machine starts sewing. CAUTION z Before removing the embroidery foot, be sure to "Removing and attaching the presser foot holder" (page 45). b a Screwdriver Attach the presser foot holder. Raise the presser foot lever. EMBROIDERY Removing the embroidery foot Press (Needle position button) once or a twice to raise the...
... foot lever X The presser foot is accidentally pressed and the machine starts sewing. CAUTION z Before removing the embroidery foot, be sure to "Removing and attaching the presser foot holder" (page 45). b a Screwdriver Attach the presser foot holder. Raise the presser foot lever. EMBROIDERY Removing the embroidery foot Press (Needle position button) once or a twice to raise the...
Users Manual - English
Page 125
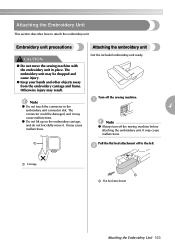
.... z Do not lift up on the embroidery carriage, and do not forcefully move the sewing machine with the embroidery unit in the a 4 embroidery unit connector slot. b a Carriage a a Flat bed attachment Attaching the Embroidery Unit 123 Embroidery unit precautions Attaching the embroidery unit CAUTION ● Do not move it may cause malfunctions. Note z Always turn off the sewing machine. It may result. Note z Do...
.... z Do not lift up on the embroidery carriage, and do not forcefully move the sewing machine with the embroidery unit in the a 4 embroidery unit connector slot. b a Carriage a a Flat bed attachment Attaching the Embroidery Unit 123 Embroidery unit precautions Attaching the embroidery unit CAUTION ● Do not move it may cause malfunctions. Note z Always turn off the sewing machine. It may result. Note z Do...
Users Manual - English
Page 126
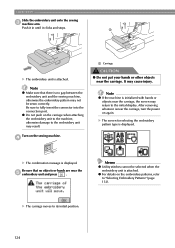
... carriage, turn the power on the carriage when attaching the embroidery unit to the machine, otherwise damage to the embroidery unit may cause injury. X The confirmation message is attached. EMBROIDERY Slide the embroidery unit onto the sewing c machine arm. z Do not push on again. a X The embroidery unit is displayed. Turn on the embroidery patterns, refer to the initial display. Memo z Utility...
... carriage, turn the power on the carriage when attaching the embroidery unit to the machine, otherwise damage to the embroidery unit may cause injury. X The confirmation message is attached. EMBROIDERY Slide the embroidery unit onto the sewing c machine arm. z Do not push on again. a X The embroidery unit is displayed. Turn on the embroidery patterns, refer to the initial display. Memo z Utility...
Users Manual - English
Page 127
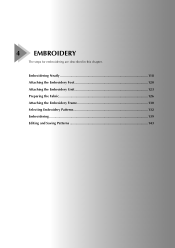
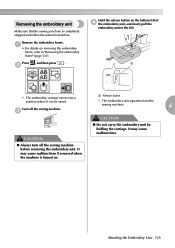
Turn off the sewing machine before removing the embroidery unit. c a Release button X The embroidery unit separates from the sewing machine. 4 CAUTION CAUTION ● Do not carry the embroidery unit by holding the carriage. Attaching the Embroidery Unit 125 It may cause malfunctions. ● Always turn off the sewing machine. a X The embroidery carriage moves into a position where it can be saved. a • For details...
Turn off the sewing machine before removing the embroidery unit. c a Release button X The embroidery unit separates from the sewing machine. 4 CAUTION CAUTION ● Do not carry the embroidery unit by holding the carriage. Attaching the Embroidery Unit 125 It may cause malfunctions. ● Always turn off the sewing machine. a X The embroidery carriage moves into a position where it can be saved. a • For details...

Users Manual - English
Page 128
...such as towels, which cannot be ironed or for thin fabrics or stretch fabrics. Attach a stabilizer material for embroidery. CAUTION ● Always use stabilizer material when sewing embroidery projects. Attaching a stabilizer material to the fabric Prepare stabilizer material that is stretched on thin ... than a the embroidery frame being used. EMBROIDERY Preparing the Fabric After attaching a stabilizer material to the embroidery fabric, it with a nap like organdy and fabrics with a steam iron. To obtain optional accessories or parts, visit [http://www.brother.com/], or ...
...such as towels, which cannot be ironed or for thin fabrics or stretch fabrics. Attach a stabilizer material for embroidery. CAUTION ● Always use stabilizer material when sewing embroidery projects. Attaching a stabilizer material to the fabric Prepare stabilizer material that is stretched on thin ... than a the embroidery frame being used. EMBROIDERY Preparing the Fabric After attaching a stabilizer material to the embroidery fabric, it with a nap like organdy and fabrics with a steam iron. To obtain optional accessories or parts, visit [http://www.brother.com/], or ...
Users Manual - English
Page 129
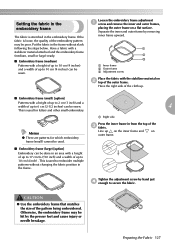
Have a fabric with a stabilizer material attached and the embroidery frame (medium, small or large) ready. ■ Embroidery frame (medium) Patterns with a height of up to 17 cm (6-7/10 inch) and a width of the embroidery pattern may be used. Loosen the embroidery frame adjustment a screw and remove the inner and...the fabric in the frame without changing the fabric position in the frame. Preparing the Fabric 127 Setting the fabric in the embroidery frame The fabric is used to embroider multiple patterns without slack following the steps below. Separate the inner and outer frame by ...
Have a fabric with a stabilizer material attached and the embroidery frame (medium, small or large) ready. ■ Embroidery frame (medium) Patterns with a height of up to 17 cm (6-7/10 inch) and a width of the embroidery pattern may be used. Loosen the embroidery frame adjustment a screw and remove the inner and...the fabric in the frame without changing the fabric position in the frame. Preparing the Fabric 127 Setting the fabric in the embroidery frame The fabric is used to embroider multiple patterns without slack following the steps below. Separate the inner and outer frame by ...
Users Manual - English
Page 132
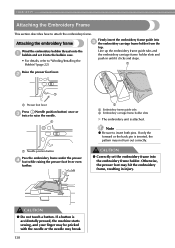
... holder. If a button is accidentally pressed, the machine starts sewing, and your finger may be pricked with the needle or the needle may hit the embroidery frame, resulting in until it into the bobbin case. • For details, refer to attach the embroidery frame. EMBROIDERY Attaching the Embroidery Frame This section describes how to "Winding/Installing the Bobbin...
... holder. If a button is accidentally pressed, the machine starts sewing, and your finger may be pricked with the needle or the needle may hit the embroidery frame, resulting in until it into the bobbin case. • For details, refer to attach the embroidery frame. EMBROIDERY Attaching the Embroidery Frame This section describes how to "Winding/Installing the Bobbin...


