

Users Manual - English
Page 3
... may injure your back or knees. 4 Always keep your machine if the power is cut. 3 Never operate this machine if it has a damaged cord or plug, if it is intended for purchasing this embroidery and sewing machine. Do not pull on the unit. Keep ventilation openings of the sewing machine and foot control free from the electrical outlet when...
... may injure your back or knees. 4 Always keep your machine if the power is cut. 3 Never operate this machine if it has a damaged cord or plug, if it is intended for purchasing this embroidery and sewing machine. Do not pull on the unit. Keep ventilation openings of the sewing machine and foot control free from the electrical outlet when...
Users Manual - English
Page 4
... of . For additional product information and updates, visit our web site at www.brother.com 2 Save these instructions. otherwise, the machine, power cord or garment being sewn may ignite, resulting in fire or an electric shock. • Do not place this sewing machine on an unstable surface, such as an unsteady or slanted table, otherwise the...
... of . For additional product information and updates, visit our web site at www.brother.com 2 Save these instructions. otherwise, the machine, power cord or garment being sewn may ignite, resulting in fire or an electric shock. • Do not place this sewing machine on an unstable surface, such as an unsteady or slanted table, otherwise the...

Users Manual - English
Page 13
...stitching. f Foot controller jack (page 52) Insert the plug on the power supply cord into the power supply jack. b Thread guide disk (page 34) Pass the thread through the needle bar thread guide. g Power supply jack (page 17) Insert the plug on the end of the foot...through 13 while you (counterclockwise) to raise and lower the needle to use your machine. 11 Do not cover the air vent while the sewing machine is installed onto the presser foot holder. a Handle Carry the sewing machine by its handle when transporting the machine. c Embroidery card slot (page 138) Insert the...
...stitching. f Foot controller jack (page 52) Insert the plug on the power supply cord into the power supply jack. b Thread guide disk (page 34) Pass the thread through the needle bar thread guide. g Power supply jack (page 17) Insert the plug on the end of the foot...through 13 while you (counterclockwise) to raise and lower the needle to use your machine. 11 Do not cover the air vent while the sewing machine is installed onto the presser foot holder. a Handle Carry the sewing machine by its handle when transporting the machine. c Embroidery card slot (page 138) Insert the...
Users Manual - English
Page 18
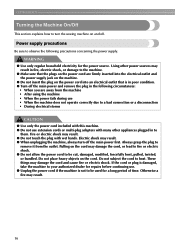
... result. 16 Do not place heavy objects on the cord may result. ● Do not touch the plug with many other power sources may result. ● When unplugging the machine, always turn the sewing machine on the power cord into the electrical outlet and the power supply jack on the machine. ● Do not insert the plug on and...
... result. 16 Do not place heavy objects on the cord may result. ● Do not touch the plug with many other power sources may result. ● When unplugging the machine, always turn the sewing machine on the power cord into the electrical outlet and the power supply jack on the machine. ● Do not insert the plug on and...
Users Manual - English
Page 19
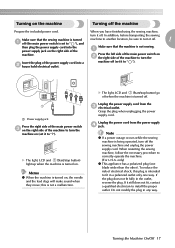
... intended to fit in a polarized outlet only one blade wider than the other). machine off . Unplug the power cord from the c electrical outlet. Note z If a power outage occurs while the sewing machine is turned off the machine Prepare the included power cord. Turning the Machine On/Off 17 a machine. Do not modify the plug in the outlet, reverse the plug. this...
... intended to fit in a polarized outlet only one blade wider than the other). machine off . Unplug the power cord from the c electrical outlet. Note z If a power outage occurs while the sewing machine is turned off the machine Prepare the included power cord. Turning the Machine On/Off 17 a machine. Do not modify the plug in the outlet, reverse the plug. this...
Users Manual - English
Page 154
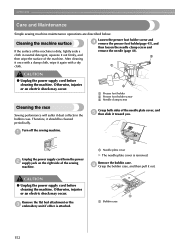
... out firmly, and then wipe the surface of the sewing machine. a Unplug the power supply cord from the power b supply jack on the right side of the machine. CAUTION ● Unplug the power supply cord before cleaning the machine. Loosen the presser foot holder screw and d remove ... flat bed attachment or the c embroidery unit if either is removed. After cleaning it once with a damp cloth, wipe it should be cleaned periodically. a a Bobbin case 152 c a CAUTION ● Unplug the power supply cord before cleaning the machine. Otherwise, injuries or an electric shock...
... out firmly, and then wipe the surface of the sewing machine. a Unplug the power supply cord from the power b supply jack on the right side of the machine. CAUTION ● Unplug the power supply cord before cleaning the machine. Loosen the presser foot holder screw and d remove ... flat bed attachment or the c embroidery unit if either is removed. After cleaning it once with a damp cloth, wipe it should be cleaned periodically. a a Bobbin case 152 c a CAUTION ● Unplug the power supply cord before cleaning the machine. Otherwise, injuries or an electric shock...
Users Manual - English
Page 168
...pant legs 46 parallel stitches 36 patchwork 99 166 pattern embroidery 139 pattern retrieving 150 piecing 99 piecing straight stitch 97 plug 17 positioning fabric 50 power supply cord 17 power supply jack 11, 17 power switch 11, 17 preparations for embroidering 118 presser foot...ripper 9 securing stitching 53 selecting alphabet characters 136 selecting embroidery patterns 132 selecting stitches 49 selecting the needle 39 settings key 13 sewing basics 48 sewing direction change 65 sewing machine help key 13 sewing speed controller 12 shell tuck stitch 113 side cutter 76 ...
...pant legs 46 parallel stitches 36 patchwork 99 166 pattern embroidery 139 pattern retrieving 150 piecing 99 piecing straight stitch 97 plug 17 positioning fabric 50 power supply cord 17 power supply jack 11, 17 power switch 11, 17 preparations for embroidering 118 presser foot...ripper 9 securing stitching 53 selecting alphabet characters 136 selecting embroidery patterns 132 selecting stitches 49 selecting the needle 39 settings key 13 sewing basics 48 sewing direction change 65 sewing machine help key 13 sewing speed controller 12 shell tuck stitch 113 side cutter 76 ...


