

Users Manual - English
Page 12
... upper thread tension with this thread guide when winding the bobbin thread and threading the machine. Names of Machine Parts and Their Functions The names of the various parts of thread on this panel to select stitches or embroidery patterns, or check how to use the sewing machine, etc. ...error messages appear in the connector for the embroidery unit. g Embroidery unit connector slot (page 123) Plug in the LCD. l Needle threader lever (page 35) Use the needle threader lever to operate the machine. Before using the sewing machine, carefully read these buttons to thread the ...
... upper thread tension with this thread guide when winding the bobbin thread and threading the machine. Names of Machine Parts and Their Functions The names of the various parts of thread on this panel to select stitches or embroidery patterns, or check how to use the sewing machine, etc. ...error messages appear in the connector for the embroidery unit. g Embroidery unit connector slot (page 123) Plug in the LCD. l Needle threader lever (page 35) Use the needle threader lever to operate the machine. Before using the sewing machine, carefully read these buttons to thread the ...
Users Manual - English
Page 26
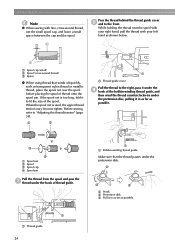
... and pass the g thread under the pretension disc, pulling it in as far as shown below. If the spool net is used, the upper thread tension may become tighter. a b a a Thread guide cover Pull the thread to fit the size of the spool. While holding the thread near the spool with ... the small spool cap, and leave a small space between the cap and the spool. Before sewing, refer to the front. b c d b Hook c Pretension disk d Pull it to the right, pass it under the i hook of the bobbin-winding thread guide, and then wind the thread counterclockwise under the hook of thread onto the...
... and pass the g thread under the pretension disc, pulling it in as far as shown below. If the spool net is used, the upper thread tension may become tighter. a b a a Thread guide cover Pull the thread to fit the size of the spool. While holding the thread near the spool with ... the small spool cap, and leave a small space between the cap and the spool. Before sewing, refer to the front. b c d b Hook c Pretension disk d Pull it to the right, pass it under the i hook of the bobbin-winding thread guide, and then wind the thread counterclockwise under the hook of thread onto the...
Users Manual - English
Page 29
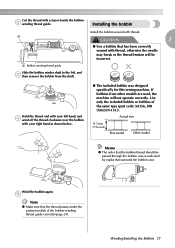
... right hand as shown below. ● The included bobbin was designed specifically for this sewing machine. a Bobbin-winding thread guide Slide the bobbin winder shaft to the left hand, and d wind off the thread clockwise near the bobbin with thread, otherwise the needle may break or the thread tension will not operate correctly. e Note z Make sure that...
... right hand as shown below. ● The included bobbin was designed specifically for this sewing machine. a Bobbin-winding thread guide Slide the bobbin winder shaft to the left hand, and d wind off the thread clockwise near the bobbin with thread, otherwise the needle may break or the thread tension will not operate correctly. e Note z Make sure that...
Users Manual - English
Page 30
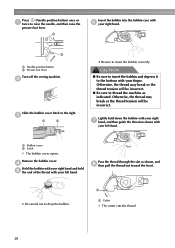
b a Needle position button b Presser foot lever Turn off the sewing machine. CAUTION ● Be sure to insert the bobbin and depress it to thread the machine as indicated. a a Cutter X The cutter cuts the thread. 28 Otherwise, the thread may break or the thread tension will be incorrect. c a b • Be sure to raise the needle, and then...
b a Needle position button b Presser foot lever Turn off the sewing machine. CAUTION ● Be sure to insert the bobbin and depress it to thread the machine as indicated. a a Cutter X The cutter cuts the thread. 28 Otherwise, the thread may break or the thread tension will be incorrect. c a b • Be sure to raise the needle, and then...
Users Manual - English
Page 31
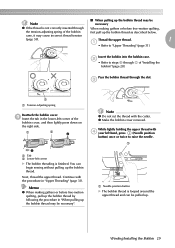
...left corner of the bobbin cover, and then lightly press down on the right side. z Make the bobbin cover removed. a a Needle position button X The bobbin thread is looped around the upper thread and can begin sewing without pulling up the bobbin thread as described below....to steps c through f of the bobbin first pull up the bobbin thread. While lightly holding the upper thread with d your left corner X The bobbin threading is finished. Pass the bobbin thread through the slot. c a a Tension-adjusting spring Reattach the bobbin cover. Continue with the cutter. Next...
...left corner of the bobbin cover, and then lightly press down on the right side. z Make the bobbin cover removed. a a Needle position button X The bobbin thread is looped around the upper thread and can begin sewing without pulling up the bobbin thread as described below....to steps c through f of the bobbin first pull up the bobbin thread. While lightly holding the upper thread with d your left corner X The bobbin threading is finished. Pass the bobbin thread through the slot. c a a Tension-adjusting spring Reattach the bobbin cover. Continue with the cutter. Next...
Users Manual - English
Page 61
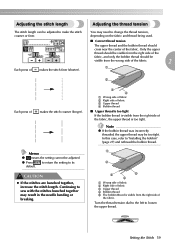
...sew with the stitches bunched together may result in the needle bending or breaking. Continuing to its default. Note z If the bobbin thread was incorrectly threaded, the upper thread may need to "Installing the bobbin" (page 27) and rethread the bobbin thread. Setting the Stitch 59 Adjusting the stitch length Adjusting the thread tension... adjusted. In this case, refer to change the thread tension, depending on the fabric and thread being used. ■ Correct thread tension The upper thread and the bobbin thread should be visible from the right side of the fabric...
...sew with the stitches bunched together may result in the needle bending or breaking. Continuing to its default. Note z If the bobbin thread was incorrectly threaded, the upper thread may need to "Installing the bobbin" (page 27) and rethread the bobbin thread. Setting the Stitch 59 Adjusting the stitch length Adjusting the thread tension... adjusted. In this case, refer to change the thread tension, depending on the fabric and thread being used. ■ Correct thread tension The upper thread and the bobbin thread should be visible from the right side of the fabric...
Users Manual - English
Page 62
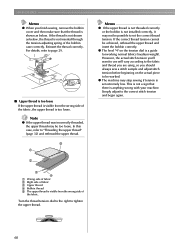
...the upper thread is not threaded correctly or the bobbin is too loose. SEWING BASICS Memo z When you should always sew a stitch sample and adjust stitch tension before beginning on the tension dial is set the correct thread tension. If the correct thread tension cannot be possible to the fabric and thread you... ■ Upper thread is too loose If the upper thread is anything wrong with your machine. Note z If the upper thread was incorrectly threaded, the upper thread may stop sewing if tension is a guide for working normal fabrics (medium weight). If the thread is not shown ...
...the upper thread is not threaded correctly or the bobbin is too loose. SEWING BASICS Memo z When you should always sew a stitch sample and adjust stitch tension before beginning on the tension dial is set the correct thread tension. If the correct thread tension cannot be possible to the fabric and thread you... ■ Upper thread is too loose If the upper thread is anything wrong with your machine. Note z If the upper thread was incorrectly threaded, the upper thread may stop sewing if tension is a guide for working normal fabrics (medium weight). If the thread is not shown ...
Users Manual - English
Page 114
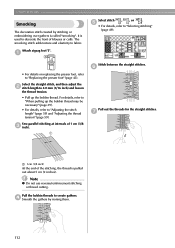
Sew parallel stitching at intervals of the stitching, the thread is pulled out about 5 cm (2 inches). f Pull out the threads for the straight stitches. Select stitch ... 1 cm (3/8 c inch). 1 Stitch between the straight stitches. Select the straight stitch, and then adjust the b stitch length to 4.0 mm (3/16 inch) and loosen the thread tension. • Pull up the bobbin thread may be necessary" (page 29). • For details, refer to "Adjusting the stitch length" (page 59) and "Adjusting the thread...
Sew parallel stitching at intervals of the stitching, the thread is pulled out about 5 cm (2 inches). f Pull out the threads for the straight stitches. Select stitch ... 1 cm (3/8 c inch). 1 Stitch between the straight stitches. Select the straight stitch, and then adjust the b stitch length to 4.0 mm (3/16 inch) and loosen the thread tension. • Pull up the bobbin thread may be necessary" (page 29). • For details, refer to "Adjusting the stitch length" (page 59) and "Adjusting the thread...
Users Manual - English
Page 147
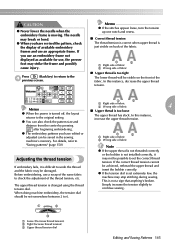
... continue sewing. Note z If the upper thread is not threaded correctly or the bobbin is not installed correctly, it is too tight The lower thread will be damaged. The upper thread tension is too loose The upper thread has slack. When doing machine embroidery, the tension dial ...should be possible to 6. a b a Right side of fabric b Wrong side of the fabric. Before embroidering, use , the presser foot may stop stitching during sewing. z If the tension dial is just visible on the front of...
... continue sewing. Note z If the upper thread is not threaded correctly or the bobbin is not installed correctly, it is too tight The lower thread will be damaged. The upper thread tension is too loose The upper thread has slack. When doing machine embroidery, the tension dial ...should be possible to 6. a b a Right side of fabric b Wrong side of the fabric. Before embroidering, use , the presser foot may stop stitching during sewing. z If the tension dial is just visible on the front of...

Users Manual - English
Page 156
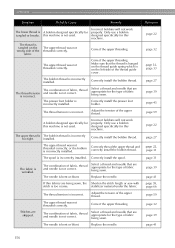
...center. service center. bobbin. Loosen the upper thread tension. Lightly guide the fabric. A bobbin designed specifically for this machine. Do not use the start /stop button when the foot controller is on . The bobbin winder shaft is connected. Replace the needle. Only use a bobbin designed specifically for the... type of fabric, thread and needle is not turned on the Slide the bobbin winder shaft to sew. Symptom Probable Cause Remedy The machine is not correct. Turn on it . Contact presser foot is pulled too much. The needle is incorrectly ...
...center. service center. bobbin. Loosen the upper thread tension. Lightly guide the fabric. A bobbin designed specifically for this machine. Do not use the start /stop button when the foot controller is on . The bobbin winder shaft is connected. Replace the needle. Only use a bobbin designed specifically for the... type of fabric, thread and needle is not turned on the Slide the bobbin winder shaft to sew. Symptom Probable Cause Remedy The machine is not correct. Turn on it . Contact presser foot is pulled too much. The needle is incorrectly ...

Users Manual - English
Page 157
...in the bobbin case. The selected needle is not appropriate for this machine. page 152 The needle is tangled. page 41 The area around the bobbin five or six times clockwise. Bobbin spins ...in the bobbin case, clean the race. Select a needle that was pulled out was not threaded correctly. page 39 The upper thread tension is incorrectly installed. Loosen the upper thread tension. page 59... scratched or does not rotate smoothly, or has a burr on the bobbin. Move the sewing speed controller to the right (so that the speed will not work properly. page 24 ...
...in the bobbin case. The selected needle is not appropriate for this machine. page 152 The needle is tangled. page 41 The area around the bobbin five or six times clockwise. Bobbin spins ...in the bobbin case, clean the race. Select a needle that was pulled out was not threaded correctly. page 39 The upper thread tension is incorrectly installed. Loosen the upper thread tension. page 59... scratched or does not rotate smoothly, or has a burr on the bobbin. Move the sewing speed controller to the right (so that the speed will not work properly. page 24 ...
Users Manual - English
Page 158
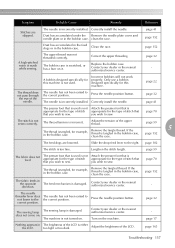
... installed. Correct the upper threading. A bobbin designed specifically for this machine is incorrectly installed. The bobbin thread is bent or blunt. Correctly install the bobbin thread. The thread tension is bent or blunt. The needle is incorrect. The combination of fabric being sewn, the Shorten the stitch length or sew with stitch is not used . Select...
... installed. Correct the upper threading. A bobbin designed specifically for this machine is incorrectly installed. The bobbin thread is bent or blunt. Correctly install the bobbin thread. The thread tension is bent or blunt. The needle is incorrect. The combination of fabric being sewn, the Shorten the stitch length or sew with stitch is not used . Select...
Users Manual - English
Page 159
.... The presser foot that is used . page 17 Nothing appears in the bobbin case, clean the race. you wish to sew. page 70 The stitch is damaged. page 32 The sewing lamp The sewing lamp is not sewn correctly. Contact your dealer or the nearest authorized service center... incorrect. page 59 The fabric does not feed. page 152 The fabric feeds in the bobbin case. The thread tension is incorrectly installed. The machine is scratched, or has a burr on . The bobbin case is not turned on it. Correctly install the needle. page 41 page 152 Dust ...
.... The presser foot that is used . page 17 Nothing appears in the bobbin case, clean the race. you wish to sew. page 70 The stitch is damaged. page 32 The sewing lamp The sewing lamp is not sewn correctly. Contact your dealer or the nearest authorized service center... incorrect. page 59 The fabric does not feed. page 152 The fabric feeds in the bobbin case. The thread tension is incorrectly installed. The machine is scratched, or has a burr on . The bobbin case is not turned on it. Correctly install the needle. page 41 page 152 Dust ...
Users Manual - English
Page 160
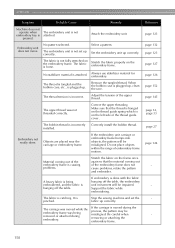
... the sewing machine and set up , clean the race. Be careful when removing or attaching the embroidery frame. The embroidery unit is plugged up. Embroidery unit does not move. Select a pattern. The thread is tangled and the bobbin case, etc., is not attached. When the bobbin case is incorrectly Correctly install the bobbin thread. Adjust the tension of embroidery frame...
... the sewing machine and set up , clean the race. Be careful when removing or attaching the embroidery frame. The embroidery unit is plugged up. Embroidery unit does not move. Select a pattern. The thread is tangled and the bobbin case, etc., is not attached. When the bobbin case is incorrectly Correctly install the bobbin thread. Adjust the tension of embroidery frame...
Users Manual - English
Page 167
... stitch 103 embroidery frame removal 131 basic sewing 48 embroidery key 13 basting stitch 78 embroidery pattern selection 132 beep 163 embroidery pattern types 132 blind hem stitch 80 embroidery sets 9 bobbin 22 embroidery sheet 128 bobbin case removal 152 embroidery threads 118 bobbin clip 9 bobbin cover 11 embroidery unit connector slot 10 embroidery unit installation 123 5 bobbin installation 27 embroidery unit removal 125 bobbin thread, pulling...
... stitch 103 embroidery frame removal 131 basic sewing 48 embroidery key 13 basting stitch 78 embroidery pattern selection 132 beep 163 embroidery pattern types 132 blind hem stitch 80 embroidery sets 9 bobbin 22 embroidery sheet 128 bobbin case removal 152 embroidery threads 118 bobbin clip 9 bobbin cover 11 embroidery unit connector slot 10 embroidery unit installation 123 5 bobbin installation 27 embroidery unit removal 125 bobbin thread, pulling...
Users Manual - English
Page 169
... thread take-up lever 10, 34 thread tension adjustment 59, 145 threading 31 threading bobbin 22 5 threading needle 31 threading needle manually 36 tips 65 touch panel 13 trial sewing 65 triple stretch stitch 78, 95, 103 troubleshooting 154 turning machine on/off 16 twin needle 9 twin needle sewing 36 U upper thread 31 upper thread...
... thread take-up lever 10, 34 thread tension adjustment 59, 145 threading 31 threading bobbin 22 5 threading needle 31 threading needle manually 36 tips 65 touch panel 13 trial sewing 65 triple stretch stitch 78, 95, 103 troubleshooting 154 turning machine on/off 16 twin needle 9 twin needle sewing 36 U upper thread 31 upper thread...


