Users Manual - English
Page 3
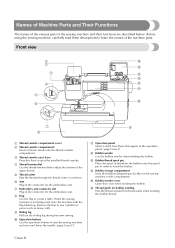
...cut them. p Thread guide for the embroidery unit. Cover B Before using the sewing machine, carefully read these descriptions to wind the bobbin. h Flap Use the flap to eject the installed thread cassette. d Thread tension dial Use the thread tension dial to ... E) l Bobbin winder Use the bobbin winder when winding the bobbin. n Bobbin storage compartment Store the bobbins designed specifically for the embroidery unit. j Operation buttons Use the operation buttons to adjust the tension of thread for the bobbin onto this spool pin in the connector for bobbin winding Pass the...
...cut them. p Thread guide for the embroidery unit. Cover B Before using the sewing machine, carefully read these descriptions to wind the bobbin. h Flap Use the flap to eject the installed thread cassette. d Thread tension dial Use the thread tension dial to ... E) l Bobbin winder Use the bobbin winder when winding the bobbin. n Bobbin storage compartment Store the bobbins designed specifically for the embroidery unit. j Operation buttons Use the operation buttons to adjust the tension of thread for the bobbin onto this spool pin in the connector for bobbin winding Pass the...
Users Manual - English
Page 6
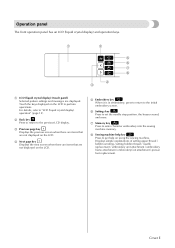
... that are not displayed on the LCD. f Settings key Press to "LCD (liquid crystal display) operation" (page 12). Displays simple explanations of setting upper thread / bobbin winding / setting bobbin thread / needle replacement / embroidery unit attachment / embroidery frame attachment / embroidery foot attachment / presser foot replacement. c Previous page key Displays the previous screen when there...
... that are not displayed on the LCD. f Settings key Press to "LCD (liquid crystal display) operation" (page 12). Displays simple explanations of setting upper thread / bobbin winding / setting bobbin thread / needle replacement / embroidery unit attachment / embroidery frame attachment / embroidery foot attachment / presser foot replacement. c Previous page key Displays the previous screen when there...
Users Manual - English
Page 7
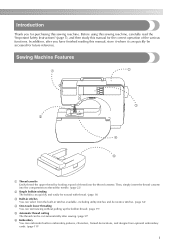
...) e Automatic thread cutting The thread can be accessed for the correct operation of thread into the compartment to thread the needle. (page 22) b Simple bobbin-winding The bobbin can quickly and easily be wound with thread. (page 16) c Built-in stitches You can select from the built-in embroidery patterns, characters, framed decorations...
...) e Automatic thread cutting The thread can be accessed for the correct operation of thread into the compartment to thread the needle. (page 22) b Simple bobbin-winding The bobbin can quickly and easily be wound with thread. (page 16) c Built-in stitches You can select from the built-in embroidery patterns, characters, framed decorations...
Users Manual - English
Page 8
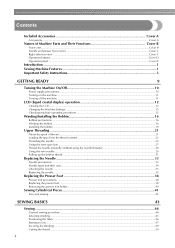
... LCD (liquid crystal display) operation 12 Viewing the LCD...12 Changing the Machine Settings ...13 Checking machine operating procedures ...15 Winding/Installing the Bobbin 16 Bobbin precautions ...16 Winding the bobbin ...16 Installing the bobbin ...19 Upper Threading ...21 About the spool of thread ...21 Loading the spool into the thread cassette ...22 Threading the needle...
... LCD (liquid crystal display) operation 12 Viewing the LCD...12 Changing the Machine Settings ...13 Checking machine operating procedures ...15 Winding/Installing the Bobbin 16 Bobbin precautions ...16 Winding the bobbin ...16 Installing the bobbin ...19 Upper Threading ...21 About the spool of thread ...21 Loading the spool into the thread cassette ...22 Threading the needle...
Users Manual - English
Page 15
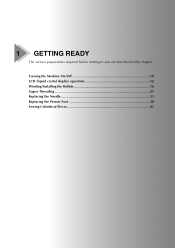
1 GETTING READY The various preparations required before starting to sew are described in this chapter. Turning the Machine On/Off 10 LCD (liquid crystal display) operation 12 Winding/Installing the Bobbin 16 Upper Threading ...21 Replacing the Needle 33 Replacing the Presser Foot 38 Sewing Cylindrical Pieces 41
1 GETTING READY The various preparations required before starting to sew are described in this chapter. Turning the Machine On/Off 10 LCD (liquid crystal display) operation 12 Winding/Installing the Bobbin 16 Upper Threading ...21 Replacing the Needle 33 Replacing the Presser Foot 38 Sewing Cylindrical Pieces 41
Users Manual - English
Page 21
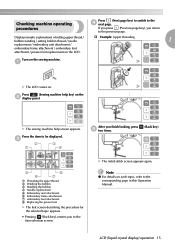
... 4 After you finish looking, press e two times. (Back key) 5 6 8 7 a Threading the upper thread b Winding the bobbin c Installing the bobbin d Needle replacement e Embroidery unit attachment f Embroidery frame attachment g embroidery foot attachment h Replacing the presser foot X The first screen...the LCD. Press (Sewing machine help screen appears. Turn on . Displays simple explanations of setting upper thread / bobbin winding / setting bobbin thread / needle † Example: Upper threading 1 replacement / embroidery unit attachment / embroidery frame attachment / embroidery...
... 4 After you finish looking, press e two times. (Back key) 5 6 8 7 a Threading the upper thread b Winding the bobbin c Installing the bobbin d Needle replacement e Embroidery unit attachment f Embroidery frame attachment g embroidery foot attachment h Replacing the presser foot X The first screen...the LCD. Press (Sewing machine help screen appears. Turn on . Displays simple explanations of setting upper thread / bobbin winding / setting bobbin thread / needle † Example: Upper threading 1 replacement / embroidery unit attachment / embroidery frame attachment / embroidery...
Users Manual - English
Page 22
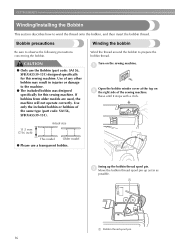
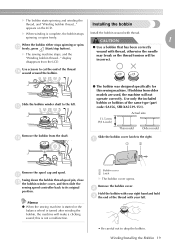
... in injuries or damage to wind the thread onto the bobbin, and then insert the bobbin thread. Use only the included bobbin or bobbins of the sewing machine. Wind the thread around the bobbin to observe the following precautions concerning the bobbin. a Open the bobbin winder cover at the top on... 11.5 mm (7/16 inch) This model Older model ● Please use the Bobbin (part code: SA156, SFB:XA5539-151) designed specifically for this sewing machine. Bobbin precautions Winding the bobbin Be sure to prepare the bobbin thread. Turn on b the right side of the same type (part code:...
... in injuries or damage to wind the thread onto the bobbin, and then insert the bobbin thread. Use only the included bobbin or bobbins of the sewing machine. Wind the thread around the bobbin to observe the following precautions concerning the bobbin. a Open the bobbin winder cover at the top on... 11.5 mm (7/16 inch) This model Older model ● Please use the Bobbin (part code: SA156, SFB:XA5539-151) designed specifically for this sewing machine. Bobbin precautions Winding the bobbin Be sure to prepare the bobbin thread. Turn on b the right side of the same type (part code:...
Users Manual - English
Page 23
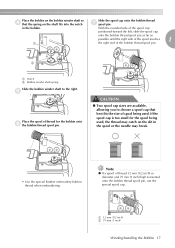
...mm (3 inch) high is too small for the bobbin onto f the bobbin thread spool pin. If the spool cap is inserted onto the bobbin thread spool pin, use the special spool cap. 2 1 a 12 mm (1/2 inch) b 75 mm (3 inch) Winding/Installing the Bobbin 17 With the rounded side of the spool cap ... spool touches 1 1 the right end of thread for the spool being used , the thread may break. ● • Use the special Brother embroidery bobbin thread when embroidering. CAUTION ● Two spool cap sizes are available, allowing you to the right. in the spool or the needle may catch ...
...mm (3 inch) high is too small for the bobbin onto f the bobbin thread spool pin. If the spool cap is inserted onto the bobbin thread spool pin, use the special spool cap. 2 1 a 12 mm (1/2 inch) b 75 mm (3 inch) Winding/Installing the Bobbin 17 With the rounded side of the spool cap ... spool touches 1 1 the right end of thread for the spool being used , the thread may break. ● • Use the special Brother embroidery bobbin thread when embroidering. CAUTION ● Two spool cap sizes are available, allowing you to the right. in the spool or the needle may catch ...
Users Manual - English
Page 24
... Be sure to cut to a suitable length. 4 3 2 a Spool net b Spool c Spool pin d Spool cap Pull out some thread, and then thread the h thread guide for bobbin winding b Two slits Wind the thread that was pulled clockwise five or six times without cutting the thread using thread that was pulled out onto the... starts to the right and pass it does not start when the start /stop button) once. a Thread guide for bobbin winding. Wind the thread that winds off quickly, such as described. Press the start /stop button is pressed, an animation is too long, fold it to fit the size of ...
... Be sure to cut to a suitable length. 4 3 2 a Spool net b Spool c Spool pin d Spool cap Pull out some thread, and then thread the h thread guide for bobbin winding b Two slits Wind the thread that was pulled clockwise five or six times without cutting the thread using thread that was pulled out onto the... starts to the right and pass it does not start when the start /stop button) once. a Thread guide for bobbin winding. Wind the thread that winds off quickly, such as described. Press the start /stop button is pressed, an animation is too long, fold it to fit the size of ...
Users Manual - English
Page 25
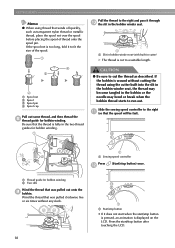
... cap and spool. Memo z When the sewing machine is started or the balance wheel is complete, the bobbin stops Install the bobbin wound with your left . X The bobbin starts spinning and winding the thread, and "Winding bobbin thread..." If bobbins from older models are used, the machine will make a clicking sound; spinning or spins freely. Remove the...
... cap and spool. Memo z When the sewing machine is started or the balance wheel is complete, the bobbin stops Install the bobbin wound with your left . X The bobbin starts spinning and winding the thread, and "Winding bobbin thread..." If bobbins from older models are used, the machine will make a clicking sound; spinning or spins freely. Remove the...
Users Manual - English
Page 120
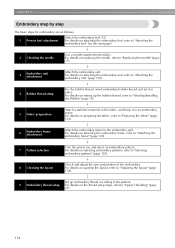
... (page 138). ↓ Set up embroidery thread according to the pattern. 9 Embroidery thread setup For details on setting up the bobbin thread, refer to "Winding/Installing the Bobbin" (page 16). ↓ 5 Fabric preparation Attach a stabilizer material to "Upper Threading" (page 21). 114 For details on ...7 Pattern selection Turn the power on attaching the embroidery frame, refer to "Attaching the embroidery unit" (page 118). ↓ 4 Bobbin thread setup For the bobbin thread, wind embroidery bobbin thread and set it in place. For details on , and select an embroidery pattern.
... (page 138). ↓ Set up embroidery thread according to the pattern. 9 Embroidery thread setup For details on setting up the bobbin thread, refer to "Winding/Installing the Bobbin" (page 16). ↓ 5 Fabric preparation Attach a stabilizer material to "Upper Threading" (page 21). 114 For details on ...7 Pattern selection Turn the power on attaching the embroidery frame, refer to "Attaching the embroidery unit" (page 118). ↓ 4 Bobbin thread setup For the bobbin thread, wind embroidery bobbin thread and set it in place. For details on , and select an embroidery pattern.
Users Manual - English
Page 132
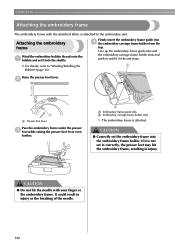
... frame holder from the top. CAUTION ● Do not hit the needle with the stretched fabric is attached to "Winding/Installing the Bobbin" (page 16). Attaching the embroidery frame Wind the embroidery bobbin thread onto the a bobbin and set it into the shuttle. • For details, refer to the embroidery unit. CAUTION ● Correctly set...
... frame holder from the top. CAUTION ● Do not hit the needle with the stretched fabric is attached to "Winding/Installing the Bobbin" (page 16). Attaching the embroidery frame Wind the embroidery bobbin thread onto the a bobbin and set it into the shuttle. • For details, refer to the embroidery unit. CAUTION ● Correctly set...
Users Manual - English
Page 155
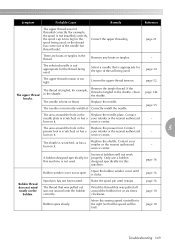
...out of thread being used. Remove the tangle thread. If the thread is not open. Replace the shuttle. Incorrect bobbins will be fast). Raise the spool pin until it . Wind the thread that was pulled out was pulled off around the hole in the Replace the needle plate. Symptom Probable ...tension is tangled, for the type of the needle bar thread hook). The thread is too tight. page 16 Bobbin thread does not wind neatly on it clicks. The area around the bobbin five or six times clockwise. page 18 Troubleshooting 149 Remove any knots or tangles. - page 21 There are ...
...out of thread being used. Remove the tangle thread. If the thread is not open. Replace the shuttle. Incorrect bobbins will be fast). Raise the spool pin until it . Wind the thread that was pulled out was pulled off around the hole in the Replace the needle plate. Symptom Probable ...tension is tangled, for the type of the needle bar thread hook). The thread is too tight. page 16 Bobbin thread does not wind neatly on it clicks. The area around the bobbin five or six times clockwise. page 18 Troubleshooting 149 Remove any knots or tangles. - page 21 There are ...
Users Manual - English
Page 159
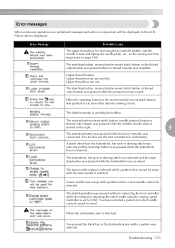
Upper thread not set up correctly. When the embroidery unit is winding the bobbin. Error messages When erroneous operations are performed messages and advice on the LCD. Either the start /stop button was pressed while the buttonhole lever is... The twin needle setting is set to [ON]. You pressed the Back key or the Embroidery key while a pattern was pressed while the bobbin winder shaft is displayed. The bobbin winder is attached. A twin needle was connected. Upper thread broken. The start / stop button, reverse/reinforcement stitch button or thread cutter ...
Upper thread not set up correctly. When the embroidery unit is winding the bobbin. Error messages When erroneous operations are performed messages and advice on the LCD. Either the start /stop button was pressed while the buttonhole lever is... The twin needle setting is set to [ON]. You pressed the Back key or the Embroidery key while a pattern was pressed while the bobbin winder shaft is displayed. The bobbin winder is attached. A twin needle was connected. Upper thread broken. The start / stop button, reverse/reinforcement stitch button or thread cutter ...
Users Manual - English
Page 163
... tape 89 , embroidering 112 134 embroidering pattern 134 embroidering steps 114 B embroidery bobbin thread Cover A embroidery card slot Cover C back key Cover E balance wheel ...bobbin shuttle Cover C embroidery pattern types 128 bobbin storage compartment Cover B embroidery sheets 124 bobbin thread spool pin 16 embroidery threads 112 bobbin thread, pulling up 31 embroidery unit connector slot Cover B bobbin threading 20 embroidery unit installation 118 bobbin winder Cover B embroidery unit removal 120 bobbin winding 16 error messages 153 bobbin winding...
... tape 89 , embroidering 112 134 embroidering pattern 134 embroidering steps 114 B embroidery bobbin thread Cover A embroidery card slot Cover C back key Cover E balance wheel ...bobbin shuttle Cover C embroidery pattern types 128 bobbin storage compartment Cover B embroidery sheets 124 bobbin thread spool pin 16 embroidery threads 112 bobbin thread, pulling up 31 embroidery unit connector slot Cover B bobbin threading 20 embroidery unit installation 118 bobbin winder Cover B embroidery unit removal 120 bobbin winding 16 error messages 153 bobbin winding...
Users Manual - English
Page 165
...thread tension 52 utility stitch selection screen 12 utility stitches 103 shuttle 20 W shuttle cleaning 146 shuttle removal 147 side cutter 71 winding bobbin 16 wing needle 108 sleeve cuffs 41 , sliding leg Cover B 41 Z smocking 105 smocking stitch 103 soft cover Cover ...button Cover D 50 thread cutting 50 thread cutting, automatic 57 , thread guide for bobbin winding Cover B 18 thread spools 21 , thread tension adjustment 52 141 , thread tension dial Cover B 53 threading bobbin 20 , threading needle 21 25 threading needle manually 28 tips 59 touch panel Cover E...
...thread tension 52 utility stitch selection screen 12 utility stitches 103 shuttle 20 W shuttle cleaning 146 shuttle removal 147 side cutter 71 winding bobbin 16 wing needle 108 sleeve cuffs 41 , sliding leg Cover B 41 Z smocking 105 smocking stitch 103 soft cover Cover ...button Cover D 50 thread cutting 50 thread cutting, automatic 57 , thread guide for bobbin winding Cover B 18 thread spools 21 , thread tension adjustment 52 141 , thread tension dial Cover B 53 threading bobbin 20 , threading needle 21 25 threading needle manually 28 tips 59 touch panel Cover E...


