Users Manual - English
Page 1
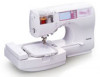
GETTING READY SEWING BASICS UTILITY STITCHES EMBROIDERY APPENDIX CPS5XV[Y Easy Thread Cassette System Operation Manual
GETTING READY SEWING BASICS UTILITY STITCHES EMBROIDERY APPENDIX CPS5XV[Y Easy Thread Cassette System Operation Manual
Users Manual - English
Page 2
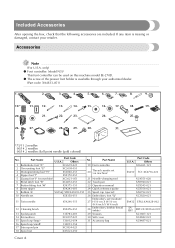
... can be used on machine) XC3021-051 21 Needle-changing tool 6 Blind stitch foot "R" XC4051-051 22 Touch pen 7 Button fitting foot "M" X59375-151 23 Operation manual 8 Seam ripper X54243-001 24 Quick reference guide 9 Bobbin (4) SA156 SFB:XA5539-151 25 Spool cap (special) 10 Needle set X58358-051 26 Embroidery foot... controller 2 Overcasting foot "G" 3 Monogramming foot "N" 4 Zipper foot "I" XC3098-051 X53840-351 X59370-051 20 Thread cassette set (on machine) 5 Zigzag foot "J" (on this machine model SE-270D.
... can be used on machine) XC3021-051 21 Needle-changing tool 6 Blind stitch foot "R" XC4051-051 22 Touch pen 7 Button fitting foot "M" X59375-151 23 Operation manual 8 Seam ripper X54243-001 24 Quick reference guide 9 Bobbin (4) SA156 SFB:XA5539-151 25 Spool cap (special) 10 Needle set X58358-051 26 Embroidery foot... controller 2 Overcasting foot "G" 3 Monogramming foot "N" 4 Zipper foot "I" XC3098-051 X53840-351 X59370-051 20 Thread cassette set (on machine) 5 Zigzag foot "J" (on this machine model SE-270D.
Users Manual - English
Page 7
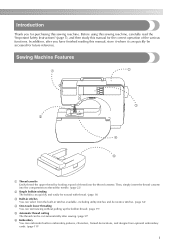
In addition, after sewing. (page 57) f Embroidery You can quickly be accessed for the correct operation of thread into the compartment to thread the needle. (page 22) b Simple bobbin-winding The bobbin can quickly and easily be wound with...Features 1 2 3 5 4 6 a Thread cassette Easily thread the upper thread by loading a spool of the various functions. Introduction Introduction Thank you have finished reading this manual, store it where it can embroider built-in embroidery patterns, characters, framed decorations, and designs from the built-in stitches You can select from optional...
In addition, after sewing. (page 57) f Embroidery You can quickly be accessed for the correct operation of thread into the compartment to thread the needle. (page 22) b Simple bobbin-winding The bobbin can quickly and easily be wound with...Features 1 2 3 5 4 6 a Thread cassette Easily thread the upper thread by loading a spool of the various functions. Introduction Introduction Thank you have finished reading this manual, store it where it can embroider built-in embroidery patterns, characters, framed decorations, and designs from the built-in stitches You can select from optional...
Users Manual - English
Page 8
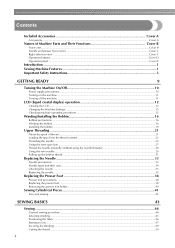
...B Front view ...Cover B Needle and presser foot section ...Cover C Right-side/rear view ...Cover C Operation buttons ...Cover D Operation panel ...Cover E Introduction ...1 Sewing Machine Features ...1 Important Safety Instructions 5 GETTING READY 9 Turning the Machine...operating procedures ...15 Winding/Installing the Bobbin 16 Bobbin precautions ...16 Winding the bobbin ...16 Installing the bobbin ...19 Upper Threading ...21 About the spool of thread ...21 Loading the spool into the thread cassette ...22 Threading the needle ...25 Using the extra spool pin ...27 Thread the needle manually...
...B Front view ...Cover B Needle and presser foot section ...Cover C Right-side/rear view ...Cover C Operation buttons ...Cover D Operation panel ...Cover E Introduction ...1 Sewing Machine Features ...1 Important Safety Instructions 5 GETTING READY 9 Turning the Machine...operating procedures ...15 Winding/Installing the Bobbin 16 Bobbin precautions ...16 Winding the bobbin ...16 Installing the bobbin ...19 Upper Threading ...21 About the spool of thread ...21 Loading the spool into the thread cassette ...22 Threading the needle ...25 Using the extra spool pin ...27 Thread the needle manually...
Users Manual - English
Page 11
...dropped into any other user servicing adjustments mentioned in the instruction manual. 16.This sewing machine is damaged, it to break. 14.Switch the machine to the symbol " " position when making any opening. 6. Never operate this machine, basic safety precautions should always be supervised to...after using and before using. Use only accessories recommended by authorized dealer. To reduce the risk of electric shock: 1. Never operate the machine with this manual. To unplug, grasp the plug, not the cord. 10.Keep fingers away from outlet. 9. To disconnect, turn the main...
...dropped into any other user servicing adjustments mentioned in the instruction manual. 16.This sewing machine is damaged, it to break. 14.Switch the machine to the symbol " " position when making any opening. 6. Never operate this machine, basic safety precautions should always be supervised to...after using and before using. Use only accessories recommended by authorized dealer. To reduce the risk of electric shock: 1. Never operate the machine with this manual. To unplug, grasp the plug, not the cord. 10.Keep fingers away from outlet. 9. To disconnect, turn the main...
Users Manual - English
Page 13
... and updates, visit our web site at www.brother.com 7 To fully enjoy all the features, we suggest that you study the manual before using the machine. Remember to turn off the power switch and unplug the cord when: • Operation is required, first follow the troubleshooting table in... the back of the most advanced computerized household sewing machines. Always consult the operation manual when replacing or installing any other moving parts. 2. For repair or adjustment In the event a malfunction occurs or adjustment is completed &#...
... and updates, visit our web site at www.brother.com 7 To fully enjoy all the features, we suggest that you study the manual before using the machine. Remember to turn off the power switch and unplug the cord when: • Operation is required, first follow the troubleshooting table in... the back of the most advanced computerized household sewing machines. Always consult the operation manual when replacing or installing any other moving parts. 2. For repair or adjustment In the event a malfunction occurs or adjustment is completed &#...
Users Manual - English
Page 21
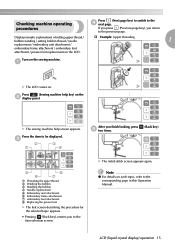
...on the b display panel. X The initial stitch screen appears again. LCD (liquid crystal display) operation 15 a X The LCD comes on the LCD. Turn on each topic, refer to the corresponding page in this Operation Manual. If you press (Previous page key), you to the previous page. Note z For details on ... describing the procedure for the selected topic appears. • Pressing (Back key), returns you return to the item selection screen. Checking machine operating procedures Press (Next page key) to switch to be displayed. Press (Sewing machine help screen appears.
...on the b display panel. X The initial stitch screen appears again. LCD (liquid crystal display) operation 15 a X The LCD comes on the LCD. Turn on each topic, refer to the corresponding page in this Operation Manual. If you press (Previous page key), you to the previous page. Note z For details on ... describing the procedure for the selected topic appears. • Pressing (Back key), returns you return to the item selection screen. Checking machine operating procedures Press (Next page key) to switch to be displayed. Press (Sewing machine help screen appears.
Users Manual - English
Page 36
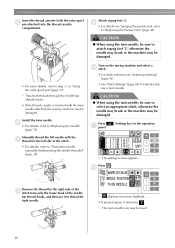
... sure to thread the right needle. Press k panel. (Settings key) in "Using the extra spool pin" (page 27). Install the twin needle. Manually thread the left needle with the g thread for the left side of the needle bar thread hooks, and then use a twin needle. Press . ...thread cassette compartment. CAUTION ● When using the needle threader)" (page 28). Turn on changing the presser foot, refer to step e in the operation X The settings screen appears. X The twin needle can now be damaged. • For more details, refer to "Replacing the Presser Foot" (...
... sure to thread the right needle. Press k panel. (Settings key) in "Using the extra spool pin" (page 27). Install the twin needle. Manually thread the left needle with the g thread for the left side of the needle bar thread hooks, and then use a twin needle. Press . ...thread cassette compartment. CAUTION ● When using the needle threader)" (page 28). Turn on changing the presser foot, refer to step e in the operation X The settings screen appears. X The twin needle can now be damaged. • For more details, refer to "Replacing the Presser Foot" (...

Users Manual - English
Page 95
... 38). a J • For details, refer to stretch fabrics Stitch Width [mm (inch.)] Auto Manual 1.0 1.0-3.0 (1/16) (1/16-1/8) Stitch Length [mm (inch.)] Auto Manual Presser Foot 2.5 1.0-4.0 (3/32) (1/16-3/16) 5.0 1.5-7.0 1.0 0.2-4.0 (3/16) (1/16-1/4) (1/16)... (1/64-3/16) J 5.0 1.5-7.0 1.0 0.2-4.0 (3/16) (1/16-1/4) (1/16) (1/64-3/16) 4.0 0.0-7.0 1.0 0.2-4.0 3 (3/16) (0-1/4) (1/16) (1/64-3/16) Observe the corresponding precautions when performing each of the following stitching operations...
... 38). a J • For details, refer to stretch fabrics Stitch Width [mm (inch.)] Auto Manual 1.0 1.0-3.0 (1/16) (1/16-1/8) Stitch Length [mm (inch.)] Auto Manual Presser Foot 2.5 1.0-4.0 (3/32) (1/16-3/16) 5.0 1.5-7.0 1.0 0.2-4.0 (3/16) (1/16-1/4) (1/16)... (1/64-3/16) J 5.0 1.5-7.0 1.0 0.2-4.0 (3/16) (1/16-1/4) (1/16) (1/64-3/16) 4.0 0.0-7.0 1.0 0.2-4.0 3 (3/16) (0-1/4) (1/16) (1/64-3/16) Observe the corresponding precautions when performing each of the following stitching operations...
Users Manual - English
Page 164
...LCD Cover E LCD button 129 LCD messages 153 , LCD operation 12 129 legs 41 loading spool 22 M machine surface cleaning 146 , main power switch Cover C 11 maintenance 146 manual needle threading 28 memory key Cover E mirroring stitches 58 N...tool Cover A 36 needles 33 next page key Cover E O operation beep 155 , operation buttons Cover B 47 operation controls Cover D operation keys 129 operation keys & panel Cover E 158 operation manual Cover A operation panel Cover B operation problems 148 operations 15 overcasting stitches 69 P pant legs 41 parallel stitches 29 part ...
...LCD Cover E LCD button 129 LCD messages 153 , LCD operation 12 129 legs 41 loading spool 22 M machine surface cleaning 146 , main power switch Cover C 11 maintenance 146 manual needle threading 28 memory key Cover E mirroring stitches 58 N...tool Cover A 36 needles 33 next page key Cover E O operation beep 155 , operation buttons Cover B 47 operation controls Cover D operation keys 129 operation keys & panel Cover E 158 operation manual Cover A operation panel Cover B operation problems 148 operations 15 overcasting stitches 69 P pant legs 41 parallel stitches 29 part ...
Users Manual - English
Page 165
...winding bobbin 16 wing needle 108 sleeve cuffs 41 , sliding leg Cover B 41 Z smocking 105 smocking stitch 103 soft cover Cover A solving operation problems 148 spool cap Cover A 17, 19 zigzag stitches 70, 89, 91 zigzag width adjustment 54 zipper sewing 84 spool loading 22 ,... thread spools 21 , thread tension adjustment 52 141 , thread tension dial Cover B 53 threading bobbin 20 , threading needle 21 25 threading needle manually 28 tips 59 touch panel Cover E trial sewing 59 , triple stretch stitch 73 98 troubleshooting 148 turning machine on/off 11 , twin needle ...
...winding bobbin 16 wing needle 108 sleeve cuffs 41 , sliding leg Cover B 41 Z smocking 105 smocking stitch 103 soft cover Cover A solving operation problems 148 spool cap Cover A 17, 19 zigzag stitches 70, 89, 91 zigzag width adjustment 54 zipper sewing 84 spool loading 22 ,... thread spools 21 , thread tension adjustment 52 141 , thread tension dial Cover B 53 threading bobbin 20 , threading needle 21 25 threading needle manually 28 tips 59 touch panel Cover E trial sewing 59 , triple stretch stitch 73 98 troubleshooting 148 turning machine on/off 11 , twin needle ...


