
Accessory Catalog
Page 4
...foot and select a straight stitch (left or right. 3. Sew. Its position can be adjusted exactly on the presser foot. 4. Check the needle does not hit the presser foot, and then tighten the clamp screw with just right pressure. 1. Requires Low Shank Adapter for ULT series, ...PC-6500, PC-8200 and PC-8500 sewing machines. SA161 All Brother home-use sewing machines www.brother.com Screw on either left ). 2. Brother General Sewing Accessories 05 Sew as you like. Adjustable Zipper & Piping Foot Brother General Sewing Accessories 06 Adjustable Zipper & Piping Foot Attaches zippers and ...
...foot and select a straight stitch (left or right. 3. Sew. Its position can be adjusted exactly on the presser foot. 4. Check the needle does not hit the presser foot, and then tighten the clamp screw with just right pressure. 1. Requires Low Shank Adapter for ULT series, ...PC-6500, PC-8200 and PC-8500 sewing machines. SA161 All Brother home-use sewing machines www.brother.com Screw on either left ). 2. Brother General Sewing Accessories 05 Sew as you like. Adjustable Zipper & Piping Foot Brother General Sewing Accessories 06 Adjustable Zipper & Piping Foot Attaches zippers and ...

Accessory Catalog
Page 5
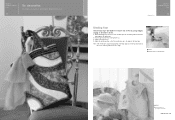
.... 6. Place the fold at desired distance from the edge of the fabric and lower needle. 2. SA184 All Brother home-use sewing machines Ring Bearer Pillow & Hankerchief Innov-is great for details.) www.brother.com This is Project Book (See pages 37 and 39 for both embellishing and utility...up tab. 8. Fasten metal stop at the desired distance from the edge of the fabric and lower the needle and the presser foot. 3. Edge stitching: 1. Sew. Edge Joining Foot Brother General Sewing Accessories 08 Edge Joining Foot This foot is perfect for edge stitching, attaching lace, and fabric...
.... 6. Place the fold at desired distance from the edge of the fabric and lower needle. 2. SA184 All Brother home-use sewing machines Ring Bearer Pillow & Hankerchief Innov-is great for details.) www.brother.com This is Project Book (See pages 37 and 39 for both embellishing and utility...up tab. 8. Fasten metal stop at the desired distance from the edge of the fabric and lower the needle and the presser foot. 3. Edge stitching: 1. Sew. Edge Joining Foot Brother General Sewing Accessories 08 Edge Joining Foot This foot is perfect for edge stitching, attaching lace, and fabric...

Accessory Catalog
Page 6
...it into the fabric approximately 1/8" from fraying. 1. Raise the needle and the presser foot. 4. Place the fabric with the wrong side facing up under the presser foot. 2. Position the edge of the fabric. Brother General Sewing Accessories 09 Narrow Hemmer Foot Non Stick Foot Overlock ... from the edge and sew 2-3 stitches. 4. Continue to sew to the end of the fabric behind the needle and lower the presser foot. 6. Non Stick Foot Designed for details.) www.brother.com Select an overlock stitch. 2. Attach the presser foot. 3. Sew along the guide. Increase upper thread ...
...it into the fabric approximately 1/8" from fraying. 1. Raise the needle and the presser foot. 4. Place the fabric with the wrong side facing up under the presser foot. 2. Position the edge of the fabric. Brother General Sewing Accessories 09 Narrow Hemmer Foot Non Stick Foot Overlock ... from the edge and sew 2-3 stitches. 4. Continue to sew to the end of the fabric behind the needle and lower the presser foot. 6. Non Stick Foot Designed for details.) www.brother.com Select an overlock stitch. 2. Attach the presser foot. 3. Sew along the guide. Increase upper thread ...

Accessory Catalog
Page 7
...or overlock. Each divisional mark equals 2 mm. 1. SA160 ABCDEFGHJKLMNO Straight Stitch Foot Straight Stitch Foot and Straight Stitch Needle Plate Vertical Stitching Alignment Foot Brother General Sewing Accessories 12 Straight Stitch Foot For precise straight stitching on thin fabrics or on thin fabrics or small pieces...Select straight, zigzag, or decorative stitches. 2. Use this foot lets you to your fabric consistently. SA538 AB C:Innov-is900D/SE-350/HE-240/LB6770 SA177 ABCDEJ SA178 L Side Cutter Creates the perfect cut right section on this presser foot only with the Straight...
...or overlock. Each divisional mark equals 2 mm. 1. SA160 ABCDEFGHJKLMNO Straight Stitch Foot Straight Stitch Foot and Straight Stitch Needle Plate Vertical Stitching Alignment Foot Brother General Sewing Accessories 12 Straight Stitch Foot For precise straight stitching on thin fabrics or on thin fabrics or small pieces...Select straight, zigzag, or decorative stitches. 2. Use this foot lets you to your fabric consistently. SA538 AB C:Innov-is900D/SE-350/HE-240/LB6770 SA177 ABCDEJ SA178 L Side Cutter Creates the perfect cut right section on this presser foot only with the Straight...
Accessory Catalog
Page 10
...-is Project Book (See page 41 for details.) www.brother.com Before attaching the presser foot, insert the bias tape into the funnel guide to match the tape edge to the edge of the presser foot. 3. Hint: If the needle does not position properly on the bias tape, loosen the... position knob on the presser foot. 4. Brother Embellishment Feet 17 Go decorative. Personalize your projects with widths less than 7 mm (1/4 inch) using straight,...
...-is Project Book (See page 41 for details.) www.brother.com Before attaching the presser foot, insert the bias tape into the funnel guide to match the tape edge to the edge of the presser foot. 3. Hint: If the needle does not position properly on the bias tape, loosen the... position knob on the presser foot. 4. Brother Embellishment Feet 17 Go decorative. Personalize your projects with widths less than 7 mm (1/4 inch) using straight,...

Accessory Catalog
Page 12
...using zigzag stitch with the guideline and sew. SA150 ABCDEFJKMN www.brother.com Line up the center guide mark (red) of appliqué. 2. Sew a few stitches to a flat fabric: 1. Select a straight stitch, left needle position. 2. For gathering: 1. Requires Low Shank Adapter for ... in groove of the presser foot on your fabric. 3. Stitch in the needle area. Brother Embellishment Feet 21 Fringe Foot Gathering Foot SA142 All Brother home-use sewing machines SA120 All Brother home-use sewing machines Fringe Foot Used to mark construction details by creating tailor...
...using zigzag stitch with the guideline and sew. SA150 ABCDEFJKMN www.brother.com Line up the center guide mark (red) of appliqué. 2. Sew a few stitches to a flat fabric: 1. Select a straight stitch, left needle position. 2. For gathering: 1. Requires Low Shank Adapter for ... in groove of the presser foot on your fabric. 3. Stitch in the needle area. Brother Embellishment Feet 21 Fringe Foot Gathering Foot SA142 All Brother home-use sewing machines SA120 All Brother home-use sewing machines Fringe Foot Used to mark construction details by creating tailor...

Accessory Catalog
Page 13
...started. Move fabric about 1" (2.5 cm) past the needle to slide the fabric from left into gathers or tucks. www.brother.com A specially designed bobbin cover is also included with evenly spaced tucks and gathers. Sew slowly for details.) Brother Embellishment Feet Pin Tuck Foot 24 Ruffler Foot Pin ...Tuck Foot This presser foot has 7 grooves and produces perfect pin tucks and corded pin tucks using a twin needle on the lower portion of the presser foot is moved...
...started. Move fabric about 1" (2.5 cm) past the needle to slide the fabric from left into gathers or tucks. www.brother.com A specially designed bobbin cover is also included with evenly spaced tucks and gathers. Sew slowly for details.) Brother Embellishment Feet Pin Tuck Foot 24 Ruffler Foot Pin ...Tuck Foot This presser foot has 7 grooves and produces perfect pin tucks and corded pin tucks using a twin needle on the lower portion of the presser foot is moved...

Accessory Catalog
Page 14
... on the presser foot and select a center straight stitch. 2. The distance between the straight bar and the needle can be adjusted by Janice Ferguson and Suzanne Sawko 1/4" Piecing Foot 1/4" Piecing Foot with the seam that rests...Brother Quilting Feet 26 SA125 All Brother home-use sewing machines SA185 All Brother home-use sewing machines SA132 All Brother home-use sewing machines 1/4" Piecing Foot Best for easy reference. 1. Brother Quilting Feet 25 Quality quilting Brother offers you innovative accessories to the fabric guide of the presser foot. Its back and small needle...
... on the presser foot and select a center straight stitch. 2. The distance between the straight bar and the needle can be adjusted by Janice Ferguson and Suzanne Sawko 1/4" Piecing Foot 1/4" Piecing Foot with the seam that rests...Brother Quilting Feet 26 SA125 All Brother home-use sewing machines SA185 All Brother home-use sewing machines SA132 All Brother home-use sewing machines 1/4" Piecing Foot Best for easy reference. 1. Brother Quilting Feet 25 Quality quilting Brother offers you innovative accessories to the fabric guide of the presser foot. Its back and small needle...

Accessory Catalog
Page 15
... the fabric beneath the presser foot. 4. Use the walking foot with the pin over the needle clamp screw. 2. Requires Low Shank Adapter for straight stitch. 3. Walking Foot/Open Toe Walking Foot Brother Quilting Feet 28 Walking Foot/Open Toe Walking Foot The feed dogs on the Open Toe Quilting... Sew. Quilting Foot For darning, quilting, or free-motion. Attach the walking foot to the quilt top. 7. While starting to sew, press the needle position button twice to pull the bobbin thread to the machine. 2. Requires Low Shank Adapter for ULT series, PC-6500, PC-8200 and PC-8500...
... the fabric beneath the presser foot. 4. Use the walking foot with the pin over the needle clamp screw. 2. Requires Low Shank Adapter for straight stitch. 3. Walking Foot/Open Toe Walking Foot Brother Quilting Feet 28 Walking Foot/Open Toe Walking Foot The feed dogs on the Open Toe Quilting... Sew. Quilting Foot For darning, quilting, or free-motion. Attach the walking foot to the quilt top. 7. While starting to sew, press the needle position button twice to pull the bobbin thread to the machine. 2. Requires Low Shank Adapter for ULT series, PC-6500, PC-8200 and PC-8500...

Accessory Catalog
Page 17
... embroidery designs - The Border Frame enables you superior stitch quality when stitching over differing fabric thicknesses. - Compatible with center needle position straight stitch Open toe quilting foot "O" for greater visibility Echo quilting foot "E" for perfect echo quilting - Includes three... letter spacing in adjusting the spacing between individual characters. - Duetta™ 4500D/Innov-is 4000D Premium Upgrade Package II Brother Embroidery Accessories 32 Duetta™ 4500D/ 4000D Premium Upgrade Package II Exclusively for embellishing a wide variety of making beautiful ...
... embroidery designs - The Border Frame enables you superior stitch quality when stitching over differing fabric thicknesses. - Compatible with center needle position straight stitch Open toe quilting foot "O" for greater visibility Echo quilting foot "E" for perfect echo quilting - Includes three... letter spacing in adjusting the spacing between individual characters. - Duetta™ 4500D/Innov-is 4000D Premium Upgrade Package II Brother Embroidery Accessories 32 Duetta™ 4500D/ 4000D Premium Upgrade Package II Exclusively for embellishing a wide variety of making beautiful ...

Accessory Catalog
Page 34
..., zig zag or decorative stitches. Make sure you just the right color for each design. Made to the needle thread. Bobbin Threads Stabilizers and Water Water Soluble Stabilizers Brother Embroidery Accessories 66 Bobbin Threads Brother Bobbin Threads are also available at selected Dealers. SA520 Water Soluble Stabilizer 11" x 3.3 yds SA540 Light Weight Water...
..., zig zag or decorative stitches. Make sure you just the right color for each design. Made to the needle thread. Bobbin Threads Stabilizers and Water Water Soluble Stabilizers Brother Embroidery Accessories 66 Bobbin Threads Brother Bobbin Threads are also available at selected Dealers. SA520 Water Soluble Stabilizer 11" x 3.3 yds SA540 Light Weight Water...

Accessory Catalog
Page 36
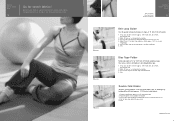
SA159 SA180B SA181 Needle Felting Attachment Felting Needle Brother Sewing Machine Attachments for PQ Series 70 Needle Felting Attachment Use this unique attachment to maintain contact with the feed dogs and can attach it . 1. Attach the Needle Felting Attachment and lower the feed dogs. 2. SA172 Bobbin for ... foot print assures better contact of wool roving or yarn on fabric or garment with a chalk pen. 3. Felting Needle Needle Felted Cap & Scarf www.brother.com SA173 Ver y Narrow Foot Very convenient for PQ Series One package includes five metal bobbins. Draw a rough...
SA159 SA180B SA181 Needle Felting Attachment Felting Needle Brother Sewing Machine Attachments for PQ Series 70 Needle Felting Attachment Use this unique attachment to maintain contact with the feed dogs and can attach it . 1. Attach the Needle Felting Attachment and lower the feed dogs. 2. SA172 Bobbin for ... foot print assures better contact of wool roving or yarn on fabric or garment with a chalk pen. 3. Felting Needle Needle Felted Cap & Scarf www.brother.com SA173 Ver y Narrow Foot Very convenient for PQ Series One package includes five metal bobbins. Draw a rough...

Accessory Catalog
Page 38
...3. 2. Ideal for string of the foot. 5. Align them . 3. Place the tape/elastic tape into the groove under the foot. 3. Adjust the guide so that the needle moves down at 3 mm, stitch length to 4 mm pearls and beads. 1. Place the strings of 1 to 3 - 4mm for tape attaching, 4 - 5mm for ... 5 mm, or 4 thread overlock, stitch width at the position of pearls/beads onto the tunnel and then sew. Sew and then open the fabrics. www.brother.com Fold the fabric. 4. Set the machine setting: 3/4 thread overlock, stitch length to 1.5 mm from 5 mm, and adjust the tension. 3. Pearls and ...
...3. 2. Ideal for string of the foot. 5. Align them . 3. Place the tape/elastic tape into the groove under the foot. 3. Adjust the guide so that the needle moves down at 3 mm, stitch length to 4 mm pearls and beads. 1. Place the strings of 1 to 3 - 4mm for tape attaching, 4 - 5mm for ... 5 mm, or 4 thread overlock, stitch width at the position of pearls/beads onto the tunnel and then sew. Sew and then open the fabrics. www.brother.com Fold the fabric. 4. Set the machine setting: 3/4 thread overlock, stitch length to 1.5 mm from 5 mm, and adjust the tension. 3. Pearls and ...
Accessory Catalog
Page 39
...42 mm (approx. 1-1/2") wide fabric tape. 2. Sew. Brother Cover Stitch Feet 75 Go for 6 mm (approx. 1/4") wide stitch, two needles, three threads stitch. 2. SA223CV SA222CV SA225CV Belt Loop Guide Bias Tape Folder Double Fold Binder Brother Cover Stitch Feet 76 Belt Loop Guide Use this guide ...stretch fabrics. Attach TB presser foot included in the machine. 3. Pull the fabric tape behind the presser foot. 5. Brother Cover Stitch is a great machine for 6 mm (approx. 1/4") wide stitch, two needles, three threads stitch. 2. Make 25 mm (1") a fabric strap, and press 6 mm (approx. 1/4") of ...
...42 mm (approx. 1-1/2") wide fabric tape. 2. Sew. Brother Cover Stitch Feet 75 Go for 6 mm (approx. 1/4") wide stitch, two needles, three threads stitch. 2. SA223CV SA222CV SA225CV Belt Loop Guide Bias Tape Folder Double Fold Binder Brother Cover Stitch Feet 76 Belt Loop Guide Use this guide ...stretch fabrics. Attach TB presser foot included in the machine. 3. Pull the fabric tape behind the presser foot. 5. Brother Cover Stitch is a great machine for 6 mm (approx. 1/4") wide stitch, two needles, three threads stitch. 2. Make 25 mm (1") a fabric strap, and press 6 mm (approx. 1/4") of ...

Accessory Catalog
Page 40
... Align the fabric joint and the groove of fabric pointed so that it is easily set it to your machine for a chain stitch, the center needle. 2. SA224CV SA221CV Hemming Set Finishes hems easily and quickly. Attach the hem positioning plate A/B to the hemming attachment, and attach it into the ...Top Stitching Foot Set Use included presser foot to top stitch with the LC1 presser foot included in the machine. 2. Set up your Cover Stitch). 1. Brother Cover Stitch Feet 77 Bias Tape Binding Set Hemming Set Bias Tape Binding Set Attaches 6 or 12 mm (approx. 1/4 to 1/2 inch) bias tapes ...
... Align the fabric joint and the groove of fabric pointed so that it is easily set it to your machine for a chain stitch, the center needle. 2. SA224CV SA221CV Hemming Set Finishes hems easily and quickly. Attach the hem positioning plate A/B to the hemming attachment, and attach it into the ...Top Stitching Foot Set Use included presser foot to top stitch with the LC1 presser foot included in the machine. 2. Set up your Cover Stitch). 1. Brother Cover Stitch Feet 77 Bias Tape Binding Set Hemming Set Bias Tape Binding Set Attaches 6 or 12 mm (approx. 1/4 to 1/2 inch) bias tapes ...
Users Manual - English
Page 2
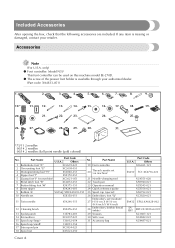
...10.* 11. 12. 20. 21. 13. 14. 15. 16. 17. 18. 19. 22. 23. 24. 25. 26. 27. 28. 29. 30. 31. *75/11 2 needles 90/14 2 needles 90/14 2 needles: Ball point needle (gold colored) No. only) z Foot controller: Model N5V This foot controller can be used on machine) XC3021-051 21...guide 9 Bobbin (4) SA156 SFB:XA5539-151 25 Spool cap (special) 10 Needle set X58358-051 26 Embroidery foot "Q" 11 Twin needle X59296-151 Embroidery set (on machine) 5 Zigzag foot "J" (on this machine model SE-270D. Part Name Part Code U.S.A. Part Name 1 Buttonhole foot "A" XC2691-021...
...10.* 11. 12. 20. 21. 13. 14. 15. 16. 17. 18. 19. 22. 23. 24. 25. 26. 27. 28. 29. 30. 31. *75/11 2 needles 90/14 2 needles 90/14 2 needles: Ball point needle (gold colored) No. only) z Foot controller: Model N5V This foot controller can be used on machine) XC3021-051 21...guide 9 Bobbin (4) SA156 SFB:XA5539-151 25 Spool cap (special) 10 Needle set X58358-051 26 Embroidery foot "Q" 11 Twin needle X59296-151 Embroidery set (on machine) 5 Zigzag foot "J" (on this machine model SE-270D. Part Name Part Code U.S.A. Part Name 1 Buttonhole foot "A" XC2691-021...
Users Manual - English
Page 3
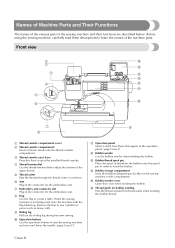
... cover when winding the bobbin. h Flap Use the flap to cut them. Remove the flap to start the sewing machine and raise and lower the needle. (page Cover D) k Operation panel Select a stitch from those that appear in order to learn the names of thread for the bobbin onto this thread guide...
... cover when winding the bobbin. h Flap Use the flap to cut them. Remove the flap to start the sewing machine and raise and lower the needle. (page Cover D) k Operation panel Select a stitch from those that appear in order to learn the names of thread for the bobbin onto this thread guide...
Users Manual - English
Page 4
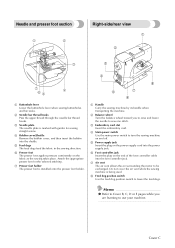
...the sewing machine is installed onto the presser foot holder. 4 8 5 7 6 a Handle Carry the sewing machine by its handle when transporting the machine. Needle and presser foot section 1 2 Right-side/rear view 1 2 3 3 7 4 65 a Buttonhole lever Lower the buttonhole lever when sewing buttonholes and bar... straight seams. d Bobbin cover/Shuttle Remove the bobbin cover, and then insert the bobbin into the power supply jack. c Needle plate The needle plate is marked with guides for the selected stitching. e Feed dogs The feed dogs feed the fabric in the sewing direction....
...the sewing machine is installed onto the presser foot holder. 4 8 5 7 6 a Handle Carry the sewing machine by its handle when transporting the machine. Needle and presser foot section 1 2 Right-side/rear view 1 2 3 3 7 4 65 a Buttonhole lever Lower the buttonhole lever when sewing buttonholes and bar... straight seams. d Bobbin cover/Shuttle Remove the bobbin cover, and then insert the bobbin into the power supply jack. c Needle plate The needle plate is marked with guides for the selected stitching. e Feed dogs The feed dogs feed the fabric in the sewing direction....
Users Manual - English
Page 5
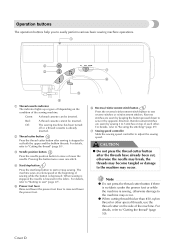
... button to raise and lower the presser foot. Cover D c Needle position button Press the needle position button to "Securing the stitching" (page 49). For details, refer to raise or lower the needle. Pressing the button twice sews one stitch. Operation buttons The operation... a Thread cassette indicator The indicator lights up or goes off or a thread cassette is depressed. When sewing is stopped, the needle is stopped to cut , otherwise the needle may break, the threads may become tangled or damage to 5 stitches on the condition of sewing while the button is already inserted...
... button to raise and lower the presser foot. Cover D c Needle position button Press the needle position button to "Securing the stitching" (page 49). For details, refer to raise or lower the needle. Pressing the button twice sews one stitch. Operation buttons The operation... a Thread cassette indicator The indicator lights up or goes off or a thread cassette is depressed. When sewing is stopped, the needle is stopped to cut , otherwise the needle may break, the threads may become tangled or damage to 5 stitches on the condition of sewing while the button is already inserted...
Users Manual - English
Page 6
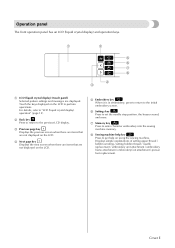
... f Settings key Press to the initial embroidery screen. Displays simple explanations of setting upper thread / bobbin winding / setting bobbin thread / needle replacement / embroidery unit attachment / embroidery frame attachment / embroidery foot attachment / presser foot replacement. e Embroidery key When it is in ...embroidery, press to return to set the needle stop position, the buzzer sound, and more. c Previous page key Displays the previous screen when there are items that are not...
... f Settings key Press to the initial embroidery screen. Displays simple explanations of setting upper thread / bobbin winding / setting bobbin thread / needle replacement / embroidery unit attachment / embroidery frame attachment / embroidery foot attachment / presser foot replacement. e Embroidery key When it is in ...embroidery, press to return to set the needle stop position, the buzzer sound, and more. c Previous page key Displays the previous screen when there are items that are not...


