
Accessory Catalog
Page 4
Its position can be adjusted exactly on the edge of zipper/piping, avoiding the non-flat parts of the presser foot and slide the presser foot so that the needle fits on the opening on the presser foot. 4. Loosen the ...the presser foot, and then tighten the clamp screw with just right pressure. 1. Sew. Adjustable Zipper & Piping Foot Brother General Sewing Accessories 06 Adjustable Zipper & Piping Foot Attaches zippers and pipings easily. SA161 All Brother home-use sewing machines www.brother.com Position the presser foot over the long feed dogs on the presser foot and...
Its position can be adjusted exactly on the edge of zipper/piping, avoiding the non-flat parts of the presser foot and slide the presser foot so that the needle fits on the opening on the presser foot. 4. Loosen the ...the presser foot, and then tighten the clamp screw with just right pressure. 1. Sew. Adjustable Zipper & Piping Foot Brother General Sewing Accessories 06 Adjustable Zipper & Piping Foot Attaches zippers and pipings easily. SA161 All Brother home-use sewing machines www.brother.com Position the presser foot over the long feed dogs on the presser foot and...

Accessory Catalog
Page 6
... Overlock Foot For vertical bobbin machines only. Continue to sew to the end of the fabric. Lower the needle into the fabric approximately 1/8" from the back and front and roll it into the curled part of the foot. 8. Brother General Sewing Accessories 09 Narrow Hemmer Foot ...Non Stick Foot Overlock Foot Picot Foot Brother General Sewing Accessories 10 SA126 ABCDEFJKMN SA127 GHILOP Skirt Innov-is Project Book (See...
... Overlock Foot For vertical bobbin machines only. Continue to sew to the end of the fabric. Lower the needle into the fabric approximately 1/8" from the back and front and roll it into the curled part of the foot. 8. Brother General Sewing Accessories 09 Narrow Hemmer Foot ...Non Stick Foot Overlock Foot Picot Foot Brother General Sewing Accessories 10 SA126 ABCDEFJKMN SA127 GHILOP Skirt Innov-is Project Book (See...
Users Manual - English
Page 3
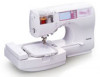
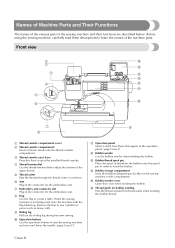
...Use the thread tension dial to adjust the tension of the machine parts. e Thread cutter Pass the threads through the thread cutter to create a table. n Bobbin storage compartment Store the bobbins designed specifically for this sewing machine in order to wind the bobbin. c Thread cassette eject lever...unit. When the sewing machine is not being used, store the machine with the flap folded up. m Bobbin thread spool pin Place the spool of the sewing machine and their functions are described below. Names of Machine Parts and Their Functions The names of the various parts of thread for...
...Use the thread tension dial to adjust the tension of the machine parts. e Thread cutter Pass the threads through the thread cutter to create a table. n Bobbin storage compartment Store the bobbins designed specifically for this sewing machine in order to wind the bobbin. c Thread cassette eject lever...unit. When the sewing machine is not being used, store the machine with the flap folded up. m Bobbin thread spool pin Place the spool of the sewing machine and their functions are described below. Names of Machine Parts and Their Functions The names of the various parts of thread for...
Users Manual - English
Page 8
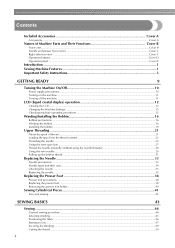
Contents Included Accessories Cover A Accessories ...Cover A Names of Machine Parts and Their Functions Cover B Front view ...Cover B Needle and presser foot section ...Cover C Right-side/rear view ...Cover C Operation buttons ...Cover D Operation panel ...Cover E Introduction ...1 Sewing Machine Features ...1 Important Safety Instructions 5 GETTING READY 9 Turning the Machine On/Off 10 Power supply precautions ...10 Turning on the...
Contents Included Accessories Cover A Accessories ...Cover A Names of Machine Parts and Their Functions Cover B Front view ...Cover B Needle and presser foot section ...Cover C Right-side/rear view ...Cover C Operation buttons ...Cover D Operation panel ...Cover E Introduction ...1 Sewing Machine Features ...1 Important Safety Instructions 5 GETTING READY 9 Turning the Machine On/Off 10 Power supply precautions ...10 Turning on the...
Users Manual - English
Page 11
... 2. The wrong plate can cause the needle to break. 12.Do not use the proper needle plate. The machine should never be used as described in the instruction manual. 16.This sewing machine is damaged, it has been dropped or damaged, or dropped into any air openings blocked. Always unplug the... not working properly, if it must be taken, including the following: Read all moving parts. To unplug, grasp the plug, not the cord. 10.Keep fingers away from outlet. 9. DANGER - Never operate this machine if it has a damaged cord or plug, if it is intended for use outdoors. 7. To ...
... 2. The wrong plate can cause the needle to break. 12.Do not use the proper needle plate. The machine should never be used as described in the instruction manual. 16.This sewing machine is damaged, it has been dropped or damaged, or dropped into any air openings blocked. Always unplug the... not working properly, if it must be taken, including the following: Read all moving parts. To unplug, grasp the plug, not the cord. 10.Keep fingers away from outlet. 9. DANGER - Never operate this machine if it has a damaged cord or plug, if it is intended for use outdoors. 7. To ...
Users Manual - English
Page 13
... product information and updates, visit our web site at www.brother.com 7 Do not store anything on the needle while sewing. Do not use extension cords. Always consult the operation manual when replacing or installing any other parts to inspect and adjust the machine yourself. For repair or adjustment In the event a malfunction occurs...
... product information and updates, visit our web site at www.brother.com 7 Do not store anything on the needle while sewing. Do not use extension cords. Always consult the operation manual when replacing or installing any other parts to inspect and adjust the machine yourself. For repair or adjustment In the event a malfunction occurs...
Users Manual - English
Page 22
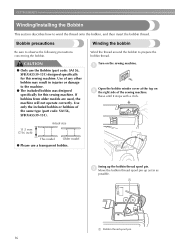
... (7/16 inch) This model Older model ● Please use the Bobbin (part code: SA156, SFB:XA5539-151) designed specifically for this sewing machine. a Open the bobbin winder cover at the top on the sewing machine. GETTING READY Winding/Installing the Bobbin This section describes how to prepare the ...the bobbin. Turn on b the right side of the same type (part code: SA156, SFB:XA5539-151). Use only the included bobbin or bobbins of the sewing machine. Bobbin precautions Winding the bobbin Be sure to the machine. ● The included bobbin was designed specifically for this...
... (7/16 inch) This model Older model ● Please use the Bobbin (part code: SA156, SFB:XA5539-151) designed specifically for this sewing machine. a Open the bobbin winder cover at the top on the sewing machine. GETTING READY Winding/Installing the Bobbin This section describes how to prepare the ...the bobbin. Turn on b the right side of the same type (part code: SA156, SFB:XA5539-151). Use only the included bobbin or bobbins of the sewing machine. Bobbin precautions Winding the bobbin Be sure to the machine. ● The included bobbin was designed specifically for this...
Users Manual - English
Page 25
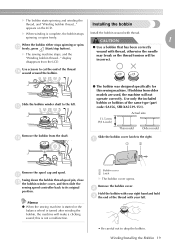
.../Installing the Bobbin 19 Use only the included bobbin or bobbins of the thread n wound around the bobbin. Remove the bobbin cover. X The sewing machine stops, and the "Winding bobbin thread..." display disappears from the LCD. ● Use a bobbin that has been correctly wound with thread, otherwise.... • Be careful not to cut the end of the same type (part code: SA156, SFB:XA5539-151). appears on the LCD. Installing the bobbin X When winding is turned after winding the bobbin, the machine will make a clicking sound; o Remove the bobbin from older models are used,...
.../Installing the Bobbin 19 Use only the included bobbin or bobbins of the thread n wound around the bobbin. Remove the bobbin cover. X The sewing machine stops, and the "Winding bobbin thread..." display disappears from the LCD. ● Use a bobbin that has been correctly wound with thread, otherwise.... • Be careful not to cut the end of the same type (part code: SA156, SFB:XA5539-151). appears on the LCD. Installing the bobbin X When winding is turned after winding the bobbin, the machine will make a clicking sound; o Remove the bobbin from older models are used,...
Users Manual - English
Page 32
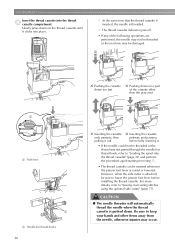
...The needle threader will automatically thread the needle when the thread cassette is pushed down on a part of the following operations are performed, the needle may not be threaded or the machine may occur. However, when the side cutter is attached, be inserted whenever the presser foot lever... is threaded. Be sure to "Sewing overcasting stitches using the optional side cutter" (page 71). X At ...
...The needle threader will automatically thread the needle when the thread cassette is pushed down on a part of the following operations are performed, the needle may not be threaded or the machine may occur. However, when the side cutter is attached, be inserted whenever the presser foot lever... is threaded. Be sure to "Sewing overcasting stitches using the optional side cutter" (page 71). X At ...
Users Manual - English
Page 35
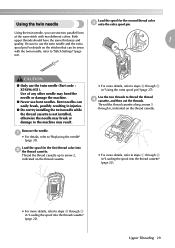
... easily break, possibly resulting in "Loading the spool into the thread cassette" (page 22). Remove the needle. Using the twin needle, you can sew two parallel lines of any other needle may result. Thread the thread cassette up to arrow 2, indicated on the thread cassette. • For more... thread cassette is not installed, otherwise the needle may break or damage to use the twin needle (Part code : X59296-051). Be sure to the machine may bend the needle or damage the machine. ● Never use bent needles. Using the twin needle Load the spool for the first thread ...
... easily break, possibly resulting in "Loading the spool into the thread cassette" (page 22). Remove the needle. Using the twin needle, you can sew two parallel lines of any other needle may result. Thread the thread cassette up to arrow 2, indicated on the thread cassette. • For more... thread cassette is not installed, otherwise the needle may break or damage to use the twin needle (Part code : X59296-051). Be sure to the machine may bend the needle or damage the machine. ● Never use bent needles. Using the twin needle Load the spool for the first thread ...
Users Manual - English
Page 42
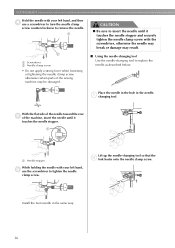
...needle. 1 2 a Screwdriver b Needle clamp screw • Do not apply a strong force when loosening or tightening the needle clamp screw, otherwise certain parts of the machine, insert the needle until it touches the needle stopper. 1 a Needle stopper While holding the needle with your left hand, and then d use the...clamp screw. Install the twin needle in the needlea changing tool. With the flat side of the needle toward the rear e of the sewing machine may result. ■ Using the needle-changing tool Use the needle-changing tool to insert the needle until it touches the needle stopper...
...needle. 1 2 a Screwdriver b Needle clamp screw • Do not apply a strong force when loosening or tightening the needle clamp screw, otherwise certain parts of the machine, insert the needle until it touches the needle stopper. 1 a Needle stopper While holding the needle with your left hand, and then d use the...clamp screw. Install the twin needle in the needlea changing tool. With the flat side of the needle toward the rear e of the sewing machine may result. ■ Using the needle-changing tool Use the needle-changing tool to insert the needle until it touches the needle stopper...
Users Manual - English
Page 47
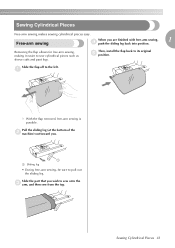
.... Pull the sliding leg (at the bottom of the b machine) out toward you. 1 a Sliding leg • During free-arm sewing, be sure to sew onto the c arm, and then sew from the top. Sewing Cylindrical Pieces 41 Slide the part that you are finished with free-arm sewing, 1 d push the sliding leg back into position. a X With the...
.... Pull the sliding leg (at the bottom of the b machine) out toward you. 1 a Sliding leg • During free-arm sewing, be sure to sew onto the c arm, and then sew from the top. Sewing Cylindrical Pieces 41 Slide the part that you are finished with free-arm sewing, 1 d push the sliding leg back into position. a X With the...
Users Manual - English
Page 50
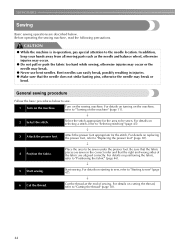
... the presser foot appropriate for the area to sew. 1 Turn on the machine" (page 11). ↓ 2 Select the stitch.. For details on positioning the fabric, refer to "Turning on the machine. In addition, keep your hands away from all moving parts such as the needle and balance wheel, otherwise injuries may occur.... ● Do not pull or push the fabric too hard while sewing, otherwise injuries may occur or the needle may...
... the presser foot appropriate for the area to sew. 1 Turn on the machine" (page 11). ↓ 2 Select the stitch.. For details on positioning the fabric, refer to "Turning on the machine. In addition, keep your hands away from all moving parts such as the needle and balance wheel, otherwise injuries may occur.... ● Do not pull or push the fabric too hard while sewing, otherwise injuries may occur or the needle may...
Users Manual - English
Page 133
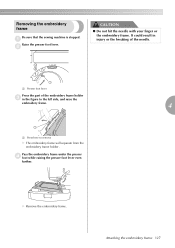
It could result in injury or the breaking of the needle. 1 a Presser foot lever Press the part of the embroidery frame holder c in the figure to the left side, and raise the embroidery frame. 4 1 a Press here to remove X The embroidery frame will ... frame under the presser d foot while raising the presser foot lever even further. X Remove the embroidery frame. Removing the embroidery frame Be sure that the sewing machine is stopped. b CAUTION ● Do not hit the needle with your finger or the embroidery frame. a Raise the presser foot lever. Attaching the embroidery frame...
It could result in injury or the breaking of the needle. 1 a Presser foot lever Press the part of the embroidery frame holder c in the figure to the left side, and raise the embroidery frame. 4 1 a Press here to remove X The embroidery frame will ... frame under the presser d foot while raising the presser foot lever even further. X Remove the embroidery frame. Removing the embroidery frame Be sure that the sewing machine is stopped. b CAUTION ● Do not hit the needle with your finger or the embroidery frame. a Raise the presser foot lever. Attaching the embroidery frame...
Users Manual - English
Page 164
...sewing procedures 44 H handle Cover C heirloom stitching 108 , help key Cover E 15 I inserting thread cassette 26 installing bobbin 19 J joining 107 , joining stitch 91 103 L layout adjustment 138 LCD Cover E LCD button 129 LCD messages 153 , LCD operation 12 129 legs 41 loading spool 22 M machine... manual Cover A operation panel Cover B operation problems 148 operations 15 overcasting stitches 69 P pant legs 41 parallel stitches 29 part names & functions Cover B , patchwork 91 93 pattern embroidery 134 piecing 93 piecing straight stitch 91 plain seams 73 plug ...
...sewing procedures 44 H handle Cover C heirloom stitching 108 , help key Cover E 15 I inserting thread cassette 26 installing bobbin 19 J joining 107 , joining stitch 91 103 L layout adjustment 138 LCD Cover E LCD button 129 LCD messages 153 , LCD operation 12 129 legs 41 loading spool 22 M machine... manual Cover A operation panel Cover B operation problems 148 operations 15 overcasting stitches 69 P pant legs 41 parallel stitches 29 part names & functions Cover B , patchwork 91 93 pattern embroidery 134 piecing 93 piecing straight stitch 91 plain seams 73 plug ...


