
Accessory Catalog
Page 2
.... We at your imagination and dreams to a new level of straw hats Contents 02 FZ2-B1 Brother Sewing Machine Lineup 03-04 Brother General Sewing Accessories 05-16 Brother Embellishment Feet 17-24 Brother Quilting Feet 25-28 Brother Embroidery Accessories 29-66 Brother Sewing Machine Attachments for the production of art and creativity. ZZ3-B820 ZZ3-B894 QuattroTM 6000D Chain-stitch...
.... We at your imagination and dreams to a new level of straw hats Contents 02 FZ2-B1 Brother Sewing Machine Lineup 03-04 Brother General Sewing Accessories 05-16 Brother Embellishment Feet 17-24 Brother Quilting Feet 25-28 Brother Embroidery Accessories 29-66 Brother Sewing Machine Attachments for the production of art and creativity. ZZ3-B820 ZZ3-B894 QuattroTM 6000D Chain-stitch...

Accessory Catalog
Page 3
... with leading-edge technology Brother's new and exciting high-end sewing and embroidery machine Quattro™ 6000D is not only incredibly sophisticated and innovative but powerful sewing and quilting machines. These embroidery only machines create beautiful embroidered results using designs from these machines. This machine is the perfect multifunction machine. B Innov-is 900D/ SE-350/ HE-240/LB6770 Sewing & Embroidery Combination Machines Entry-level model...
... with leading-edge technology Brother's new and exciting high-end sewing and embroidery machine Quattro™ 6000D is not only incredibly sophisticated and innovative but powerful sewing and quilting machines. These embroidery only machines create beautiful embroidered results using designs from these machines. This machine is the perfect multifunction machine. B Innov-is 900D/ SE-350/ HE-240/LB6770 Sewing & Embroidery Combination Machines Entry-level model...

Accessory Catalog
Page 17
... 2 new Cyrillic fonts. *Requires additional purchase. Basting Function to see embroidery designs. - Addition of items. - Compatible with the Brother Innov-is 4000D machines that come with the QuattroTM 6000D. Good for all Duetta™ 4500D's and Innov-is 4000D sewing and embroidery machine. * Requires additional purchases. Sewing Decorative Stitches as border designs. Used in conjunction with the...
... 2 new Cyrillic fonts. *Requires additional purchase. Basting Function to see embroidery designs. - Addition of items. - Compatible with the Brother Innov-is 4000D machines that come with the QuattroTM 6000D. Good for all Duetta™ 4500D's and Innov-is 4000D sewing and embroidery machine. * Requires additional purchases. Sewing Decorative Stitches as border designs. Used in conjunction with the...

Accessory Catalog
Page 33
... Select hoops appropriate for your selected dealer or check on creating. Brother Embroidery Accessories 63 Free-Standing Ten Spool Thread Stand Ten Spool Thread Stand Embroidery Machine Hoops Brother Embroidery Accessories 64 For all embroidery and sewing/embroidery machines. The spool pins can be removed to the machine as well as a thread locking system which keeps those loose ends tamed when...
... Select hoops appropriate for your selected dealer or check on creating. Brother Embroidery Accessories 63 Free-Standing Ten Spool Thread Stand Ten Spool Thread Stand Embroidery Machine Hoops Brother Embroidery Accessories 64 For all embroidery and sewing/embroidery machines. The spool pins can be removed to the machine as well as a thread locking system which keeps those loose ends tamed when...

Accessory Catalog
Page 34
... for placement on the top surface of colors specifically designed for Brother Embroidery machines, but compatible with other sewing and embroidery machine brands. Brother Embroidery Accessories PacesetterTM Polyester Threads 65 Brother Country Yarn Embroidery Threads Metallic Threads For the best embroidery results, use these embroidery threads especially designed for Brother sewing and embroidering machines. 61 Color Thread Set with Wooden Rack ETKSP999 PacesetterTM Polyester Threads...
... for placement on the top surface of colors specifically designed for Brother Embroidery machines, but compatible with other sewing and embroidery machine brands. Brother Embroidery Accessories PacesetterTM Polyester Threads 65 Brother Country Yarn Embroidery Threads Metallic Threads For the best embroidery results, use these embroidery threads especially designed for Brother sewing and embroidering machines. 61 Color Thread Set with Wooden Rack ETKSP999 PacesetterTM Polyester Threads...
Users Manual - English
Page 3
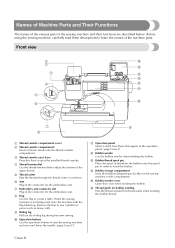
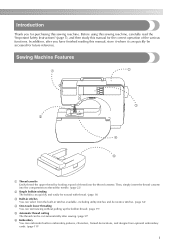
...adjust the tension of thread for the bobbin onto this sewing machine in the connector for bobbin winding Pass the thread around this lever to learn the names of the sewing machine and their functions are described below. g Embroidery unit connector slot Plug in the operation panel. (... Use the flap to cut them. p Thread guide for the embroidery unit. Before using the sewing machine, carefully read these descriptions to eject the installed thread cassette. When the sewing machine is not being used, store the machine with the flap folded up. j Operation buttons Use the operation ...
...adjust the tension of thread for the bobbin onto this sewing machine in the connector for bobbin winding Pass the thread around this lever to learn the names of the sewing machine and their functions are described below. g Embroidery unit connector slot Plug in the operation panel. (... Use the flap to cut them. p Thread guide for the embroidery unit. Before using the sewing machine, carefully read these descriptions to eject the installed thread cassette. When the sewing machine is not being used, store the machine with the flap folded up. j Operation buttons Use the operation ...
Users Manual - English
Page 4
... lower the feed dogs. Do not cover the air vent while the sewing machine is installed onto the presser foot holder. 4 8 5 7 6 a Handle Carry the sewing machine by its handle when transporting the machine. h Feed dog position switch Use the feed dog position switch to ... 3 7 4 65 a Buttonhole lever Lower the buttonhole lever when sewing buttonholes and bar tacks. f Foot controller jack Insert the plug on the power supply cord into the foot controller jack. c Embroidery card slot Insert the embroidery card. b Needle bar thread hooks Pass the upper thread through the ...
... lower the feed dogs. Do not cover the air vent while the sewing machine is installed onto the presser foot holder. 4 8 5 7 6 a Handle Carry the sewing machine by its handle when transporting the machine. h Feed dog position switch Use the feed dog position switch to ... 3 7 4 65 a Buttonhole lever Lower the buttonhole lever when sewing buttonholes and bar tacks. f Foot controller jack Insert the plug on the power supply cord into the foot controller jack. c Embroidery card slot Insert the embroidery card. b Needle bar thread hooks Pass the upper thread through the ...
Users Manual - English
Page 6
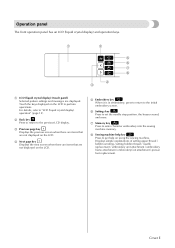
...display) (touch panel) Selected pattern settings and messages are not displayed on the LCD. For details, refer to enter character embroidery into the sewing machine memory. c Previous page key Displays the previous screen when there are items that are displayed. d Next page key Displays ... setting bobbin thread / needle replacement / embroidery unit attachment / embroidery frame attachment / embroidery foot attachment / presser foot replacement. e Embroidery key When it is in embroidery, press to return to perform operations. Cover E h Sewing machine help key Press to get help on ...
...display) (touch panel) Selected pattern settings and messages are not displayed on the LCD. For details, refer to enter character embroidery into the sewing machine memory. c Previous page key Displays the previous screen when there are items that are displayed. d Next page key Displays ... setting bobbin thread / needle replacement / embroidery unit attachment / embroidery frame attachment / embroidery foot attachment / presser foot replacement. e Embroidery key When it is in embroidery, press to return to perform operations. Cover E h Sewing machine help key Press to get help on ...
Users Manual - English
Page 7
... cassette into the thread cassette. Before using this sewing machine, carefully read the "Important Safety Instructions" (page 5), and then study this manual for purchasing this manual, store it where it can embroider built-in embroidery patterns, characters, framed decorations, and designs from the... built-in stitches You can select from optional embroidery cards. (page 111) 1 In addition, after sewing. (page 57) f Embroidery You can quickly be cut automatically after you...
... cassette into the thread cassette. Before using this sewing machine, carefully read the "Important Safety Instructions" (page 5), and then study this manual for purchasing this manual, store it where it can embroider built-in embroidery patterns, characters, framed decorations, and designs from the... built-in stitches You can select from optional embroidery cards. (page 111) 1 In addition, after sewing. (page 57) f Embroidery You can quickly be cut automatically after you...
Users Manual - English
Page 18
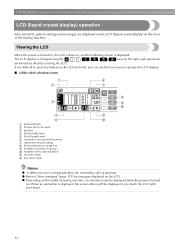
...liquid crystal display) operation Selected stitch, pattern settings and messages are displayed on the LCD (liquid crystal display) on the front of sewing machine, an animation may be displayed when the power is turned on. z Depending on the LCD by directly touching the LCD. z Refer...selected stitch k Increase value l Decrease value 8 9 0 A B Memo z A different screen is displayed when the embroidery unit is difficult to press the buttons on the model of the sewing machine. If it is attached. The LCD display is changed using the keys on the right, and operations performed by...
...liquid crystal display) operation Selected stitch, pattern settings and messages are displayed on the LCD (liquid crystal display) on the front of sewing machine, an animation may be displayed when the power is turned on. z Depending on the LCD by directly touching the LCD. z Refer...selected stitch k Increase value l Decrease value 8 9 0 A B Memo z A different screen is displayed when the embroidery unit is difficult to press the buttons on the model of the sewing machine. If it is attached. The LCD display is changed using the keys on the right, and operations performed by...
Users Manual - English
Page 19
... this key to Embroider (after is pressed) Needle position Specifies where the needle is positioned when the sewing machine is sounded with the sewing speed controller. Thread color/Embroidery thread number/Country Embroidery thread number/Needle count/Time to use the automatic thread cutting function when embroidering. Buzzer Specifies whether or not a beep is stopped...
... this key to Embroider (after is pressed) Needle position Specifies where the needle is positioned when the sewing machine is sounded with the sewing speed controller. Thread color/Embroidery thread number/Country Embroidery thread number/Needle count/Time to use the automatic thread cutting function when embroidering. Buzzer Specifies whether or not a beep is stopped...
Users Manual - English
Page 20
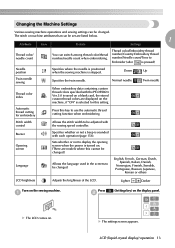
c Switch screens using (Previous page key) and (Next page key). is the color number display used . z Settings that are changed are not lost when the power is turned off. • The items shown in reverse highlighting are used when embroidery cards made by "PE-Design" are the settings at the time of purchase. † Example: Changing the needle stop position 14 Note z The "Thread color index" is the number for the sewing machine. z The "NO." When settings are complete, press d key). (Back X The initial screen appears again. GETTING READY Press the item to be set.
c Switch screens using (Previous page key) and (Next page key). is the color number display used . z Settings that are changed are not lost when the power is turned off. • The items shown in reverse highlighting are used when embroidery cards made by "PE-Design" are the settings at the time of purchase. † Example: Changing the needle stop position 14 Note z The "Thread color index" is the number for the sewing machine. z The "NO." When settings are complete, press d key). (Back X The initial screen appears again. GETTING READY Press the item to be set.
Users Manual - English
Page 21
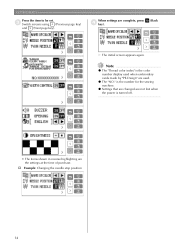
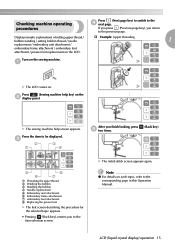
...sewing machine. X The initial stitch screen appears again. Press (Sewing machine help screen appears. Turn on . Displays simple explanations of setting upper thread / bobbin winding / setting bobbin thread / needle † Example: Upper threading 1 replacement / embroidery unit attachment / embroidery frame attachment / embroidery... the upper thread b Winding the bobbin c Installing the bobbin d Needle replacement e Embroidery unit attachment f Embroidery frame attachment g embroidery foot attachment h Replacing the presser foot X The first screen describing the procedure for ...
...sewing machine. X The initial stitch screen appears again. Press (Sewing machine help screen appears. Turn on . Displays simple explanations of setting upper thread / bobbin winding / setting bobbin thread / needle † Example: Upper threading 1 replacement / embroidery unit attachment / embroidery frame attachment / embroidery... the upper thread b Winding the bobbin c Installing the bobbin d Needle replacement e Embroidery unit attachment f Embroidery frame attachment g embroidery foot attachment h Replacing the presser foot X The first screen describing the procedure for ...
Users Manual - English
Page 40
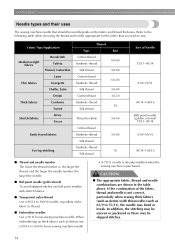
... be uneven or puckered or there may bend or break. If the combination of the fabric or thread. ■ Embroidery needles Use a 75/11 home sewing machine needle. Refer to the following table when choosing the thread and needle appropriate for knits Cotton thread Synthetic thread Silk thread... point needle (gold colored) To avoid skipped stitches use a 90/14 or 100/16 home sewing machine needle. • A 75/11 needle is already installed when the sewing machine is not correct, particularly when sewing thick fabrics (such as denim) with thin needles (such as denim, use ball point needles ...
... be uneven or puckered or there may bend or break. If the combination of the fabric or thread. ■ Embroidery needles Use a 75/11 home sewing machine needle. Refer to the following table when choosing the thread and needle appropriate for knits Cotton thread Synthetic thread Silk thread... point needle (gold colored) To avoid skipped stitches use a 90/14 or 100/16 home sewing machine needle. • A 75/11 needle is already installed when the sewing machine is not correct, particularly when sewing thick fabrics (such as denim) with thin needles (such as denim, use ball point needles ...
Users Manual - English
Page 45
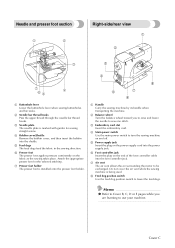
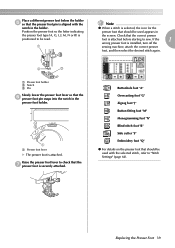
... "G" Zigzag foot "J" Button fitting foot "M" Monogramming foot "N" Blind stitch foot "R" Side cutter "S" Embroidery foot "Q" z For details on the presser foot that the correct presser foot is attached before starting to sew. Check that should be used with the notch in the presser foot holder. 1 a Presser foot...the holder. Raise the presser foot lever to "Stitch Settings" (page 64). If the 1 wrong presser foot is installed, turn off the sewing machine, attach the correct presser foot, and then select the desired stitch again. 2 3 a Presser foot holder b Notch c Pin Slowly lower ...
... "G" Zigzag foot "J" Button fitting foot "M" Monogramming foot "N" Blind stitch foot "R" Side cutter "S" Embroidery foot "Q" z For details on the presser foot that the correct presser foot is attached before starting to sew. Check that should be used with the notch in the presser foot holder. 1 a Presser foot...the holder. Raise the presser foot lever to "Stitch Settings" (page 64). If the 1 wrong presser foot is installed, turn off the sewing machine, attach the correct presser foot, and then select the desired stitch again. 2 3 a Presser foot holder b Notch c Pin Slowly lower ...
Users Manual - English
Page 46
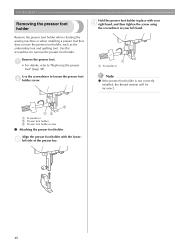
... the screwdriver to "Replacing the presser foot" (page 38). Remove the presser foot holder when cleaning the sewing machine or when installing a presser foot that does not use the presser foot holder, such as the embroidery foot and quilting foot. GETTING READY Removing the presser foot holder Hold the presser foot holder in...
... the screwdriver to "Replacing the presser foot" (page 38). Remove the presser foot holder when cleaning the sewing machine or when installing a presser foot that does not use the presser foot holder, such as the embroidery foot and quilting foot. GETTING READY Removing the presser foot holder Hold the presser foot holder in...
Users Manual - English
Page 102
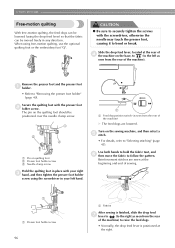
... b folder screw. Reinforcement stitches are lowered. When using free-motion quilting, use the optional quilting foot or the embroidery foot "Q". Slide the drop feed lever, located at the rear of d the machine on the sewing machine, and then select a e stitch. • For details, refer to raise the feed dogs. • Normally, the drop feed...
... b folder screw. Reinforcement stitches are lowered. When using free-motion quilting, use the optional quilting foot or the embroidery foot "Q". Slide the drop feed lever, located at the rear of d the machine on the sewing machine, and then select a e stitch. • For details, refer to raise the feed dogs. • Normally, the drop feed...
Users Manual - English
Page 118
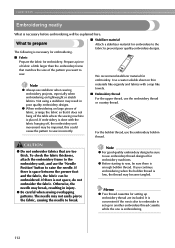
Note z Always use stabilizer when sewing embroidery projects, especially when embroidering on thin materials like organdy and fabrics with the fabric hanging off the table where the sewing machine is placed. z When embroidering ...sewing overlapping patterns. Note z For good quality embroidery designs be explained here. EMBROIDERY Embroidering neatly What is necessary before embroidering will be sure to use embroidery thread designed for setting up in another embroidery thread cassette while the one is embroidering. 112 Memo z Two thread cassettes for embroidery machines...
Note z Always use stabilizer when sewing embroidery projects, especially when embroidering on thin materials like organdy and fabrics with the fabric hanging off the table where the sewing machine is placed. z When embroidering ...sewing overlapping patterns. Note z For good quality embroidery designs be explained here. EMBROIDERY Embroidering neatly What is necessary before embroidering will be sure to use embroidery thread designed for setting up in another embroidery thread cassette while the one is embroidering. 112 Memo z Two thread cassettes for embroidery machines...

Users Manual - English
Page 119
Memo z A 75/11 needle is already installed when the sewing machine is purchased. CAUTION ● Since ball point needles (gold colored) are needles for fabrics where stitches are easily skipped, such as denim, use them for embroidery. Needle Use a 75/11 home sewing machine needle. When embroidering on thick fabrics such as pattern stitching and stretch fabrics, be broken or bent. 4 Embroidering neatly 113 The needle may be absolutely sure not to "Replacing the needle" (page 35). z When replacing the needle, refer to use a 90/14 home sewing machine needle.
Memo z A 75/11 needle is already installed when the sewing machine is purchased. CAUTION ● Since ball point needles (gold colored) are needles for fabrics where stitches are easily skipped, such as denim, use them for embroidery. Needle Use a 75/11 home sewing machine needle. When embroidering on thick fabrics such as pattern stitching and stretch fabrics, be broken or bent. 4 Embroidering neatly 113 The needle may be absolutely sure not to "Replacing the needle" (page 35). z When replacing the needle, refer to use a 90/14 home sewing machine needle.
Users Manual - English
Page 125
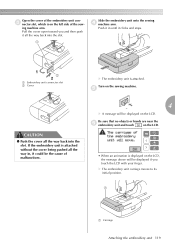
... toward you touch the LCD with your finger. Turn on the left side of the sew- e CAUTION ● Push the cover all the way back into the slot. X The embroidery unit carriage moves to its initial position. 1 a Carriage Attaching the embroidery unit 119 Be sure that no objects or hands are near the... be the cause of malfunctions. 4 X A message will be displayed on the LCD. Push it in , it all the way back into the slot. 1 Slide the embroidery unit onto the sewing d machine arm. Open the cover of the embroidery unit conc nector slot, which is on the...
... toward you touch the LCD with your finger. Turn on the left side of the sew- e CAUTION ● Push the cover all the way back into the slot. X The embroidery unit carriage moves to its initial position. 1 a Carriage Attaching the embroidery unit 119 Be sure that no objects or hands are near the... be the cause of malfunctions. 4 X A message will be displayed on the LCD. Push it in , it all the way back into the slot. 1 Slide the embroidery unit onto the sewing d machine arm. Open the cover of the embroidery unit conc nector slot, which is on the...


