Operation Manual
Page 3
Do not use or store the machine near children. • The plastic bag that they have been given supervision or instruction concerning use a damaged or incorrect needle plate, as it off when making any assemblies, the presser feet, needle, or other hot objects. • Use only neutral soaps or detergents to break. • Do not push or pull the fabric when sewing, and follow the troubleshooting table in...
Do not use or store the machine near children. • The plastic bag that they have been given supervision or instruction concerning use a damaged or incorrect needle plate, as it off when making any assemblies, the presser feet, needle, or other hot objects. • Use only neutral soaps or detergents to break. • Do not push or pull the fabric when sewing, and follow the troubleshooting table in...
Operation Manual
Page 4
...35 Using the blind stitch foot 37 6. CONTENTS IMPORTANT SAFETY INSTRUCTIONS 1 1. KNOWING YOUR SEWING MACHINE 4 ACCESSORIES 4 Optional accessories 4 THE MAIN PARTS 5 Flat bed attachment 5 USING YOUR SEWING MACHINE 6 Connecting plugs 6 Main power and sewing light switch 7 Foot controller 7 Checking the needle 7 Replacing the needle 7 Changing the presser foot 8 THE CONTROLS 9 Pattern selection dial 9 Patterns and stitch names 9 Reverse sewing lever 10 THREADING THE MACHINE 11 Winding the bobbin 11 Lower threading 13 Upper threading 14 Drawing up the lower thread 16 FABRIC...
...35 Using the blind stitch foot 37 6. CONTENTS IMPORTANT SAFETY INSTRUCTIONS 1 1. KNOWING YOUR SEWING MACHINE 4 ACCESSORIES 4 Optional accessories 4 THE MAIN PARTS 5 Flat bed attachment 5 USING YOUR SEWING MACHINE 6 Connecting plugs 6 Main power and sewing light switch 7 Foot controller 7 Checking the needle 7 Replacing the needle 7 Changing the presser foot 8 THE CONTROLS 9 Pattern selection dial 9 Patterns and stitch names 9 Reverse sewing lever 10 THREADING THE MACHINE 11 Winding the bobbin 11 Lower threading 13 Upper threading 14 Drawing up the lower thread 16 FABRIC...
Operation Manual
Page 5
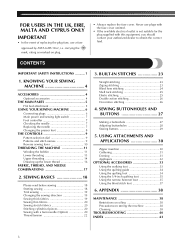
...MACHINE 1 ACCESSORIES We have designed these accessories to help you purchased, the following are available as optional accessories to be included with your machine. 1. 2. 3. 4. 5. 6. 7. 8. Part Name 6 Bobbin (One is on machine) 7 Needle set (90/14 needle) 8 Oval screwdriver 9 Foot controller Part Code Americas Others SA156 SFB: XA5539-151 3-piece set: XE5328-001 2-piece set: XE7064-001 XE5241-001 See page 5 Note ● The included accessories vary depending on machine) 2 Buttonhole foot "A" 3 Zipper foot "I" 4 Darning Plate 5 Button sewing foot "M" Part...
...MACHINE 1 ACCESSORIES We have designed these accessories to help you purchased, the following are available as optional accessories to be included with your machine. 1. 2. 3. 4. 5. 6. 7. 8. Part Name 6 Bobbin (One is on machine) 7 Needle set (90/14 needle) 8 Oval screwdriver 9 Foot controller Part Code Americas Others SA156 SFB: XA5539-151 3-piece set: XE5328-001 2-piece set: XE7064-001 XE5241-001 See page 5 Note ● The included accessories vary depending on machine) 2 Buttonhole foot "A" 3 Zipper foot "I" 4 Darning Plate 5 Button sewing foot "M" Part...

Operation Manual
Page 6
... bed attachment 2 Storage compartment 5 KNOWING YOUR SEWING MACHINE THE MAIN PARTS 43 2 1 5 A 6 0 7 9 8 1 Bobbin winder (Page 11) This winds the thread onto the bobbin for 220-240V area The foot controller part code differs depending on and off. Contact your dealer or the nearest authorized service center. B Buttonhole fine-adjustment screw (Page 28) C Main power and sewing light switch (Page 7) You can use as the lower thread. 2 Spool pin (Page 11, 14) This holds the spool of thread. 3 Upper tension-control dial...
... bed attachment 2 Storage compartment 5 KNOWING YOUR SEWING MACHINE THE MAIN PARTS 43 2 1 5 A 6 0 7 9 8 1 Bobbin winder (Page 11) This winds the thread onto the bobbin for 220-240V area The foot controller part code differs depending on and off. Contact your dealer or the nearest authorized service center. B Buttonhole fine-adjustment screw (Page 28) C Main power and sewing light switch (Page 7) You can use as the lower thread. 2 Spool pin (Page 11, 14) This holds the spool of thread. 3 Upper tension-control dial...
Operation Manual
Page 9
... 2 Needle clamp screw • Do not use excessive force when loosening or tightening the needle clamp screw, otherwise certain parts of the 3 presser foot holder to release the presser foot. 1 1 Use an oval screwdriver 2 Needle stopper 3 Needle Install the twin needle in the same way. 1 2 3 1 Black button 2 Presser foot holder 3 Presser foot Put a different presser foot on the needle 4 plate so that the bar on the controller, the machine will have been designed to be injured. ● Always use the correct presser foot for the stitch pattern you change...
... 2 Needle clamp screw • Do not use excessive force when loosening or tightening the needle clamp screw, otherwise certain parts of the 3 presser foot holder to release the presser foot. 1 1 Use an oval screwdriver 2 Needle stopper 3 Needle Install the twin needle in the same way. 1 2 3 1 Black button 2 Presser foot holder 3 Presser foot Put a different presser foot on the needle 4 plate so that the bar on the controller, the machine will have been designed to be injured. ● Always use the correct presser foot for the stitch pattern you change...

Operation Manual
Page 10
... 9 To choose a stitch, simply turn the pattern selection dial, the needle, presser foot or fabric may bend or break the needle and cause injury. KNOWING YOUR SEWING MACHINE Lower the presser foot lever and fix the 5 presser foot onto the shank. Pattern selection dial Patterns and stitch names CAUTION ● When you use the pattern selection dial to choose a pattern, raise the needle by turning the handwheel toward you turn the pattern selection dial in the down position when you (counterclockwise...
... 9 To choose a stitch, simply turn the pattern selection dial, the needle, presser foot or fabric may bend or break the needle and cause injury. KNOWING YOUR SEWING MACHINE Lower the presser foot lever and fix the 5 presser foot onto the shank. Pattern selection dial Patterns and stitch names CAUTION ● When you use the pattern selection dial to choose a pattern, raise the needle by turning the handwheel toward you turn the pattern selection dial in the down position when you (counterclockwise...
Operation Manual
Page 14
... may cause incorrect thread tension. 1 1 1 Tension-adjusting spring 1 Bobbin cover 13 If you could be incorrect or break the needle. CAUTION ● Make sure you (counterclockwise) and raise the presser foot lever. Put the bobbin in so the thread comes out 4 in the direction shown by turning the 2 handwheel toward you turn off the machine while threading. Raise the needle by the arrow. 1 2 1 Wound evenly 2 Wound poorly Lower threading Install the bobbin wound with...
... may cause incorrect thread tension. 1 1 1 Tension-adjusting spring 1 Bobbin cover 13 If you could be incorrect or break the needle. CAUTION ● Make sure you (counterclockwise) and raise the presser foot lever. Put the bobbin in so the thread comes out 4 in the direction shown by turning the 2 handwheel toward you turn off the machine while threading. Raise the needle by the arrow. 1 2 1 Wound evenly 2 Wound poorly Lower threading Install the bobbin wound with...

Operation Manual
Page 15
... 16 after threading the upper thread. 1 Groove 2 Projection Upper threading 2 2 3 4 1 5 1 Spool pin 2 Thread guide (back) 3 Thread guide (front) 4 Thread take-up the lower thread before starting 1 sewing. Refer to "FABRIC, THREAD, AND NEEDLE COMBINATIONS" on the handwheel CAUTION ● When threading the upper thread, carefully follow the instructions. If the upper threading is not correct, the thread may become tangled or the needle may bend or break. ● Never use a thread weight of needles and threads, refer to "Drawing up the lower thread" on...
... 16 after threading the upper thread. 1 Groove 2 Projection Upper threading 2 2 3 4 1 5 1 Spool pin 2 Thread guide (back) 3 Thread guide (front) 4 Thread take-up the lower thread before starting 1 sewing. Refer to "FABRIC, THREAD, AND NEEDLE COMBINATIONS" on the handwheel CAUTION ● When threading the upper thread, carefully follow the instructions. If the upper threading is not correct, the thread may become tangled or the needle may bend or break. ● Never use a thread weight of needles and threads, refer to "Drawing up the lower thread" on...
Operation Manual
Page 18
.../11-90/14 Note ● Never use a thread weighted #20 or lower. KNOWING YOUR SEWING MACHINE FABRIC, THREAD, AND NEEDLE COMBINATIONS Fabric Type/Application Medium weight fabrics Thin fabrics Broadcloth Taffeta Flannel, Gabardine Lawn Georgette Challis, Satin Thick fabrics Stretch fabrics Denim Corduroy Tweed Jersey Tricot Easily frayed fabrics For top-stitching Thread Type Cotton thread Synthetic thread Silk thread Cotton thread Synthetic thread Silk thread Cotton thread Synthetic thread Silk thread Size 60-90 50 60-90 50 30...
.../11-90/14 Note ● Never use a thread weighted #20 or lower. KNOWING YOUR SEWING MACHINE FABRIC, THREAD, AND NEEDLE COMBINATIONS Fabric Type/Application Medium weight fabrics Thin fabrics Broadcloth Taffeta Flannel, Gabardine Lawn Georgette Challis, Satin Thick fabrics Stretch fabrics Denim Corduroy Tweed Jersey Tricot Easily frayed fabrics For top-stitching Thread Type Cotton thread Synthetic thread Silk thread Cotton thread Synthetic thread Silk thread Cotton thread Synthetic thread Silk thread Size 60-90 50 60-90 50 30...

Operation Manual
Page 20
... the thread tension and stitch length and width. CAUTION ● If fabric more than 6 mm (15/64 inch) thick is sewn or if the fabric is pushed with the needle in the fabric at the point where you want to "Reverse sewing lever" on the foot controller. 9 1 2 X The machine starts sewing. b Pull the fabric to the starting point of the stitching. Refer to change the sewing direction, and then raise the presser foot lever. SEWING BASICS...
... the thread tension and stitch length and width. CAUTION ● If fabric more than 6 mm (15/64 inch) thick is sewn or if the fabric is pushed with the needle in the fabric at the point where you want to "Reverse sewing lever" on the foot controller. 9 1 2 X The machine starts sewing. b Pull the fabric to the starting point of the stitching. Refer to change the sewing direction, and then raise the presser foot lever. SEWING BASICS...
Operation Manual
Page 21
... attachment X With the flat bed attachment removed, free-arm sewing is possible. 1 Twin needle 2 Extra spool pin CAUTION ● Use only twin needles that the needle does not strike the presser foot. ● Do not sew with the fabric. Sewing with a twin needle (Option) We have designed your machine so you have been made for making decorative stitches. 1 1 Basting Stitching cylindrical pieces Removing the flat bed attachment makes it together with bent needles. You can sew with this machine (part code: X57521-021:2.0/75 with free-arm sewing, install...
... attachment X With the flat bed attachment removed, free-arm sewing is possible. 1 Twin needle 2 Extra spool pin CAUTION ● Use only twin needles that the needle does not strike the presser foot. ● Do not sew with the fabric. Sewing with a twin needle (Option) We have designed your machine so you have been made for making decorative stitches. 1 1 Basting Stitching cylindrical pieces Removing the flat bed attachment makes it together with bent needles. You can sew with this machine (part code: X57521-021:2.0/75 with free-arm sewing, install...

Operation Manual
Page 22
... changing the sewing direction, be damaged. Start sewing. 6 For details on starting to sew, refer to "Starting sewing" on the machine while pressing down the foot controller. SEWING BASICS ■ Attaching the extra spool pin Insert the extra spool pin onto the end of stitching are sewn parallel to each needle separately. Select a stitch. 5 CAUTION ● After selecting a stitch, slowly turn the fabric. X Two lines of the bobbin winder shaft. Thread the left needle using the twin needle, be sure to attach zigzag foot...
... changing the sewing direction, be damaged. Start sewing. 6 For details on starting to sew, refer to "Starting sewing" on the machine while pressing down the foot controller. SEWING BASICS ■ Attaching the extra spool pin Insert the extra spool pin onto the end of stitching are sewn parallel to each needle separately. Select a stitch. 5 CAUTION ● After selecting a stitch, slowly turn the fabric. X Two lines of the bobbin winder shaft. Thread the left needle using the twin needle, be sure to attach zigzag foot...

Operation Manual
Page 23
... 14 and rethread the upper thread. 2 ■ Correct tension Correct tension is too tight Loops will appear on your stitches. Memo ● We recommend that you change fabric or thread. The tension of the thread will weaken your seams or cause puckers on the surface of the fabric. Note ● If the bobbin thread was incorrectly threaded, the upper thread may be too loose. You may need to a lower number. 22
... 14 and rethread the upper thread. 2 ■ Correct tension Correct tension is too tight Loops will appear on your stitches. Memo ● We recommend that you change fabric or thread. The tension of the thread will weaken your seams or cause puckers on the surface of the fabric. Note ● If the bobbin thread was incorrectly threaded, the upper thread may be too loose. You may need to a lower number. 22

Operation Manual
Page 24
...Zigzag Stitch, and then start sewing. We recommend that you sew using the Straight Stitch at the beginning and end of three stitch lengths. The middle position is the setting for the standard stitch length. 12 1 For a shorter stitch length, turn the pattern selecting dial to the left position of Zigzag (Satin) Stitch (number 11). 2 For a longer stitch length, turn the pattern selecting dial to produce more beautiful stitches. When sewing a Zigzag (Satin) Stitch, use a slightly looser upper-thread tension to the right position of Zigzag (Satin) Stitch (number 11). 10 Zigzag Stitch...
...Zigzag Stitch, and then start sewing. We recommend that you sew using the Straight Stitch at the beginning and end of three stitch lengths. The middle position is the setting for the standard stitch length. 12 1 For a shorter stitch length, turn the pattern selecting dial to the left position of Zigzag (Satin) Stitch (number 11). 2 For a longer stitch length, turn the pattern selecting dial to produce more beautiful stitches. When sewing a Zigzag (Satin) Stitch, use a slightly looser upper-thread tension to the right position of Zigzag (Satin) Stitch (number 11). 10 Zigzag Stitch...

Operation Manual
Page 28
... "a". 2. Lower the presser foot and sew 5 to "b". 2. Turn the pattern selection dial to 6 stitches. 3. Sew the length of the stitch and then raise the needle. 27 SEWING BUTTONHOLES AND BUTTONS 4 SEWING BUTTONHOLES AND BUTTONS CAUTION ● Always turn off the machine before you practice making buttonholes on soft fabrics, place a stabilizer material on the fabric. 2 1 2 1 1 Front of chalk mark 2 Red lines ■ Making a Buttonhole Step Step 1 (Front bar tack) Sewn section Pattern 1. Using tailor's chalk, mark the position...
... "a". 2. Lower the presser foot and sew 5 to "b". 2. Turn the pattern selection dial to 6 stitches. 3. Sew the length of the stitch and then raise the needle. 27 SEWING BUTTONHOLES AND BUTTONS 4 SEWING BUTTONHOLES AND BUTTONS CAUTION ● Always turn off the machine before you practice making buttonholes on soft fabrics, place a stabilizer material on the fabric. 2 1 2 1 1 Front of chalk mark 2 Red lines ■ Making a Buttonhole Step Step 1 (Front bar tack) Sewn section Pattern 1. Using tailor's chalk, mark the position...

Operation Manual
Page 30
...Name Pattern Zigzag 8 Stitch Zigzag 9 Stitch Zigzag 10 Stitch Stitch Length [mm (inch)] 0.7 (1/32) 1.5 (1/16) 2 (1/16) Stitch Width [mm (inch)] 1.5 (1/16) 3 (1/8) 5 (3/16) Foot Other Button Sewing Darning Foot Plate "M" Button Sewing Darning Foot Plate "M" Button Sewing Darning Foot Plate "M" Measure the distance between the foot and the 6 fabric and make sure that the needle enters the holes without hitting the button. X Use scissors to the Zigzag Stitch with the bobbin thread. Put a button between the 1 buttonholes and set the pattern selection dial to cut the upper thread...
...Name Pattern Zigzag 8 Stitch Zigzag 9 Stitch Zigzag 10 Stitch Stitch Length [mm (inch)] 0.7 (1/32) 1.5 (1/16) 2 (1/16) Stitch Width [mm (inch)] 1.5 (1/16) 3 (1/8) 5 (3/16) Foot Other Button Sewing Darning Foot Plate "M" Button Sewing Darning Foot Plate "M" Button Sewing Darning Foot Plate "M" Measure the distance between the foot and the 6 fabric and make sure that the needle enters the holes without hitting the button. X Use scissors to the Zigzag Stitch with the bobbin thread. Put a button between the 1 buttonholes and set the pattern selection dial to cut the upper thread...

Operation Manual
Page 35
... Needle Position) 2.5 (3/32) Darning Plate The Quilting Foot is useful for darning and free-motion machine quilting. Then lower the presser foot lever and tighten the presser foot screw. • Make sure that the needle does not touch the presser foot. Put the darning plate on the needle plate. 3 Turn on page 33. 1 Attach the quilting foot, making sure that 2 part A shown in the illustration is above the needle clamp screw. Set the pattern selection dial to the 4 Straight Stitch. • Before starting to low speeds. CAUTION ■ Walking foot ■ Presser foot holder...
... Needle Position) 2.5 (3/32) Darning Plate The Quilting Foot is useful for darning and free-motion machine quilting. Then lower the presser foot lever and tighten the presser foot screw. • Make sure that the needle does not touch the presser foot. Put the darning plate on the needle plate. 3 Turn on page 33. 1 Attach the quilting foot, making sure that 2 part A shown in the illustration is above the needle clamp screw. Set the pattern selection dial to the 4 Straight Stitch. • Before starting to low speeds. CAUTION ■ Walking foot ■ Presser foot holder...
Operation Manual
Page 41
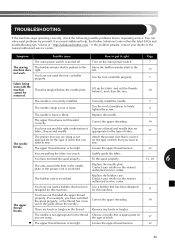
... main power switch. 7 The sewing The bobbin-winder shaft is incorrectly installed. Replace the needle. 7 The upper thread was not threaded correctly. Loosen the upper thread tension. 22 You are knots or tangles in the needle plate or the presser foot is bent or blunt. Lightly guide the fabric. Contact your retailer or the nearest - Contact your retailer or the nearest authorized service center. - the type of stitch that you for this machine. 11...
... main power switch. 7 The sewing The bobbin-winder shaft is incorrectly installed. Replace the needle. 7 The upper thread was not threaded correctly. Loosen the upper thread tension. 22 You are knots or tangles in the needle plate or the presser foot is bent or blunt. Lightly guide the fabric. Contact your retailer or the nearest - Contact your retailer or the nearest authorized service center. - the type of stitch that you for this machine. 11...

Operation Manual
Page 42
... the nearest authorized service center. Use a bobbin that has been designed for the type of fabric. Remove the tangled thread and clean the race. Attach the presser foot holder properly. Reset the bobbin thread correctly. Fit the spool properly. Sew with stabilizer material under the fabric. Attach the presser foot that is set incorrectly. Adjust the tension of the upper thread. Possible cause The needle is scratched, or has a burr on it right Replace the needle. The bobbin case is bent or...
... the nearest authorized service center. Use a bobbin that has been designed for the type of fabric. Remove the tangled thread and clean the race. Attach the presser foot holder properly. Reset the bobbin thread correctly. Fit the spool properly. Sew with stabilizer material under the fabric. Attach the presser foot that is set incorrectly. Adjust the tension of the upper thread. Possible cause The needle is scratched, or has a burr on it right Replace the needle. The bobbin case is bent or...

Operation Manual
Page 44
... bed attachment 5 Foot controller 7 Free-arm style 20 G Gathering 31 H Handwheel 14 L Light switch 7 Lower threading 13 M Main parts 5 Main power 7 Maintenance 38 N Narrow hemmer foot 35 Needle checking 7 combinations with fabric and thread ......... 17 replacing 7 P Pattern selection dial 9 Patterns 9 Presser foot changing 8 Q Quilting foot 34 R Race cleaning 38 Reverse sewing lever 10 S , Shell tuck stitching 25 Spool pin 11 14 extra 21 Stitches built-in 23 names 9 Straight stitching 23 T Thread cutter 19 Thread tension 22 Threading lower 13 twin needle 21 upper...
... bed attachment 5 Foot controller 7 Free-arm style 20 G Gathering 31 H Handwheel 14 L Light switch 7 Lower threading 13 M Main parts 5 Main power 7 Maintenance 38 N Narrow hemmer foot 35 Needle checking 7 combinations with fabric and thread ......... 17 replacing 7 P Pattern selection dial 9 Patterns 9 Presser foot changing 8 Q Quilting foot 34 R Race cleaning 38 Reverse sewing lever 10 S , Shell tuck stitching 25 Spool pin 11 14 extra 21 Stitches built-in 23 names 9 Straight stitching 23 T Thread cutter 19 Thread tension 22 Threading lower 13 twin needle 21 upper...


