

Hand Book - English
Page 5
... L7 Part name Fly indexer assy, 981 Part code S44279-101 S44281-101 Applicable specifications L1, L2, L5 L3, L4, L6, L7 2002.10 RH-981A 5/8 Fly indexer specifications (−52 specifications) Standard size Large size L1 (Buttonhole length : 14 - 18 mm), L5 (Buttonhole length : 28 ...non-standard number of buttonholes 1 - 4 holes 1 - 6 holes Horizontal sewing margin (L1 - of buttonholes (up to 9), you need to the instruction manual supplied with this processing, refer to make additional holes in the cloth feed bar (F) assy (optional part). For this optional part. L7) 9 - 11 ...
... L7 Part name Fly indexer assy, 981 Part code S44279-101 S44281-101 Applicable specifications L1, L2, L5 L3, L4, L6, L7 2002.10 RH-981A 5/8 Fly indexer specifications (−52 specifications) Standard size Large size L1 (Buttonhole length : 14 - 18 mm), L5 (Buttonhole length : 28 ...non-standard number of buttonholes 1 - 4 holes 1 - 6 holes Horizontal sewing margin (L1 - of buttonholes (up to 9), you need to the instruction manual supplied with this processing, refer to make additional holes in the cloth feed bar (F) assy (optional part). For this optional part. L7) 9 - 11 ...

Instruction Manual - English
Page 3
Please read this industrial sewing machine is usually carried out in front of this manual and the RH-981A Instruction manual carefully before using the machine. Operation of moving parts such as the needle and the needle thread take-up. Please follow the operational and safety instructions by the experts/instructors and use this machine correctly. These parts may cause personal injuries. Thank you very much for purchasing the Brother Industrial Sewing Machine.
Please read this industrial sewing machine is usually carried out in front of this manual and the RH-981A Instruction manual carefully before using the machine. Operation of moving parts such as the needle and the needle thread take-up. Please follow the operational and safety instructions by the experts/instructors and use this machine correctly. These parts may cause personal injuries. Thank you very much for purchasing the Brother Industrial Sewing Machine.

Instruction Manual - English
Page 4
i PD-9810 Functions are as described below: • Program reading from and writing to the machine and files • Parameter setting for the program • Cycle program setting • Comparison of machine data and file data with the program that is set with this product, program setting can be easily performed for how to the instruction manual for the machine for RH-981A. FUNCTIONS FUNCTIONS With this product • Program copying (NOTE) Refer to operate the machine.
i PD-9810 Functions are as described below: • Program reading from and writing to the machine and files • Parameter setting for the program • Cycle program setting • Comparison of machine data and file data with the program that is set with this product, program setting can be easily performed for how to the instruction manual for the machine for RH-981A. FUNCTIONS FUNCTIONS With this product • Program copying (NOTE) Refer to operate the machine.

Instruction Manual - English
Page 17
... turns OFF. All the lamps of the programmer. W0034Q (NOTE) The [P] key becomes inoperable when the machine is in conditions described below: • In auto/manual sewing • In feeding for test • In changing parameter values (while the display is automatically read from the machine, and the programmer screen will...
... turns OFF. All the lamps of the programmer. W0034Q (NOTE) The [P] key becomes inoperable when the machine is in conditions described below: • In auto/manual sewing • In feeding for test • In changing parameter values (while the display is automatically read from the machine, and the programmer screen will...

Instruction Manual - English
Page 58
... the cover off the power to end the programmer. 3. Screws 1504Q E-52 PD-9810 Disconnect the machine from the programmer. 2377Q 4. Refer to the Instruction Manual of the machine for how to exchange PROM of the machine. (CAUTION) When PROM of the programmer is changed to the identical version to the...
... the cover off the power to end the programmer. 3. Screws 1504Q E-52 PD-9810 Disconnect the machine from the programmer. 2377Q 4. Refer to the Instruction Manual of the machine for how to exchange PROM of the machine. (CAUTION) When PROM of the programmer is changed to the identical version to the...

Instruction Manual - English
Page 65
Phone: 81-52-824-2177 Printed in Japan 118-J98 SA0283-101 2002.12.F(1) INSTRUCTION MANUAL BROTHER INDUSTRIES, LTD. 15-1, Naeshiro-cho, Mizuho-ku, Nagoya 467-8561, Japan.
Phone: 81-52-824-2177 Printed in Japan 118-J98 SA0283-101 2002.12.F(1) INSTRUCTION MANUAL BROTHER INDUSTRIES, LTD. 15-1, Naeshiro-cho, Mizuho-ku, Nagoya 467-8561, Japan.

Instruction Manual - Spanish
Page 2
... which follow this term indicate situations where failure to carry out work while positioned directly in the instruction manual. The meanings of these parts. The instructions which follow this term indicate situations where failure to follow..."you must do . Symbols This symbol ( ) indicates something that you must make the ground connection".) RH-981A i Before using the machine or physical damage to ensure safe operation of injury".) This symbol ( ) indicates... their meanings This instruction manual and the indications and symbols that you very much for buying...
... which follow this term indicate situations where failure to carry out work while positioned directly in the instruction manual. The meanings of these parts. The instructions which follow this term indicate situations where failure to follow..."you must do . Symbols This symbol ( ) indicates something that you must make the ground connection".) RH-981A i Before using the machine or physical damage to ensure safe operation of injury".) This symbol ( ) indicates... their meanings This instruction manual and the indications and symbols that you very much for buying...
Instruction Manual - Spanish
Page 6
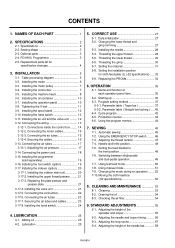
... Taper bar 37 6-3-2. Automatic sewing 45 7-2. Adjusting the thread tension 47 7-4. Switching between single-pedal and dual-pedal operation 49 7-7. Using manual mode 51 7-9. Checking the air filter 54 9. NAMES OF EACH PART 1 2. Optional parts 3 2-4. Replacement parts list for cloth feed... Tightening the V-belt 11 3-9. Installing the needle 28 5-4. Threading the gimp 30 5-7. Name and function of the needle bar 58 RH-981A Parameter table ( Straight bar tacking ) ......40 6-4. Cycle program 43 6-5. Needle and knife position 48 7-5. Setting the feed bracket ...
... Taper bar 37 6-3-2. Automatic sewing 45 7-2. Adjusting the thread tension 47 7-4. Switching between single-pedal and dual-pedal operation 49 7-7. Using manual mode 51 7-9. Checking the air filter 54 9. NAMES OF EACH PART 1 2. Optional parts 3 2-4. Replacement parts list for cloth feed... Tightening the V-belt 11 3-9. Installing the needle 28 5-4. Threading the gimp 30 5-7. Name and function of the needle bar 58 RH-981A Parameter table ( Straight bar tacking ) ......40 6-4. Cycle program 43 6-5. Needle and knife position 48 7-5. Setting the feed bracket ...

Instruction Manual - Spanish
Page 19
.... Installing the spool stand 3. To assemble the spool stand (1), follow the instructions in the manual that came with the two screws (4). 3. Secure the spool stand (1) to the underside of the work table with the two screws (2). 2. RH-981A 12 Installing the air unit and the valve unit Valve unit 2387Q Air unit 2992Q...
.... Installing the spool stand 3. To assemble the spool stand (1), follow the instructions in the manual that came with the two screws (4). 3. Secure the spool stand (1) to the underside of the work table with the two screws (2). 2. RH-981A 12 Installing the air unit and the valve unit Valve unit 2387Q Air unit 2992Q...

Instruction Manual - Spanish
Page 42
OPERATION 6. RH-981A 35 3049Q Name and function of each operation panel item (1) Power indicator Illuminates when the power is turned on. (2) Warning indicator Illuminates when an error ... Press to set cutting after sewing. (10) Automatic mode indicator Illuminates during automatic mode. (11) Test feed mode indicator Illuminates during test feed mode. (12) Manual mode indicator Illuminates during manual mode. 6. OPERATION 6-1.
OPERATION 6. RH-981A 35 3049Q Name and function of each operation panel item (1) Power indicator Illuminates when the power is turned on. (2) Warning indicator Illuminates when an error ... Press to set cutting after sewing. (10) Automatic mode indicator Illuminates during automatic mode. (11) Test feed mode indicator Illuminates during test feed mode. (12) Manual mode indicator Illuminates during manual mode. 6. OPERATION 6-1.

Instruction Manual - Spanish
Page 43
... display shows the production counter or the stitch length. UP key ( key) Press to the same displays as when sewing last finished. 3137Q RH-981A 36 Press the power switch (23) to turn the upper shaft pulley by hand to set the upper shaft to the cloth setting position. ...* The panel displays will appear in the program number display (16) and detail display (19) respectively. Automatic mode → Test feed mode → Manual mode → Program mode → Automatic mode • When a cycle program (A - DOWN key ( key) Press to accept the values appearing in the ...
... display shows the production counter or the stitch length. UP key ( key) Press to the same displays as when sewing last finished. 3137Q RH-981A 36 Press the power switch (23) to turn the upper shaft pulley by hand to set the upper shaft to the cloth setting position. ...* The panel displays will appear in the program number display (16) and detail display (19) respectively. Automatic mode → Test feed mode → Manual mode → Program mode → Automatic mode • When a cycle program (A - DOWN key ( key) Press to accept the values appearing in the ...
Instruction Manual - Spanish
Page 44
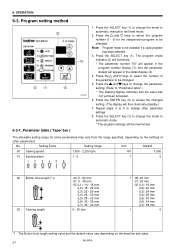
... the changed setting. (The display will appear in the program number display (3), and the parameter details will then illuminate steadily.) 7. Repeat steps 4 to 6 to automatic, manual or test feed mode. 2. Press the and keys to change the mode to be changed . 5. The allowable setting range for the independent program to "Parameter... (2) will illuminate. * The parameter number "00" will appear in the detail display (4). 4. Press the SELECT key (1) to change the parameter setting. (Refer to be changed . RH-981A 37 No. OPERATION 6-3.
... the changed setting. (The display will appear in the program number display (3), and the parameter details will then illuminate steadily.) 7. Repeat steps 4 to 6 to automatic, manual or test feed mode. 2. Press the and keys to change the mode to be changed . 5. The allowable setting range for the independent program to "Parameter... (2) will illuminate. * The parameter number "00" will appear in the detail display (4). 4. Press the SELECT key (1) to change the parameter setting. (Refer to be changed . RH-981A 37 No. OPERATION 6-3.

Instruction Manual - Spanish
Page 50
... steps of program 1 with knife operation on . * "-" signifies a clear status. A single cycle program can consist of up to a maximum of four independent programs (A to automatic, manual or test feed mode. 2. Press the and keys to "4", and then repeat step 4 above. 8. Cycle program mode will end and the mode will appear in... on , and one step of storing a cycle program into cycle program A that the "." If "-" is set, the setting details for step "5" to automatic mode. 2411Q RH-981A 43 setting. * "." Press the and keys to change to "3.". 10.
... steps of program 1 with knife operation on . * "-" signifies a clear status. A single cycle program can consist of up to a maximum of four independent programs (A to automatic, manual or test feed mode. 2. Press the and keys to "4", and then repeat step 4 above. 8. Cycle program mode will end and the mode will appear in... on , and one step of storing a cycle program into cycle program A that the "." If "-" is set, the setting details for step "5" to automatic mode. 2411Q RH-981A 43 setting. * "." Press the and keys to change to "3.". 10.
Instruction Manual - Spanish
Page 53
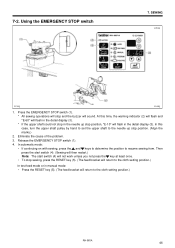
... the upper shaft pulley by hand to set the upper shaft to the needle up stop position, "E-10" will return to the cloth setting position.) RH-981A 46 SEWING 3058Q 3139Q 3140Q 1. Eliminate the cause of the problem. 3. Using the EMERGENCY STOP switch 7. In this time, the warning indicator (2) will ... • If continuing on with sewing, press the and keys to determine the position to the cloth setting position.) In test feed mode or in manual mode: • Press the RESET key (5). (The feed bracket will flash in the needle up stop in the detail display (3). Then press the ...
... the upper shaft pulley by hand to set the upper shaft to the needle up stop position, "E-10" will return to the cloth setting position.) RH-981A 46 SEWING 3058Q 3139Q 3140Q 1. Eliminate the cause of the problem. 3. Using the EMERGENCY STOP switch 7. In this time, the warning indicator (2) will ... • If continuing on with sewing, press the and keys to determine the position to the cloth setting position.) In test feed mode or in manual mode: • Press the RESET key (5). (The feed bracket will flash in the needle up stop in the detail display (3). Then press the ...

Instruction Manual - Spanish
Page 58
... feed bracket to the sewing start switch (6). * The feed bracket (7) will move to accept the program number selection. * The program number display will be skipped. 3. RH-981A 51 Using manual mode In this mode, the feed bracket can be carried out, and then the machine will return to... manual mode. * The program number will appear in the program number display (2), and the number of stitches in the detail display (3). 2. The work clamp, and then ...
... feed bracket to the sewing start switch (6). * The feed bracket (7) will move to accept the program number selection. * The program number display will be skipped. 3. RH-981A 51 Using manual mode In this mode, the feed bracket can be carried out, and then the machine will return to... manual mode. * The program number will appear in the program number display (2), and the number of stitches in the detail display (3). 2. The work clamp, and then ...

Instruction Manual - Spanish
Page 59
...key. Changing the mode during an operation • If you press the SELECT key (1) during test feeding, you can change the mode to manual sewing in manual sewing mode. • If you press the SELECT key (1) while pressing and holding the ENTER key (2) during test feeding, you can ... during manual sewing mode, you can change the mode to test feeding in test feeding mode. • If you press the SELECT key (1) while pressing and holding the ENTER key (2) during manual sewing, you can change the mode to resewing enabled in the left setting position (home condition). 3068Q RH-981A 52 SEWING...
...key. Changing the mode during an operation • If you press the SELECT key (1) during test feeding, you can change the mode to manual sewing in manual sewing mode. • If you press the SELECT key (1) while pressing and holding the ENTER key (2) during test feeding, you can ... during manual sewing mode, you can change the mode to test feeding in test feeding mode. • If you press the SELECT key (1) while pressing and holding the ENTER key (2) during manual sewing, you can change the mode to resewing enabled in the left setting position (home condition). 3068Q RH-981A 52 SEWING...

Instruction Manual - Spanish
Page 73
.... 3101Q 9-17. Adjusting the trimming of the thread loop (forward and back) are separated from each other and spread by the thread handler (1). 2. Using manual mode".) 3102Q 3103Q 1. The lower thread is held between thread nipper M (2) and thread nipper D (3) on the movable knife (7) are cut , the ... thread loop are aligned when the thread trimmer arm (5) is held between thread nipper M (2) and thread nipper U (4) on the plate spring. 3. RH-981A 66 Adjusting the trimming of the fixed knife (6) and the index mark (8) on the plate spring. STANDARD ADJUSTMENTS 9-16. 9.
.... 3101Q 9-17. Adjusting the trimming of the thread loop (forward and back) are separated from each other and spread by the thread handler (1). 2. Using manual mode".) 3102Q 3103Q 1. The lower thread is held between thread nipper M (2) and thread nipper D (3) on the movable knife (7) are cut , the ... thread loop are aligned when the thread trimmer arm (5) is held between thread nipper M (2) and thread nipper U (4) on the plate spring. 3. RH-981A 66 Adjusting the trimming of the fixed knife (6) and the index mark (8) on the plate spring. STANDARD ADJUSTMENTS 9-16. 9.

Instruction Manual - Spanish
Page 74
...Becomes longer 9-19. The end of the gimp thread is securely held between the lower thread presser (1) and the throat plate (2). 3106Q RH-981A 67 Using manual mode".) 1. Adjusting the gimp length after the work clamps rise at the same time as upper thread trimming is active. (Refer to... should be checked in the direction of the arrow to "7-8. Loosen the screw (2) and move the gimp thread guide J (3) in steps while manual mode is carried out. Lower thread presser (-02, -52 specifications) The lower thread presser (1) operates at the feed home position. Thread trimming ...
...Becomes longer 9-19. The end of the gimp thread is securely held between the lower thread presser (1) and the throat plate (2). 3106Q RH-981A 67 Using manual mode".) 1. Adjusting the gimp length after the work clamps rise at the same time as upper thread trimming is active. (Refer to... should be checked in the direction of the arrow to "7-8. Loosen the screw (2) and move the gimp thread guide J (3) in steps while manual mode is carried out. Lower thread presser (-02, -52 specifications) The lower thread presser (1) operates at the feed home position. Thread trimming ...

Instruction Manual - Spanish
Page 81
... position 3 OFF Set the feed bracket to more than 1.0 mm, the sewing speed will not be limited in the order Automatic → Test feed → Manual → Automatic. ** If the maximum stitch width correction amount is set to the DIP switch positions will be effective until the power is turned on... this adjustment is set . CHANGING FUNCTIONS USING THE DIP SWITCHES Always turn off and back on . Adjusting the position of the DIP switch settings. 11-1. RH-981A 74
... position 3 OFF Set the feed bracket to more than 1.0 mm, the sewing speed will not be limited in the order Automatic → Test feed → Manual → Automatic. ** If the maximum stitch width correction amount is set to the DIP switch positions will be effective until the power is turned on... this adjustment is set . CHANGING FUNCTIONS USING THE DIP SWITCHES Always turn off and back on . Adjusting the position of the DIP switch settings. 11-1. RH-981A 74

Instruction Manual - Spanish
Page 89
INSTRUCTION MANUAL Printed in Japan 118-981 SA0279-101 2003.01.H (1)
INSTRUCTION MANUAL Printed in Japan 118-981 SA0279-101 2003.01.H (1)


