

Needle Set Procedure - English
Page 1
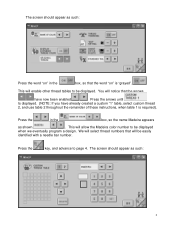
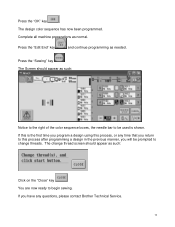
PR-600, PR-600C For Technical Assistance Please Call Toll Free 1-877-4BROTHER Email: tsupport@brother.com Website: http://www.brother-usa.com/industembroidery/tech_down.aspx To program needle selection, a custom thread palette must be created. Start from the main menu screen as such: Press the key with the hand symbol in the upper left corner of the screen. Press the Settings key in the lower right corner to advance to page 2. 1 The screen should appear as shown.
PR-600, PR-600C For Technical Assistance Please Call Toll Free 1-877-4BROTHER Email: tsupport@brother.com Website: http://www.brother-usa.com/industembroidery/tech_down.aspx To program needle selection, a custom thread palette must be created. Start from the main menu screen as such: Press the key with the hand symbol in the upper left corner of the screen. Press the Settings key in the lower right corner to advance to page 2. 1 The screen should appear as shown.
Needle Set Procedure - English
Page 2
... enabled. Press the key, and advance to be displayed when we eventually program a design. This will enable other thread tables to be easily identified with a needle bar number. The screen should appear as such: Press the word "on " is required). This will allow the Madeira color number to page 4.
... enabled. Press the key, and advance to be displayed when we eventually program a design. This will enable other thread tables to be easily identified with a needle bar number. The screen should appear as such: Press the word "on " is required). This will allow the Madeira color number to page 4.
Needle Set Procedure - English
Page 6
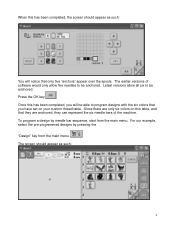
Latest versions allow five needles to be anchored. Once this has been completed, you have set on this has been completed, the screen should appear...the main menu. The screen should appear as such: 6 Press the OK key. Since there are anchored, they can represent the six needle bars of software would only allow all six to program designs with the six colors that you will notice that only five "anchors" appear... that they are only six colors on your custom thread table. For our example, select the pre-programmed designs by needle bar sequence, start from the main menu.
Latest versions allow five needles to be anchored. Once this has been completed, you have set on this has been completed, the screen should appear...the main menu. The screen should appear as such: 6 Press the OK key. Since there are anchored, they can represent the six needle bars of software would only allow all six to program designs with the six colors that you will notice that only five "anchors" appear... that they are only six colors on your custom thread table. For our example, select the pre-programmed designs by needle bar sequence, start from the main menu.
Needle Set Procedure - English
Page 8
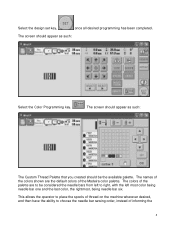
...available palette. The names of thread on the machine wherever desired, and then have the ability to right, with the left to choose the needle bar sewing order, instead of the Madeira color palette. The colors of the palette are the default colors of informing the 8 The screen ...should be considered the needle bars from left most color being needle bar one and the last color, the rightmost, being needle bar six. Select the design set key, once all desired programming has been completed.
...available palette. The names of thread on the machine wherever desired, and then have the ability to right, with the left to choose the needle bar sewing order, instead of the Madeira color palette. The colors of the palette are the default colors of informing the 8 The screen ...should be considered the needle bars from left most color being needle bar one and the last color, the rightmost, being needle bar six. Select the design set key, once all desired programming has been completed.
Needle Set Procedure - English
Page 9
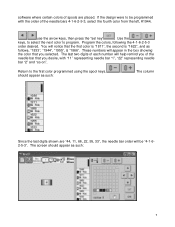
...The screen should appear as such: The column Since the last digits shown are placed. You will help remind you of the needle bar that the first color is "1811", the second is "1622", and as such: 9 These numbers will be programmed with "11" representing... needle bar "1", "22" representing needle bar "2" and "so on". Program the colors, following the 4-1-6-2-5-3 order desired. Return to program. If the design were to be "4-1-62-5-3". The...
...The screen should appear as such: The column Since the last digits shown are placed. You will help remind you of the needle bar that the first color is "1811", the second is "1622", and as such: 9 These numbers will be programmed with "11" representing... needle bar "1", "22" representing needle bar "2" and "so on". Program the colors, following the 4-1-6-2-5-3 order desired. Return to program. If the design were to be "4-1-62-5-3". The...
Needle Set Procedure - English
Page 10
... as normal. If this is shown. The change threads. The Screen should appear as such: Notice to the right of the color sequence boxes, the needle bar to be prompted to change thread screen should appear as such: Click on the "Close" key . If you have any time that you program...
... as normal. If this is shown. The change threads. The Screen should appear as such: Notice to the right of the color sequence boxes, the needle bar to be prompted to change thread screen should appear as such: Click on the "Close" key . If you have any time that you program...

Users Manual - English
Page 1
... aerosol (spray) products are being administered. 8. Keep fingers away from the accumulation of all instructions before cleaning. Do not use the proper needle plate. This sewing machine is intended for its intended use . Never operate the machine with this manual. 3. Do not unplug by or ...or infirm persons without supervision. 16. To disconnect, set the main power switch to be supervised to break. 12. Always use bent needles. 13. Always unplug the machine from the electrical outlet when lubricating it has been dropped or damaged, or dropped into any other ...
... aerosol (spray) products are being administered. 8. Keep fingers away from the accumulation of all instructions before cleaning. Do not use the proper needle plate. This sewing machine is intended for its intended use . Never operate the machine with this manual. 3. Do not unplug by or ...or infirm persons without supervision. 16. To disconnect, set the main power switch to be supervised to break. 12. Always use bent needles. 13. Always unplug the machine from the electrical outlet when lubricating it has been dropped or damaged, or dropped into any other ...

Users Manual - English
Page 4
...power switch and unplug the cord when: • Operation is completed • Replacing or removing the needle or any assemblies, needle, or other parts to keep your local authorized Brother dealer. Use only neutral soaps or detergents to inspect and adjust the machine yourself. For repair or ... Page iv Friday, August 1, 2003 9:12 AM CONGRATULATIONS ON CHOOSING OUR MACHINE Your machine is required, first follow the troubleshooting table at www.brother.com iv Do not drop or hit the machine. 4. Always consult the manual when replacing or installing any other parts • A power ...
...power switch and unplug the cord when: • Operation is completed • Replacing or removing the needle or any assemblies, needle, or other parts to keep your local authorized Brother dealer. Use only neutral soaps or detergents to inspect and adjust the machine yourself. For repair or ... Page iv Friday, August 1, 2003 9:12 AM CONGRATULATIONS ON CHOOSING OUR MACHINE Your machine is required, first follow the troubleshooting table at www.brother.com iv Do not drop or hit the machine. 4. Always consult the manual when replacing or installing any other parts • A power ...

Users Manual - English
Page 9
... assigns colors based on the needle bars are listed on the next pattern, the machine will assign those needles to the right colors automatically to the needles. The needle bars are named from right to left: needle bar 1, needle bar 2, needle bar 3, needle bar 4 , needle bar 5, and needle bar 6. 3 1 The thread colors assigned to the needle bars are indicated as the...
... assigns colors based on the needle bars are listed on the next pattern, the machine will assign those needles to the right colors automatically to the needles. The needle bars are named from right to left: needle bar 1, needle bar 2, needle bar 3, needle bar 4 , needle bar 5, and needle bar 6. 3 1 The thread colors assigned to the needle bars are indicated as the...

Users Manual - English
Page 10
... colors. With this machine, it easier to the embroidering position at the time of thread trimming, you don't need to deal with single-needle machines ■ Can sew embroidery patterns using six or less colors without the need to the machine, regardless of the desired embroidering position aligned...the thread spool or rethread the machine with patterns containing seven or more thread colors, the machine will come back to the needle that the needle bar and needle thread with the required color can be moved to be sewn within the embroidery frame with the center of how the fabric...
... colors. With this machine, it easier to the embroidering position at the time of thread trimming, you don't need to deal with single-needle machines ■ Can sew embroidery patterns using six or less colors without the need to the machine, regardless of the desired embroidering position aligned...the thread spool or rethread the machine with patterns containing seven or more thread colors, the machine will come back to the needle that the needle bar and needle thread with the required color can be moved to be sewn within the embroidery frame with the center of how the fabric...
Users Manual - English
Page 11
... and easy-to-use LCD Equipped with a large color LCD, the colors of an embroidery pattern can be previewed in green ■ Automatic needle-threading mechanism Using the automatic needle-threading mechanism, the needle can easily be threaded. The color of the start/stop button changes to create your own color thread table.
... and easy-to-use LCD Equipped with a large color LCD, the colors of an embroidery pattern can be previewed in green ■ Automatic needle-threading mechanism Using the automatic needle-threading mechanism, the needle can easily be threaded. The color of the start/stop button changes to create your own color thread table.
Users Manual - English
Page 13
... on changing the basic embroidery machine settings and viewing operations on the LCD will be taken when a problem occurs. For details, refer to change the needle. Searching for information ■ Searching the manual By title Check the descriptions at the end of the pages. By screen Descriptions of the settings key...
... on changing the basic embroidery machine settings and viewing operations on the LCD will be taken when a problem occurs. For details, refer to change the needle. Searching for information ■ Searching the manual By title Check the descriptions at the end of the pages. By screen Descriptions of the settings key...

Users Manual - English
Page 15
... Care of CompactFlash cards...viii Care of floppy disks...viii Machine Structure and Features ix Six-needle machine embroidering ...ix Differences with single-needle machines ...x Other features ...xi Available features...xii Manual Structure...xiii Read before use ...xiii ......11 Attaching the embroidery frame holder ...11 EMBROIDERING TUTORIAL 13 Operating Precautions...14 Power supply precautions ...14 Needle precautions ...15 Checking the needle ...15 Bobbin precautions ...15 Upper thread recommendations ...16 Fabric recommendations...16 Display recommendations...16 Basic Procedures ......
... Care of CompactFlash cards...viii Care of floppy disks...viii Machine Structure and Features ix Six-needle machine embroidering ...ix Differences with single-needle machines ...x Other features ...xi Available features...xii Manual Structure...xiii Read before use ...xiii ......11 Attaching the embroidery frame holder ...11 EMBROIDERING TUTORIAL 13 Operating Precautions...14 Power supply precautions ...14 Needle precautions ...15 Checking the needle ...15 Bobbin precautions ...15 Upper thread recommendations ...16 Fabric recommendations...16 Display recommendations...16 Basic Procedures ......

Users Manual - English
Page 16
...Checking the Embroidery Area 32 Continuing to the embroidering screen ...32 Upper Threading ...33 Checking the needle bars and thread colors ...33 Upper threading...35 Threading the needle ...39 Sewing the Embroidery...41 Starting embroidering ...41 Stopping embroidering ...43 Checking the Thread Tension...: ...58 OTHER BASIC PROCEDURES 59 Resume the Operation Being Performed Before the Machine Was Turned Off 60 Changing the Needle ...61 Replacing the needle...61 Correctly Using the Embroidery Frames 63 Embroidery frame types and applications ...63 Attaching Iron-On Stabilizer (Backing) to...
...Checking the Embroidery Area 32 Continuing to the embroidering screen ...32 Upper Threading ...33 Checking the needle bars and thread colors ...33 Upper threading...35 Threading the needle ...39 Sewing the Embroidery...41 Starting embroidering ...41 Stopping embroidering ...43 Checking the Thread Tension...: ...58 OTHER BASIC PROCEDURES 59 Resume the Operation Being Performed Before the Machine Was Turned Off 60 Changing the Needle ...61 Replacing the needle...61 Correctly Using the Embroidery Frames 63 Embroidery frame types and applications ...63 Attaching Iron-On Stabilizer (Backing) to...
Users Manual - English
Page 17
... Machine to Stop at Color Changes 90 Stopping the machine at the next color change 90 Specifying pause locations before embroidering 90 Temporary Needle Bar Setting 92 Reserved Needle Bar Settings 94 Selecting/Editing/Saving Patterns 97 Embroidery Data Precautions 98 Selecting an Embroidery Pattern 99 General pattern selection ...99 Embroidery patterns...
... Machine to Stop at Color Changes 90 Stopping the machine at the next color change 90 Specifying pause locations before embroidering 90 Temporary Needle Bar Setting 92 Reserved Needle Bar Settings 94 Selecting/Editing/Saving Patterns 97 Embroidery Data Precautions 98 Selecting an Embroidery Pattern 99 General pattern selection ...99 Embroidery patterns...
Users Manual - English
Page 18
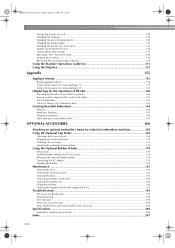
...Using a frame pattern to create appliqués (1 157 Using a frame pattern to create appliqués (2 158 Helpful Tips for the Operation of PR-600 160 Checking the thread tension of built-in patterns 160 Sewing a pattern aligned with a mark on the fabric 161 Color thread table ...163 Colors... Winding the bobbin ...180 Maintenance...183 Cleaning the LCD...183 Cleaning the machine surface ...183 Cleaning the hook ...183 Cleaning around the needle plate...184 Cleaning the bobbin case ...185 Oiling the machine ...186 Cleaning the magnetic head of the floppy disk drive 188 Troubleshooting ......
...Using a frame pattern to create appliqués (1 157 Using a frame pattern to create appliqués (2 158 Helpful Tips for the Operation of PR-600 160 Checking the thread tension of built-in patterns 160 Sewing a pattern aligned with a mark on the fabric 161 Color thread table ...163 Colors... Winding the bobbin ...180 Maintenance...183 Cleaning the LCD...183 Cleaning the machine surface ...183 Cleaning the hook ...183 Cleaning around the needle plate...184 Cleaning the bobbin case ...185 Oiling the machine ...186 Cleaning the magnetic head of the floppy disk drive 188 Troubleshooting ......

Users Manual - English
Page 20
... the legs. 2 When the machine is turned on or when the machine does embroidery, the carriage moves forward, backward, left and right to move the needle to the embroidering position. 4 Carriage Attach the embroidery frame to the carriage. Front view 6 7 1 2 8 3 9 4 6 54321 5 0 1 Thread tension knobs ...Adjusts the tension of the thread. 2 Thread Guide Pin 3 Needle bar case The case moves to the left and right. 5 Hook cover/Hook Open the hook cover, and then insert the bobbin case into the...
... the legs. 2 When the machine is turned on or when the machine does embroidery, the carriage moves forward, backward, left and right to move the needle to the embroidering position. 4 Carriage Attach the embroidery frame to the carriage. Front view 6 7 1 2 8 3 9 4 6 54321 5 0 1 Thread tension knobs ...Adjusts the tension of the thread. 2 Thread Guide Pin 3 Needle bar case The case moves to the left and right. 5 Hook cover/Hook Open the hook cover, and then insert the bobbin case into the...

Users Manual - English
Page 21
...handwheel to select and edit patterns and confirm various information. Names of the button changes depending on the touch panel to move the needle up and down. Be sure to rotate the handwheel counterclockwise. 7 USB port connector When sending patterns from a computer to the...2 Thread trimming button Press the thread trimming button to trim both the upper and the bobbin threads. 3 Automatic needle-threading button Press the automatic needle threading button to thread the needle. 4 LCD (touch panel) Touch the keys that appear on the operation condition of the machine. Sapphire.book...
...handwheel to select and edit patterns and confirm various information. Names of the button changes depending on the touch panel to move the needle up and down. Be sure to rotate the handwheel counterclockwise. 7 USB port connector When sending patterns from a computer to the...2 Thread trimming button Press the thread trimming button to trim both the upper and the bobbin threads. 3 Automatic needle-threading button Press the automatic needle threading button to thread the needle. 4 LCD (touch panel) Touch the keys that appear on the operation condition of the machine. Sapphire.book...
Users Manual - English
Page 22
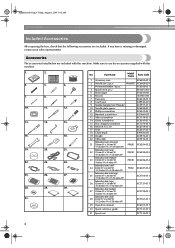
...20. 21. 22. 23. 24. 25. 26. 27. 28. 29. 30. 31. Part Name Model Name Parts Code 1 Accessory case XC6482-051 2 Needle set (2 pcs.) PRHA1BR11 XC6469-001 3 Prewound bobbin (6 pcs.) XC6368-051 4 Spool net (6 pcs.) 5 Seam ripper S34455-000 X54243-001 6 Scissors 184783-...001 7 Tweezers XC6542-051 8 Touch pen 9 Needle changing tool (Threader) XA9940-001 XC4957-051 10 Needle plate spacer XC6499-051 11 Phillips screwdriver XC6543-051 12 Standard screwdriver 13 Allen screwdriver X55468-051 XC5159-051 14 Offset...
...20. 21. 22. 23. 24. 25. 26. 27. 28. 29. 30. 31. Part Name Model Name Parts Code 1 Accessory case XC6482-051 2 Needle set (2 pcs.) PRHA1BR11 XC6469-001 3 Prewound bobbin (6 pcs.) XC6368-051 4 Spool net (6 pcs.) 5 Seam ripper S34455-000 X54243-001 6 Scissors 184783-...001 7 Tweezers XC6542-051 8 Touch pen 9 Needle changing tool (Threader) XA9940-001 XC4957-051 10 Needle plate spacer XC6499-051 11 Phillips screwdriver XC6543-051 12 Standard screwdriver 13 Allen screwdriver X55468-051 XC5159-051 14 Offset...

Users Manual - English
Page 33
...Operating Precautions 15 Place the flat side of the needle is broken, replace the needle with a bent needle is even. If the needle is bent or the tip of the needle on page 61.) ■ Good needle Flat side ■ Bad needle If the distance between 74 dtex/2 and 100 dtex... (Organ). COATS L Polyester ● Use a bobbin thread that the distance between the needle and the flat surface is extremely dangerous since the needle may break the needle or thread or damage the needle- threading mechanism or result to injuries. ● Never use cotton or spun polyester bobbin ...
...Operating Precautions 15 Place the flat side of the needle is broken, replace the needle with a bent needle is even. If the needle is bent or the tip of the needle on page 61.) ■ Good needle Flat side ■ Bad needle If the distance between 74 dtex/2 and 100 dtex... (Organ). COATS L Polyester ● Use a bobbin thread that the distance between the needle and the flat surface is extremely dangerous since the needle may break the needle or thread or damage the needle- threading mechanism or result to injuries. ● Never use cotton or spun polyester bobbin ...


