
Users Manual - English
Page 18
... Using a frame pattern to create appliqués (2 158 Helpful Tips for the Operation of PR-600 160 Checking the thread tension of built-in patterns 160 Sewing a pattern aligned with a mark... ...163 Creating Beautiful Embroidery 164 Threads ...164 Stabilizers (Backing) ...165 Hooping Techniques...166 Fabric/stabilizer compatibility chart ...167 OPTIONAL ACCESSORIES 168 Attaching an optional embroidery frame...embroidery machines 168 Using the Optional Cap Frame 169 Cap frame and its accessories...169 Preparing to use the cap frame ...170 Attaching the cap frame ...173 Installing the embroidery...
... Using a frame pattern to create appliqués (2 158 Helpful Tips for the Operation of PR-600 160 Checking the thread tension of built-in patterns 160 Sewing a pattern aligned with a mark... ...163 Creating Beautiful Embroidery 164 Threads ...164 Stabilizers (Backing) ...165 Hooping Techniques...166 Fabric/stabilizer compatibility chart ...167 OPTIONAL ACCESSORIES 168 Attaching an optional embroidery frame...embroidery machines 168 Using the Optional Cap Frame 169 Cap frame and its accessories...169 Preparing to use the cap frame ...170 Attaching the cap frame ...173 Installing the embroidery...
Users Manual - English
Page 47
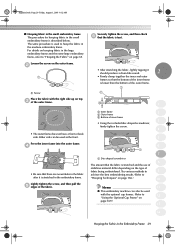
...fabric being embroidered. Try various methods to 9 achieve the best embroidering results. (Refer to "Hooping Techniques" on page 166.) 10 Memo 11 ● This embroidery machine can be used to 12 "Using the Optional Cap Frame" on top 3 of the fabric. Sapphire.book Page 29 Friday, August 1, 2003 .... The same procedure is described below. Loosen the screw on the outer frame. 2 1 1 Screw Place the fabric with the optional cap frames. (Refer to hoop the fabric in the Embroidery Frame 29 Press the inner frame into the outer frame. 4 • Be sure that there are no ...
...fabric being embroidered. Try various methods to 9 achieve the best embroidering results. (Refer to "Hooping Techniques" on page 166.) 10 Memo 11 ● This embroidery machine can be used to 12 "Using the Optional Cap Frame" on top 3 of the fabric. Sapphire.book Page 29 Friday, August 1, 2003 .... The same procedure is described below. Loosen the screw on the outer frame. 2 1 1 Screw Place the fabric with the optional cap frames. (Refer to hoop the fabric in the Embroidery Frame 29 Press the inner frame into the outer frame. 4 • Be sure that there are no ...
Users Manual - English
Page 81
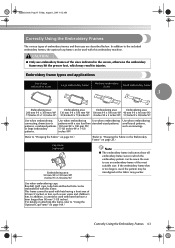
Use when embroidering Use when embroidering patterns with this embroidery machine. Use when embroidering caps. Be sure to "Hooping the Fabric in the Embroidery Frame" on page 169.) Correctly Using the Embroidery Frames 63 If the embroidery frame that have a brim longer than ...80 mm (3-1/8 inches). (For details on attaching this frame, refer to the included embroidery frames, the optional cap frame can be embroidered with a ...
Use when embroidering Use when embroidering patterns with this embroidery machine. Use when embroidering caps. Be sure to "Hooping the Fabric in the Embroidery Frame" on page 169.) Correctly Using the Embroidery Frames 63 If the embroidery frame that have a brim longer than ...80 mm (3-1/8 inches). (For details on attaching this frame, refer to the included embroidery frames, the optional cap frame can be embroidered with a ...

Users Manual - English
Page 173
... / 156 Using a frame pattern to create appliqués (1) / 157 Using a frame pattern to use the cap frame / 170 Attaching the cap frame / 173 Installing the embroidery frame holder / 176 Maintenance ...183 Cleaning the LCD / 183 Cleaning the machine ...Hooping Techniques / 166 Fabric/stabilizer compatibility chart / 167 OPTIONAL ACCESSORIES Attaching an optional embroidery frame for industrial embroidery machines ......168 Using the Optional Cap Frame 169 Cap frame and its accessories / 169 Preparing to create appliqués (2) / 158 Helpful Tips for the Operation of PR-600...
... / 156 Using a frame pattern to create appliqués (1) / 157 Using a frame pattern to use the cap frame / 170 Attaching the cap frame / 173 Installing the embroidery frame holder / 176 Maintenance ...183 Cleaning the LCD / 183 Cleaning the machine ...Hooping Techniques / 166 Fabric/stabilizer compatibility chart / 167 OPTIONAL ACCESSORIES Attaching an optional embroidery frame for industrial embroidery machines ......168 Using the Optional Cap Frame 169 Cap frame and its accessories / 169 Preparing to create appliqués (2) / 158 Helpful Tips for the Operation of PR-600...

Users Manual - English
Page 184
.../outer frame positioning: There should be sure that allows sewing the cap in poor design alignment during this will cause puckers in the embroidery industry. If there are specialized embroidery frames (hoops) designed to hold caps for the right job" is a statement many of fabric and backing... below the outer frame on the fabric and backing together. Cap frames: These are bubbles or wrinkles that must be removed,...
.../outer frame positioning: There should be sure that allows sewing the cap in poor design alignment during this will cause puckers in the embroidery industry. If there are specialized embroidery frames (hoops) designed to hold caps for the right job" is a statement many of fabric and backing... below the outer frame on the fabric and backing together. Cap frames: These are bubbles or wrinkles that must be removed,...

Users Manual - English
Page 225
... 124 Display 16, 48 Display expanded color 140, 146 C Cancel key 50, 56 Canton fleece 167 Canvas 167 Cap frame 169 Display guides 143 Distance from center (horizontal 51, 53 Distance from center (vertical 51, 53 Dress shirt ...(woven 167 DST "DST" TRIM SETTING 140, 149 attaching 173 removing 176 E Cap frame driver 170 Edit end key 52 Carriage 2 Edit key 49, 54 Center cursor 145 Editing 25, 118, 128 ... attaching to the machine 30 needle bars and thread colors 33 hooping 28 preview image 27 removing 45 types 63 Index 207
... 124 Display 16, 48 Display expanded color 140, 146 C Cancel key 50, 56 Canton fleece 167 Canvas 167 Cap frame 169 Display guides 143 Distance from center (horizontal 51, 53 Distance from center (vertical 51, 53 Dress shirt ...(woven 167 DST "DST" TRIM SETTING 140, 149 attaching 173 removing 176 E Cap frame driver 170 Edit end key 52 Carriage 2 Edit key 49, 54 Center cursor 145 Editing 25, 118, 128 ... attaching to the machine 30 needle bars and thread colors 33 hooping 28 preview image 27 removing 45 types 63 Index 207

Users Manual - English
Page 18
... Using a frame pattern to create appliqués (2 158 Helpful Tips for the Operation of PR-600 160 Checking the thread tension of built-in patterns 160 Sewing a pattern aligned with a mark... ...163 Creating Beautiful Embroidery 164 Threads ...164 Stabilizers (Backing) ...165 Hooping Techniques...166 Fabric/stabilizer compatibility chart ...167 OPTIONAL ACCESSORIES 168 Attaching an optional embroidery frame...embroidery machines 168 Using the Optional Cap Frame 169 Cap frame and its accessories...169 Preparing to use the cap frame ...170 Attaching the cap frame ...173 Installing the embroidery...
... Using a frame pattern to create appliqués (2 158 Helpful Tips for the Operation of PR-600 160 Checking the thread tension of built-in patterns 160 Sewing a pattern aligned with a mark... ...163 Creating Beautiful Embroidery 164 Threads ...164 Stabilizers (Backing) ...165 Hooping Techniques...166 Fabric/stabilizer compatibility chart ...167 OPTIONAL ACCESSORIES 168 Attaching an optional embroidery frame...embroidery machines 168 Using the Optional Cap Frame 169 Cap frame and its accessories...169 Preparing to use the cap frame ...170 Attaching the cap frame ...173 Installing the embroidery...

Users Manual - English
Page 47
... used with the right side up on page 65. Loosen the screw on the outer frame. 2 1 1 Screw Place the fabric with the optional cap frames. (Refer to "Hooping the Fabric" on top 3 of the fabric. Securely tighten the screw, and then check 6 that the fabric is taut. • After stretching... in the fabric after it is stretched in the medium embroidery frame. For details on hooping fabric in the large embroidery frame and the extra-large embroidery frame, refer to 12 "Using the Optional Cap Frame" on the type of fabric being embroidered. The same procedure is described below. ...
... used with the right side up on page 65. Loosen the screw on the outer frame. 2 1 1 Screw Place the fabric with the optional cap frames. (Refer to "Hooping the Fabric" on top 3 of the fabric. Securely tighten the screw, and then check 6 that the fabric is taut. • After stretching... in the fabric after it is stretched in the medium embroidery frame. For details on hooping fabric in the large embroidery frame and the extra-large embroidery frame, refer to 12 "Using the Optional Cap Frame" on the type of fabric being embroidered. The same procedure is described below. ...

Users Manual - English
Page 81
.... CAUTION ● Only use an embroidery frame of 50 mm (2 inches) or less, such as nametags. (Refer to "Hooping the Fabric" on page 65.) (Refer to "Using the Optional Cap Frame" on page 28.) Cap frame (optional) Embroidering area: 50 mm (H) × 130 mm (W) (2 inches (H) × 5-1/8 inches (W)) Note ● The embroidery frame indicators...
.... CAUTION ● Only use an embroidery frame of 50 mm (2 inches) or less, such as nametags. (Refer to "Hooping the Fabric" on page 65.) (Refer to "Using the Optional Cap Frame" on page 28.) Cap frame (optional) Embroidering area: 50 mm (H) × 130 mm (W) (2 inches (H) × 5-1/8 inches (W)) Note ● The embroidery frame indicators...
Users Manual - English
Page 173
... / 156 Using a frame pattern to create appliqués (1) / 157 Using a frame pattern to use the cap frame / 170 Attaching the cap frame / 173 Installing the embroidery frame holder / 176 Maintenance ...183 Cleaning the LCD / 183 Cleaning the machine ...Hooping Techniques / 166 Fabric/stabilizer compatibility chart / 167 OPTIONAL ACCESSORIES Attaching an optional embroidery frame for industrial embroidery machines ......168 Using the Optional Cap Frame 169 Cap frame and its accessories / 169 Preparing to create appliqués (2) / 158 Helpful Tips for the Operation of PR-600...
... / 156 Using a frame pattern to create appliqués (1) / 157 Using a frame pattern to use the cap frame / 170 Attaching the cap frame / 173 Installing the embroidery frame holder / 176 Maintenance ...183 Cleaning the LCD / 183 Cleaning the machine ...Hooping Techniques / 166 Fabric/stabilizer compatibility chart / 167 OPTIONAL ACCESSORIES Attaching an optional embroidery frame for industrial embroidery machines ......168 Using the Optional Cap Frame 169 Cap frame and its accessories / 169 Preparing to create appliqués (2) / 158 Helpful Tips for the Operation of PR-600...

Users Manual - English
Page 184
...size or type of embroidery frame may cause puckers around the hook assembly. Cap frames: These are specialized embroidery frames (hoops) designed to hold caps for use on a flat machine) or one that allows sewing a flattened cap (for use on a tubular machine). Avoid overtightening the screw as this ...with two basic styles: one that you pull on the back side. Sapphire.book Page 166 Friday, August 1, 2003 9:12 AM Appendix Hooping Techniques "Use the right tool for the right job" is a statement many of wrinkles or bubbles. Overstretching the fabric during sewing or ...
...size or type of embroidery frame may cause puckers around the hook assembly. Cap frames: These are specialized embroidery frames (hoops) designed to hold caps for use on a flat machine) or one that allows sewing a flattened cap (for use on a tubular machine). Avoid overtightening the screw as this ...with two basic styles: one that you pull on the back side. Sapphire.book Page 166 Friday, August 1, 2003 9:12 AM Appendix Hooping Techniques "Use the right tool for the right job" is a statement many of wrinkles or bubbles. Overstretching the fabric during sewing or ...
Users Manual - English
Page 225
... 124 Display 16, 48 Display expanded color 140, 146 C Cancel key 50, 56 Canton fleece 167 Canvas 167 Cap frame 169 Display guides 143 Distance from center (horizontal 51, 53 Distance from center (vertical 51, 53 Dress shirt ...(woven 167 DST "DST" TRIM SETTING 140, 149 attaching 173 removing 176 E Cap frame driver 170 Edit end key 52 Carriage 2 Edit key 49, 54 Center cursor 145 Editing 25, 118, 128 ... attaching to the machine 30 needle bars and thread colors 33 hooping 28 preview image 27 removing 45 types 63 Index 207
... 124 Display 16, 48 Display expanded color 140, 146 C Cancel key 50, 56 Canton fleece 167 Canvas 167 Cap frame 169 Display guides 143 Distance from center (horizontal 51, 53 Distance from center (vertical 51, 53 Dress shirt ...(woven 167 DST "DST" TRIM SETTING 140, 149 attaching 173 removing 176 E Cap frame driver 170 Edit end key 52 Carriage 2 Edit key 49, 54 Center cursor 145 Editing 25, 118, 128 ... attaching to the machine 30 needle bars and thread colors 33 hooping 28 preview image 27 removing 45 types 63 Index 207


