
Accessory Catalog - English
Page 2
CONTENTS EMBROIDERY FRAMES (SQUARE 2 EMBROIDERY FRAMES (SQUARE) for PR-1000 4 EMBROIDERY FRAMES (ROUND) for PR-1000 6 CAP FRAMES 8 CAP FRAMES for PR-1000/650/620 10 CAP FRAMES for PR-1000 12 CYLINDER FRAMES for PR-1000/650/620 14 BORDER FRAMES for PR-1000 16 BOBBIN WINDER SET 18 OTHERS 20 - 1 -
CONTENTS EMBROIDERY FRAMES (SQUARE 2 EMBROIDERY FRAMES (SQUARE) for PR-1000 4 EMBROIDERY FRAMES (ROUND) for PR-1000 6 CAP FRAMES 8 CAP FRAMES for PR-1000/650/620 10 CAP FRAMES for PR-1000 12 CYLINDER FRAMES for PR-1000/650/620 14 BORDER FRAMES for PR-1000 16 BOBBIN WINDER SET 18 OTHERS 20 - 1 -
Accessory Catalog - English
Page 10
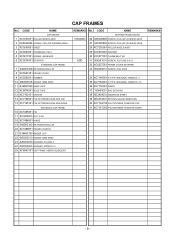
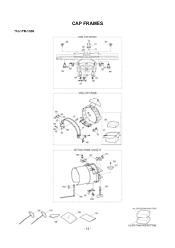
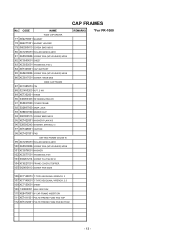
...(S/P WASHER) M3X6 3 XC5550051 SHEET 4 XC5553051 THUMB BOLT M4 L 5 XC5817051 SCREW, KNOB M4S 6 XC5574001 STOPPER STANDARD CAP FRAME 7 048050346 RETAINING RING, E5 8 XC5561051 FRAME COVER 9 XC5562051 RUBBER 10 060300516 SCREW, BIND M3X5 11 S32897000 SNAP LOCK 12 XC6974051 HOLD TAPE 13 XC7163151 CARTON 14 ...22 060300513 SCREW, BIND M3X5 23 026030233 WASHER, PLAIN M 3 24 028030243 WASHER, SPRING 2-3 25 XC8943151 CAP FRAME USER'S GUIDE,ENG REMARKS No. CODE NAME SETTING FRAME GAUGE 1000022560 26 0A5400606 SCREW, PAN (S/P WASHER) M4X6 27 0A5300806 SCREW, PAN (S/P WASHER) M3X8 28 ...
...(S/P WASHER) M3X6 3 XC5550051 SHEET 4 XC5553051 THUMB BOLT M4 L 5 XC5817051 SCREW, KNOB M4S 6 XC5574001 STOPPER STANDARD CAP FRAME 7 048050346 RETAINING RING, E5 8 XC5561051 FRAME COVER 9 XC5562051 RUBBER 10 060300516 SCREW, BIND M3X5 11 S32897000 SNAP LOCK 12 XC6974051 HOLD TAPE 13 XC7163151 CARTON 14 ...22 060300513 SCREW, BIND M3X5 23 026030233 WASHER, PLAIN M 3 24 028030243 WASHER, SPRING 2-3 25 XC8943151 CAP FRAME USER'S GUIDE,ENG REMARKS No. CODE NAME SETTING FRAME GAUGE 1000022560 26 0A5400606 SCREW, PAN (S/P WASHER) M4X6 27 0A5300806 SCREW, PAN (S/P WASHER) M3X8 28 ...
Accessory Catalog - English
Page 11
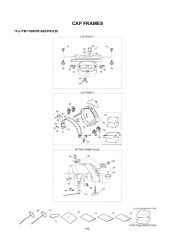
*For PR-1000/PR-650/PR-620 CAP FRAMES - 10 -
*For PR-1000/PR-650/PR-620 CAP FRAMES - 10 -
Accessory Catalog - English
Page 12
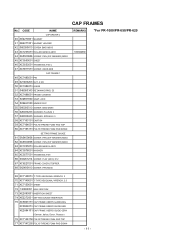
...XC5550051 SHEET 46 XC5553051 THUMB BOLT M4 L 47 XC5817051 SCREW, KNOB M4S CAP FRAME C 48 XC7485051 PIN 49 021400203 NUT, 2 M4 50 XC7484051 HINGE 51 048050343 RETAINING RING, E5 52 XC7486051 FRAME COVER B 53 S32897000 SNAP LOCK 54 S39460100 BINDER CLIP 55 060300513 SCREW...For PR-1000/PR-650/PR-620 69 XC7148051 T-TYPE HEXGONAL WRENCH, 3 70 XC7149051 T-TYPE HEXGONAL WRENCH, 2.5 71 XC7150051 SHEET 72 130800051 BAG 230X310H 73 XE2893001 INSERTION SHEET 74 XE2272001 SETTING GAUGE INSERTION 75 XC8943151 CAP FRAME USER'S GUIDE,ENG XC8944051 CAP FRAME USER'S GUIDE,GER XE2894101 CAP FRAME USER...
...XC5550051 SHEET 46 XC5553051 THUMB BOLT M4 L 47 XC5817051 SCREW, KNOB M4S CAP FRAME C 48 XC7485051 PIN 49 021400203 NUT, 2 M4 50 XC7484051 HINGE 51 048050343 RETAINING RING, E5 52 XC7486051 FRAME COVER B 53 S32897000 SNAP LOCK 54 S39460100 BINDER CLIP 55 060300513 SCREW...For PR-1000/PR-650/PR-620 69 XC7148051 T-TYPE HEXGONAL WRENCH, 3 70 XC7149051 T-TYPE HEXGONAL WRENCH, 2.5 71 XC7150051 SHEET 72 130800051 BAG 230X310H 73 XE2893001 INSERTION SHEET 74 XE2272001 SETTING GAUGE INSERTION 75 XC8943151 CAP FRAME USER'S GUIDE,ENG XC8944051 CAP FRAME USER'S GUIDE,GER XE2894101 CAP FRAME USER...
Accessory Catalog - English
Page 13
*For PR-1000 CAP FRAMES - 12 -
*For PR-1000 CAP FRAMES - 12 -
Accessory Catalog - English
Page 14
... SCREW PAN (S/P WASHER) M3X6 82 XC5550051 SHEET 83 XC5553051 THUMB BOLT M4 L 84 XE7343001 CAP SUPPORT 85 0A5400806 SCREW PAN (S/P WASHER) M4X8 86 XC5817051 SCREW, KNOB M4S WIDE CAP FRAME 87 XC7485051 PIN 88 021400203 NUT, 2 M4 89 XE7352001 HINGE 90 048050343 RETAINING RING E5 ...(S/P WASHER) M3X8 101 XC5576051 WASHER 102 XC5577051 THUMB BOLT M6 103 004261214 SCREW FLAT M2.6X12 104 XC6227051 FRAME COVER STOPPER 105 062400613 SCREW PAN M4X6 CAP FRAMES REMARKS *For PR-1000 106 XC7148051 T-TYPE HEXGONAL WRENCH, 3 107 XC7149051 T-TYPE HEXGONAL WRENCH, 2.5 108 XC7150051 SHEET 109 ...
... SCREW PAN (S/P WASHER) M3X6 82 XC5550051 SHEET 83 XC5553051 THUMB BOLT M4 L 84 XE7343001 CAP SUPPORT 85 0A5400806 SCREW PAN (S/P WASHER) M4X8 86 XC5817051 SCREW, KNOB M4S WIDE CAP FRAME 87 XC7485051 PIN 88 021400203 NUT, 2 M4 89 XE7352001 HINGE 90 048050343 RETAINING RING E5 ...(S/P WASHER) M3X8 101 XC5576051 WASHER 102 XC5577051 THUMB BOLT M6 103 004261214 SCREW FLAT M2.6X12 104 XC6227051 FRAME COVER STOPPER 105 062400613 SCREW PAN M4X6 CAP FRAMES REMARKS *For PR-1000 106 XC7148051 T-TYPE HEXGONAL WRENCH, 3 107 XC7149051 T-TYPE HEXGONAL WRENCH, 2.5 108 XC7150051 SHEET 109 ...
Users Manual - English
Page 12
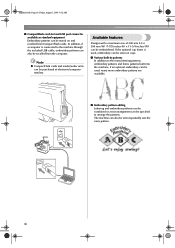
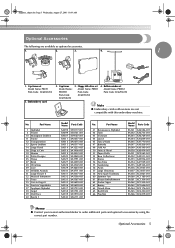
If the optional cap frame is used , many more embroidery patterns are available. ■ Embroidery pattern editing Lettering and embroidery patterns can be combined or a text arrangement can be specified ... ■ CompactFlash card slot and USB port connector available as standard equipment Embroidery patterns can be stored on caps. ■ Various built-in patterns In addition to the many lettering patterns, embroidery patterns and frame patterns built into the machine, if an optional embroidery card is used , embroidery can be sewn on...
If the optional cap frame is used , many more embroidery patterns are available. ■ Embroidery pattern editing Lettering and embroidery patterns can be combined or a text arrangement can be specified ... ■ CompactFlash card slot and USB port connector available as standard equipment Embroidery patterns can be stored on caps. ■ Various built-in patterns In addition to the many lettering patterns, embroidery patterns and frame patterns built into the machine, if an optional embroidery card is used , embroidery can be sewn on...
Users Manual - English
Page 18
...233; Sewing...156 Sewing appliqué patterns ...156 Using a frame pattern to create appliqués (1 157 Using a frame pattern to create appliqués (2 158 Helpful Tips for the Operation of PR-600 160 Checking the thread tension of built-in patterns 160 Sewing a... OPTIONAL ACCESSORIES 168 Attaching an optional embroidery frame for industrial embroidery machines 168 Using the Optional Cap Frame 169 Cap frame and its accessories...169 Preparing to use the cap frame ...170 Attaching the cap frame ...173 Installing the embroidery frame holder...176 Using the Optional Bobbin Winder ...
...233; Sewing...156 Sewing appliqué patterns ...156 Using a frame pattern to create appliqués (1 157 Using a frame pattern to create appliqués (2 158 Helpful Tips for the Operation of PR-600 160 Checking the thread tension of built-in patterns 160 Sewing a... OPTIONAL ACCESSORIES 168 Attaching an optional embroidery frame for industrial embroidery machines 168 Using the Optional Cap Frame 169 Cap frame and its accessories...169 Preparing to use the cap frame ...170 Attaching the cap frame ...173 Installing the embroidery frame holder...176 Using the Optional Bobbin Winder ...
Users Manual - English
Page 23
Floppy disk drive set Model Name: PRCF1 Parts Code: XC6288-052 5. Cap frame Model Name: PRCFH1 Parts Code: XC6958-052 3. No. Part Name 41 Renaissance Alphabet 42 Farm 43 Victorian 44 Lace2 45 Fancy Work 47 Butterfly 49 ... Name: PRBW1 Parts Code: XC6290-052 Note ● Embroidery cards sold overseas are available as optional accessories. 1. 2. 3. 4. 1 1. Cap frame set Model Name: PRFD1 Parts Code: XC6289-052 4. Part Name 1 Alphabet 2 Flower 10 Monogram Emblem 11 Frame 12 Transportation 13 Sports Emblem 14 Large Floral 16 Dogs & Cats 19 Marine 20 Petite Designs 25...
Floppy disk drive set Model Name: PRCF1 Parts Code: XC6288-052 5. Cap frame Model Name: PRCFH1 Parts Code: XC6958-052 3. No. Part Name 41 Renaissance Alphabet 42 Farm 43 Victorian 44 Lace2 45 Fancy Work 47 Butterfly 49 ... Name: PRBW1 Parts Code: XC6290-052 Note ● Embroidery cards sold overseas are available as optional accessories. 1. 2. 3. 4. 1 1. Cap frame set Model Name: PRFD1 Parts Code: XC6289-052 4. Part Name 1 Alphabet 2 Flower 10 Monogram Emblem 11 Frame 12 Transportation 13 Sports Emblem 14 Large Floral 16 Dogs & Cats 19 Marine 20 Petite Designs 25...
Users Manual - English
Page 47
Either side can also be used to 12 "Using the Optional Cap Frame" on the type of the outer frame. • The outer frame does not have a front or back side. Securely tighten the screw, and then check 6 that the fabric is stretched and the use of ...stabilizer material differ depending on page 169.) 13 14 Hooping the Fabric in the medium embroidery frame. Loosen the screw on the outer frame. 2 1 1 Screw Place the fabric with the optional cap frames. (Refer to hoop the fabric in the Embroidery Frame 29 Lightly tighten the screw, and then pull the 5 edges of inner...
Either side can also be used to 12 "Using the Optional Cap Frame" on the type of the outer frame. • The outer frame does not have a front or back side. Securely tighten the screw, and then check 6 that the fabric is stretched and the use of ...stabilizer material differ depending on page 169.) 13 14 Hooping the Fabric in the medium embroidery frame. Loosen the screw on the outer frame. 2 1 1 Screw Place the fabric with the optional cap frames. (Refer to hoop the fabric in the Embroidery Frame 29 Lightly tighten the screw, and then pull the 5 edges of inner...
Users Manual - English
Page 81
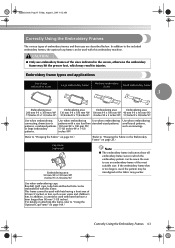
Be sure to the included embroidery frames, the optional cap frame can be used with this frame, refer to "Hooping the Fabric in the Embroidery Frame" on page 28.) Cap frame (optional) Embroidering area: 50 mm (H) × 130 mm (W) (2 inches (H) × 5-1/8 inches (W)) Note ● The embroidery frame indicators show all embroidery frame sizes in which may result in the screen...
Be sure to the included embroidery frames, the optional cap frame can be used with this frame, refer to "Hooping the Fabric in the Embroidery Frame" on page 28.) Cap frame (optional) Embroidering area: 50 mm (H) × 130 mm (W) (2 inches (H) × 5-1/8 inches (W)) Note ● The embroidery frame indicators show all embroidery frame sizes in which may result in the screen...

Users Manual - English
Page 86
..., warning that it is changed . If the embroidery frame is correctly positioned. Therefore, the embroidery frame size is positioned so that the embroidery frame must be correctly positioned. Embroidery frames with an embroidering area smaller than the embroidering area but...frames that is installed will move. • The embroidering settings screen is installed. If the pattern extends out of the embroidering area for embroidering As explained on page 28, the embroidery frame indicators at the starting position before embroidering. A message indicating that the cap frame...
..., warning that it is changed . If the embroidery frame is correctly positioned. Therefore, the embroidery frame size is positioned so that the embroidery frame must be correctly positioned. Embroidery frames with an embroidering area smaller than the embroidering area but...frames that is installed will move. • The embroidering settings screen is installed. If the pattern extends out of the embroidering area for embroidering As explained on page 28, the embroidery frame indicators at the starting position before embroidering. A message indicating that the cap frame...

Users Manual - English
Page 107
...from the embroidering settings screen or the embroidering screen. Maximum Sewing Speed Setting 89 Maximum sewing speed Embroidery frame Cap frame 1 1000 1 600 2 900 2 550 3 800 3 500 4 700 4 450 5 600 5 400 The maximum sewing speed setting is selected. The setting specified before the machine is turned off....book Page 89 Friday, August 1, 2003 9:12 AM Maximum Sewing Speed Setting The maximum sewing speed can be set to 600 rpm (Cap frame for 400 rpm). When the embroidery machine is purchased, the maximum sewing speed is turned on thin, thick or heavy fabrics...
...from the embroidering settings screen or the embroidering screen. Maximum Sewing Speed Setting 89 Maximum sewing speed Embroidery frame Cap frame 1 1000 1 600 2 900 2 550 3 800 3 500 4 700 4 450 5 600 5 400 The maximum sewing speed setting is selected. The setting specified before the machine is turned off....book Page 89 Friday, August 1, 2003 9:12 AM Maximum Sewing Speed Setting The maximum sewing speed can be set to 600 rpm (Cap frame for 400 rpm). When the embroidery machine is purchased, the maximum sewing speed is turned on thin, thick or heavy fabrics...
Users Manual - English
Page 162
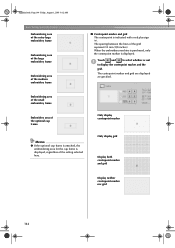
...the grid. Memo ● If the optional cap frame is attached, the embroidering area for the cap frame is displayed. When the embroidery machine is purchased, only the centerpoint marker is displayed, regardless of the medium embroidery frame ■ Centerpoint marker and grid The centerpoint ... (+). The centerpoint marker and grid are displayed as specified. The spacing between the lines of the optional cap frame. Embroidering area of the small embroidery frame Embroidery area of the grid represent 10 mm (3/8 inches). Only display centerpoint marker Only display grid Display ...
...the grid. Memo ● If the optional cap frame is attached, the embroidering area for the cap frame is displayed. When the embroidery machine is purchased, only the centerpoint marker is displayed, regardless of the medium embroidery frame ■ Centerpoint marker and grid The centerpoint ... (+). The centerpoint marker and grid are displayed as specified. The spacing between the lines of the optional cap frame. Embroidering area of the small embroidery frame Embroidery area of the grid represent 10 mm (3/8 inches). Only display centerpoint marker Only display grid Display ...

Users Manual - English
Page 170
... beginning of pages 5 Movie key Appears only if the procedure for • Threading theupper thread • Threading the needle • Replacing the embroidery frame holder • Attaching the cap frame. While a movie is paused, the key changes to . While the movie is being shown, the key changes to . After checking the procedure, touch...
... beginning of pages 5 Movie key Appears only if the procedure for • Threading theupper thread • Threading the needle • Replacing the embroidery frame holder • Attaching the cap frame. While a movie is paused, the key changes to . While the movie is being shown, the key changes to . After checking the procedure, touch...
Users Manual - English
Page 173
... sewing applications, pointers for industrial embroidery machines ......168 Using the Optional Cap Frame 169 Cap frame and its accessories / 169 Preparing to use the cap frame / 170 Attaching the cap frame / 173 Installing the embroidery frame holder / 176 Maintenance ...183 Cleaning the LCD / 183 Cleaning the...233; Sewing 156 Sewing appliqué patterns / 156 Using a frame pattern to create appliqués (1) / 157 Using a frame pattern to create appliqués (2) / 158 Helpful Tips for the Operation of PR-600 160 Checking the thread tension of built-in patterns / 160 Sewing...
... sewing applications, pointers for industrial embroidery machines ......168 Using the Optional Cap Frame 169 Cap frame and its accessories / 169 Preparing to use the cap frame / 170 Attaching the cap frame / 173 Installing the embroidery frame holder / 176 Maintenance ...183 Cleaning the LCD / 183 Cleaning the...233; Sewing 156 Sewing appliqué patterns / 156 Using a frame pattern to create appliqués (1) / 157 Using a frame pattern to create appliqués (2) / 158 Helpful Tips for the Operation of PR-600 160 Checking the thread tension of built-in patterns / 160 Sewing...

Users Manual - English
Page 184
... and backing should be perfectly flat and free of fabric and backing below the outer frame on a flat machine) or one that allows sewing the cap in the fabric and may cause puckers around the hook assembly. If there are bubbles or wrinkles that you pull on a tubular machine)....for embroidering. Avoid overtightening the screw as this process may "strip" the screw. 166 The wrong size or type of frame allows tubular fabric or pre-assembled garments to hold caps for use on the fabric and backing together. Gaps may result in the embroidery industry. Pull no more than is a...
... and backing should be perfectly flat and free of fabric and backing below the outer frame on a flat machine) or one that allows sewing the cap in the fabric and may cause puckers around the hook assembly. If there are bubbles or wrinkles that you pull on a tubular machine)....for embroidering. Avoid overtightening the screw as this process may "strip" the screw. 166 The wrong size or type of frame allows tubular fabric or pre-assembled garments to hold caps for use on the fabric and backing together. Gaps may result in the embroidery industry. Pull no more than is a...
Users Manual - English
Page 187
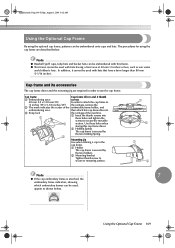
...jig are described below . The procedures for using the optional cap frame, patterns can be used, appear as sun visors and children's hats. Cap frame 1 Embroidering area: Cap frame driver and 4 thumb screws 50 mm (H) × 130 mm (W) In order to attach the cap frame to (2 inches (H) × 5-1/8 inches (W)) the carriage,... than 80 mm (3-1/16 inches). Sapphire.book Page 169 Friday, August 1, 2003 9:12 AM Using the Optional Cap Frame By using the cap frame are required in the cap frame. 1 Holder The cap frame is secured by the two holding Spring. 3 Mounting jig Use when...
...jig are described below . The procedures for using the optional cap frame, patterns can be used, appear as sun visors and children's hats. Cap frame 1 Embroidering area: Cap frame driver and 4 thumb screws 50 mm (H) × 130 mm (W) In order to attach the cap frame to (2 inches (H) × 5-1/8 inches (W)) the carriage,... than 80 mm (3-1/16 inches). Sapphire.book Page 169 Friday, August 1, 2003 9:12 AM Using the Optional Cap Frame By using the cap frame are required in the cap frame. 1 Holder The cap frame is secured by the two holding Spring. 3 Mounting jig Use when...
Users Manual - English
Page 188
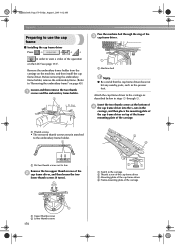
...lose Remove the two upper thumb screws of the 2 cap frame driver, and then loosen the two lower thumb screws (4 turns). 1 2 1 1 Notch in the carriage 2 Thumb screw of the cap frame driver 3 Mounting plate of the cap frame driver 4 Frame-mounting plate of the carriage 2 1 Upper thumb ...The removed thumb screws remain attached to the embroidery frame holder. 1 3 4 1 Put two thumb screws not to use the cap frame ■ Installing the cap frame driver Press → → →→ Pass the machine bed through 6. Attach the cap frame driver to view a video of the operation on...
...lose Remove the two upper thumb screws of the 2 cap frame driver, and then loosen the two lower thumb screws (4 turns). 1 2 1 1 Notch in the carriage 2 Thumb screw of the cap frame driver 3 Mounting plate of the cap frame driver 4 Frame-mounting plate of the carriage 2 1 Upper thumb ...The removed thumb screws remain attached to the embroidery frame holder. 1 3 4 1 Put two thumb screws not to use the cap frame ■ Installing the cap frame driver Press → → →→ Pass the machine bed through 6. Attach the cap frame driver to view a video of the operation on...
Users Manual - English
Page 189
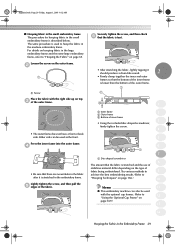
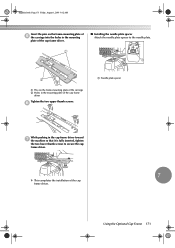
... Attach the needle plate spacer to the needle plate. 1 1 2 1 Pins on the frame-mounting plate of the carriage 2 Holes in the mounting plate of the cap frame driver Tighten the two upper thumb screws. 6 1 Needle plate spacer While pushing in the cap frame driver toward 7 the machine so that it is fully inserted, tighten the...
... Attach the needle plate spacer to the needle plate. 1 1 2 1 Pins on the frame-mounting plate of the carriage 2 Holes in the mounting plate of the cap frame driver Tighten the two upper thumb screws. 6 1 Needle plate spacer While pushing in the cap frame driver toward 7 the machine so that it is fully inserted, tighten the...


