
Upper Thread Breaks - English
Page 1
... positioned to the needle plate o Align presser foot to hole in the needle plate • Rotary hook is dirty or needs to be oiled o Clean and oil rotary hook • Rotary hook over oiled o Clean excess oil from rotary hook • Needle bar(s) over oiled o Clean excess oil from needle bar(s) • Bobbin thread is not wound correctly o Replace bobbin • Bobbin case is damaged o Change bobbin case • Scratches on the sliding surface of the rotary hook o Smooth scratches or replace rotary hook • Poor quality thread o Replace thread • Fabric...
... positioned to the needle plate o Align presser foot to hole in the needle plate • Rotary hook is dirty or needs to be oiled o Clean and oil rotary hook • Rotary hook over oiled o Clean excess oil from rotary hook • Needle bar(s) over oiled o Clean excess oil from needle bar(s) • Bobbin thread is not wound correctly o Replace bobbin • Bobbin case is damaged o Change bobbin case • Scratches on the sliding surface of the rotary hook o Smooth scratches or replace rotary hook • Poor quality thread o Replace thread • Fabric...

Upper Thread Breaks - English
Page 2
• Wrong type of backing o Use the correct backing for garment • Design contains many small stitches of .2 mm or less o Modify design to eliminate stitches of .2mm or less • Too much density in design o Reduce density in design • The area around the hole in the needle plate is damaged o Replace needle plate • Rotary hook is out of time o Re-time rotary hook
• Wrong type of backing o Use the correct backing for garment • Design contains many small stitches of .2 mm or less o Modify design to eliminate stitches of .2mm or less • Too much density in design o Reduce density in design • The area around the hole in the needle plate is damaged o Replace needle plate • Rotary hook is out of time o Re-time rotary hook
Rotary Hook Scratches - English
Page 1
... be checked before adjusting the rotary hook timing. If changing the presser foot and or height does not fix the problem than the rotary hook might have some nicks or scratches on a 4 and 6 head. using the tweezers to 100 degrees or by pressing the back switch on the head on it needs the height adjusted. After checking and repairing the rotary hook it will...
... be checked before adjusting the rotary hook timing. If changing the presser foot and or height does not fix the problem than the rotary hook might have some nicks or scratches on a 4 and 6 head. using the tweezers to 100 degrees or by pressing the back switch on the head on it needs the height adjusted. After checking and repairing the rotary hook it will...

Needle Set Procedure - English
Page 1
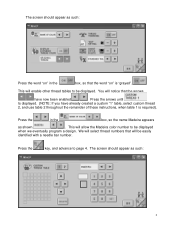
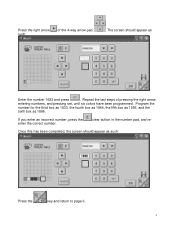
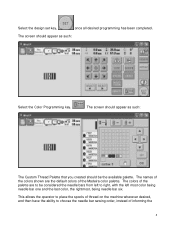
Start from the main menu screen as such: Press the key with the hand symbol in the upper left corner of the screen. Press the Settings key in the lower right corner to advance to page 2. 1 PR-600, PR-600C For Technical Assistance Please Call Toll Free 1-877-4BROTHER Email: tsupport@brother.com Website: http://www.brother-usa.com/industembroidery/tech_down.aspx To program needle selection, a custom thread palette must be created. The screen should appear as shown.
Start from the main menu screen as such: Press the key with the hand symbol in the upper left corner of the screen. Press the Settings key in the lower right corner to advance to page 2. 1 PR-600, PR-600C For Technical Assistance Please Call Toll Free 1-877-4BROTHER Email: tsupport@brother.com Website: http://www.brother-usa.com/industembroidery/tech_down.aspx To program needle selection, a custom thread palette must be created. The screen should appear as shown.
Needle Set Procedure - English
Page 2
... have already created a custom "1" table, select custom thread 2, and use table 2 throughout the remainder of these instructions, when table 1 is "grayed". This will be displayed when we eventually program a design. This will notice that the word "on " in the box, so the name Madeira appears as such: 2 Press the key, and advance to be easily identified with a needle bar number.
... have already created a custom "1" table, select custom thread 2, and use table 2 throughout the remainder of these instructions, when table 1 is "grayed". This will be displayed when we eventually program a design. This will notice that the word "on " in the box, so the name Madeira appears as such: 2 Press the key, and advance to be easily identified with a needle bar number.
Needle Set Procedure - English
Page 3
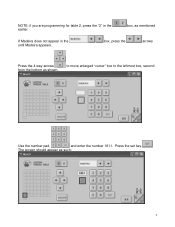
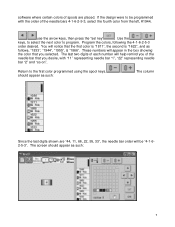
box, press the arrows Press the 4 way arrows from the bottom as such: 3 The screen should appear as shown. NOTE: if you are programming for table 2, press the "2" in the until Madeira appears. to move enlarged "cursor" box to the leftmost box, second Use the number pad, and enter the number 1811. Press the set key. box, as mentioned If Madeira does not appear in the earlier.
box, press the arrows Press the 4 way arrows from the bottom as such: 3 The screen should appear as shown. NOTE: if you are programming for table 2, press the "2" in the until Madeira appears. to move enlarged "cursor" box to the leftmost box, second Use the number pad, and enter the number 1811. Press the set key. box, as mentioned If Madeira does not appear in the earlier.
Needle Set Procedure - English
Page 4
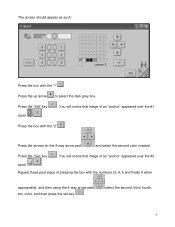
...such: Press the key and return to page 3. 4 Once this has been completed, the screen should appear as Enter the number 1622 and press . clear button in the number pad, and re- Repeat the last steps of the 4-way arrow pad. Press the right arrow such: of pressing the ...right arrow, entering numbers, and pressing set, until six colors have been programmed. If you enter an incorrect number, press the enter the correct number. The screen...
...such: Press the key and return to page 3. 4 Once this has been completed, the screen should appear as Enter the number 1622 and press . clear button in the number pad, and re- Repeat the last steps of the 4-way arrow pad. Press the right arrow such: of pressing the ...right arrow, entering numbers, and pressing set, until six colors have been programmed. If you enter an incorrect number, press the enter the correct number. The screen...
Needle Set Procedure - English
Page 5
... screen should appear as such: Press the box with the numbers (3, 4, 5 and finally 6 when appropriate), and then using the 4-way arrow pad etc. Press the "Set" key spool . . Press the arrows on the 4-way arrow pad and select the second color created. Press the "Set" key . select the second, third, fourth, 5 You will notice that...
... screen should appear as such: Press the box with the numbers (3, 4, 5 and finally 6 when appropriate), and then using the 4-way arrow pad etc. Press the "Set" key spool . . Press the arrows on the 4-way arrow pad and select the second color created. Press the "Set" key . select the second, third, fourth, 5 You will notice that...
Needle Set Procedure - English
Page 6
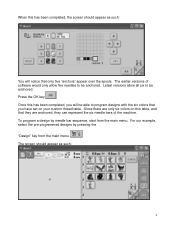
...needle bars of software would only allow all six to be anchored. The earlier versions of the machine. Once this has been completed, you have set on this has been completed, the screen should appear as such: You will be able to be anchored. For our example, select the pre-programmed designs by needle bar sequence, start... from the main menu. The screen should appear as such: 6 When this table, and that they are only six colors on your custom thread table. Latest versions allow five needles to program designs with ...
...needle bars of software would only allow all six to be anchored. The earlier versions of the machine. Once this has been completed, you have set on this has been completed, the screen should appear as such: You will be able to be anchored. For our example, select the pre-programmed designs by needle bar sequence, start... from the main menu. The screen should appear as such: 6 When this table, and that they are only six colors on your custom thread table. Latest versions allow five needles to program designs with ...
Needle Set Procedure - English
Page 7
The screen should appear as such: The design displayed is the tension test design, which contains six vertical satin columns, as such: 7 The screen should appear as shown. Select the design. This is contained in the software of the machine. Use the "page turn" key, and advance to page two.
The screen should appear as such: The design displayed is the tension test design, which contains six vertical satin columns, as such: 7 The screen should appear as shown. Select the design. This is contained in the software of the machine. Use the "page turn" key, and advance to page two.
Needle Set Procedure - English
Page 8
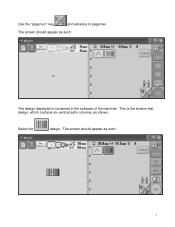
... should be considered the needle bars from left to choose the needle bar sewing order, instead of the Madeira color palette. The colors of the palette are the default colors of informing the 8 Select the design set key, once all desired programming has been completed. This allows the operator to place the spools of thread on the machine wherever desired, and...
... should be considered the needle bars from left to choose the needle bar sewing order, instead of the Madeira color palette. The colors of the palette are the default colors of informing the 8 Select the design set key, once all desired programming has been completed. This allows the operator to place the spools of thread on the machine wherever desired, and...
Needle Set Procedure - English
Page 9
... numbers will notice that you desire, with the order of the needle bars 4-1-6-2-5-3, select the fourth color from the left, #1944, use the arrow keys, then press the "set key" . Program the colors, following the 4-1-6-2-5-3 order desired. software where certain colors of spools are "44, 11, 66, 22, 55, 33", the needle bar order will help remind you of the needle bar...
... numbers will notice that you desire, with the order of the needle bars 4-1-6-2-5-3, select the fourth color from the left, #1944, use the arrow keys, then press the "set key" . Program the colors, following the 4-1-6-2-5-3 order desired. software where certain colors of spools are "44, 11, 66, 22, 55, 33", the needle bar order will help remind you of the needle bar...
Needle Set Procedure - English
Page 10
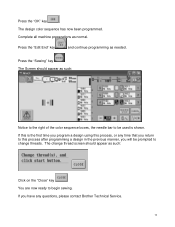
... contact Brother Technical Service. 10 You are now ready to change threads. Complete all machine preparations as needed. The change thread screen should appear as such: Click on the "Close" key . Press the "OK" key . If you will be used is the first time you program a design using this process, or any time that you return to this is shown. Press the "Sewing" key...
... contact Brother Technical Service. 10 You are now ready to change threads. Complete all machine preparations as needed. The change thread screen should appear as such: Click on the "Close" key . Press the "OK" key . If you will be used is the first time you program a design using this process, or any time that you return to this is shown. Press the "Sewing" key...


