

Users Manual - English
Page 2
... necessary when the sewing machine is not working properly, if it to break. G Never operate the sewing machine with any adjustments in the needle area, such as contained in the instruction manual. Keep ventilation openings of the sewing machine and foot control free from the accumulation of electric... the bobbin or changing the presser foot etc. To unplug, grasp the plug, not the cord. Special care is not intended for household use bent needles. G Always use outdoors. G Do not use ." G Do not pull or push fabric while stitching. G Turn off , then remove plug from the ...
... necessary when the sewing machine is not working properly, if it to break. G Never operate the sewing machine with any adjustments in the needle area, such as contained in the instruction manual. Keep ventilation openings of the sewing machine and foot control free from the accumulation of electric... the bobbin or changing the presser foot etc. To unplug, grasp the plug, not the cord. Special care is not intended for household use bent needles. G Always use outdoors. G Do not use ." G Do not pull or push fabric while stitching. G Turn off , then remove plug from the ...

Users Manual - English
Page 4
... the machine is required, first follow the troubleshooting table in relation to the needle while sewing. G Remember to clean the case. For a longer service life G When storing your nearest authorized Brother service center. PLEASE READ BEFORE USING YOUR SEWING MACHINE For safe operation G Be sure ... center visit www.brother.com and use extension cords. G Use only neutral soaps or detergents to turn off the power switch and unplug the cord when: G Operation is completed G Replacing or removing the needle or any accessories, including: the presser feet, needle or other parts to ...
... the machine is required, first follow the troubleshooting table in relation to the needle while sewing. G Remember to clean the case. For a longer service life G When storing your nearest authorized Brother service center. PLEASE READ BEFORE USING YOUR SEWING MACHINE For safe operation G Be sure ... center visit www.brother.com and use extension cords. G Use only neutral soaps or detergents to turn off the power switch and unplug the cord when: G Operation is completed G Replacing or removing the needle or any accessories, including: the presser feet, needle or other parts to ...

Users Manual - English
Page 5
... Knee Lift 4 Presser Foot Pressure Adjustment Dial 4 Fabric Extension Table 4 Thread Cutter Button 5 Needle Stop Position Button 5 Light Switch 5 Feed Dog Adjustment Knob 5 Changing Needles and Light Bulb 6 Changing the Needle 6 Changing the Feed Pin 6 Changing Light Bulbs 6 Threading 7 Bobbin Winding 7 Bobbin Insertion... 9 Upper Threading 10 Using the Automatic Needle Threader 10 Stitch Samples and Needle Chart 12 Stitch Samples 12 Thread Tension 12 Changing Presser Feet 13 Changing Presser Feet (Zipper Foot...
... Knee Lift 4 Presser Foot Pressure Adjustment Dial 4 Fabric Extension Table 4 Thread Cutter Button 5 Needle Stop Position Button 5 Light Switch 5 Feed Dog Adjustment Knob 5 Changing Needles and Light Bulb 6 Changing the Needle 6 Changing the Feed Pin 6 Changing Light Bulbs 6 Threading 7 Bobbin Winding 7 Bobbin Insertion... 9 Upper Threading 10 Using the Automatic Needle Threader 10 Stitch Samples and Needle Chart 12 Stitch Samples 12 Thread Tension 12 Changing Presser Feet 13 Changing Presser Feet (Zipper Foot...

Users Manual - English
Page 6
... 16 17 18 19 20 21 22 No. Part Name 1 Cover 2 Medium Screwdriver 3 Small Screwdriver 4 Cleaning Brush 5 Knee Lift 6 Needles and Case 1 Size 9 (ORGAN HLX5) 2 Size 11 1 Size 14 1 Size 16 1 Ballpoint Needle 7 Lining Plate Screw (2) 8 Fabric Separator 9 Feed Pin 10 Feed Pin Changer 11 General Purpose Foot 12 Bobbin (5) 13 Spool...
... 16 17 18 19 20 21 22 No. Part Name 1 Cover 2 Medium Screwdriver 3 Small Screwdriver 4 Cleaning Brush 5 Knee Lift 6 Needles and Case 1 Size 9 (ORGAN HLX5) 2 Size 11 1 Size 14 1 Size 16 1 Ballpoint Needle 7 Lining Plate Screw (2) 8 Fabric Separator 9 Feed Pin 10 Feed Pin Changer 11 General Purpose Foot 12 Bobbin (5) 13 Spool...

Users Manual - English
Page 7
...Pressure Three Holed Adjustment Dial (Page 4) Thread Guide (Page 10) Light Switch (Page 5) Thread Trimmer Sewing Area Light (Page 6) Automatic Needle Threader (Page 10 and 11) Quick Bobbin Thread Device (Page 9) Thread Cutter Button (Page 5) Thread Tension Dial (Page 3 and 12)...Feed Dogs (Page 5 and 14) Thread Guide Bar (Page 7) Stitch Length Regulator (Page 3) Bobbin Winder (Page 7) Hand Wheel (Page 3) Indicator Lamp Needle Stop Position Button (Page 5) Power Switch (Page 3) Reverse Stitch Lever (Page 3) Power Socket (Page 3) Feed Dog Adjustment Knob (Page 5) Foot Controller ...
...Pressure Three Holed Adjustment Dial (Page 4) Thread Guide (Page 10) Light Switch (Page 5) Thread Trimmer Sewing Area Light (Page 6) Automatic Needle Threader (Page 10 and 11) Quick Bobbin Thread Device (Page 9) Thread Cutter Button (Page 5) Thread Tension Dial (Page 3 and 12)...Feed Dogs (Page 5 and 14) Thread Guide Bar (Page 7) Stitch Length Regulator (Page 3) Bobbin Winder (Page 7) Hand Wheel (Page 3) Indicator Lamp Needle Stop Position Button (Page 5) Power Switch (Page 3) Reverse Stitch Lever (Page 3) Power Socket (Page 3) Feed Dog Adjustment Knob (Page 5) Foot Controller ...

Users Manual - English
Page 8
... desired stitch length using hand wheel. ✽ Always turn on wrong side of the fabric. Upper Thread Tension Loosen Tighten Tension Block Hand Wheel G Position needle using stitch regulator dial. 67 23 Stitch Length Reference Mark 1 Lower number = shorter stitches Higher number = longer stitches 45 Reverse Stitch Lever G Sewing in reverse...
... desired stitch length using hand wheel. ✽ Always turn on wrong side of the fabric. Upper Thread Tension Loosen Tighten Tension Block Hand Wheel G Position needle using stitch regulator dial. 67 23 Stitch Length Reference Mark 1 Lower number = shorter stitches Higher number = longer stitches 45 Reverse Stitch Lever G Sewing in reverse...

Users Manual - English
Page 9
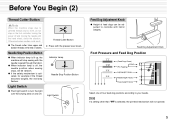
.... ✽ When knee lift is not in use, it can rest at the bottom of pressure on the presser foot changes. Pressure Indicator Needle Fabric Extension Table G Lower table feet and attach fabric extension table as the amount of the fabric extension table. 4 Presser Foot Lift Lever... Knee Lift Fabric Extension Table Knee Lift Presser Foot Pressure Adjustment Dial G Turning the pressure adjustment dial raises and lowers the pressure indicator needle as shown in the below diagram. 2 Hole Guide pin 2 1 Table legs 3 3 Stopper Hook See also: "Feed Dog Adjustment Knob" on page ...
.... ✽ When knee lift is not in use, it can rest at the bottom of pressure on the presser foot changes. Pressure Indicator Needle Fabric Extension Table G Lower table feet and attach fabric extension table as the amount of the fabric extension table. 4 Presser Foot Lift Lever... Knee Lift Fabric Extension Table Knee Lift Presser Foot Pressure Adjustment Dial G Turning the pressure adjustment dial raises and lowers the pressure indicator needle as shown in the below diagram. 2 Hole Guide pin 2 1 Table legs 3 3 Stopper Hook See also: "Feed Dog Adjustment Knob" on page ...
Users Manual - English
Page 10
...Position (Feed Dogs Down) Velvet (Pin Feeding) Lightweight Fabrics Middleweight Fabrics Heavyweight Fabrics Select one of seams. Needle Stop Position Button G When indicator lamp is off . Otherwise broken needles could result. Light Switch G Push light switch to turn the light over the sewing area on the foot... controller, turning the power off and moving the needle with the presser lever down. Thread Cutter Button ✽ Press with the hand wheel, check the situation. G When indicator lamp is ...
...Position (Feed Dogs Down) Velvet (Pin Feeding) Lightweight Fabrics Middleweight Fabrics Heavyweight Fabrics Select one of seams. Needle Stop Position Button G When indicator lamp is off . Otherwise broken needles could result. Light Switch G Push light switch to turn the light over the sewing area on the foot... controller, turning the power off and moving the needle with the presser lever down. Thread Cutter Button ✽ Press with the hand wheel, check the situation. G When indicator lamp is ...
Users Manual - English
Page 11
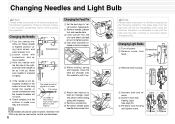
... it up. 6 Attach new feed pin to cool down before carrying out the following operation. however, Schmetz 130/ 705H may break the needle or cause a breakdown and the needle threader will be used under normal circumstances. 6 Changing the Feed Pin 1 Set the feed dogs to "velvet" position. (See page 5.)... 2 Remove needle, presser foot and needle plate. 3 Lower presser foot and turn hand wheel until the light bulb has had a chance to feed pin changer, lower and attach ...
... it up. 6 Attach new feed pin to cool down before carrying out the following operation. however, Schmetz 130/ 705H may break the needle or cause a breakdown and the needle threader will be used under normal circumstances. 6 Changing the Feed Pin 1 Set the feed dogs to "velvet" position. (See page 5.)... 2 Remove needle, presser foot and needle plate. 3 Lower presser foot and turn hand wheel until the light bulb has had a chance to feed pin changer, lower and attach ...
Users Manual - English
Page 14
...thread setting cover beforehand, then set securely on ✽ Always use the bobbin case that was sup- Bobbin Insertion CAUTION - Open covers. 1 Needle Plate Latch Spring Quick Bobbin Thread Device 1 2 Thread Notch Bobbin Door ✽ Bobbin should be positioned so it winds to an appropriate length ... of the arrow 3, then cut the thread. # Quick Bobbin Thread Device This device cuts the bobbin thread end to the left. 3 2 1 Lift needle plate and open bob- 2 Put bobbin into the ✽ Run thread through the quick bobbin thread device in the order 1 2, pull in place. ...
...thread setting cover beforehand, then set securely on ✽ Always use the bobbin case that was sup- Bobbin Insertion CAUTION - Open covers. 1 Needle Plate Latch Spring Quick Bobbin Thread Device 1 2 Thread Notch Bobbin Door ✽ Bobbin should be positioned so it winds to an appropriate length ... of the arrow 3, then cut the thread. # Quick Bobbin Thread Device This device cuts the bobbin thread end to the left. 3 2 1 Lift needle plate and open bob- 2 Put bobbin into the ✽ Run thread through the quick bobbin thread device in the order 1 2, pull in place. ...
Users Manual - English
Page 15
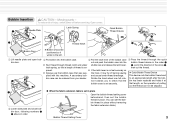
... guide. ✽ If the thread is in the highest position, and lower presser foot. 10 2 Take thread in the direction of 2 to the machine. Automatic Needle Threader Thread 2 Pin 1 Hook ✽ Pull the thread to the left and check that tangles or breaks, run the thread through the eye of 1 and... when the hook extends from the needle hole, pull the thread in your left hand, and gently pull it is caught on the hook. 1 Rotate hand wheel towards you do this operation...
... guide. ✽ If the thread is in the highest position, and lower presser foot. 10 2 Take thread in the direction of 2 to the machine. Automatic Needle Threader Thread 2 Pin 1 Hook ✽ Pull the thread to the left and check that tangles or breaks, run the thread through the eye of 1 and... when the hook extends from the needle hole, pull the thread in your left hand, and gently pull it is caught on the hook. 1 Rotate hand wheel towards you do this operation...

Users Manual - English
Page 16
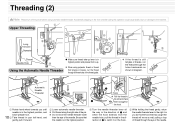
Transparent nylon thread can be used is a #14 or #16. 6 Pull thread loop to the left. Needle (HLX5) #9 #11 #14 #16 Thread #20 #30 #50 #60 #20 #30 #20 #30 #20 G The automatic needle threader cannot be used regardless of the chart, providing the needle used with the threadneedle combinations illustrated in the chart to the right. 11
Transparent nylon thread can be used is a #14 or #16. 6 Pull thread loop to the left. Needle (HLX5) #9 #11 #14 #16 Thread #20 #30 #50 #60 #20 #30 #20 #30 #20 G The automatic needle threader cannot be used regardless of the chart, providing the needle used with the threadneedle combinations illustrated in the chart to the right. 11

Users Manual - English
Page 17
...puckered seams Upper Thread and thread breakage. Special fabric Light weight fabrics Middle weight fabrics Heavy weight fabrics Fabric - however, Schmetz 130/705H needles may cause fabric to bunch up lever to their highest positions. 6 Lift presser foot, remove fabric and then cut thread. ✽ ... it is too tight it is in the down position. 6 Lift foot and remove fabric. 12 Thread Tension ✽ Bobbin thread should feed smoothly. Needles Cloth Thread Velvet Silk, Polyester #30 - #50 Quilt Polyester #20 - #50 Synthetic Suede Polyester #20 - #50 Knit Polyester #20 - #50...
...puckered seams Upper Thread and thread breakage. Special fabric Light weight fabrics Middle weight fabrics Heavy weight fabrics Fabric - however, Schmetz 130/705H needles may cause fabric to bunch up lever to their highest positions. 6 Lift presser foot, remove fabric and then cut thread. ✽ ... it is too tight it is in the down position. 6 Lift foot and remove fabric. 12 Thread Tension ✽ Bobbin thread should feed smoothly. Needles Cloth Thread Velvet Silk, Polyester #30 - #50 Quilt Polyester #20 - #50 Synthetic Suede Polyester #20 - #50 Knit Polyester #20 - #50...

Users Manual - English
Page 18
... concealed fasteners. Presser Feet G Pin Feed Foot For perfect stitching on hems of dress shirts, to fold the edge of the fabric in relation to needle. ✽ Only the zipper foot has a position knob. G Zipper Foot Use to attach fasteners other feet that come with 1/4" or 1/8" seam allowance. Use of ...; Use the position knob on back of the zipper foot to adjust position of foot in three while sewing. You can begin sewing with the PQ series machines may damage or break the pin feed mechanism. G General purpose Foot This foot is used for most sewing. (Can also be used ...
... concealed fasteners. Presser Feet G Pin Feed Foot For perfect stitching on hems of dress shirts, to fold the edge of the fabric in relation to needle. ✽ Only the zipper foot has a position knob. G Zipper Foot Use to attach fasteners other feet that come with 1/4" or 1/8" seam allowance. Use of ...; Use the position knob on back of the zipper foot to adjust position of foot in three while sewing. You can begin sewing with the PQ series machines may damage or break the pin feed mechanism. G General purpose Foot This foot is used for most sewing. (Can also be used ...

Users Manual - English
Page 19
Begin sewing. Pin Feeding (for hard-to-handle fabrics) Pin Feeding Mechanism Fabric: Velvet Quilt Synthetic Suede Knit Coading Others Indicator Needle Feed Pin Fabric Feed Pin Feed Dog ✽ 14 The fabrics shown above can be cut thread. ✽ When using thread ...sewing directions. 1 cm 1 Lift foot, pull about 1 cm. 4 Raise needle to highest position. 5 Lift foot, remove fabric and cut automatically and the needle to stop in the matching color coded area. 3 Gently pull thread until indicator needle is in the right position in a raised position). 5 Lift presser foot and ...
Begin sewing. Pin Feeding (for hard-to-handle fabrics) Pin Feeding Mechanism Fabric: Velvet Quilt Synthetic Suede Knit Coading Others Indicator Needle Feed Pin Fabric Feed Pin Feed Dog ✽ 14 The fabrics shown above can be cut thread. ✽ When using thread ...sewing directions. 1 cm 1 Lift foot, pull about 1 cm. 4 Raise needle to highest position. 5 Lift foot, remove fabric and cut automatically and the needle to stop in the matching color coded area. 3 Gently pull thread until indicator needle is in the right position in a raised position). 5 Lift presser foot and ...

Users Manual - English
Page 20
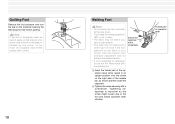
Rolled Hem Foot 1 Attach rolled hem foot. ✽ Refer to page 13 for instructions on changing sewing feet. 2 Insert needle approximately 0.5 cm from the edge of the rolled hem under the presser foot, from the spot where the threads come out. Lower the presser foot. 6 ... sew 2 stitches. 0.5 cm 0.5 cm 3 Turn the hand wheel towards the curved guide on threads in left hand while sewing the first 3-4 stitches to raise the needle, raise the presser foot, then pull the fabric forward. 4 Hold the 4 threads in place. 7 Fold hem over about 0.5 cm and continue feeding folded hem under...
Rolled Hem Foot 1 Attach rolled hem foot. ✽ Refer to page 13 for instructions on changing sewing feet. 2 Insert needle approximately 0.5 cm from the edge of the rolled hem under the presser foot, from the spot where the threads come out. Lower the presser foot. 6 ... sew 2 stitches. 0.5 cm 0.5 cm 3 Turn the hand wheel towards the curved guide on threads in left hand while sewing the first 3-4 stitches to raise the needle, raise the presser foot, then pull the fabric forward. 4 Hold the 4 threads in place. 7 Fold hem over about 0.5 cm and continue feeding folded hem under...
Users Manual - English
Page 21
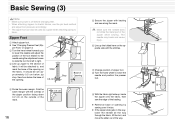
... screw to slide the foot from below the base of the opening by sewing over it will be set approximately 0.5 cm below zip stop. The needle may break and cause injury. 6 Line up zipper to fabric. Slide 0.5 cm " Stop Base of the zipper when sewing. Basic Sewing (3) Note • Make sure... be used as a guide when attaching piping to the section of fabric it twice. ✽ If the zipper slide gets in the way, lower the needle all the way 16 through the fabric, lift the foot, and move the slider out of the way. Zipper Foot 1 Attach zipper foot. ✽ See...
... screw to slide the foot from below the base of the opening by sewing over it will be set approximately 0.5 cm below zip stop. The needle may break and cause injury. 6 Line up zipper to fabric. Slide 0.5 cm " Stop Base of the zipper when sewing. Basic Sewing (3) Note • Make sure... be used as a guide when attaching piping to the section of fabric it twice. ✽ If the zipper slide gets in the way, lower the needle all the way 16 through the fabric, lift the foot, and move the slider out of the way. Zipper Foot 1 Attach zipper foot. ✽ See...
Users Manual - English
Page 23
... speeds. • The feed dog for free motion quilting. Quilting Foot Reduce the foot pressure and turn the dial on the right side of the needle bar, as the screw might loosen due to the foot and forked operation lever vibration. Note If the foot is frequently used, be sure to...
... speeds. • The feed dog for free motion quilting. Quilting Foot Reduce the foot pressure and turn the dial on the right side of the needle bar, as the screw might loosen due to the foot and forked operation lever vibration. Note If the foot is frequently used, be sure to...

Users Manual - English
Page 24
... foot. 2 Move separator so it sits under presser foot. 3 Make sure it is lined up so that the needle passes through the slot of the separator without hitting the plate itself. 4 Secure liner plate in place with lining plate screws. 5 Set pressure of the ... when using separator, it might otherwise loosen due to vibration. 1 Installation To be swung off to the side as illustrated in a perfect seam. Fabric Separator Needle Lining Separator Velvets Seam Guide 1 Tighten the screw securely with a screwdriver since it can be able to adjust the position of sewing feet and feed...
... foot. 2 Move separator so it sits under presser foot. 3 Make sure it is lined up so that the needle passes through the slot of the separator without hitting the plate itself. 4 Secure liner plate in place with lining plate screws. 5 Set pressure of the ... when using separator, it might otherwise loosen due to vibration. 1 Installation To be swung off to the side as illustrated in a perfect seam. Fabric Separator Needle Lining Separator Velvets Seam Guide 1 Tighten the screw securely with a screwdriver since it can be able to adjust the position of sewing feet and feed...
Users Manual - English
Page 25
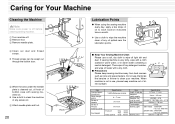
.... Caring for Your Machine Cleaning the Machine Note Make sure power is off before cleaning sewing machine. 1 Turn machine off. 2 Remove foot. 3 Remove needle plate. 4 Clean out dust and thread scraps. ✽ Thread scraps can be used SCHMETZ 130/705H #65 - #110 Bed dimensions 439 mm ×...use , please keep sewing machine away from heat sources such as irons and space heaters. Item Sewing Speed (maximum) Stitch Length (pitch) Stroke of Needle Stroke of Thread Take-Up Lever Foot Height Specification 1,500 stitches per minute 0 - 7 mm 34.1 mm 64.7 mm Foot Lift Knee control ...
.... Caring for Your Machine Cleaning the Machine Note Make sure power is off before cleaning sewing machine. 1 Turn machine off. 2 Remove foot. 3 Remove needle plate. 4 Clean out dust and thread scraps. ✽ Thread scraps can be used SCHMETZ 130/705H #65 - #110 Bed dimensions 439 mm ×...use , please keep sewing machine away from heat sources such as irons and space heaters. Item Sewing Speed (maximum) Stitch Length (pitch) Stroke of Needle Stroke of Thread Take-Up Lever Foot Height Specification 1,500 stitches per minute 0 - 7 mm 34.1 mm 64.7 mm Foot Lift Knee control ...


