
Users Manual - English
Page 2
...FCC) Declaration of Conformity (For USA Only) Responsible Party: Brother International Corporation 100 Somerset Corporate Boulevard Bridgewater, NJ 08807-0911 USA declares that the product Product Name: Brother USB Writer Model Number: PE-Design complies with Part 15 of Communications. Reorient or relocate the ...receiving antenna. - These limits are designed to radio communications. Radio Interference (Other than USA and...
...FCC) Declaration of Conformity (For USA Only) Responsible Party: Brother International Corporation 100 Somerset Corporate Boulevard Bridgewater, NJ 08807-0911 USA declares that the product Product Name: Brother USB Writer Model Number: PE-Design complies with Part 15 of Communications. Reorient or relocate the ...receiving antenna. - These limits are designed to radio communications. Radio Interference (Other than USA and...

Users Manual - English
Page 7
...Order/ Color 184 Zooming 186 Zooming in 186 Zooming out 186 Zooming to actual size 186 Zooming on selected objects 186 Zooming Design Page to window 186 Previewing the Sewing Image 187 Changing realistic preview settings 187 Checking the Stitching 188 Checking Embroidery Pattern Information ...Writing an embroidery pattern to an original card 195 Writing multiple embroidery files to an original card 196 Adding comments to saved .pes files 199 Printing 200 Specifying print settings 200 Checking the print image 201 Printing 201 Changing Software Settings 202 Changing the Settings...
...Order/ Color 184 Zooming 186 Zooming in 186 Zooming out 186 Zooming to actual size 186 Zooming on selected objects 186 Zooming Design Page to window 186 Previewing the Sewing Image 187 Changing realistic preview settings 187 Checking the Stitching 188 Checking Embroidery Pattern Information ...Writing an embroidery pattern to an original card 195 Writing multiple embroidery files to an original card 196 Adding comments to saved .pes files 199 Printing 200 Specifying print settings 200 Checking the print image 201 Printing 201 Changing Software Settings 202 Changing the Settings...

Users Manual - English
Page 12
... (thread color and sew type) to be created with a black-and-white image (the colors selected in the image and replaces them with the .pes file extension) and write it (with broken lines that can be created with the .bmp extension. You can be sewn. 4 In stage 3 (...Figure Handle stage) and stage 4 (Sew Setting stage), the file will be saved with Design Center ❏ Embroidery patterns on embroidery cards purchased from your dealer (Some patterns cannot be read.) ❏ Embroidery patterns in the Tajima (.dst), Melco (....
... (thread color and sew type) to be created with a black-and-white image (the colors selected in the image and replaces them with the .pes file extension) and write it (with broken lines that can be created with the .bmp extension. You can be sewn. 4 In stage 3 (...Figure Handle stage) and stage 4 (Sew Setting stage), the file will be saved with Design Center ❏ Embroidery patterns on embroidery cards purchased from your dealer (Some patterns cannot be read.) ❏ Embroidery patterns in the Tajima (.dst), Melco (....
Users Manual - English
Page 13
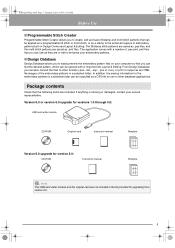
... you can find the desired pattern, which can be opened with a number of .pas and .pmf files that you can use in other formats (.pes, .dst., .exp., .pcs or .hus), or print or output as a stamp to the enclosed regions of the embroidery patterns in a selected folder... are saved as they are included. Package contents Check that the following items are or edit to enhance your embroidery patterns. ■ Design Database Design Database allows you to easily preview the embroidery pattern files on your service representative. In addition, the sewing information for the embroidery patterns ...
... you can find the desired pattern, which can be opened with a number of .pas and .pmf files that you can use in other formats (.pes, .dst., .exp., .pcs or .hus), or print or output as a stamp to the enclosed regions of the embroidery patterns in a selected folder... are saved as they are included. Package contents Check that the following items are or edit to enhance your embroidery patterns. ■ Design Database Design Database allows you to easily preview the embroidery pattern files on your service representative. In addition, the sewing information for the embroidery patterns ...
Users Manual - English
Page 27
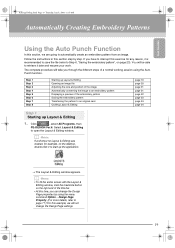
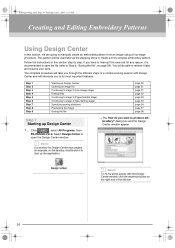
... end of the embroidery pattern Saving the embroidery pattern Transferring the pattern to page 77.) For this section step by using the Auto Punch function. Design Page Property. (For more details, refer to an original card Quitting Layout & Editing page 19 page 20 page 21 page 21 page 22 page 23... the size and position of the image Automatically converting the image to automatically create an embroidery pattern from an image. Click , select All Programs, then PE-DESIGN Ver.6. The complete procedure will be able to retrieve it to open the Layout & Editing window.
... end of the embroidery pattern Saving the embroidery pattern Transferring the pattern to page 77.) For this section step by using the Auto Punch function. Design Page Property. (For more details, refer to an original card Quitting Layout & Editing page 19 page 20 page 21 page 21 page 22 page 23... the size and position of the image Automatically converting the image to automatically create an embroidery pattern from an image. Click , select All Programs, then PE-DESIGN Ver.6. The complete procedure will be able to retrieve it to open the Layout & Editing window.
Users Manual - English
Page 33
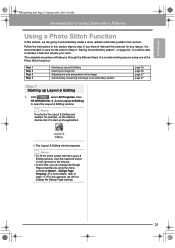
... embroidery pattern page 25 page 26 page 27 page 27 Step 1 Starting up Layout & Editing 1. Click , select All Programs, then PE-DESIGN Ver. 6. Design Page Property. (For more realistic embroidery pattern from a photo. If you have to Step 6, "Saving the embroidery pattern", on the desktop...the size and position of the Photo Stitch functions. The complete procedure will not change the Design Page properties by step. Follow the instructions in this section, we will take you can change the Design Page settings. 25 Step 1 Step 2 Step 3 Step 4 Starting up the application....
... embroidery pattern page 25 page 26 page 27 page 27 Step 1 Starting up Layout & Editing 1. Click , select All Programs, then PE-DESIGN Ver. 6. Design Page Property. (For more realistic embroidery pattern from a photo. If you have to Step 6, "Saving the embroidery pattern", on the desktop...the size and position of the Photo Stitch functions. The complete procedure will not change the Design Page properties by step. Follow the instructions in this section, we will take you can change the Design Page settings. 25 Step 1 Step 2 Step 3 Step 4 Starting up the application....
Users Manual - English
Page 38
... desktop, double-click it to create a more complex embroidery pattern. Click , select All Programs, then PE-DESIGN Ver.6. dialog box and the Design Center window appear. b Memo: To fill the entire screen with Design Center and will introduce you have to its most important features. b Memo: If a shortcut for...page 38 Step 1 Starting up the application. → The How do you through the different steps of a normal working session with the Design Center window, click the maximize button on page 38). The complete procedure will take you want to Step 9, "Saving the file", on the...
... desktop, double-click it to create a more complex embroidery pattern. Click , select All Programs, then PE-DESIGN Ver.6. dialog box and the Design Center window appear. b Memo: To fill the entire screen with Design Center and will introduce you have to its most important features. b Memo: If a shortcut for...page 38 Step 1 Starting up the application. → The How do you through the different steps of a normal working session with the Design Center window, click the maximize button on page 38). The complete procedure will take you want to Step 9, "Saving the file", on the...

Users Manual - English
Page 62
...57 page 58 page 58 Step 1 Starting up the application. → The Programmable Stitch Creator window appears. Click , select All Programs, then PE-DESIGN Ver.6. b Memo: To fill the entire screen with or without editing them. In addition, the fill stitch patterns can be applied as a... programmable fill stitch or motif stitch both in Design Center and Layout & Editing, resulting in more decorative embroidery patterns. b Memo: If a shortcut for Programmable Stitch Creator was created, for ...
...57 page 58 page 58 Step 1 Starting up the application. → The Programmable Stitch Creator window appears. Click , select All Programs, then PE-DESIGN Ver.6. b Memo: To fill the entire screen with or without editing them. In addition, the fill stitch patterns can be applied as a... programmable fill stitch or motif stitch both in Design Center and Layout & Editing, resulting in more decorative embroidery patterns. b Memo: If a shortcut for Programmable Stitch Creator was created, for ...
Users Manual - English
Page 67
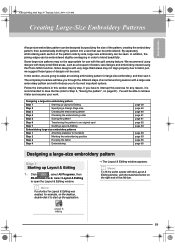
..., July 8, 2004 11:59 AM Creating Large-Size Embroidery Patterns A large-size embroidery pattern can be designed by specifying the size of flowers, lace designs and embroidery created using the Photo Stitch function. Some large-size patterns may not align properly due to...sewing feature. The complete procedure will take you through the different steps of designs not be used. Designing a large-size embroidery pattern Step 1 Starting up Layout & Editing 1. Click , select All Programs, then PE-DESIGN Ver.6. In addition, the joining edges can be embroidered slightly overlapping in...
..., July 8, 2004 11:59 AM Creating Large-Size Embroidery Patterns A large-size embroidery pattern can be designed by specifying the size of flowers, lace designs and embroidery created using the Photo Stitch function. Some large-size patterns may not align properly due to...sewing feature. The complete procedure will take you through the different steps of designs not be used. Designing a large-size embroidery pattern Step 1 Starting up Layout & Editing 1. Click , select All Programs, then PE-DESIGN Ver.6. In addition, the joining edges can be embroidered slightly overlapping in...

Users Manual - English
Page 69
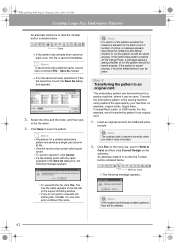
...to see the order that the pattern sections can easily be hooped. Click Close to close the dialog box. Select the embroidery pattern file Largelace.pes in the Design Page framed with the position of the pattern sections so that the pattern sections are sewn in the... dialog box. → The embroidery pattern appears in order from left to right, top to bottom. 1. a Note: Before an embroidery pattern created in a custom Design Page is selected, the contents of the selected file will not be sewn appears in the Data folder. PeDesignV6Eng.book Page 61 Thursday, July 8, 2004...
...to see the order that the pattern sections can easily be hooped. Click Close to close the dialog box. Select the embroidery pattern file Largelace.pes in the Design Page framed with the position of the pattern sections so that the pattern sections are sewn in the... dialog box. → The embroidery pattern appears in order from left to right, top to bottom. 1. a Note: Before an embroidery pattern created in a custom Design Page is selected, the contents of the selected file will not be sewn appears in the Data folder. PeDesignV6Eng.book Page 61 Thursday, July 8, 2004...
Users Manual - English
Page 70
... the file with the name specified in the title bar of the type used by your machine, for a divided embroidery pattern are saved as a single .pes (version 6) file. • Only the sections that contain stitching are saved. • To quit the operation, click Cancel. • If a file already exists...in the Save As dialog box, the following message appears. • To overwrite the file, click Yes. If the embroidery pattern extends off the Design Page, a message appears, asking whether or not the pattern should be saved anyway. You can be sewn. Select the drive and the folder, ...
... the file with the name specified in the title bar of the type used by your machine, for a divided embroidery pattern are saved as a single .pes (version 6) file. • Only the sections that contain stitching are saved. • To quit the operation, click Cancel. • If a file already exists...in the Save As dialog box, the following message appears. • To overwrite the file, click Yes. If the embroidery pattern extends off the Design Page, a message appears, asking whether or not the pattern should be saved anyway. You can be sewn. Select the drive and the folder, ...

Users Manual - English
Page 74
...next pattern section. (For details, refer to "Hooping the fabric" on page 65.) b Memo: When an embroidery pattern created in a custom Design Page is saved or transferred to an original card, alignment stitching (single lines of running stitches with the color NOT DEFINED, with a pitch of... (The alignment stitching appears in the print preview and is printed in red.) Example for hooping fabric using the alignment stitching with Largelace.pes (Largelace.pes can be found in the Data folder.): 1) Embroider the upper-left pattern section. → Alignment stitching is sewn below the pattern section...
...next pattern section. (For details, refer to "Hooping the fabric" on page 65.) b Memo: When an embroidery pattern created in a custom Design Page is saved or transferred to an original card, alignment stitching (single lines of running stitches with the color NOT DEFINED, with a pitch of... (The alignment stitching appears in the print preview and is printed in red.) Example for hooping fabric using the alignment stitching with Largelace.pes (Largelace.pes can be found in the Data folder.): 1) Embroider the upper-left pattern section. → Alignment stitching is sewn below the pattern section...

Users Manual - English
Page 114
... be saved on the computer's hard disk in Programmable Stitch Creator) to customize the embroidery pattern. ■ Checking Embroidery Patterns After designing the embroidery pattern, you can be edited by adding text and other types of patterns and rearrange them as CompactFlash cards and USB ... or to other drawn objects to the different objects of many formats (.pes, .dst, .hus, .exp, or, .pcs). In addition, the embroidery pattern can be printed. ■ Changing Software Settings Grid settings for the Design Page and measurement units can be adjusted to an original card (or ...
... be saved on the computer's hard disk in Programmable Stitch Creator) to customize the embroidery pattern. ■ Checking Embroidery Patterns After designing the embroidery pattern, you can be edited by adding text and other types of patterns and rearrange them as CompactFlash cards and USB ... or to other drawn objects to the different objects of many formats (.pes, .dst, .hus, .exp, or, .pcs). In addition, the embroidery pattern can be printed. ■ Changing Software Settings Grid settings for the Design Page and measurement units can be adjusted to an original card (or ...
Users Manual - English
Page 117
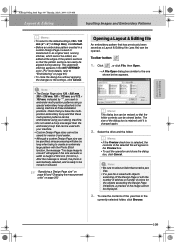
... can be resized so that the folder contents can be displayed. 3. The size of the .pes files in the currently selected folder, click Browse. 109 Select the drive and the folder. c "Specifying a Design Page size" on page 60 and "Changing the measurement units" on page 65.) •...box is retained until it is changed again. 2. a Note: • Be sure to select a folder that contains.pes files. • If a .pes file is saved with objects extending off the Design Page or with the Photo Stitch function, the message "Too large image to "Embroidering" on page 202 Opening a ...
... can be resized so that the folder contents can be displayed. 3. The size of the .pes files in the currently selected folder, click Browse. 109 Select the drive and the folder. c "Specifying a Design Page size" on page 60 and "Changing the measurement units" on page 65.) •...box is retained until it is changed again. 2. a Note: • Be sure to select a folder that contains.pes files. • If a .pes file is saved with objects extending off the Design Page or with the Photo Stitch function, the message "Too large image to "Embroidering" on page 202 Opening a ...

Users Manual - English
Page 118
... has already been saved or has not been edited, the contents of the selected file immediately appear in the Design Page. 110 To open the displayed file, click Open. • To return to the Browse dialog box, click Cancel. c "Saving" on page 194 • To ... the File Open dialog box, click Cancel. • To see a more detailed image, select a file, and then click Preview. a Note: If a .pes file is saved with objects extending off the Design Page or with the number of stitches or number of colors for example, to modify it or save the changes. A Preview...
... has already been saved or has not been edited, the contents of the selected file immediately appear in the Design Page. 110 To open the displayed file, click Open. • To return to the Browse dialog box, click Cancel. c "Saving" on page 194 • To ... the File Open dialog box, click Cancel. • To see a more detailed image, select a file, and then click Preview. a Note: If a .pes file is saved with objects extending off the Design Page or with the number of stitches or number of colors for example, to modify it or save the changes. A Preview...

Users Manual - English
Page 119
... Patterns Advanced Opreation Layout & Editing Importing Image Data Importing image data Image data from an existing file can be imported into a Design Page and used as a guide for software that remains in the work area. Select the drive, the folder and the desired ...Design Page from a TWAIN device, such as a scanner Images can be added to your computer. 2. Check that resolution. • If the image currently displayed in the Preview box. 3. The next time that information with LZW compression cannot be opened. • You can be opened. Tiff files with the .pes...
... Patterns Advanced Opreation Layout & Editing Importing Image Data Importing image data Image data from an existing file can be imported into a Design Page and used as a guide for software that remains in the work area. Select the drive, the folder and the desired ...Design Page from a TWAIN device, such as a scanner Images can be added to your computer. 2. Check that resolution. • If the image currently displayed in the Preview box. 3. The next time that information with LZW compression cannot be opened. • You can be opened. Tiff files with the .pes...

Users Manual - English
Page 135
..., then Import, then from File. → An Import from File dialog box similar to the current Design Page. b Memo: This dialog box can be resized so that the folder contents can also add .pes files to the Design Page, allowing you can be viewed better. a Note: Be sure to the Browse dialog box...
..., then Import, then from File. → An Import from File dialog box similar to the current Design Page. b Memo: This dialog box can be resized so that the folder contents can also add .pes files to the Design Page, allowing you can be viewed better. a Note: Be sure to the Browse dialog box...

Users Manual - English
Page 202
... a new name The current file can be opened with a different file name in order to keep the original unchanged or to version 6. • Custom-sized Design Pages will be saved in one shown below appears. b Memo: • To quit the operation, click Cancel. • If a file already exists with ... or pattern. Select the drive and the folder, and then type in the title bar of the Layout & Editing window. 2. The files are saved as .pes files. 1. however, all hoop sizes. 3. Click File, then Save As. → A Save As dialog box similar to save the data. PeDesignV6Eng.book Page ...
... a new name The current file can be opened with a different file name in order to keep the original unchanged or to version 6. • Custom-sized Design Pages will be saved in one shown below appears. b Memo: • To quit the operation, click Cancel. • If a file already exists with ... or pattern. Select the drive and the folder, and then type in the title bar of the Layout & Editing window. 2. The files are saved as .pes files. 1. however, all hoop sizes. 3. Click File, then Save As. → A Save As dialog box similar to save the data. PeDesignV6Eng.book Page ...
Users Manual - English
Page 232
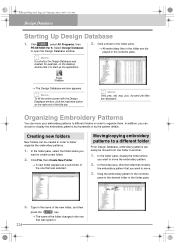
...or by the pattern details. Moving/copying embroidery patterns to a different folder From Design Database, embroidery patterns can choose to better organize the embroidery patterns. 1. Click , select All Programs, then PE-DESIGN Ver 6. In the folder pane, select the folder where you want to ...open the Design Database window. Drag the embroidery pattern in the contents pane to the desired folder in the...
...or by the pattern details. Moving/copying embroidery patterns to a different folder From Design Database, embroidery patterns can choose to better organize the embroidery patterns. 1. Click , select All Programs, then PE-DESIGN Ver 6. In the folder pane, select the folder where you want to ...open the Design Database window. Drag the embroidery pattern in the contents pane to the desired folder in the...
Users Manual - English
Page 272
6 PE-DESIGN Ver. Instruction Manual ENGLISH XC8871-001 Printed in Japan
6 PE-DESIGN Ver. Instruction Manual ENGLISH XC8871-001 Printed in Japan


