Users Manual - English
Page 7
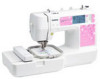
... Included accessories ...8 Optional accessories ...9 Names of Machine Parts and Their Functions 10 Front view ...10 Needle and embroidery foot section ...11 Right-side/rear view ...11 Operation buttons ...12 Operation panel ...13 GETTING READY 15 Basic ...to the fabric ...43 Setting the fabric in the embroidery frame ...44 Attaching the Embroidery Frame 47 Attaching the embroidery frame ...47 Removing the embroidery frame ...48 EMBROIDERY 49 Selecting Embroidery Patterns 50 Copyright information ...50 Embroidery pattern types ...50 Setting for embroidering ...51 Selecting alphanumeric...
... Included accessories ...8 Optional accessories ...9 Names of Machine Parts and Their Functions 10 Front view ...10 Needle and embroidery foot section ...11 Right-side/rear view ...11 Operation buttons ...12 Operation panel ...13 GETTING READY 15 Basic ...to the fabric ...43 Setting the fabric in the embroidery frame ...44 Attaching the Embroidery Frame 47 Attaching the embroidery frame ...47 Removing the embroidery frame ...48 EMBROIDERY 49 Selecting Embroidery Patterns 50 Copyright information ...50 Embroidery pattern types ...50 Setting for embroidering ...51 Selecting alphanumeric...

Users Manual - English
Page 12
...names of the machine parts. l Needle threader lever (page 41) Use the needle threader lever to the machine, and then attach the embroidery frame. m Thread tension dial (page 63) Adjust the upper thread tension with this thread guide and around the pretension disc when winding the ... crystal display) (touch panel) (page 22) Setting for the selected pattern and error messages appear in the connector for the embroidery unit. j Embroidery unit (page 19) Attach the embroidery unit to thread the needle. n Thread take-up lever (page 40) o Bobbin-winding thread guide and pretension disc (page...
...names of the machine parts. l Needle threader lever (page 41) Use the needle threader lever to the machine, and then attach the embroidery frame. m Thread tension dial (page 63) Adjust the upper thread tension with this thread guide and around the pretension disc when winding the ... crystal display) (touch panel) (page 22) Setting for the selected pattern and error messages appear in the connector for the embroidery unit. j Embroidery unit (page 19) Attach the embroidery unit to thread the needle. n Thread take-up lever (page 40) o Bobbin-winding thread guide and pretension disc (page...
Users Manual - English
Page 15
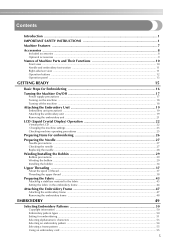
... operations. b Back key Press to return to display the pattern type selection screen. f Embroidery key Press to the previous screen. For details, refer to save embroidery patterns and the alphanumeric characters in the LCD. c Previous page key Press to display the...that are not displayed on using the machine. Displays simple explanations of setting upper thread / bobbin winding / setting bobbin thread / embroidery unit attachment / embroidery frame attachment / needle replacement. 13 Touch the keys displayed on the LCD. e Memory key Press to "LCD (Liquid Crystal Display...
... operations. b Back key Press to return to display the pattern type selection screen. f Embroidery key Press to the previous screen. For details, refer to save embroidery patterns and the alphanumeric characters in the LCD. c Previous page key Press to display the...that are not displayed on using the machine. Displays simple explanations of setting upper thread / bobbin winding / setting bobbin thread / embroidery unit attachment / embroidery frame attachment / needle replacement. 13 Touch the keys displayed on the LCD. e Memory key Press to "LCD (Liquid Crystal Display...
Users Manual - English
Page 17
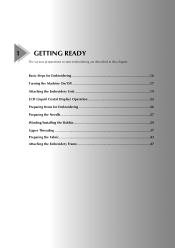
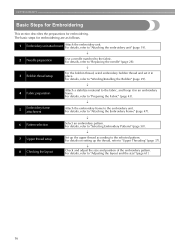
Basic Steps for Embroidering 16 Turning the Machine On/Off 17 Attaching the Embroidery Unit 19 LCD (Liquid Crystal Display) Operation 22 Preparing Items for Embroidering 26 Preparing the Needle 27 Winding/Installing the Bobbin 29 Upper Threading ...37 Preparing the Fabric 43 Attaching the Embroidery Frame 47 1 GETTING READY The various preparations to start embroidering are described in this chapter.
Basic Steps for Embroidering 16 Turning the Machine On/Off 17 Attaching the Embroidery Unit 19 LCD (Liquid Crystal Display) Operation 22 Preparing Items for Embroidering 26 Preparing the Needle 27 Winding/Installing the Bobbin 29 Upper Threading ...37 Preparing the Fabric 43 Attaching the Embroidery Frame 47 1 GETTING READY The various preparations to start embroidering are described in this chapter.
Users Manual - English
Page 18
... layout and the size" (page 61). 16 For details, refer to "Attaching the Embroidery Frame" (page 47). ↓ 6 Pattern selection Select an embroidery pattern. For details, refer to "Attaching the embroidery unit" (page 19). ↓ 2 Needle preparation Use a needle matched to the embroidery unit. For details, refer to the fabric, and hoop it in an...
... layout and the size" (page 61). 16 For details, refer to "Attaching the Embroidery Frame" (page 47). ↓ 6 Pattern selection Select an embroidery pattern. For details, refer to "Attaching the embroidery unit" (page 19). ↓ 2 Needle preparation Use a needle matched to the embroidery unit. For details, refer to the fabric, and hoop it in an...

Users Manual - English
Page 23
Make sure that the machine is turned on. a Release button X The embroidery unit separates from the machine. Attaching the Embroidery Unit 21 a • For details on removing the embroidery frame, refer to the left of d the embroidery unit, and slowly pull the embroidery unit to "Removing the embroidery frame" (page 48). c CAUTION ● Always turn off the machine. Removing...
Make sure that the machine is turned on. a Release button X The embroidery unit separates from the machine. Attaching the Embroidery Unit 21 a • For details on removing the embroidery frame, refer to the left of d the embroidery unit, and slowly pull the embroidery unit to "Removing the embroidery frame" (page 48). c CAUTION ● Always turn off the machine. Removing...
Users Manual - English
Page 27
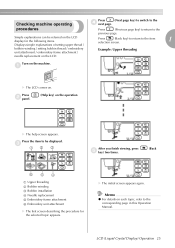
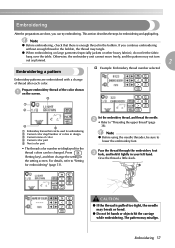
... X The first screen describing the procedure for the following items. Displays simple explanations of setting upper thread / previous page. bobbin winding / setting bobbin thread / embroidery unit attachment / embroidery frame attachment / Example: Upper threading needle replacement on the machine. Checking machine operating Press (Next page key) to switch to the item 1 selection screen. Press...
... X The first screen describing the procedure for the following items. Displays simple explanations of setting upper thread / previous page. bobbin winding / setting bobbin thread / embroidery unit attachment / embroidery frame attachment / Example: Upper threading needle replacement on the machine. Checking machine operating Press (Next page key) to switch to the item 1 selection screen. Press...
Users Manual - English
Page 28
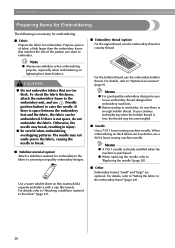
... that matches the size of fabric a little larger than the embroidery frame that are optional. Use a water soluble sheet on thick fabrics such as denim, use embroidery thread designed for embroidery to the fabric to prevent poor quality embroidery designs. For details, refer to "Optional accessories" (page 9)..... z Before starting to embroider. Otherwise, the needle may break, resulting in the embroidery frame" (page 44). 26 If you want to embroider, be sure there is space between the embroidery foot and the fabric, the fabric can be sure to raise the needle. GETTING...
... that matches the size of fabric a little larger than the embroidery frame that are optional. Use a water soluble sheet on thick fabrics such as denim, use embroidery thread designed for embroidery to the fabric to prevent poor quality embroidery designs. For details, refer to "Optional accessories" (page 9)..... z Before starting to embroider. Otherwise, the needle may break, resulting in the embroidery frame" (page 44). 26 If you want to embroider, be sure there is space between the embroidery foot and the fabric, the fabric can be sure to raise the needle. GETTING...

Users Manual - English
Page 45
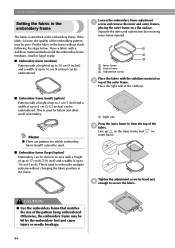
...stretch fabrics. To obtain optional accessories or parts, visit [http://www.brother.com/], or [http:// www.brothermall.com] (in the embroidery frame without using stabilizers with a steam iron. Use a water soluble sheet on an embroidery frame. The needle may not turn out correctly. 1 2 3 a ...the pattern may break or bend if you are using a stabilizer material for embroidery. Preparing the Fabric 43 a c b a Fabric b Size of embroidery frame c Stabilizer material If you embroider without attaching the stabilizer. CAUTION ● Always use stabilizer ...
...stretch fabrics. To obtain optional accessories or parts, visit [http://www.brother.com/], or [http:// www.brothermall.com] (in the embroidery frame without using stabilizers with a steam iron. Use a water soluble sheet on an embroidery frame. The needle may not turn out correctly. 1 2 3 a ...the pattern may break or bend if you are using a stabilizer material for embroidery. Preparing the Fabric 43 a c b a Fabric b Size of embroidery frame c Stabilizer material If you embroider without attaching the stabilizer. CAUTION ● Always use stabilizer ...
Users Manual - English
Page 46
... 10 cm (4 inches) can be embroidered. CAUTION ● Use the embroidery frame that matches the size of the pattern being embroidered. Loosen the embroidery frame adjustment a screw and remove the inner and outer frames, placing the outer frame on outer frame. This is used . ■ Embroidery frame (large) [option] Embroidery can be done in an area with a height of up...
... 10 cm (4 inches) can be embroidered. CAUTION ● Use the embroidery frame that matches the size of the pattern being embroidered. Loosen the embroidery frame adjustment a screw and remove the inner and outer frames, placing the outer frame on outer frame. This is used . ■ Embroidery frame (large) [option] Embroidery can be done in an area with a height of up...
Users Manual - English
Page 47
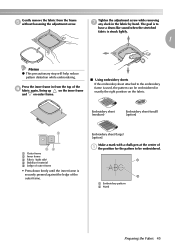
... be embroidered. Tighten the adjustment screw while removing g any slack in from the frame e without loosening the adjustment screw. Press the inner frame in the fabric by hand. a b a Embroidery pattern b Mark Preparing the Fabric 45 The goal is to the embroidery frame is struck lightly. 1 Memo z This precautionary step will help reduce pattern distortion while...
... be embroidered. Tighten the adjustment screw while removing g any slack in from the frame e without loosening the adjustment screw. Press the inner frame in the fabric by hand. a b a Embroidery pattern b Mark Preparing the Fabric 45 The goal is to the embroidery frame is struck lightly. 1 Memo z This precautionary step will help reduce pattern distortion while...
Users Manual - English
Page 48
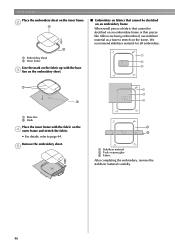
... the stabilizer material carefully. 46 a b c a a c b b a Base line b Mark Place the inner frame with the base c line on the embroidery sheet. ■ Embroidery on fabrics that cannot be stretched on an embroidery frame When small pieces of fabric that cannot be stretched on an embroidery frame or thin pieces like ribbon are being embroidered, use stabilizer material as...
... the stabilizer material carefully. 46 a b c a a c b b a Base line b Mark Place the inner frame with the base c line on the embroidery sheet. ■ Embroidery on fabrics that cannot be stretched on an embroidery frame When small pieces of fabric that cannot be stretched on an embroidery frame or thin pieces like ribbon are being embroidered, use stabilizer material as...
Users Manual - English
Page 49
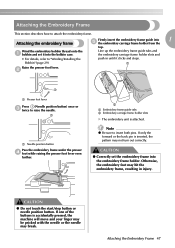
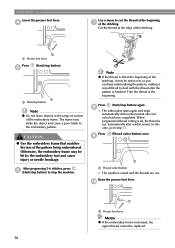
... lever Press (Needle position button) once or c twice to "Winding/Installing the push in injury. Attaching the Embroidery Frame 47 Wind the embroidery bobbin thread onto the a bobbin and set the embroidery frame into 1 Attaching the embroidery frame e the embroidery carriage frame holder from the top. a Raise the presser foot lever. If only the forward or the back pin...
... lever Press (Needle position button) once or c twice to "Winding/Installing the push in injury. Attaching the Embroidery Frame 47 Wind the embroidery bobbin thread onto the a bobbin and set the embroidery frame into 1 Attaching the embroidery frame e the embroidery carriage frame holder from the top. a Raise the presser foot lever. If only the forward or the back pin...
Users Manual - English
Page 50
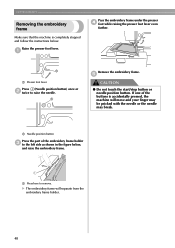
... the presser d foot while raising the presser foot lever even further. Make sure that the machine is accidentally pressed, the machine will separate from the embroidery frame holder. 48 a a a Presser foot lever Press (Needle position button) once or b twice to the left side as shown in the figure below . e ... button. a Needle position button Press the part of the buttons is completely stopped and follow the instructions below , and raise the embroidery frame. a Press here to remove. If one of the embroidery frame holder c to raise the needle. Raise the presser foot lever.
... the presser d foot while raising the presser foot lever even further. Make sure that the machine is accidentally pressed, the machine will separate from the embroidery frame holder. 48 a a a Presser foot lever Press (Needle position button) once or b twice to the left side as shown in the figure below . e ... button. a Needle position button Press the part of the buttons is completely stopped and follow the instructions below , and raise the embroidery frame. a Press here to remove. If one of the embroidery frame holder c to raise the needle. Raise the presser foot lever.
Users Manual - English
Page 55
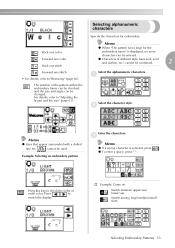
...The position of different style (sans serif, serif and outline, etc.) cannot be entered. Selecting alphanumeric characters Specify the characters for the embroidery frame" is selected, press . Back one color Forward one color Back one stitch • For details, refer to switch the display. &#...134; Example: Come on Switch between uppercase/ lowercase Switch among large/medium/small sizes Selecting Embroidery Patterns 53 z Characters of the pattern within the embroidery frame can be checked, and the size and angle can be combined. 2 Forward one stitch Memo z When...
...The position of different style (sans serif, serif and outline, etc.) cannot be entered. Selecting alphanumeric characters Specify the characters for the embroidery frame" is selected, press . Back one color Forward one color Back one stitch • For details, refer to switch the display. &#...134; Example: Come on Switch between uppercase/ lowercase Switch among large/medium/small sizes Selecting Embroidery Patterns 53 z Characters of the pattern within the embroidery frame can be checked, and the size and angle can be combined. 2 Forward one stitch Memo z When...
Users Manual - English
Page 59
... a b d e a Embroidery frames that there is pulled too tight, the needle may tangle. Set the embroidery thread, and thread the needle. Pass the thread through the embroidery foot c hole, and hold it lightly in the setting screen. b • Refer to lower the embroidery foot. Note z Before using... the thread a little slack. The pattern may not turn out as planned. 2 Embroidering a pattern † Example: Embroidery thread number selected Embroidery patterns are done, you continue embroidering without enough thread in design c Current name of the color shown a on large...
... a b d e a Embroidery frames that there is pulled too tight, the needle may tangle. Set the embroidery thread, and thread the needle. Pass the thread through the embroidery foot c hole, and hold it lightly in the setting screen. b • Refer to lower the embroidery foot. Note z Before using... the thread a little slack. The pattern may not turn out as planned. 2 Embroidering a pattern † Example: Embroidery thread number selected Embroidery patterns are done, you continue embroidering without enough thread in design c Current name of the color shown a on large...
Users Manual - English
Page 60
...foot lever Memo z If the embroidery foot is left at the beginning g of the embroidery frame. Otherwise, the embroidery frame may strike the object and cause a poor finish to cut . Note z If the thread is not raised, the upper thread cannot be hit by the embroidery foot and cause injury or ...be sewn over as you continue embroidering the pattern, making it very difficult to step j . d Use scissors to the embroidery pattern. CAUTION ● Use the embroidery frame that matches the size of the stitching. After progressing 5-6 stitches, press f (Start/stop button) to stop button Note ...
...foot lever Memo z If the embroidery foot is left at the beginning g of the embroidery frame. Otherwise, the embroidery frame may strike the object and cause a poor finish to cut . Note z If the thread is not raised, the upper thread cannot be hit by the embroidery foot and cause injury or ...be sewn over as you continue embroidering the pattern, making it very difficult to step j . d Use scissors to the embroidery pattern. CAUTION ● Use the embroidery frame that matches the size of the stitching. After progressing 5-6 stitches, press f (Start/stop button) to stop button Note ...
Users Manual - English
Page 61
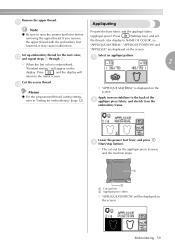
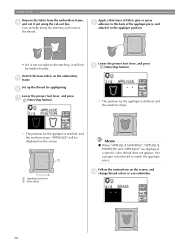
... set the thread color display to NAME OF COLOR, so "APPLIQUE MATERIAL", "APPLIQUE POSITION" and "APPLIQUE" are displayed on the embroidery frame. a 2 X When the last color is displayed on the screen. Set up embroidery thread for the appliqué piece is sewn, and the machine stops. l and repeat steps b through h. Prepare the base...
... set the thread color display to NAME OF COLOR, so "APPLIQUE MATERIAL", "APPLIQUE POSITION" and "APPLIQUE" are displayed on the embroidery frame. a 2 X When the last color is displayed on the screen. Set up embroidery thread for the appliqué piece is sewn, and the machine stops. l and repeat steps b through h. Prepare the base...
Users Manual - English
Page 62
...POSITION" and "APPLIQUE" are displayed, a specific color thread does not appear. b a Appliqué position b Base fabric Follow the instructions on the embroidery e frame. Stretch the base fabric on the screen, and j change thread colors as you embroider. 60 f Lower the presser foot lever, and press g (...Start/stop button). Cut carefully along the cut-out line. EMBROIDERY Remove the fabric from the embroidery frame, d and cut it out along the stitching and remove the thread. Use a proper color thread to the back of...
...POSITION" and "APPLIQUE" are displayed, a specific color thread does not appear. b a Appliqué position b Base fabric Follow the instructions on the embroidery e frame. Stretch the base fabric on the screen, and j change thread colors as you embroider. 60 f Lower the presser foot lever, and press g (...Start/stop button). Cut carefully along the cut-out line. EMBROIDERY Remove the fabric from the embroidery frame, d and cut it out along the stitching and remove the thread. Use a proper color thread to the back of...
Users Manual - English
Page 63
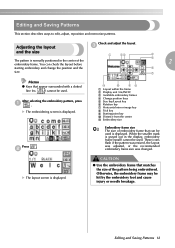
...g Horizontal mirror image key h Trial key i Starting point key j Distance from the center k Embroidery size Embroidery frame size The size of embroidery frame that matches the size of the 2 embroidery frame. Editing and Saving Patterns This section describes ways to edit, adjust, reposition and memorize patterns. Adjusting... the size Check and adjust the layout. You can be used . CAUTION ● Use the embroidery frame that can check the layout before starting embroidery and change the position and the size. Editing and Saving Patterns 61 X The embroidering screen is...
...g Horizontal mirror image key h Trial key i Starting point key j Distance from the center k Embroidery size Embroidery frame size The size of embroidery frame that matches the size of the 2 embroidery frame. Editing and Saving Patterns This section describes ways to edit, adjust, reposition and memorize patterns. Adjusting... the size Check and adjust the layout. You can be used . CAUTION ● Use the embroidery frame that can check the layout before starting embroidery and change the position and the size. Editing and Saving Patterns 61 X The embroidering screen is...


