
Accessory Catalog
Page 34
...our embroidery only machines, PE750D and PE700II. All 61 exclusive Brother palette colors are strong, soft and smooth, and perfectly balanced to hoop your sewing counter or can illustrate more of fabrics. Designed for high speed embroidery stitching, made in the 61 color set of the ...for the Quattro™ 6000D, Duetta™ 4500D/Innov-is 4000D, 2500D, 1500D, 1200 series, PC and ULT series machines and the PE-400D and Innov-is also recommended for Brother Embroidery machines, but compatible with Wooden Rack) Our high sheen 100% polyester mini king embroidery thread (...
...our embroidery only machines, PE750D and PE700II. All 61 exclusive Brother palette colors are strong, soft and smooth, and perfectly balanced to hoop your sewing counter or can illustrate more of fabrics. Designed for high speed embroidery stitching, made in the 61 color set of the ...for the Quattro™ 6000D, Duetta™ 4500D/Innov-is 4000D, 2500D, 1500D, 1200 series, PC and ULT series machines and the PE-400D and Innov-is also recommended for Brother Embroidery machines, but compatible with Wooden Rack) Our high sheen 100% polyester mini king embroidery thread (...

Users Manual - English
Page 8
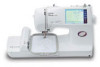
Needle threader lever 5- Needle threader 8- Presser foot lever 16- Spool cap 3- Bobbin cover 11- Knee Lifter Mounting Slot 17- Bobbin winder device 13- Handle 2- Speed range control lever 15- Feed dog 10- Knee Lifter A-Main power switch and connectors B-Accessory compartment C-Selection keys (Refer to page 10) D-L.C.D. (Liquid Crystal Display) E-...
Needle threader lever 5- Needle threader 8- Presser foot lever 16- Spool cap 3- Bobbin cover 11- Knee Lifter Mounting Slot 17- Bobbin winder device 13- Handle 2- Speed range control lever 15- Feed dog 10- Knee Lifter A-Main power switch and connectors B-Accessory compartment C-Selection keys (Refer to page 10) D-L.C.D. (Liquid Crystal Display) E-...
Users Manual - English
Page 14
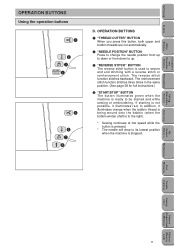
... illuminates orange when the bobbin thread is being wound onto the bobbin (when the bobbin winder shaft is to the right). * Sewing continues at low speed while the button is pressed. * The needle will drop to its lowest position when the machine is used to up. 3 "REVERSE STITCH" BUTTON The reverse...
... illuminates orange when the bobbin thread is being wound onto the bobbin (when the bobbin winder shaft is to the right). * Sewing continues at low speed while the button is pressed. * The needle will drop to its lowest position when the machine is used to up. 3 "REVERSE STITCH" BUTTON The reverse...
Users Manual - English
Page 20
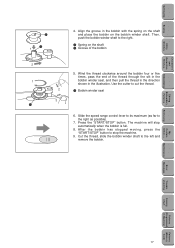
... illustration. Press the "START/STOP" button. Wind the thread clockwise around the bobbin four or five times, pass the end of the bobbin 2 5. Slide the speed range control lever to its maximum (as possible). 7.
... illustration. Press the "START/STOP" button. Wind the thread clockwise around the bobbin four or five times, pass the end of the bobbin 2 5. Slide the speed range control lever to its maximum (as possible). 7.
Users Manual - English
Page 25
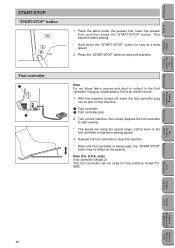
... machine turned off, insert the foot controller plug into its jack on this machine, then slowly depress the foot controller to start sewing. * The speed set using the speed range control lever is being used for this machine. 1 Foot controller 2 Foot controller jack 2. Note (For U.S.A. This machine starts sewing. * Hold down the... foot controller to stop this machine. Press the "START/STOP" button to stop this machine. * When the foot controller is the foot controller's maximum sewing speed. 3.
... machine turned off, insert the foot controller plug into its jack on this machine, then slowly depress the foot controller to start sewing. * The speed set using the speed range control lever is being used for this machine. 1 Foot controller 2 Foot controller jack 2. Note (For U.S.A. This machine starts sewing. * Hold down the... foot controller to stop this machine. Press the "START/STOP" button to stop this machine. * When the foot controller is the foot controller's maximum sewing speed. 3.
Users Manual - English
Page 40
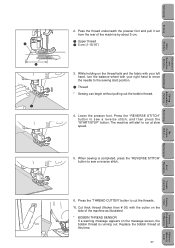
..., the bobbin thread is completed, press the "REVERSE STITCH" button to run at this time. 37 Patterns (Memory Card) Replace the bobbin thread at slow speed. 3 5 5. Cut thick thread (thicker than # 30) with your right hand to move the needle to the sewing start to sew a reverse stitch. Setting Up Sewing...
..., the bobbin thread is completed, press the "REVERSE STITCH" button to run at this time. 37 Patterns (Memory Card) Replace the bobbin thread at slow speed. 3 5 5. Cut thick thread (thicker than # 30) with your right hand to move the needle to the sewing start to sew a reverse stitch. Setting Up Sewing...
Users Manual - English
Page 48
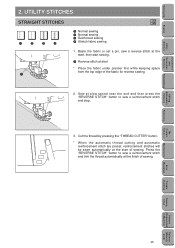
Sew at the finish of sewing. Press the "REVERSE STITCH" button to sew a reinforcement stitch and trim the thread automatically at slow speed near the end and then press the "REVERSE STITCH" button to sew a reinforcement stitch and stop. 3. UTILITY STITCHES STRAIGHT STITCHES 1 2 3 4 3 5 J 1 Normal sewing 2 Normal sewing 3 Reinforced ...
Sew at the finish of sewing. Press the "REVERSE STITCH" button to sew a reinforcement stitch and trim the thread automatically at slow speed near the end and then press the "REVERSE STITCH" button to sew a reinforcement stitch and stop. 3. UTILITY STITCHES STRAIGHT STITCHES 1 2 3 4 3 5 J 1 Normal sewing 2 Normal sewing 3 Reinforced ...

Users Manual - English
Page 50
... screw driver to tighten the screw firmly. Attach the adapter for sewing materials such as possible. * Use the metal disk provided with slow to medium speed. 1 Connection lever 47 Sewing Chart Patterns (Programmed in Machine) Patterns (Memory Card) You can prevent such materials from crumpling, slipping or sticking between presser foot...
... screw driver to tighten the screw firmly. Attach the adapter for sewing materials such as possible. * Use the metal disk provided with slow to medium speed. 1 Connection lever 47 Sewing Chart Patterns (Programmed in Machine) Patterns (Memory Card) You can prevent such materials from crumpling, slipping or sticking between presser foot...
Users Manual - English
Page 109
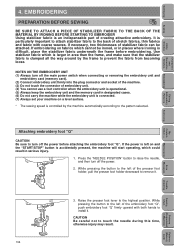
... the stabilizer fabric underneath the frame before attaching the embroidery foot "Q". Attaching embroidery foot "Q" CAUTION Be sure to the left on a level surface. * The sewing speed is left of stretch fabrics, thin fabrics and fabric with both hands to the pattern selected. If the power is controlled by the frame to...
... the stabilizer fabric underneath the frame before attaching the embroidery foot "Q". Attaching embroidery foot "Q" CAUTION Be sure to the left on a level surface. * The sewing speed is left of stretch fabrics, thin fabrics and fabric with both hands to the pattern selected. If the power is controlled by the frame to...

Users Manual - English
Page 185
... Machine) Patterns (Memory Card) 182 The fabric is not good 4. Machine does not start 1. Main power switch is not used . 3. Presser foot is noisy, slow speed, thread 1. Press "START/STOP" button. 2. Machine is not lowered. 3. Turn the power on page 173. 5. Setting Up Sewing Utility Stitches Characters and Decorative Stitches Embroidering...
... Machine) Patterns (Memory Card) 182 The fabric is not good 4. Machine does not start 1. Main power switch is not used . 3. Presser foot is noisy, slow speed, thread 1. Press "START/STOP" button. 2. Machine is not lowered. 3. Turn the power on page 173. 5. Setting Up Sewing Utility Stitches Characters and Decorative Stitches Embroidering...

