Brother International XL 5500 Support Question
Brother International XL 5500 Support Question
Find answers below for this question about Brother International XL 5500 - 42 Stitch Sewing Machine.Need a Brother International XL 5500 manual? We have 1 online manual for this item!
Question posted by brahapick on November 26th, 2011
Sewing Speed
sewing is sometime too fast, especially for embroidering, how can I reduce the speed?
Current Answers
Related Brother International XL 5500 Manual Pages
Users Manual - English - Page 2

...not play with this manual.
3. This sewing machine is not intended for examination, repair, ...stitching. It may deflect the needle, causing it off ), and
then remove the plug from the outlet. 9. SAVE THESE INSTRUCTIONS This machine is not working properly, if it .
2. Always unplug the machine... Always unplug the machine from the accumulation of electric shock:
1. To reduce the risk of burns...
Users Manual - English - Page 4

... Stitching ...30 Making a Buttonhole (1-Step Automatic Buttonhole 30 Making a Buttonhole (4-Step Buttonhole) ...31 Adjusting Buttonholes ...33 Sewing Buttons ...33 Zipper Insertion ...34 Gathering ...35 Darning...35 Appliqués ...36 Monogramming and Embroidering ...36
MAINTENANCE ...38
Changing the Light Bulb ...38 Oiling ...38 Cleaning ...39 Performance Checklist ...40 Repacking the Machine...
Users Manual - English - Page 5

... (page 14)
This controls the stitch width. 8 Pattern selection dial (page 10)
You can turn the main power and sewing light on and off. KNOWING YOUR SEWING MACHINE
PRINCIPAL PARTS
1 Bobbin-winding assembly (page 15) This winds the thread onto the bobbin, which you use this to control the sewing speed, and to start and stop...
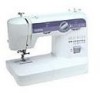
Users Manual - English - Page 8

To reduce the ...foot controller when the machine is not in a polarized outlet only one
blade wider than the other).
When you press harder, the machine's speed will run at a low speed.
only) ●...the foot controller, the machine will start and you may bend or break and cause injury.
● Never sew with Models XL-5500/XL-5600/XL-5700/ XL-5510/XL-5610/XL-5710.
.
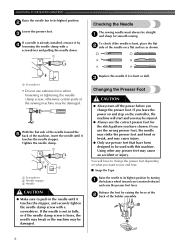
Foot Controller...
Users Manual - English - Page 9
... the needle until it is loose, the needle may break or the machine may be used with a
screwdriver and pulling the needle down.
1
Checking the Needle
The sewing needle must always be straight 1 and sharp for the stitch pattern you have chosen.
With the flat side of the holder assembly.
8 Release the foot...
Users Manual - English - Page 11
... SEWING MACHINE
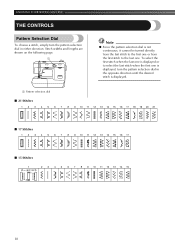
THE CONTROLS
Pattern Selection Dial
To choose a stitch, simply turn the pattern selection dial in either direction. To select the first stitch when the last one is displayed or to the last one is not continuous, it cannot be turned directly from the last stitch to the first one or from the first stitch...
Users Manual - English - Page 13
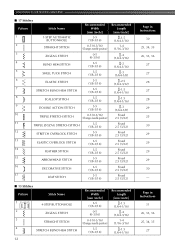
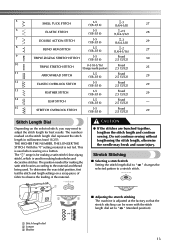
...28 29 25 30 29 29 29 29 30 - KNOWING YOUR SEWING MACHINE
■ 17 Stitches Pattern
1
Stitch Name
1-STEP AUTOMATIC BUTTONHOLE
Recommended Width
[mm (inch)]
3-5 (1/8-3/16)
2
STRAIGHT STITCH
0-5 (0-3/16) (Changes needle position)
3
ZIGZAG STITCH
0-5 (0-3/16)
4
BLIND HEM STITCH
3-5 (1/8-3/16)
5
SHELL TUCK STITCH
3-5 (1/8-3/16)
6
ELASTIC STITCH
3-5 (1/8-3/16)
7
STRETCH BLIND HEM...
Users Manual - English - Page 14
... THE NUMBER, THE LONGER THE STITCH. SS
1
10
2
2
3
1
■ Adjusting the stretch stitching The machine is not fed.
This is used for making the satin stitch varies according to adjust the stitch length for making buttonholes and decorative stitches. CAUTION
● If the stitches are bunched together, lengthen the stitch length and continue sewing. To determine the exact dial...
Users Manual - English - Page 15
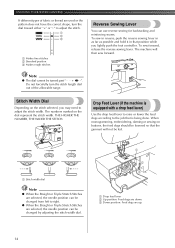
... feed lever)
Use the drop feed lever to raise or lower the feed dogs according to adjust the stitch width.
When monogramming, embroidering, darning or sewing on the dial represent the stitch width. To sew forward, release the reverse sewing lever. The machine will not be fed.
1 Stitch width dial
Note
● When the Straight or Triple Stretch...
Users Manual - English - Page 22
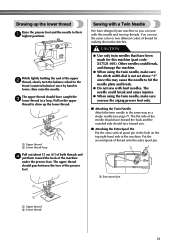
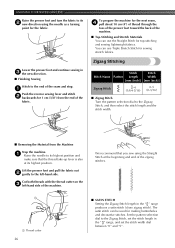
While lightly holding the end of thread for this needle and two top threads. You can sew with bent needles. The needle could break, and damage the machine.
● When using the twin needle, make sure the stitch width dial is not set above "3" since this may cause the needle to draw up the...
Users Manual - English - Page 23

...thread the twin needle. When sewing with thin thread on your stitches.
Decrease the thread tension by turning the dial to the procedure described below .
For most sewing applications, no adjustment is too...front to check the thread tension before starting your next project. KNOWING YOUR SEWING MACHINE
■ Twin Needle Threading You should thread each needle separately. Instead, ...
Users Manual - English - Page 25
...● For clear nylon thread, always use needle 90/14 - 100/16. KNOWING YOUR SEWING MACHINE
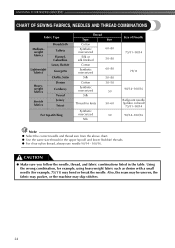
CHART OF SEWING FABRICS, NEEDLES AND THREAD COMBINATIONS
Fabric Type
Mediumweight fabrics
Lightweight fabrics
Heavyweight fabrics
Stretch fabrics
Broadcloth
...size thread for example, 75/11) may skip stitches.
24
CAUTION
● Make sure you follow the needle, thread, and fabric combinations listed ...
Users Manual - English - Page 26
... Direction
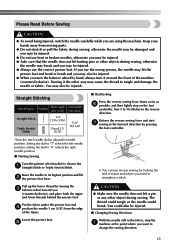
With the needle still in the fabric, stop the 1 machine at the point where you are using the machine. Straight Stitching
Stitch Name
Pattern
Stitch Length [mm (inch)]
Stitch Width [mm (inch)]
Straight Stitch
Triple Stretch Stitch
1-4 (1/16-3/16)
Fixed 2.5 (3/32)
5-0* (3/16-0)
■ Backtacking
Press the reverse sewing lever down as far as 6 possible, and then lightly step...
Users Manual - English - Page 27
.... Lower the presser foot and continue sewing in 3 the new direction. ■ Finishing Sewing
Stitch to the end of the seam and stop.
1
Push the reverse sewing lever and stitch 2 backwards for 1 cm (3/8") from the Machine
Stop the machine. 1 Raise the needle to the Zigzag Stitch, and then select the stitch length and the stitch width.
■ Removing the Material...
Users Manual - English - Page 29
... around the scallop with 3 scissors to cut the thread.
28 KNOWING YOUR SEWING MACHINE
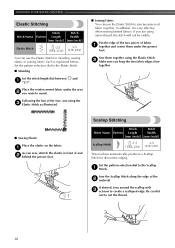
Elastic Stitching
Stitch
Stitch
Stitch Name Pattern Length
Width
[mm (inch)] [mm (inch)]
Elastic Stitch
-2.5
3-5
(1/64-3/32) (1/8-3/16)
You can use the Elastic Stitch for decorative edging. Each is very effective when sewing knitted fabrics. Put the edge of the two pieces of and 2 behind...
Users Manual - English - Page 31
...also be used as a decorative top-stitch.
Stitch
Stitch
2
Stitch Name Pattern Length
Width
[mm (inch)] [mm (inch)]
Decorative Stitch
Fixed 2.5
3-5
(3/32)
(1/8-3/16)
This stitch can be used for decorative stitching.
1 Starting mark on the fabric 2 Marks on the fabric.
KNOWING YOUR SEWING MACHINE
The stitch will prevent the fabric from unravelling. Attach the buttonhole...
Users Manual - English - Page 32
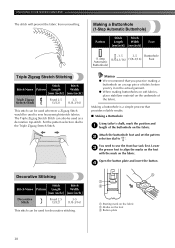
...shown.
3
2
4
1
Stop the machine when buttonhole stitching is 8 finished.
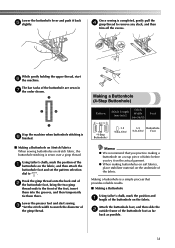
■ Making a Buttonhole on Stretch Fabrics When sewing buttonholes on stretch fabric, the buttonhole stitching is a simple process that you practice ...gimp thread. PUSH
PUSH
PUSH
While gently holding the upper thread, start sewing. 3 *Set the stitch width to match the diameter of the buttonhole on the fabric, and...
Users Manual - English - Page 33
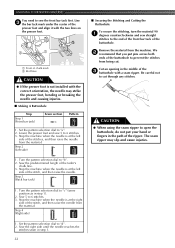
... the left
side of the buttonhole to open the buttonhole, do not put pins across both
ends of the stitches, and then raise the needle from being cut through any stitches.
KNOWING YOUR SEWING MACHINE
You need to the end of the front bar tack of the buttonhole.
2
1
1 Front of chalk mark 2 Red lines...
Users Manual - English - Page 35

...speed, sew about 10 stitches.
5
Zipper Insertion
Stitch
Stitch
Stitch Name
Pattern
Length
Width
[mm (inch)] [mm (inch)]
Straight Stitch
2-3 (1/16-1/8)
2.5 (center needle position) (3/32)
Foot
Zipper Foot
You can use the zipper foot to sew... dial to adjust the needle 4 position.
KNOWING YOUR SEWING MACHINE
Put a button between the foot and the fabric 4 and make sure ...
Users Manual - English - Page 44
... and Embroidering 36
N
Needle Replacement 7 Needle Threader 19
O
Oiling 38 Overedge Stitching 29
P
Pattern Length 11 Pattern Selection Dial 10 Pattern Width 11 Performance Checklist 40 Presser foot lever 4 Presser Foot Replacement 8 Principal Parts 4
Q
Quick Thread-setting System 20
R
Rampart Stitch 11 Recommended Widths and Lengths for Stitches 11 Repacking the Machine 42 Reverse...
Similar Questions

How Do I Draw The Lower Thread Of A Brother Sewing Machine
(Posted by rcgurt 9 years ago)

How To Thread A Brother Sewing Machine Xl-5500
(Posted by CAB14mitk 9 years ago)

How To Use Foot Attachments Of Brother Sewing Machine Xl 5130
(Posted by brusSi 10 years ago)
How To Use A Brother Sewing Machine Xl-2600i Setting Stitch And Tension
(Posted by v007CCdu 10 years ago)

How To Change Needle Brother Sewing Machine Ce 5500 Prw
i lost my manual and do not know how to change the needle for a brother sewing machine CE 5500 PRW. ...
i lost my manual and do not know how to change the needle for a brother sewing machine CE 5500 PRW. ...
(Posted by giomariagina 11 years ago)