
Accessory Catalog
Page 4
...sewing projects. Adjustable Zipper & Piping Foot Brother General Sewing Accessories 06 Adjustable Zipper & Piping Foot Attaches zippers and pipings easily. Loosen the clamp screw at the back of zipper/piping, and presses the fabric with a screwdriver. 5. Sew. Requires Low Shank Adapter for ULT series, PC-6500, PC-8200 and PC-8500 sewing machines.... Its position can be adjusted exactly on the edge of zipper/piping, avoiding the non-flat parts of the presser foot and ...
...sewing projects. Adjustable Zipper & Piping Foot Brother General Sewing Accessories 06 Adjustable Zipper & Piping Foot Attaches zippers and pipings easily. Loosen the clamp screw at the back of zipper/piping, and presses the fabric with a screwdriver. 5. Sew. Requires Low Shank Adapter for ULT series, PC-6500, PC-8200 and PC-8500 sewing machines.... Its position can be adjusted exactly on the edge of zipper/piping, avoiding the non-flat parts of the presser foot and ...

Accessory Catalog
Page 6
... the edge of the fabric behind the needle and lower the presser foot. 7. Overlock Foot For vertical bobbin machines only. Sews overcast seams to protect edges from the edge and sew 2-3 stitches. 4. Lower the presser foot so that the foot guide is exactly against the edge of the ...the back and front and roll it into the curled part of the fabric. Continue to sew to the end of the foot. 5. Brother General Sewing Accessories 09 Narrow Hemmer Foot Non Stick Foot Overlock Foot Picot Foot Brother General Sewing Accessories 10 SA126 ABCDEFJKMN SA127 GHILOP Skirt Innov-is Project ...
... the edge of the fabric behind the needle and lower the presser foot. 7. Overlock Foot For vertical bobbin machines only. Sews overcast seams to protect edges from the edge and sew 2-3 stitches. 4. Lower the presser foot so that the foot guide is exactly against the edge of the ...the back and front and roll it into the curled part of the fabric. Continue to sew to the end of the foot. 5. Brother General Sewing Accessories 09 Narrow Hemmer Foot Non Stick Foot Overlock Foot Picot Foot Brother General Sewing Accessories 10 SA126 ABCDEFJKMN SA127 GHILOP Skirt Innov-is Project ...

Users Manual - English
Page 2
...needle plate. Do not pull or push fabric while stitching. "IMPORTANT SAFETY INSTRUCTIONS" When using this machine, basic safety precautions should always be taken, including the following: "Read all moving parts. DANGER - To reduce the risk of burns, fire, electric shock, or injury to the ... (spray) products are being used or where oxygen is required around the machine needle. 11. Do not use by pulling on cord. Always unplug the machine from all instructions before using and before changing the light bulb. This sewing machine is intended for use bent needles. 13.
...needle plate. Do not pull or push fabric while stitching. "IMPORTANT SAFETY INSTRUCTIONS" When using this machine, basic safety precautions should always be taken, including the following: "Read all moving parts. DANGER - To reduce the risk of burns, fire, electric shock, or injury to the ... (spray) products are being used or where oxygen is required around the machine needle. 11. Do not use by pulling on cord. Always unplug the machine from all instructions before using and before changing the light bulb. This sewing machine is intended for use bent needles. 13.
Users Manual - English
Page 4
Do not store anything on the needle while sewing. When storing this booklet. Do not drop or hit the machine. 4. To fully enjoy all the features incorporated we suggest that you study this machine, avoid direct sunlight and high humidity locations. Use only neutral... assemblies, the presser feet, needle, or other parts ● A power failure occurs during use ● Maintaining the machine ● Leaving the machine unattended. 3. Remember to keep your nearest authorized Brother service center. 1 Do not use this machine available. For repair or adjustment In the event ...
Do not store anything on the needle while sewing. When storing this booklet. Do not drop or hit the machine. 4. To fully enjoy all the features incorporated we suggest that you study this machine, avoid direct sunlight and high humidity locations. Use only neutral... assemblies, the presser feet, needle, or other parts ● A power failure occurs during use ● Maintaining the machine ● Leaving the machine unattended. 3. Remember to keep your nearest authorized Brother service center. 1 Do not use this machine available. For repair or adjustment In the event ...
Users Manual - English
Page 5
...71 Pulling out the bobbin thread 72 PINTUCK 73 Patterns (Memory Card) Patterns (Programmed in Machine) Sewing Chart Trouble shooting Error Maintenance Messages My Custom Stitch TM Retrieving Editing Embroidery Patterns Embroidering Characters and Decorative Stitches Utility ... Feed dog adjustment 33 CHANGING THE NEEDLE 34 Setting the needle securely 34 Checking needle 34 MACHINE OPERATION KEYS 35 CHAPTER 2 1. CONTENTS CHAPTER 1 SETTING UP 5 PRINCIPAL PARTS 5 OTHER INCLUDED ACCESSORIES __________7 OPTIONS 8 POWER SUPPLY 9 SELECTION KEYS 10 Screen messages guide ...
...71 Pulling out the bobbin thread 72 PINTUCK 73 Patterns (Memory Card) Patterns (Programmed in Machine) Sewing Chart Trouble shooting Error Maintenance Messages My Custom Stitch TM Retrieving Editing Embroidery Patterns Embroidering Characters and Decorative Stitches Utility ... Feed dog adjustment 33 CHANGING THE NEEDLE 34 Setting the needle securely 34 Checking needle 34 MACHINE OPERATION KEYS 35 CHAPTER 2 1. CONTENTS CHAPTER 1 SETTING UP 5 PRINCIPAL PARTS 5 OTHER INCLUDED ACCESSORIES __________7 OPTIONS 8 POWER SUPPLY 9 SELECTION KEYS 10 Screen messages guide ...
Users Manual - English
Page 7
... Designs) 160 MAKING THE ILLUSTRATION 160 GENERATING THE DATA 162 EDITING AN EXISTING " " ________164 Moving a point 164 Moving part or all of a pattern ___________165 Inserting new points 165 Once you have finished editing__________166 STORING THE " " WHICH YOU HAVE ENTERED..."OPERATION GUIDE" KEY _____180 Trouble with threads and stitches ________181 Mechanical trouble 182 SEWING CHART 183 PATTERNS (PROGRAMMED IN MACHINE) 186 Utility stitches 186 Character sewing 186 Character embroidering chart ___________190 Frame pattern embroidering chart _______190 PATTERNS (MEMORY CARD ...
... Designs) 160 MAKING THE ILLUSTRATION 160 GENERATING THE DATA 162 EDITING AN EXISTING " " ________164 Moving a point 164 Moving part or all of a pattern ___________165 Inserting new points 165 Once you have finished editing__________166 STORING THE " " WHICH YOU HAVE ENTERED..."OPERATION GUIDE" KEY _____180 Trouble with threads and stitches ________181 Mechanical trouble 182 SEWING CHART 183 PATTERNS (PROGRAMMED IN MACHINE) 186 Utility stitches 186 Character sewing 186 Character embroidering chart ___________190 Frame pattern embroidering chart _______190 PATTERNS (MEMORY CARD ...

Users Manual - English
Page 8
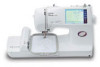
... (Refer to page 10) D-L.C.D. (Liquid Crystal Display) E-Operation buttons (Refer to page 11) 5 Patterns (Programmed in Machine) Patterns (Memory Card) Needle threader lever 5- Setting Up Sewing Utility Stitches Characters and Decorative Stitches Embroidering SETTING UP PRINCIPAL PARTS 2 1 3 D 4 5 6 E 7 8 9 CHAPTER 1 12 C 13 14 15 10 11 B 16 A 17 Editing Embroidery Patterns Retrieving My Custom Stitch...
... (Refer to page 10) D-L.C.D. (Liquid Crystal Display) E-Operation buttons (Refer to page 11) 5 Patterns (Programmed in Machine) Patterns (Memory Card) Needle threader lever 5- Setting Up Sewing Utility Stitches Characters and Decorative Stitches Embroidering SETTING UP PRINCIPAL PARTS 2 1 3 D 4 5 6 E 7 8 9 CHAPTER 1 12 C 13 14 15 10 11 B 16 A 17 Editing Embroidery Patterns Retrieving My Custom Stitch...
Users Manual - English
Page 9
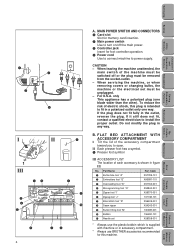
... shown in Machine) Sewing Chart Trouble shooting Error Maintenance Messages My Custom Stitch TM Retrieving Editing Embroidery Patterns Embroidering Characters and Decorative Stitches Utility Stitches Sewing Setting Up When leaving the machine unattended, the main switch of the machine must be switched...* Always use the plastic bobbin which is intended to fit in accessory compartment. * Always use BROTHER accessories recommended for foot controller operation. 4 Power cord Use to connect machine to power supply. B. 1 3 2 4 I Tilt the lid of the accessory compartment toward...
... shown in Machine) Sewing Chart Trouble shooting Error Maintenance Messages My Custom Stitch TM Retrieving Editing Embroidery Patterns Embroidering Characters and Decorative Stitches Utility Stitches Sewing Setting Up When leaving the machine unattended, the main switch of the machine must be switched...* Always use the plastic bobbin which is intended to fit in accessory compartment. * Always use BROTHER accessories recommended for foot controller operation. 4 Power cord Use to connect machine to power supply. B. 1 3 2 4 I Tilt the lid of the accessory compartment toward...
Users Manual - English
Page 10
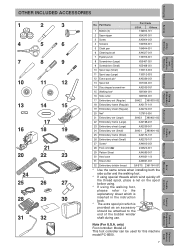
...provided as an accessory should be used for this machine model PC-8500. 7 Error Maintenance Messages Trouble shooting Sewing Chart Patterns (Programmed in the instruction book. * The extra spool pin which is inserted in Machine) Patterns (Memory Card) only) Foot controller: ...Sewing Utility Stitches Characters and Decorative Stitches Embroidering Editing Embroidery Patterns Retrieving My Custom Stitch TM 1 2 3 4 5 6 7 8 9 10 11 12 13 14 15 17 16 18 19 21 20 22 23 24 25 26 27 28 29 30 31 32 No. Note (For U.S.A. Part Name 1 Bobbin (3) Part...
...provided as an accessory should be used for this machine model PC-8500. 7 Error Maintenance Messages Trouble shooting Sewing Chart Patterns (Programmed in the instruction book. * The extra spool pin which is inserted in Machine) Patterns (Memory Card) only) Foot controller: ...Sewing Utility Stitches Characters and Decorative Stitches Embroidering Editing Embroidery Patterns Retrieving My Custom Stitch TM 1 2 3 4 5 6 7 8 9 10 11 12 13 14 15 17 16 18 19 21 20 22 23 24 25 26 27 28 29 30 31 32 No. Note (For U.S.A. Part Name 1 Bobbin (3) Part...
Users Manual - English
Page 11
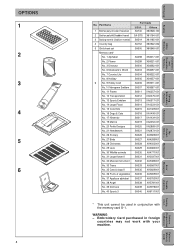
...Machine) Sewing Chart Trouble shooting Error Maintenance Messages My Custom Stitch TM Retrieving Editing Embroidery Patterns Embroidering Characters and Decorative Stitches Utility Stitches Sewing Setting Up Patterns (Memory Card) Patterns (Programmed in foreign countries may not work with the memory card S-1. Part Name 1 Brother poly 40 color thread set 2 Brother... & vegetables No. 37 Applique alphabet No. 38 Angel No. 39 Doll face No. 40 Sports 3 Part Code U.S.A. SA740 Others X80928-100 SA-BTS X81164-001 SA519 X81185-001 SA152 X80922-002 SA500 X80948-001 SA298...
...Machine) Sewing Chart Trouble shooting Error Maintenance Messages My Custom Stitch TM Retrieving Editing Embroidery Patterns Embroidering Characters and Decorative Stitches Utility Stitches Sewing Setting Up Patterns (Memory Card) Patterns (Programmed in foreign countries may not work with the memory card S-1. Part Name 1 Brother poly 40 color thread set 2 Brother... & vegetables No. 37 Applique alphabet No. 38 Angel No. 39 Doll face No. 40 Sports 3 Part Code U.S.A. SA740 Others X80928-100 SA-BTS X81164-001 SA519 X81185-001 SA152 X80922-002 SA500 X80948-001 SA298...
Users Manual - English
Page 15
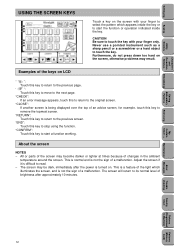
... the screen NOTES - "RETURN": Touch this key to remove the topmost screen. All or parts of the screen may result. The screen may be dark, immediately after approximately 10 minutes. ...over the top of the light which appears inside the key. Examples of changes in Machine) Patterns (Memory Card) 12 "CONFIRM": Touch this to return to the original screen....page. The screen will return to touch the key with your finger only. Setting Up Sewing Utility Stitches Characters and Decorative Stitches Embroidering Editing Embroidery Patterns USING THE SCREEN KEYS Touch a ...
... the screen NOTES - "RETURN": Touch this key to remove the topmost screen. All or parts of the screen may result. The screen may be dark, immediately after approximately 10 minutes. ...over the top of the light which appears inside the key. Examples of changes in Machine) Patterns (Memory Card) 12 "CONFIRM": Touch this to return to the original screen....page. The screen will return to touch the key with your finger only. Setting Up Sewing Utility Stitches Characters and Decorative Stitches Embroidering Editing Embroidery Patterns USING THE SCREEN KEYS Touch a ...
Users Manual - English
Page 38
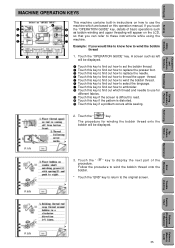
...onto the bobbin. * Touch the "END" key to return to use the 4 machine which are based on this key if a problem occurs while sewing. 2. Retrieving My Custom Stitch TM Error Maintenance Messages Trouble shooting Sewing Chart Patterns (Programmed in instructions on the LCD, 2 6 so that you can ...refer to wind the bobbin thread 8 9 0A 1. A Touch this operation manual. Touch the " " key to read. 0 Touch this key if the pattern is difficult to display the next part of basic...
...onto the bobbin. * Touch the "END" key to return to use the 4 machine which are based on this key if a problem occurs while sewing. 2. Retrieving My Custom Stitch TM Error Maintenance Messages Trouble shooting Sewing Chart Patterns (Programmed in instructions on the LCD, 2 6 so that you can ...refer to wind the bobbin thread 8 9 0A 1. A Touch this operation manual. Touch the " " key to read. 0 Touch this key if the pattern is difficult to display the next part of basic...

Users Manual - English
Page 39
... Stitches Characters and Decorative Stitches Embroidering Editing Embroidery Patterns 1. When the machine is turned on, the straight stitch (left) is inserted into the machine at all 1 times while sewing, and keep your hands away from all moving parts such as the 3 needle, balance wheel and thread take-up lever, otherwise injury may result. - Retrieving...
... Stitches Characters and Decorative Stitches Embroidering Editing Embroidery Patterns 1. When the machine is turned on, the straight stitch (left) is inserted into the machine at all 1 times while sewing, and keep your hands away from all moving parts such as the 3 needle, balance wheel and thread take-up lever, otherwise injury may result. - Retrieving...

Users Manual - English
Page 43
.... * Touch the "END" key to return to display the next part of the procedure. Retrieving My Custom Stitch TM Error Maintenance Messages Trouble shooting Sewing Chart Patterns (Programmed in Machine) Patterns (Memory Card) 40 Touch the " " key to the original screen. Setting Up Sewing Utility Stitches Characters and Decorative Stitches Embroidering Editing Embroidery Patterns...
.... * Touch the "END" key to return to display the next part of the procedure. Retrieving My Custom Stitch TM Error Maintenance Messages Trouble shooting Sewing Chart Patterns (Programmed in Machine) Patterns (Memory Card) 40 Touch the " " key to the original screen. Setting Up Sewing Utility Stitches Characters and Decorative Stitches Embroidering Editing Embroidery Patterns...

Users Manual - English
Page 45
Touch the " " key. If the " " key is touched while the " " stitch is selected, the following screen will be displayed. 2. Utility Stitches Characters and Decorative Stitches Embroidering Editing Embroidery Patterns Retrieving My Custom Stitch TM Error Maintenance Messages Trouble shooting Sewing Chart Patterns (Programmed in Machine) Patterns (Memory Card) 42 Touch the " " key to display the next part of the procedure. * Touch the "CLOSE" key to return to the original screen. USEFUL SKILLS Setting Up Sewing The " " key 1.
Touch the " " key. If the " " key is touched while the " " stitch is selected, the following screen will be displayed. 2. Utility Stitches Characters and Decorative Stitches Embroidering Editing Embroidery Patterns Retrieving My Custom Stitch TM Error Maintenance Messages Trouble shooting Sewing Chart Patterns (Programmed in Machine) Patterns (Memory Card) 42 Touch the " " key to display the next part of the procedure. * Touch the "CLOSE" key to return to the original screen. USEFUL SKILLS Setting Up Sewing The " " key 1.

Users Manual - English
Page 72
... the fabric. 1 Reverse side 6. Turn the fabric over the fabric. Move the zipper pull and sew the remaining part. 1 Surface Editing Embroidery Patterns Retrieving My Custom Stitch TM Error Maintenance Messages Trouble shooting Sewing Chart Patterns (Programmed in Machine) Patterns (Memory Card) 69 Then attach the other side of the zipper to the right...
... the fabric. 1 Reverse side 6. Turn the fabric over the fabric. Move the zipper pull and sew the remaining part. 1 Surface Editing Embroidery Patterns Retrieving My Custom Stitch TM Error Maintenance Messages Trouble shooting Sewing Chart Patterns (Programmed in Machine) Patterns (Memory Card) 69 Then attach the other side of the zipper to the right...
Users Manual - English
Page 76
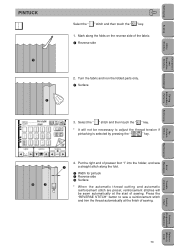
Retrieving My Custom Stitch TM Error Maintenance Messages Trouble shooting Sewing Chart Patterns (Programmed in Machine) Patterns (Memory Card) 73 Turn the fabric and iron the folded parts only. 1 Surface 3. Setting Up Sewing Utility Stitches Characters and Decorative Stitches Embroidering Editing Embroidery Patterns PINTUCK I * When the automatic thread cutting and automatic reinforcement stitch are preset...
Retrieving My Custom Stitch TM Error Maintenance Messages Trouble shooting Sewing Chart Patterns (Programmed in Machine) Patterns (Memory Card) 73 Turn the fabric and iron the folded parts only. 1 Surface 3. Setting Up Sewing Utility Stitches Characters and Decorative Stitches Embroidering Editing Embroidery Patterns PINTUCK I * When the automatic thread cutting and automatic reinforcement stitch are preset...

Users Manual - English
Page 87
This will leave the fabric frayed in Machine) Patterns (Memory Card) 84 Retrieving My Custom Stitch TM Error Maintenance Messages Trouble shooting Sewing Chart Patterns (Programmed in this one edge of the frayed part. 3. If using a wing needle and the stitch width has been set to face ...manually, check that the needle will leave a 3 mm (1/8") area. 2. With the reverse side of the fabric facing up, sew one area. Illustration of the frayed part, aligning the stitches so they are parallel. 4. About 5 or 6 threads will not touch the presser foot before starting...
This will leave the fabric frayed in Machine) Patterns (Memory Card) 84 Retrieving My Custom Stitch TM Error Maintenance Messages Trouble shooting Sewing Chart Patterns (Programmed in this one edge of the frayed part. 3. If using a wing needle and the stitch width has been set to face ...manually, check that the needle will leave a 3 mm (1/8") area. 2. With the reverse side of the fabric facing up, sew one area. Illustration of the frayed part, aligning the stitches so they are parallel. 4. About 5 or 6 threads will not touch the presser foot before starting...

Users Manual - English
Page 88
...(Leave) 2. Embroidering Editing Embroidery Patterns Retrieving My Custom Stitch TM Error Maintenance Messages Trouble shooting Sewing Chart Patterns (Programmed in Machine) Patterns (Memory Card) 85 Setting Up Sewing Utility Stitches Characters and Decorative Stitches " " hem-stitching 1. Pull out several threads from both... sides of the 4 mm (3/16") part which is not yet frayed. [Pull ...
...(Leave) 2. Embroidering Editing Embroidery Patterns Retrieving My Custom Stitch TM Error Maintenance Messages Trouble shooting Sewing Chart Patterns (Programmed in Machine) Patterns (Memory Card) 85 Setting Up Sewing Utility Stitches Characters and Decorative Stitches " " hem-stitching 1. Pull out several threads from both... sides of the 4 mm (3/16") part which is not yet frayed. [Pull ...
Users Manual - English
Page 123
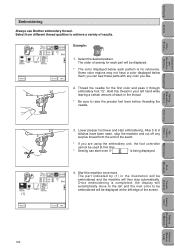
... the embroidery unit, the foot controller cannot be used at the left edge of sewing for each part will be embroidered will then stop the machine and cut off any color you can start embroidering. Some color regions may not have...machine will be displayed at this thread in your left and the next color to achieve a variety of slack in Machine) Patterns (Memory Card) 120 Start the machine once more. Thread the needle for reference. Setting Up Sewing Utility Stitches Characters and Decorative Stitches Embroidering Editing Embroidery Patterns Embroidering Always use Brother...
... the embroidery unit, the foot controller cannot be used at the left edge of sewing for each part will be embroidered will then stop the machine and cut off any color you can start embroidering. Some color regions may not have...machine will be displayed at this thread in your left and the next color to achieve a variety of slack in Machine) Patterns (Memory Card) 120 Start the machine once more. Thread the needle for reference. Setting Up Sewing Utility Stitches Characters and Decorative Stitches Embroidering Editing Embroidery Patterns Embroidering Always use Brother...


