
Accessory Catalog
Page 2
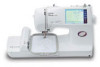
... hats Contents 02 FZ2-B1 Brother Sewing Machine Lineup 03-04 Brother General Sewing Accessories 05-16 Brother Embellishment Feet 17-24 Brother Quilting Feet 25-28 Brother Embroidery Accessories 29-66 Brother Sewing Machine Attachments for PQ Series 0637-0740 Brother Serger/Overlock Feet 71-74 Brother Cover Stitch Feet 75-78 More From Brother 79 Index 80 You can...
... hats Contents 02 FZ2-B1 Brother Sewing Machine Lineup 03-04 Brother General Sewing Accessories 05-16 Brother Embellishment Feet 17-24 Brother Quilting Feet 25-28 Brother Embroidery Accessories 29-66 Brother Sewing Machine Attachments for PQ Series 0637-0740 Brother Serger/Overlock Feet 71-74 Brother Cover Stitch Feet 75-78 More From Brother 79 Index 80 You can...

Accessory Catalog
Page 17
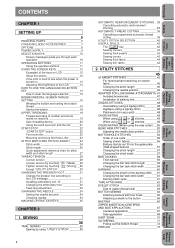
... you superior stitch quality when stitching over differing fabric thicknesses. - Duetta™ 4500D/Innov-is 4000D Premium Upgrade Package II Brother Embroidery Accessories 32 Duetta™ 4500D/ 4000D Premium Upgrade Package II Exclusively for all Duetta™ 4500D's and Innov-is 4000D ...machines that come with the built-in software in embroidery fonts. - Good for easier viewing of items. - Addition of embroidery designs - The simple and easy USB attachment takes seconds to connect and ensures your LCD screen background color for embellishing ...
... you superior stitch quality when stitching over differing fabric thicknesses. - Duetta™ 4500D/Innov-is 4000D Premium Upgrade Package II Brother Embroidery Accessories 32 Duetta™ 4500D/ 4000D Premium Upgrade Package II Exclusively for all Duetta™ 4500D's and Innov-is 4000D ...machines that come with the built-in software in embroidery fonts. - Good for easier viewing of items. - Addition of embroidery designs - The simple and easy USB attachment takes seconds to connect and ensures your LCD screen background color for embellishing ...
Users Manual - English
Page 5
..."UTILITY STITCH 30 CHANGING THE PRESSER FOOT __________31 Change the presser foot according to the LCD message 31 Installing embroidery foot "Q 31 Changing the embroidery foot ___________32 Feed dog adjustment 33 CHANGING THE NEEDLE 34 Setting the needle securely 34 Checking needle 34 MACHINE ...45 For reinforcement stretching on stretch fabric 46 Changing the stitch length 46 Changing the needle position 46 ADAPTER FOR LOW SHANK ATTACHMENTS 47 Included accessories 47 Installation of walking foot 47 ZIGZAG STITCHES 48 Overcasting (using a zigzag stitch)________48 Applique (using a...
..."UTILITY STITCH 30 CHANGING THE PRESSER FOOT __________31 Change the presser foot according to the LCD message 31 Installing embroidery foot "Q 31 Changing the embroidery foot ___________32 Feed dog adjustment 33 CHANGING THE NEEDLE 34 Setting the needle securely 34 Checking needle 34 MACHINE ...45 For reinforcement stretching on stretch fabric 46 Changing the stitch length 46 Changing the needle position 46 ADAPTER FOR LOW SHANK ATTACHMENTS 47 Included accessories 47 Installation of walking foot 47 ZIGZAG STITCHES 48 Overcasting (using a zigzag stitch)________48 Applique (using a...
Users Manual - English
Page 6
... EMBROIDERING 106 PREPARATION BEFORE SEWING _________106 Attaching embroidery foot "Q"___________106 Fitting embroidery unit 107 Removing the embroidery unit __________108 Placing the embroidery unit into the embroidery frame 117 Fitting the embroidery frame to the embroidery unit 119 Embroidering 120 Embroidering a...__116 EMBROIDERING 117 Embroidering attractive finishes _________117 Setting the fabric into its case __108 Initializing the embroidery unit __________109 SELECTING AND SEWING PATTERNS _____110 Selecting alphabetical characters ________110 Selecting one-point patterns 111...
... EMBROIDERING 106 PREPARATION BEFORE SEWING _________106 Attaching embroidery foot "Q"___________106 Fitting embroidery unit 107 Removing the embroidery unit __________108 Placing the embroidery unit into the embroidery frame 117 Fitting the embroidery frame to the embroidery unit 119 Embroidering 120 Embroidering a...__116 EMBROIDERING 117 Embroidering attractive finishes _________117 Setting the fabric into its case __108 Initializing the embroidery unit __________109 SELECTING AND SEWING PATTERNS _____110 Selecting alphabetical characters ________110 Selecting one-point patterns 111...
Users Manual - English
Page 9
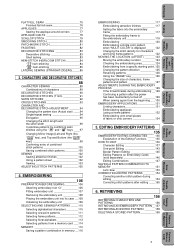
...Error Maintenance Messages My Custom Stitch TM Retrieving Editing Embroidery Patterns Embroidering Characters and Decorative Stitches Utility Stitches Sewing Setting Up B. Part Name Part ... CONNECTORS 1 Card slot Slot for this plug is shown in accessory compartment. * Always use BROTHER accessories recommended for memory card insertion. 2 Main power switch Use to turn on/off or... the plug must be removed from the socket-outlet. - FLAT BED ATTACHMENT WITH ACCESSORY COMPARTMENT I II 2 1 III 2A 1 J 1 9 3 4 0 5 6 6 78 A. When...
...Error Maintenance Messages My Custom Stitch TM Retrieving Editing Embroidery Patterns Embroidering Characters and Decorative Stitches Utility Stitches Sewing Setting Up B. Part Name Part ... CONNECTORS 1 Card slot Slot for this plug is shown in accessory compartment. * Always use BROTHER accessories recommended for memory card insertion. 2 Main power switch Use to turn on/off or... the plug must be removed from the socket-outlet. - FLAT BED ATTACHMENT WITH ACCESSORY COMPARTMENT I II 2 1 III 2A 1 J 1 9 3 4 0 5 6 6 78 A. When...
Users Manual - English
Page 10
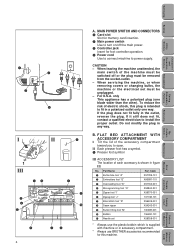
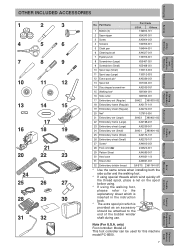
...) Note (For U.S.A. Part Name 1 Bobbin (3) Part Code U.S.A. Setting Up OTHER INCLUDED ACCESSORIES Sewing Utility Stitches Characters and Decorative Stitches Embroidering Editing Embroidery Patterns Retrieving My Custom Stitch TM 1 2 3 4 5 6 7 8 9 10 11 12 13 14 15 17 16 18 19 21 ...32 No. only) Foot controller: Model J2 This foot controller can be attached to the explanatory sheet which is provided as an accessory should be used for this machine model PC-8500. 7 Error Maintenance Messages Trouble shooting Sewing Chart Patterns (Programmed in the...
...) Note (For U.S.A. Part Name 1 Bobbin (3) Part Code U.S.A. Setting Up OTHER INCLUDED ACCESSORIES Sewing Utility Stitches Characters and Decorative Stitches Embroidering Editing Embroidery Patterns Retrieving My Custom Stitch TM 1 2 3 4 5 6 7 8 9 10 11 12 13 14 15 17 16 18 19 21 ...32 No. only) Foot controller: Model J2 This foot controller can be attached to the explanatory sheet which is provided as an accessory should be used for this machine model PC-8500. 7 Error Maintenance Messages Trouble shooting Sewing Chart Patterns (Programmed in the...
Users Manual - English
Page 24
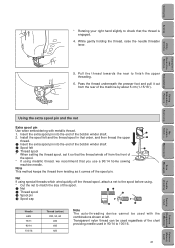
Net If using special threads which wind quickly off the thread spool, attach a net to the spool before using metallic thread, we recommend that you use a 90/14 home sewing machine needle. Transparent nylon thread can be used .... While gently holding the thread, raise the needle threader lever. 5. Install the spool felt and the thread spool in Machine) Patterns (Memory Card) Embroidering Editing Embroidery Patterns Retrieving My Custom Stitch TM Error Maintenance Messages Trouble shooting Using the extra spool pin and the net Extra spool pin Use when embroidering...
Net If using special threads which wind quickly off the thread spool, attach a net to the spool before using metallic thread, we recommend that you use a 90/14 home sewing machine needle. Transparent nylon thread can be used .... While gently holding the thread, raise the needle threader lever. 5. Install the spool felt and the thread spool in Machine) Patterns (Memory Card) Embroidering Editing Embroidery Patterns Retrieving My Custom Stitch TM Error Maintenance Messages Trouble shooting Using the extra spool pin and the net Extra spool pin Use when embroidering...

Users Manual - English
Page 30
...3.5 0.0-7.0 1.4 0.0-4.0 (1/8) (0-1/4) (1/16) (0-3/16) Darning 5.0 1.5-7.0 1.0 0.2-4.0 (3/16) (1/16-1/4) (1/16) (1/64-1/16) Bar tack 5.0 1.5-7.0 1.0 0.2-4.0 (3/16) (1/16-1/4) (1/16) (1/64-1/16) Tape attaching 3.5 2.5-5.0 2.0 1.0-4.0 (1/8) (3/32-3/16) (1/16) (1/16-3/16) Eyelet 5.0 2.5-5.0 2.5 1.0-4.0 (3/16) (3/32-3/16) (3/32) (1/16-3/16) Button sewing 5.0 0.0-7.0 2.5 0.5-3.0 (3/16) (0.0-1/4) (3/32) (1/...Setting Up Sewing Utility Stitches Characters and Decorative Stitches Embroidering Editing Embroidery Patterns Retrieving Quick adjustment reference chart for stitch width and stitch...
...3.5 0.0-7.0 1.4 0.0-4.0 (1/8) (0-1/4) (1/16) (0-3/16) Darning 5.0 1.5-7.0 1.0 0.2-4.0 (3/16) (1/16-1/4) (1/16) (1/64-1/16) Bar tack 5.0 1.5-7.0 1.0 0.2-4.0 (3/16) (1/16-1/4) (1/16) (1/64-1/16) Tape attaching 3.5 2.5-5.0 2.0 1.0-4.0 (1/8) (3/32-3/16) (1/16) (1/16-3/16) Eyelet 5.0 2.5-5.0 2.5 1.0-4.0 (3/16) (3/32-3/16) (3/32) (1/16-3/16) Button sewing 5.0 0.0-7.0 2.5 0.5-3.0 (3/16) (0.0-1/4) (3/32) (1/...Setting Up Sewing Utility Stitches Characters and Decorative Stitches Embroidering Editing Embroidery Patterns Retrieving Quick adjustment reference chart for stitch width and stitch...
Users Manual - English
Page 35
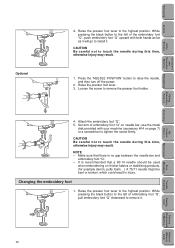
Attach the embroidery foot "Q". 5. NOTE - Changing the embroidery foot 5 1. Raise the presser foot lever to the highest position. Raise the presser foot lever. 3. Make sure that there is recommended that a 90/14 needle ... in Machine) Patterns (Memory Card) 32 Raise the presser foot lever to the highest position. While pressing the black button to the left of embroidery foot "Q", pull embroidery foot "Q" downward to remove it . Loosen the screw to raise the needle, and then turn off the power. 2. CAUTION Be careful not to install...
Attach the embroidery foot "Q". 5. NOTE - Changing the embroidery foot 5 1. Raise the presser foot lever to the highest position. Raise the presser foot lever. 3. Make sure that there is recommended that a 90/14 needle ... in Machine) Patterns (Memory Card) 32 Raise the presser foot lever to the highest position. While pressing the black button to the left of embroidery foot "Q", pull embroidery foot "Q" downward to remove it . Loosen the screw to raise the needle, and then turn off the power. 2. CAUTION Be careful not to install...
Users Manual - English
Page 36
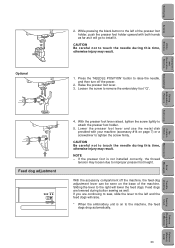
... sew, slide the lever to the left of the machine. Press the "NEEDLE POSITION" button to remove the embroidery foot "Q". Feed dog adjustment 4. With the presser foot lever raised, tighten the screw lightly to the left and... the feed dogs will raise. * When the embroidery unit is not installed correctly, the thread tension may loosen due to touch the needle during this time,... the screw firmly. While pressing the black button to attach the presser foot holder. 5. If you are lowered during button sewing as it .
... sew, slide the lever to the left of the machine. Press the "NEEDLE POSITION" button to remove the embroidery foot "Q". Feed dog adjustment 4. With the presser foot lever raised, tighten the screw lightly to the left and... the feed dogs will raise. * When the embroidery unit is not installed correctly, the thread tension may loosen due to touch the needle during this time,... the screw firmly. While pressing the black button to attach the presser foot holder. 5. If you are lowered during button sewing as it .

Users Manual - English
Page 50
...between presser foot and materials thanks to this foot for sewing other patterns including horizontal feed (STRAIGHT & ZIGZAG STITCH). 1. Attach the adapter for sewing STRAIGHT STITCH ( · ) and ZIGZAG STITCH ( ). Following is explanation about installation of ... walking foot This foot is not completely tightened, injuries may occur. Remove the presser foot and the presser foot holder. 3 5 Embroidering Editing Embroidery Patterns Retrieving My Custom Stitch TM Error Maintenance Messages Trouble shooting * 1 ** 2. Included accessories 1 2 3 1 Adapter 2 Screw (small)...
...between presser foot and materials thanks to this foot for sewing other patterns including horizontal feed (STRAIGHT & ZIGZAG STITCH). 1. Attach the adapter for sewing STRAIGHT STITCH ( · ) and ZIGZAG STITCH ( ). Following is explanation about installation of ... walking foot This foot is not completely tightened, injuries may occur. Remove the presser foot and the presser foot holder. 3 5 Embroidering Editing Embroidery Patterns Retrieving My Custom Stitch TM Error Maintenance Messages Trouble shooting * 1 ** 2. Included accessories 1 2 3 1 Adapter 2 Screw (small)...
Users Manual - English
Page 51
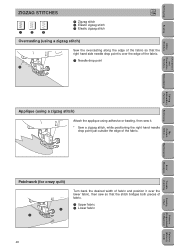
... side needle drop point is over the edge of the fabric. 1 Needle drop point Utility Stitches Characters and Decorative Stitches Embroidering Editing Embroidery Patterns Retrieving Applique (using a zigzag stitch) 5 Attach the applique using adhesive or basting, then sew it. * Sew a zigzag stitch, while positioning the right hand needle drop point just outside...
... side needle drop point is over the edge of the fabric. 1 Needle drop point Utility Stitches Characters and Decorative Stitches Embroidering Editing Embroidery Patterns Retrieving Applique (using a zigzag stitch) 5 Attach the applique using adhesive or basting, then sew it. * Sew a zigzag stitch, while positioning the right hand needle drop point just outside...

Users Manual - English
Page 52
...medium fabrics 2 Thick fabric 3 Thick and medium stretch fabric 4 Medium stretch fabric 5 Stretch fabric 6 Stretch fabric When using , or stitches Attach presser foot "J" and let the needle drop slightly past the edge of the fabric before starting to sew. * When the automatic thread cutting ...and automatic reinforcement stitch are preset, a reinforcement stitch will be sewn automatically at the start of sewing. Editing Embroidery Patterns Retrieving My Custom Stitch TM Error Maintenance Messages Trouble shooting Sewing Chart Patterns (Programmed in Machine) Patterns (Memory...
...medium fabrics 2 Thick fabric 3 Thick and medium stretch fabric 4 Medium stretch fabric 5 Stretch fabric 6 Stretch fabric When using , or stitches Attach presser foot "J" and let the needle drop slightly past the edge of the fabric before starting to sew. * When the automatic thread cutting ...and automatic reinforcement stitch are preset, a reinforcement stitch will be sewn automatically at the start of sewing. Editing Embroidery Patterns Retrieving My Custom Stitch TM Error Maintenance Messages Trouble shooting Sewing Chart Patterns (Programmed in Machine) Patterns (Memory...
Users Manual - English
Page 55
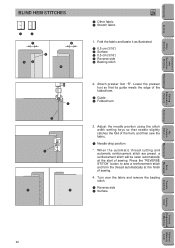
.... Press the "REVERSE STITCH" button to sew a reinforcement stitch and trim the thread automatically at the start of sewing. 4. Attach presser foot "R". Setting Up Sewing Utility Stitches Characters and Decorative Stitches Embroidering Editing Embroidery Patterns BLIND HEM STITCHES 1 2 1 3 5 R 1 Other fabric 2 Stretch fabric 1. Adjust the needle position using the stitch width setting keys...
.... Press the "REVERSE STITCH" button to sew a reinforcement stitch and trim the thread automatically at the start of sewing. 4. Attach presser foot "R". Setting Up Sewing Utility Stitches Characters and Decorative Stitches Embroidering Editing Embroidery Patterns BLIND HEM STITCHES 1 2 1 3 5 R 1 Other fabric 2 Stretch fabric 1. Adjust the needle position using the stitch width setting keys...
Users Manual - English
Page 61
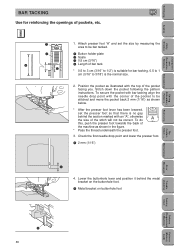
Setting Up Sewing Utility Stitches Characters and Decorative Stitches Embroidering Editing Embroidery Patterns BAR TACKING A Use for reinforcing the openings of bar tack 3 * 0.5 to 3 cm (3/16" to 1/2") is suitable for bar tacking. 0.5 to 1 cm (3/16" ... Sewing Chart Patterns (Programmed in the figure. * Pass the thread underneath the presser foot. 3. Stitch down the pocket following the pattern 5 instructions. Attach presser foot "A" and set the presser foot so that there is the normal size. 2. Position the pocket as illustrated with the corner of the pocket...
Setting Up Sewing Utility Stitches Characters and Decorative Stitches Embroidering Editing Embroidery Patterns BAR TACKING A Use for reinforcing the openings of bar tack 3 * 0.5 to 3 cm (3/16" to 1/2") is suitable for bar tacking. 0.5 to 1 cm (3/16" ... Sewing Chart Patterns (Programmed in the figure. * Pass the thread underneath the presser foot. 3. Stitch down the pocket following the pattern 5 instructions. Attach presser foot "A" and set the presser foot so that there is the normal size. 2. Position the pocket as illustrated with the corner of the pocket...
Users Manual - English
Page 65
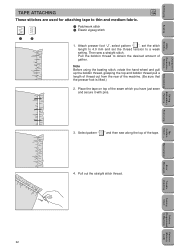
... Retrieving My Custom Stitch TM Error Maintenance Messages Trouble shooting Sewing Chart Patterns (Programmed in Machine) Patterns (Memory Card) 62 Attach presser foot "J", select pattern " ", set the stitch length to 4.0 mm and set the thread tension to thin and ... stitch 2 Elastic zigzag stitch 1 2 1. Setting Up Sewing Utility Stitches Characters and Decorative Stitches Embroidering Editing Embroidery Patterns TAPE ATTACHING J These stitches are used for attaching tape to a weak setting. Then sew a straight stitch. Pull the bobbin thread to obtain the desired ...
... Retrieving My Custom Stitch TM Error Maintenance Messages Trouble shooting Sewing Chart Patterns (Programmed in Machine) Patterns (Memory Card) 62 Attach presser foot "J", select pattern " ", set the stitch length to 4.0 mm and set the thread tension to thin and ... stitch 2 Elastic zigzag stitch 1 2 1. Setting Up Sewing Utility Stitches Characters and Decorative Stitches Embroidering Editing Embroidery Patterns TAPE ATTACHING J These stitches are used for attaching tape to a weak setting. Then sew a straight stitch. Pull the bobbin thread to obtain the desired ...
Users Manual - English
Page 66
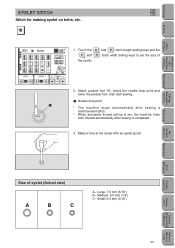
Embroidering Editing Embroidery Patterns Retrieving My Custom Stitch TM Error Maintenance Messages Trouble shooting Sewing Chart Patterns (Programmed in Machine) Size of 2. Make a hole at the center with ... " the eyelet. " and " " stitch length setting keys and the " stitch width setting keys to set , the machine trims both threads automatically after sewing is completed. 3. Attach presser foot "N", check the needle drop point and lower the presser foot, then start sewing. 1 Needle drop point * The machine stops automatically after sewing a reinforcement...
Embroidering Editing Embroidery Patterns Retrieving My Custom Stitch TM Error Maintenance Messages Trouble shooting Sewing Chart Patterns (Programmed in Machine) Size of 2. Make a hole at the center with ... " the eyelet. " and " " stitch length setting keys and the " stitch width setting keys to set , the machine trims both threads automatically after sewing is completed. 3. Attach presser foot "N", check the needle drop point and lower the presser foot, then start sewing. 1 Needle drop point * The machine stops automatically after sewing a reinforcement...

Users Manual - English
Page 67
...Sewing Chart Patterns (Programmed in the button correctly, and then start . Setting Up M Sewing Utility Stitches Characters and Decorative Stitches Embroidering Editing Embroidery Patterns BUTTON SEWING This stitch is completed, return the feed dog to its original position, pull the bobbin thread at the sewing end ... and slide the feed dog adjustment lever to the right to handle and tying off will stop automatically. * If extra attachment strength is needed, carry out the button 6 sewing operation twice. 4. Once sewing is completed, the machine will not be possible). 1.
...Sewing Chart Patterns (Programmed in the button correctly, and then start . Setting Up M Sewing Utility Stitches Characters and Decorative Stitches Embroidering Editing Embroidery Patterns BUTTON SEWING This stitch is completed, return the feed dog to its original position, pull the bobbin thread at the sewing end ... and slide the feed dog adjustment lever to the right to handle and tying off will stop automatically. * If extra attachment strength is needed, carry out the button 6 sewing operation twice. 4. Once sewing is completed, the machine will not be possible). 1.

Users Manual - English
Page 68
Utility Stitches Characters and Decorative Stitches Embroidering Editing Embroidery Patterns Retrieving My Custom Stitch TM Error Maintenance Messages Attaching a shank to the button 1. Once they have been sewn, raise the presser foot, move the needle to the next two holes and then sew... them firmly together. 3. Tie the ends of the fabric. 65 Trouble shooting Sewing Chart Patterns (Programmed in the same way. Setting Up Sewing Attaching buttons with four holes First sew the two holes which are closest to you and then start and sewing end which are between the button...
Utility Stitches Characters and Decorative Stitches Embroidering Editing Embroidery Patterns Retrieving My Custom Stitch TM Error Maintenance Messages Attaching a shank to the button 1. Once they have been sewn, raise the presser foot, move the needle to the next two holes and then sew... them firmly together. 3. Tie the ends of the fabric. 65 Trouble shooting Sewing Chart Patterns (Programmed in the same way. Setting Up Sewing Attaching buttons with four holes First sew the two holes which are closest to you and then start and sewing end which are between the button...
Users Manual - English
Page 69
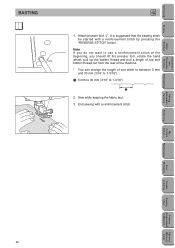
... machine. * You can change the length of one stitch to between 5 mm and 30 mm (3/16" to 1-3/16"). 1 5 mm to 30 mm (3/16" to 1-3/16") 1 2. Attach presser foot "J". Setting Up Sewing Utility Stitches Characters and Decorative Stitches BASTING J 1. End sewing with a reinforcement stitch by pressing the "REVERSE STITCH" button. Embroidering Editing...
... machine. * You can change the length of one stitch to between 5 mm and 30 mm (3/16" to 1-3/16"). 1 5 mm to 30 mm (3/16" to 1-3/16") 1 2. Attach presser foot "J". Setting Up Sewing Utility Stitches Characters and Decorative Stitches BASTING J 1. End sewing with a reinforcement stitch by pressing the "REVERSE STITCH" button. Embroidering Editing...


