
Users Manual - English
Page 5
... 69 Sample patterns for appliqué quilts 69 SCALLOP STITCHING 70 SMOCKING STITCHING 71 PATCHWORK STITCHING 72 PATTERNS (PROGRAMMED IN MACHINE) SEWING CHART ERROR MESSAGES MAINTENANCE EMBROIDERING MY CUSTOM STITCHTM (CREATE YOUR OWN STITCH DESIGNS) UTILITY STITCHES SEWING SETTING UP CONTENTS
... 69 Sample patterns for appliqué quilts 69 SCALLOP STITCHING 70 SMOCKING STITCHING 71 PATCHWORK STITCHING 72 PATTERNS (PROGRAMMED IN MACHINE) SEWING CHART ERROR MESSAGES MAINTENANCE EMBROIDERING MY CUSTOM STITCHTM (CREATE YOUR OWN STITCH DESIGNS) UTILITY STITCHES SEWING SETTING UP CONTENTS

Users Manual - English
Page 6
... pattern with a design ....119 Embroidering appliqués (using a frame pattern 120 Embroidering onto small pieces of fabric or in corners 121 MAINTENANCE 122 CLEANING 122 Cleaning the screen 122 Cleaning the machine surface 122 Cleaning the shuttle 122 CHANGING THE LIGHT BULB 124 ERROR MESSAGES 125 Warning... pattern embroidering 136 Floral alphabet 136 One-point pattern embroidering 137 3 PATTERNS (PROGRAMMED IN MACHINE) SEWING CHART ERROR MESSAGES MAINTENANCE EMBROIDERING MY CUSTOM STITCHTM (CREATE YOUR OWN STITCH DESIGNS) UTILITY STITCHES SEWING SETTING UP CONTENTS
... pattern with a design ....119 Embroidering appliqués (using a frame pattern 120 Embroidering onto small pieces of fabric or in corners 121 MAINTENANCE 122 CLEANING 122 Cleaning the screen 122 Cleaning the machine surface 122 Cleaning the shuttle 122 CHANGING THE LIGHT BULB 124 ERROR MESSAGES 125 Warning... pattern embroidering 136 Floral alphabet 136 One-point pattern embroidering 137 3 PATTERNS (PROGRAMMED IN MACHINE) SEWING CHART ERROR MESSAGES MAINTENANCE EMBROIDERING MY CUSTOM STITCHTM (CREATE YOUR OWN STITCH DESIGNS) UTILITY STITCHES SEWING SETTING UP CONTENTS

Users Manual - English
Page 7
... 15 Buttonhole lever 16 Thread cutter 17 Needle threader lever 18 LCD (liquid crystal display) 19 Thread guide for bobbin winding 20 Spool cap EMBROIDERING MAINTENANCE ERROR MESSAGES SEWING CHART PATTERNS (PROGRAMMED IN MACHINE) 4
... 15 Buttonhole lever 16 Thread cutter 17 Needle threader lever 18 LCD (liquid crystal display) 19 Thread guide for bobbin winding 20 Spool cap EMBROIDERING MAINTENANCE ERROR MESSAGES SEWING CHART PATTERNS (PROGRAMMED IN MACHINE) 4

Users Manual - English
Page 8
MY CUSTOM STITCHTM (CREATE YOUR OWN STITCH DESIGNS) EMBROIDERING MAINTENANCE ERROR MESSAGES SEWING CHART PATTERNS (PROGRAMMED IN MACHINE) 5 No. CONTENTS SETTING UP SEWING UTILITY STITCHES FLAT-BED ATTACHMENT Removing the flat-bed attachment With the ...
MY CUSTOM STITCHTM (CREATE YOUR OWN STITCH DESIGNS) EMBROIDERING MAINTENANCE ERROR MESSAGES SEWING CHART PATTERNS (PROGRAMMED IN MACHINE) 5 No. CONTENTS SETTING UP SEWING UTILITY STITCHES FLAT-BED ATTACHMENT Removing the flat-bed attachment With the ...

Users Manual - English
Page 9
...-002 XA5555-001 XA8375-002 SA298 SA299 X81175-002 a Use the same screw for installing both the walking foot and the optional side cutter. EMBROIDERING MAINTENANCE ERROR MESSAGES SEWING CHART PATTERNS (PROGRAMMED IN MACHINE) 6 c When using special threads that quickly wind off the thread spool, place a net over the spool before...
...-002 XA5555-001 XA8375-002 SA298 SA299 X81175-002 a Use the same screw for installing both the walking foot and the optional side cutter. EMBROIDERING MAINTENANCE ERROR MESSAGES SEWING CHART PATTERNS (PROGRAMMED IN MACHINE) 6 c When using special threads that quickly wind off the thread spool, place a net over the spool before...

Users Manual - English
Page 10
b Refer to page 15. 7 PATTERNS (PROGRAMMED IN MACHINE) SEWING CHART ERROR MESSAGES MAINTENANCE EMBROIDERING MY CUSTOM STITCHTM (CREATE YOUR OWN STITCH DESIGNS) UTILITY STITCHES SEWING SETTING UP CONTENTS OPTIONAL ACCESSORIES 1 2 3 4 No. Part Name 1 Side cutter Embroidery cardsa No. 3 ...
b Refer to page 15. 7 PATTERNS (PROGRAMMED IN MACHINE) SEWING CHART ERROR MESSAGES MAINTENANCE EMBROIDERING MY CUSTOM STITCHTM (CREATE YOUR OWN STITCH DESIGNS) UTILITY STITCHES SEWING SETTING UP CONTENTS OPTIONAL ACCESSORIES 1 2 3 4 No. Part Name 1 Side cutter Embroidery cardsa No. 3 ...

Users Manual - English
Page 11
.... - To turn on the cord or subject it still does not fit, contact a qualified electrician to " I ". MY CUSTOM STITCHTM (CREATE YOUR OWN STITCH DESIGNS) EMBROIDERING MAINTENANCE ERROR MESSAGES SEWING CHART PATTERNS (PROGRAMMED IN MACHINE) 8 For U.S.A. In addition, do not place heavy objects on the machine, set the main power switch to...
.... - To turn on the cord or subject it still does not fit, contact a qualified electrician to " I ". MY CUSTOM STITCHTM (CREATE YOUR OWN STITCH DESIGNS) EMBROIDERING MAINTENANCE ERROR MESSAGES SEWING CHART PATTERNS (PROGRAMMED IN MACHINE) 8 For U.S.A. In addition, do not place heavy objects on the machine, set the main power switch to...
Users Manual - English
Page 12
... while it is moved to the right in order to wind the bobbin thread onto the bobbin. 9 PATTERNS (PROGRAMMED IN MACHINE) SEWING CHART ERROR MESSAGES MAINTENANCE EMBROIDERING MY CUSTOM STITCHTM (CREATE YOUR OWN STITCH DESIGNS) UTILITY STITCHES SEWING SETTING UP CONTENTS The button lights up in orange when the bobbin winder...
... while it is moved to the right in order to wind the bobbin thread onto the bobbin. 9 PATTERNS (PROGRAMMED IN MACHINE) SEWING CHART ERROR MESSAGES MAINTENANCE EMBROIDERING MY CUSTOM STITCHTM (CREATE YOUR OWN STITCH DESIGNS) UTILITY STITCHES SEWING SETTING UP CONTENTS The button lights up in orange when the bobbin winder...

Users Manual - English
Page 13
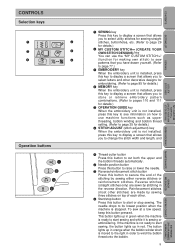
... a screwdriver. Other basic LCD keys END key Press this key to the previous screen. UTILITY STITCHES MY CUSTOM STITCHTM (CREATE YOUR OWN STITCH DESIGNS) EMBROIDERING MAINTENANCE ERROR MESSAGES SEWING CHART PATTERNS (PROGRAMMED IN MACHINE) 10 Furthermore, do not press down too hard on , the straight stitch (left needle position) is displayed...
... a screwdriver. Other basic LCD keys END key Press this key to the previous screen. UTILITY STITCHES MY CUSTOM STITCHTM (CREATE YOUR OWN STITCH DESIGNS) EMBROIDERING MAINTENANCE ERROR MESSAGES SEWING CHART PATTERNS (PROGRAMMED IN MACHINE) 10 Furthermore, do not press down too hard on , the straight stitch (left needle position) is displayed...

Users Manual - English
Page 14
...; Adjust the screen density. After making the adjustment, turn the machine off, then back on again. MY CUSTOM STITCHTM (CREATE YOUR OWN STITCH DESIGNS) EMBROIDERING MAINTENANCE ERROR MESSAGES SEWING CHART PATTERNS (PROGRAMMED IN MACHINE) 11 this key to make the density lighter. 2 Press one of these keys to read, adjust its...
...; Adjust the screen density. After making the adjustment, turn the machine off, then back on again. MY CUSTOM STITCHTM (CREATE YOUR OWN STITCH DESIGNS) EMBROIDERING MAINTENANCE ERROR MESSAGES SEWING CHART PATTERNS (PROGRAMMED IN MACHINE) 11 this key to make the density lighter. 2 Press one of these keys to read, adjust its...

Users Manual - English
Page 15
... each time one of these keys to make the density lighter. 3 2 Press one of the LCD. MY CUSTOM STITCHTM (CREATE YOUR OWN STITCH DESIGNS) EMBROIDERING MAINTENANCE ERROR MESSAGES SEWING CHART PATTERNS (PROGRAMMED IN MACHINE) 12 Press the OPERATION GUIDE key. 2. Adjust the density of these keys is pressed. 1 2 1 Press this key...
... each time one of these keys to make the density lighter. 3 2 Press one of the LCD. MY CUSTOM STITCHTM (CREATE YOUR OWN STITCH DESIGNS) EMBROIDERING MAINTENANCE ERROR MESSAGES SEWING CHART PATTERNS (PROGRAMMED IN MACHINE) 12 Press the OPERATION GUIDE key. 2. Adjust the density of these keys is pressed. 1 2 1 Press this key...

Users Manual - English
Page 16
... Portuguese). Press the OPERATION GUIDE key. 2. The display language can easily change the language of the desired language. This function should not be retained. 13 MAINTENANCE ERROR MESSAGES SEWING CHART PATTERNS (PROGRAMMED IN MACHINE) Press the LANGUAGE SELECTION key. 4. Press the NEXT key. 3. When the display language is changed . Even when...
... Portuguese). Press the OPERATION GUIDE key. 2. The display language can easily change the language of the desired language. This function should not be retained. 13 MAINTENANCE ERROR MESSAGES SEWING CHART PATTERNS (PROGRAMMED IN MACHINE) Press the LANGUAGE SELECTION key. 4. Press the NEXT key. 3. When the display language is changed . Even when...

Users Manual - English
Page 17
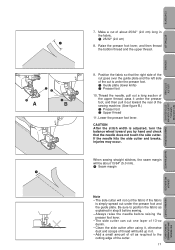
... on the stitch that is aligned with the slit in presser foot holder 2 Presser foot pin MY CUSTOM STITCHTM (CREATE YOUR OWN STITCH DESIGNS) EMBROIDERING MAINTENANCE ERROR MESSAGES SEWING CHART PATTERNS (PROGRAMMED IN MACHINE) 14 Press the black button located at the back of the presser 1 foot holder to raise the...
... on the stitch that is aligned with the slit in presser foot holder 2 Presser foot pin MY CUSTOM STITCHTM (CREATE YOUR OWN STITCH DESIGNS) EMBROIDERING MAINTENANCE ERROR MESSAGES SEWING CHART PATTERNS (PROGRAMMED IN MACHINE) 14 Press the black button located at the back of the presser 1 foot holder to raise the...

Users Manual - English
Page 18
... PATTERNS (PROGRAMMED IN MACHINE) Remove the installed presser foot and the presser foot holder. 3 5 UTILITY STITCHES MY CUSTOM STITCHTM (CREATE YOUR OWN STITCH DESIGNS) EMBROIDERING MAINTENANCE ERROR MESSAGES 1 1 2 2. Hook the connecting fork of the walking foot onto the needle clamp screw, lower the presser foot lever, and then fasten the walking...
... PATTERNS (PROGRAMMED IN MACHINE) Remove the installed presser foot and the presser foot holder. 3 5 UTILITY STITCHES MY CUSTOM STITCHTM (CREATE YOUR OWN STITCH DESIGNS) EMBROIDERING MAINTENANCE ERROR MESSAGES 1 1 2 2. Hook the connecting fork of the walking foot onto the needle clamp screw, lower the presser foot lever, and then fasten the walking...

Users Manual - English
Page 19
... of the side cutter onto the needle clamp screw. 1 Needle clamp screw 2 Connecting fork 3 5 5. Remove the installed presser foot and the presser foot holder. 3 5 1 2 4. EMBROIDERING MAINTENANCE ERROR MESSAGES SEWING CHART PATTERNS (PROGRAMMED IN MACHINE) 16 Raise the presser foot lever. 3. Press the needle position button to turns off the sewing machine. 3 5 2.
... of the side cutter onto the needle clamp screw. 1 Needle clamp screw 2 Connecting fork 3 5 5. Remove the installed presser foot and the presser foot holder. 3 5 1 2 4. EMBROIDERING MAINTENANCE ERROR MESSAGES SEWING CHART PATTERNS (PROGRAMMED IN MACHINE) 16 Raise the presser foot lever. 3. Press the needle position button to turns off the sewing machine. 3 5 2.
Users Manual - English
Page 20
... B.) 2 Presser foot 3 Upper thread 11. Be sure to position the fabric as required to the cutting edge of about 13/64" (5.0 mm). 1 Seam margin EMBROIDERING MAINTENANCE ERROR MESSAGES SEWING CHART Note - Make a cut the fabric if the fabric is simply spread out under the presser foot. 1 Guide plate (lower knife) 2 Presser...
... B.) 2 Presser foot 3 Upper thread 11. Be sure to position the fabric as required to the cutting edge of about 13/64" (5.0 mm). 1 Seam margin EMBROIDERING MAINTENANCE ERROR MESSAGES SEWING CHART Note - Make a cut the fabric if the fabric is simply spread out under the presser foot. 1 Guide plate (lower knife) 2 Presser...
Users Manual - English
Page 21
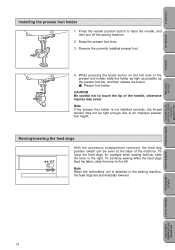
... not to touch the tip of the machine. While pressing the black button on the left . MY CUSTOM STITCHTM (CREATE YOUR OWN STITCH DESIGNS) EMBROIDERING MAINTENANCE ERROR MESSAGES SEWING CHART PATTERNS (PROGRAMMED IN MACHINE) 18 Note If the presser foot holder is attached to an improper presser foot height. Raising/lowering...
... not to touch the tip of the machine. While pressing the black button on the left . MY CUSTOM STITCHTM (CREATE YOUR OWN STITCH DESIGNS) EMBROIDERING MAINTENANCE ERROR MESSAGES SEWING CHART PATTERNS (PROGRAMMED IN MACHINE) 18 Note If the presser foot holder is attached to an improper presser foot height. Raising/lowering...

Users Manual - English
Page 22
... sure to suit a variety of needle 11-14 9-11 14-16 Golden needle 11-14 14-16 Note - Therefore, be used. - There are using. EMBROIDERING MAINTENANCE ERROR MESSAGES SEWING CHART PATTERNS (PROGRAMMED IN MACHINE) 19
... sure to suit a variety of needle 11-14 9-11 14-16 Golden needle 11-14 14-16 Note - Therefore, be used. - There are using. EMBROIDERING MAINTENANCE ERROR MESSAGES SEWING CHART PATTERNS (PROGRAMMED IN MACHINE) 19

Users Manual - English
Page 23
... side of the needle facing toward the back, insert the needle as possible so that it . 1. MY CUSTOM STITCHTM (CREATE YOUR OWN STITCH DESIGNS) EMBROIDERING MAINTENANCE ERROR MESSAGES SEWING CHART PATTERNS (PROGRAMMED IN MACHINE) 20 Loosen the needle clamp screw with a screwdriver. 1 Needle stopper 6. Turn the sewing machine on a flat surface...
... side of the needle facing toward the back, insert the needle as possible so that it . 1. MY CUSTOM STITCHTM (CREATE YOUR OWN STITCH DESIGNS) EMBROIDERING MAINTENANCE ERROR MESSAGES SEWING CHART PATTERNS (PROGRAMMED IN MACHINE) 20 Loosen the needle clamp screw with a screwdriver. 1 Needle stopper 6. Turn the sewing machine on a flat surface...

Users Manual - English
Page 24
... pass the thread through the guides as cross-wound thread, leave some space between the spool cap (small) and the spool of the spool. EMBROIDERING MAINTENANCE ERROR MESSAGES SEWING CHART PATTERNS (PROGRAMMED IN MACHINE) 21 Then, secure the spool on the main power switch. 2. Plug the machine into the power supply...
... pass the thread through the guides as cross-wound thread, leave some space between the spool cap (small) and the spool of the spool. EMBROIDERING MAINTENANCE ERROR MESSAGES SEWING CHART PATTERNS (PROGRAMMED IN MACHINE) 21 Then, secure the spool on the main power switch. 2. Plug the machine into the power supply...


