

Users Manual - English
Page 3
... knee lifter into the knee lifter mounting slot. 0 Operation buttons Use the operation buttons to start the sewing machine and automatically cut them. C Needle threader lever Use the needle threader to adjust the tension of the flat bed attachment. When sewing cylindrical pieces, remove the flat bed attachment. D Thread tension dial Use the thread tension dial to...
... knee lifter into the knee lifter mounting slot. 0 Operation buttons Use the operation buttons to start the sewing machine and automatically cut them. C Needle threader lever Use the needle threader to adjust the tension of the flat bed attachment. When sewing cylindrical pieces, remove the flat bed attachment. D Thread tension dial Use the thread tension dial to...
Users Manual - English
Page 4
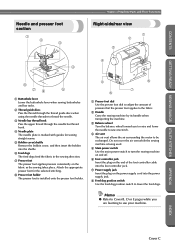
... GETTING READY SEWING BASICS UTILITY STITCHES Names of Machine Parts and Their Functions Needle and presser foot section 1 2 3 Right-side/rear view 1 2 3 4 4 8 76 5 1 Buttonhole lever Lower the buttonhole lever when sewing buttonholes and bar tacks. 2 Thread guide discs Pass the thread through the thread guide discs when using the needle threader to thread the needle. 3 Needle bar thread...
... GETTING READY SEWING BASICS UTILITY STITCHES Names of Machine Parts and Their Functions Needle and presser foot section 1 2 3 Right-side/rear view 1 2 3 4 4 8 76 5 1 Buttonhole lever Lower the buttonhole lever when sewing buttonholes and bar tacks. 2 Thread guide discs Pass the thread through the thread guide discs when using the needle threader to thread the needle. 3 Needle bar thread...

Users Manual - English
Page 31
CONTENTS GETTING READY SEWING BASICS UTILITY STITCHES 1 1 Needle position button • If the needle is not correctly raised, the sewing machine cannot be threaded correctly. If the balance wheel is not in the illustration below. Place the spool for the upper thread onto the ...spool pin. 1 1 Mark on the spool pin when the sewing machine is purchased. 1 2 Remove the spool cap that is inserted onto the 5 spool pin. 1 2 1 Spool pin 2 Spool cap 3 1 Spool cap (large) 2 Spool cap (medium) 3 Spool • When using the needle threader. • If the spool is not positioned so that is...
CONTENTS GETTING READY SEWING BASICS UTILITY STITCHES 1 1 Needle position button • If the needle is not correctly raised, the sewing machine cannot be threaded correctly. If the balance wheel is not in the illustration below. Place the spool for the upper thread onto the ...spool pin. 1 1 Mark on the spool pin when the sewing machine is purchased. 1 2 Remove the spool cap that is inserted onto the 5 spool pin. 1 2 1 Spool pin 2 Spool cap 3 1 Spool cap (large) 2 Spool cap (medium) 3 Spool • When using the needle threader. • If the spool is not positioned so that is...

Users Manual - English
Page 32
...Be sure to raise the presser foot so that best fits the size of the needle bar. 1 1 Thread hook Next, use the needle threader to thread the needle. GETTING READY SEWING BASICS UTILITY STITCHES GETTING READY CONTENTS CAUTION ● If the spool or the spool... cap is not positioned correctly, the thread may become tangled around the spool pin or the needle may break. While holding the spool with your right hand to thread the machine...
...Be sure to raise the presser foot so that best fits the size of the needle bar. 1 1 Thread hook Next, use the needle threader to thread the needle. GETTING READY SEWING BASICS UTILITY STITCHES GETTING READY CONTENTS CAUTION ● If the spool or the spool... cap is not positioned correctly, the thread may become tangled around the spool pin or the needle may break. While holding the spool with your right hand to thread the machine...
Users Manual - English
Page 33
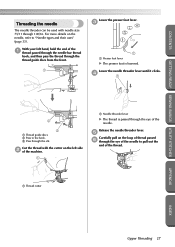
CONTENTS GETTING READY SEWING BASICS UTILITY STITCHES Threading the needle The needle threader can be used with the cutter on the left hand, hold the end of the thread. 1 Thread cutter APPENDIX INDEX Upper Threading 27 With your left side 2 of the machine. 1 5 1 Needle threader lever X The thread is lowered. Release the needle threader lever. 5 Carefully pull on the needle, refer...
CONTENTS GETTING READY SEWING BASICS UTILITY STITCHES Threading the needle The needle threader can be used with the cutter on the left hand, hold the end of the thread. 1 Thread cutter APPENDIX INDEX Upper Threading 27 With your left side 2 of the machine. 1 5 1 Needle threader lever X The thread is lowered. Release the needle threader lever. 5 Carefully pull on the needle, refer...
Users Manual - English
Page 34
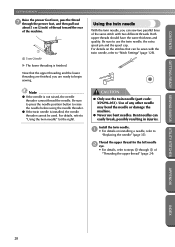
...the upper threading and the lower threading are finished, you can sew two parallel lines of the same stitch with the twin needle, refer to "Stitch Settings" (page 128). Note ● If the needle is installed, the needle threader cannot be sewn with two different threads. For details, refer to...upper thread for the left needle 2 eye. • For details, refer to use bent needles. APPENDIX INDEX 28 Be sure to press the needle position button to begin sewing. Use of any other needle may bend the needle or damage the machine. ● Never use the twin needle, the extra spool pin and...
...the upper threading and the lower threading are finished, you can sew two parallel lines of the same stitch with the twin needle, refer to "Stitch Settings" (page 128). Note ● If the needle is installed, the needle threader cannot be sewn with two different threads. For details, refer to...upper thread for the left needle 2 eye. • For details, refer to use bent needles. APPENDIX INDEX 28 Be sure to press the needle position button to begin sewing. Use of any other needle may bend the needle or damage the machine. ● Never use the twin needle, the extra spool pin and...
Users Manual - English
Page 35
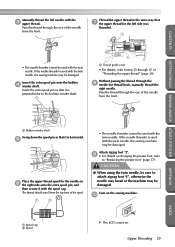
...). CONTENTS Manually thread the left side was threaded. 1 • The needle threader cannot be used with the 3 upper thread. GETTING READY SEWING BASICS UTILITY STITCHES APPENDIX 1 Bobbin winder shaft Swing down the spool pin so that it is used with the twin needle, the sewing machine may be used with the spool cap. The thread should...
...). CONTENTS Manually thread the left side was threaded. 1 • The needle threader cannot be used with the 3 upper thread. GETTING READY SEWING BASICS UTILITY STITCHES APPENDIX 1 Bobbin winder shaft Swing down the spool pin so that it is used with the twin needle, the sewing machine may be used with the spool cap. The thread should...
Users Manual - English
Page 78
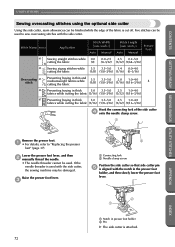
...) (3/32) (1/16-3/16) Hook the connecting fork of the fabric is used with the side cutter, the sewing machine may be damaged. If the needle threader is cut off. GETTING READY SEWING BASICS UTILITY STITCHES UTILITY STITCHES CONTENTS Sewing overcasting stitches using the optional side cutter Using the side cutter, seam allowances can be used to...
...) (3/32) (1/16-3/16) Hook the connecting fork of the fabric is used with the side cutter, the sewing machine may be damaged. If the needle threader is cut off. GETTING READY SEWING BASICS UTILITY STITCHES UTILITY STITCHES CONTENTS Sewing overcasting stitches using the optional side cutter Using the side cutter, seam allowances can be used to...
Users Manual - English
Page 116
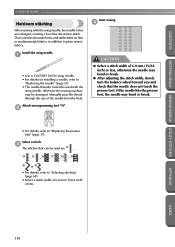
... SEWING BASICS UTILITY STITCHES • For details, refer to "Replacing the needle" (page 35). • The needle threader cannot be used are enlarged, creating a lace-like decorative stitch. If the needle hits the presser foot, the needle ...needle may bend or break. Attach monogramming foot "N". 2 Start sewing. 4 CAUTION ● Select a stitch width of the needle from the front. Select a stitch. 3 The stitches that the needle does not touch the presser foot. UTILITY STITCHES CONTENTS Heirloom stitching When sewing with the wing needle, otherwise the sewing machine...
... SEWING BASICS UTILITY STITCHES • For details, refer to "Replacing the needle" (page 35). • The needle threader cannot be used are enlarged, creating a lace-like decorative stitch. If the needle hits the presser foot, the needle ...needle may bend or break. Attach monogramming foot "N". 2 Start sewing. 4 CAUTION ● Select a stitch width of the needle from the front. Select a stitch. 3 The stitches that the needle does not touch the presser foot. UTILITY STITCHES CONTENTS Heirloom stitching When sewing with the wing needle, otherwise the sewing machine...

Users Manual - English
Page 145
... of stitch that is appropriate for the type of fabric, thread and needle is not appropriate for this machine is incorrect. Press the needle position button to sew. The needle is bent or blunt. The needle is incorrectly installed. Attach the presser foot that you wish to raise the needle. The needle threader cannot be used is not correct.
... of stitch that is appropriate for the type of fabric, thread and needle is not appropriate for this machine is incorrect. Press the needle position button to sew. The needle is bent or blunt. The needle is incorrectly installed. Attach the presser foot that you wish to raise the needle. The needle threader cannot be used is not correct.
Users Manual - English
Page 151
... thread hook Cover C, 26 needle clamp screw 35 needle plate Cover C, 64 needle plate cover 135 needle position 55, 75 needle position button Cover D needle set Cover A needle stop position 16 needle threader lever Cover B, 27 non stick foot Cover A, 64 O OK key Cover E openings 100 operating ... Cover A, 35 seam ripper Cover A, 81 selecting stitching 68 settings 14 settings key Cover E, 14 sewing machine help key Cover E, 13 sewing machine needles 33 sewing speed 49 sewing speed controller Cover B, Cover D, 99 shell tuck stitch 108 shutter 26 shuttle 22, 135 shuttle hook...
... thread hook Cover C, 26 needle clamp screw 35 needle plate Cover C, 64 needle plate cover 135 needle position 55, 75 needle position button Cover D needle set Cover A needle stop position 16 needle threader lever Cover B, 27 non stick foot Cover A, 64 O OK key Cover E openings 100 operating ... Cover A, 35 seam ripper Cover A, 81 selecting stitching 68 settings 14 settings key Cover E, 14 sewing machine help key Cover E, 13 sewing machine needles 33 sewing speed 49 sewing speed controller Cover B, Cover D, 99 shell tuck stitch 108 shutter 26 shuttle 22, 135 shuttle hook...


