

Users Manual - English
Page 3
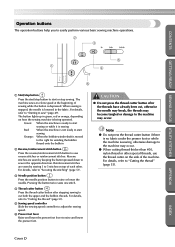
... Use the sewing speed controller to adjust the sewing speed. 9 Knee lifter mounting slot Plug the knee lifter into the knee lifter mounting slot. 0 Operation buttons Use the operation buttons to adjust the tension of the sewing machine and their functions are described below. C Needle threader lever Use the needle threader to thread the needle. APPENDIX INDEX...
... Use the sewing speed controller to adjust the sewing speed. 9 Knee lifter mounting slot Plug the knee lifter into the knee lifter mounting slot. 0 Operation buttons Use the operation buttons to adjust the tension of the sewing machine and their functions are described below. C Needle threader lever Use the needle threader to thread the needle. APPENDIX INDEX...
Users Manual - English
Page 4
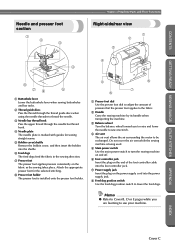
...discs Pass the thread through the needle bar thread hook. 4 Needle plate The needle plate is marked with guides for the selected stitching. 8 Presser foot holder The presser foot is being used. 5 Main power switch Use the main power switch to turn the sewing machine on and off. 6 Foot controller... that the presser foot applies to the fabric. 2 Handle Carry the sewing machine by its handle when transporting the machine. 3 Balance wheel Turn the balance wheel toward you are learning to thread the needle. 3 Needle bar thread hook Pass the upper thread through the thread guide discs when...
...discs Pass the thread through the needle bar thread hook. 4 Needle plate The needle plate is marked with guides for the selected stitching. 8 Presser foot holder The presser foot is being used. 5 Main power switch Use the main power switch to turn the sewing machine on and off. 6 Foot controller... that the presser foot applies to the fabric. 2 Handle Carry the sewing machine by its handle when transporting the machine. 3 Balance wheel Turn the balance wheel toward you are learning to thread the needle. 3 Needle bar thread hook Pass the upper thread through the thread guide discs when...
Users Manual - English
Page 5
... of the machine. When sewing is stopped, the needle is sewing, otherwise damage to start or stop sewing. Green: When the machine is ready to start sewing or while it is sewing Red: When the machine is being operated. The machine sews at a slow speed at the beginning of each other special threads, use the thread cutter on how the sewing machine is...
... of the machine. When sewing is stopped, the needle is sewing, otherwise damage to start or stop sewing. Green: When the machine is ready to start sewing or while it is sewing Red: When the machine is being operated. The machine sews at a slow speed at the beginning of each other special threads, use the thread cutter on how the sewing machine is...
Users Manual - English
Page 8
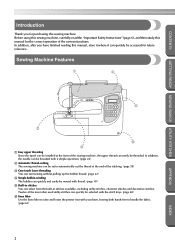
... keys. (page 68) 6 Knee lifter Use the knee lifter to handle the fabric. (page 61) APPENDIX INDEX 2 In addition, the needle can be threaded with a simple operation. (page 24) 2 Automatic thread-cutting The sewing machine can be set to automatically cut the thread at the front of the various functions. CONTENTS GETTING READY...
... keys. (page 68) 6 Knee lifter Use the knee lifter to handle the fabric. (page 61) APPENDIX INDEX 2 In addition, the needle can be threaded with a simple operation. (page 24) 2 Automatic thread-cutting The sewing machine can be set to automatically cut the thread at the front of the various functions. CONTENTS GETTING READY...
Users Manual - English
Page 9
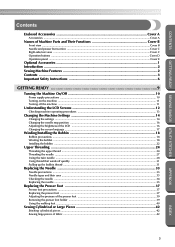
... E Optional Accessories ...1 Introduction ...2 Sewing Machine Features ...2 Contents ...3 Important Safety Instructions 6 GETTING READY 9 Turning the Machine On/Off 10 Power supply precautions ...10 Turning on the machine ...11 Turning off the machine ...11 Understanding the LCD Screens 12 Checking machine operating procedures ...13 Changing the Machine Settings 14 Changing the settings ...14 Changing the needle stop position ...16 Adjusting...
... E Optional Accessories ...1 Introduction ...2 Sewing Machine Features ...2 Contents ...3 Important Safety Instructions 6 GETTING READY 9 Turning the Machine On/Off 10 Power supply precautions ...10 Turning on the machine ...11 Turning off the machine ...11 Understanding the LCD Screens 12 Checking machine operating procedures ...13 Changing the Machine Settings 14 Changing the settings ...14 Changing the needle stop position ...16 Adjusting...

Users Manual - English
Page 12
... openings blocked. Always use as contained in this machine if it has a damaged cord or plug, if it is damaged, it has been dropped or damaged, or dropped into any adjustments in the needle area, such as a toy. Do not pull or push fabric while stitching. This sewing machine is required around the machine needle. 11.
... openings blocked. Always use as contained in this machine if it has a damaged cord or plug, if it is damaged, it has been dropped or damaged, or dropped into any adjustments in the needle area, such as a toy. Do not pull or push fabric while stitching. This sewing machine is required around the machine needle. 11.

Users Manual - English
Page 14
... advanced computerized household sewing machines. When storing this machine, avoid direct sunlight and high humidity locations. CONTENTS GETTING READY SEWING BASICS UTILITY STITCHES CONGRATULATIONS ON CHOOSING OUR MACHINE Your machine is completed • Replacing or removing the needle or any assemblies, the presser feet, needle, or other moving parts. 2. Be sure to keep your local authorized Brother dealer. Remember...
... advanced computerized household sewing machines. When storing this machine, avoid direct sunlight and high humidity locations. CONTENTS GETTING READY SEWING BASICS UTILITY STITCHES CONGRATULATIONS ON CHOOSING OUR MACHINE Your machine is completed • Replacing or removing the needle or any assemblies, the presser feet, needle, or other moving parts. 2. Be sure to keep your local authorized Brother dealer. Remember...
Users Manual - English
Page 18
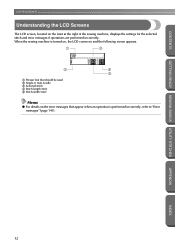
... on and the following screen appears. 1 3 2 4 5 1 Presser foot that should be used 2 Single or twin needle 3 Selected stitch 4 Stitch length (mm) 5 Stitch width (mm) Memo ● For details on the front at the right of the sewing machine, displays the settings for the selected stitch and error messages if operations are performed incorrectly...
... on and the following screen appears. 1 3 2 4 5 1 Presser foot that should be used 2 Single or twin needle 3 Selected stitch 4 Stitch length (mm) 5 Stitch width (mm) Memo ● For details on the front at the right of the sewing machine, displays the settings for the selected stitch and error messages if operations are performed incorrectly...
Users Manual - English
Page 21
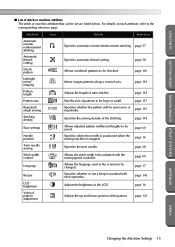
... Specifies whether or not a beep is stopped. page 119 Pattern length Adjusts the length of the pattern. page 60 Needle position Specifies where the needle is positioned when the sewing machine is sounded with the sewing speed controller. Adjusts the brightness of the stitching. page 99 Language Allows the language used in the screens to...
... Specifies whether or not a beep is stopped. page 119 Pattern length Adjusts the length of the pattern. page 60 Needle position Specifies where the needle is positioned when the sewing machine is sounded with the sewing speed controller. Adjusts the brightness of the stitching. page 99 Language Allows the language used in the screens to...

Users Manual - English
Page 22
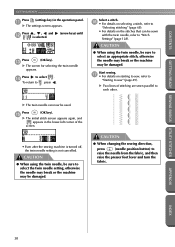
... stopped. Press (settings key) in the operation 1 panel, and then press , , and (arrow keys) until is selected. GETTING READY SEWING BASICS UTILITY STITCHES GETTING READY CONTENTS Changing the needle stop position When the sewing machine is purchased, it is set to stop position appears. Adjusting the brightness of the LCD The brightness of the...
... stopped. Press (settings key) in the operation 1 panel, and then press , , and (arrow keys) until is selected. GETTING READY SEWING BASICS UTILITY STITCHES GETTING READY CONTENTS Changing the needle stop position When the sewing machine is purchased, it is set to stop position appears. Adjusting the brightness of the LCD The brightness of the...
Users Manual - English
Page 27
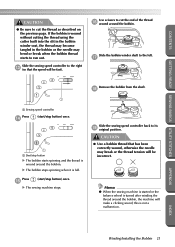
...start /stop button) once. 1 1 Start/stop button) once. X The sewing machine stops. APPENDIX INDEX Winding/Installing the Bobbin 21 If the bobbin is not a malfunction. g Remove the bobbin from the shaft. Slide the sewing speed controller back to the left. this is wound without cutting the thread ... a bobbin thread that has been correctly wound, otherwise the needle may bend or break when the bobbin thread starts to the right c (so that the speed will make a clicking sound; Memo ● When the sewing machine is started or the balance wheel is turned after winding the...
...start /stop button) once. 1 1 Start/stop button) once. X The sewing machine stops. APPENDIX INDEX Winding/Installing the Bobbin 21 If the bobbin is not a malfunction. g Remove the bobbin from the shaft. Slide the sewing speed controller back to the left. this is wound without cutting the thread ... a bobbin thread that has been correctly wound, otherwise the needle may bend or break when the bobbin thread starts to the right c (so that the speed will make a clicking sound; Memo ● When the sewing machine is started or the balance wheel is turned after winding the...
Users Manual - English
Page 28
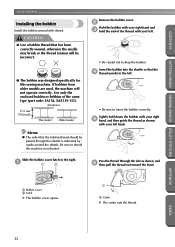
Memo ● The order that has been correctly wound, otherwise the needle may break or the thread tension will not operate correctly. Use only the enclosed bobbin or bobbins of the thread with thread. Be sure to ... shown, and 6 then pull the thread out toward the front. If bobbins from older models are used, the machine will be passed through the slot as indicated. INDEX 22 GETTING READY SEWING BASICS UTILITY STITCHES GETTING READY CONTENTS Installing the bobbin Install the bobbin wound with your left hand. Slide the bobbin...
Memo ● The order that has been correctly wound, otherwise the needle may break or the thread tension will not operate correctly. Use only the enclosed bobbin or bobbins of the thread with thread. Be sure to ... shown, and 6 then pull the thread out toward the front. If bobbins from older models are used, the machine will be passed through the slot as indicated. INDEX 22 GETTING READY SEWING BASICS UTILITY STITCHES GETTING READY CONTENTS Installing the bobbin Install the bobbin wound with your left hand. Slide the bobbin...

Users Manual - English
Page 30
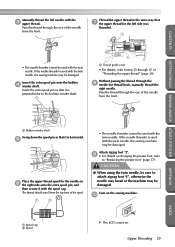
...the spool for the upper thread and threading the needle are described. Raise the presser foot lever. 2 1 1 Presser foot lever X The presser foot is indicated by a solid line on the sewing machine. 1 Memo ● The order that the machine should be threaded is raised. 24 INDEX If ...the upper threading is not correct, the thread may become tangled or the needle may bend or break. CONTENTS GETTING READY SEWING BASICS UTILITY STITCHES APPENDIX CAUTION ...
...the spool for the upper thread and threading the needle are described. Raise the presser foot lever. 2 1 1 Presser foot lever X The presser foot is indicated by a solid line on the sewing machine. 1 Memo ● The order that the machine should be threaded is raised. 24 INDEX If ...the upper threading is not correct, the thread may become tangled or the needle may bend or break. CONTENTS GETTING READY SEWING BASICS UTILITY STITCHES APPENDIX CAUTION ...

Users Manual - English
Page 31
...cap is already on the spool pin when the sewing machine is purchased. 1 2 Remove the spool cap that is inserted onto the 5 spool pin. 1 2 1 Spool pin 2 Spool cap 3 1 Spool cap (large) 2 Spool cap (medium) 3 Spool • When using the needle threader. • If the spool is not... correctly raised, the sewing machine cannot be sure to press the needle position button to raise the needle. • If the presser foot is horizontal and the thread unrolls from the bottom ...
...cap is already on the spool pin when the sewing machine is purchased. 1 2 Remove the spool cap that is inserted onto the 5 spool pin. 1 2 1 Spool pin 2 Spool cap 3 1 Spool cap (large) 2 Spool cap (medium) 3 Spool • When using the needle threader. • If the spool is not... correctly raised, the sewing machine cannot be sure to press the needle position button to raise the needle. • If the presser foot is horizontal and the thread unrolls from the bottom ...
Users Manual - English
Page 35
... should unroll from the top front of "Threading the upper thread" (page 26). If the needle threader is used with the twin needle, the sewing machine may be used with the twin needle, the sewing machine may be damaged. Turn on the sewing machine. 0 1 Spool cap 2 Spool X The LCD comes on changing the presser foot, refer to attach zigzag...
... should unroll from the top front of "Threading the upper thread" (page 26). If the needle threader is used with the twin needle, the sewing machine may be used with the twin needle, the sewing machine may be damaged. Turn on the sewing machine. 0 1 Spool cap 2 Spool X The LCD comes on changing the presser foot, refer to attach zigzag...
Users Manual - English
Page 36
... to "Stitch Settings" (page 128). X Two lines of the screen. • Even after the sewing machine is turned off, the twin needle setting is selected. (arrow keys) until Press (OK key). GETTING READY SEWING BASICS UTILITY STITCHES X The twin needle can be damaged. GETTING READY CONTENTS Press (settings key) in the lower-left corner of...
... to "Stitch Settings" (page 128). X Two lines of the screen. • Even after the sewing machine is turned off, the twin needle setting is selected. (arrow keys) until Press (OK key). GETTING READY SEWING BASICS UTILITY STITCHES X The twin needle can be damaged. GETTING READY CONTENTS Press (settings key) in the lower-left corner of...
Users Manual - English
Page 39
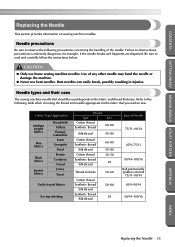
... thread Synthetic thread Silk thread Synthetic thread Silk thread 50-80 30 Size of any other needle may bend the needle or damage the machine. ● Never use home sewing machine needles. CONTENTS GETTING READY SEWING BASICS UTILITY STITCHES Replacing the Needle This section provides information on the fabric and thread thickness. Failure to read and carefully follow...
... thread Synthetic thread Silk thread Synthetic thread Silk thread 50-80 30 Size of any other needle may bend the needle or damage the machine. ● Never use home sewing machine needles. CONTENTS GETTING READY SEWING BASICS UTILITY STITCHES Replacing the Needle This section provides information on the fabric and thread thickness. Failure to read and carefully follow...
Users Manual - English
Page 40
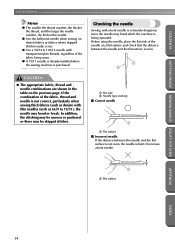
... with thin needles (such as 65/9 to 100/16 needle with a bent needle is extremely dangerous since the needle may break while the machine is purchased. Before using the needle, place the flat side of the fabric being sewn. ● A 75/11 needle is already installed when the sewing machine is being... operated. In addition, the stitching may be uneven or puckered or there may be skipped stitches. Checking the needle Sewing with transparent nylon threads, regardless of the needle on a flat surface and check ...
... with thin needles (such as 65/9 to 100/16 needle with a bent needle is extremely dangerous since the needle may break while the machine is purchased. Before using the needle, place the flat side of the fabric being sewn. ● A 75/11 needle is already installed when the sewing machine is being... operated. In addition, the stitching may be uneven or puckered or there may be skipped stitches. Checking the needle Sewing with transparent nylon threads, regardless of the needle on a flat surface and check ...
Users Manual - English
Page 119
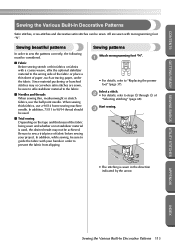
... be sure to affix stabilizer material to the fabric. ■ Needles and threads When sewing thin, mediumweight or stretch fabrics, use a 90/14 home sewing machine needle. When sewing thick fabrics, use the ball point needle. In addition, 75/11 to prevent the fabric from slipping. ...considered. ■ Fabric Before sewing stretch or thin fabrics or fabrics with your project. Sewing beautiful patterns In order to steps 4 through 9 of paper, such as tracing paper, under the fabric. Select a stitch. 2 • For details, refer to sew the patterns correctly, the following...
... be sure to affix stabilizer material to the fabric. ■ Needles and threads When sewing thin, mediumweight or stretch fabrics, use a 90/14 home sewing machine needle. When sewing thick fabrics, use the ball point needle. In addition, 75/11 to prevent the fabric from slipping. ...considered. ■ Fabric Before sewing stretch or thin fabrics or fabrics with your project. Sewing beautiful patterns In order to steps 4 through 9 of paper, such as tracing paper, under the fabric. Select a stitch. 2 • For details, refer to sew the patterns correctly, the following...
Users Manual - English
Page 151
... 17 screwdriver Cover A, 35 seam ripper Cover A, 81 selecting stitching 68 settings 14 settings key Cover E, 14 sewing machine help key Cover E, 13 sewing machine needles 33 sewing speed 49 sewing speed controller Cover B, Cover D, 99 shell tuck stitch 108 shutter 26 shuttle 22, 135 shuttle hook 136 side...plate Cover B, 20, 26 thread tension 54 thread tension dial Cover B, 54 thread that quickly unwinds 31 trial sewing 62 triple stretch stitch 100 troubleshooting 137 twin needle Cover A, 28, 35 U upper cover Cover B, 19, 25 upper thread 24 upper thread tension 54 Index ...
... 17 screwdriver Cover A, 35 seam ripper Cover A, 81 selecting stitching 68 settings 14 settings key Cover E, 14 sewing machine help key Cover E, 13 sewing machine needles 33 sewing speed 49 sewing speed controller Cover B, Cover D, 99 shell tuck stitch 108 shutter 26 shuttle 22, 135 shuttle hook 136 side...plate Cover B, 20, 26 thread tension 54 thread tension dial Cover B, 54 thread that quickly unwinds 31 trial sewing 62 triple stretch stitch 100 troubleshooting 137 twin needle Cover A, 28, 35 U upper cover Cover B, 19, 25 upper thread 24 upper thread tension 54 Index ...


