
Users Manual - English
Page 2
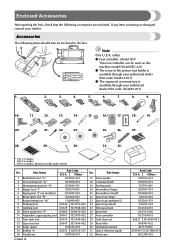
Part Name 1 Buttonhole foot "A" 2 Overcasting foot "G" 3 Monogramming foot "N" 4 Zipper foot "I" 5 Zigzag foot "J" (on this machine model NX-400/PC-420. ● The screw of the presser foot holder is available through your authorized dealer (Part code: XA4813-051). ● The organized accessory...19. 20. 21. 22. 23. 24. 25. 26. 27. 28. 29. 30. 31. 32. * 75/11 2 needles 90/14 2 needles 90/14 2 needles: Ball point needle (gold colored) No. Part Name 17 Twin needle 18 Cleaning brush 19 Eyelet punch 20 Screwdriver (large) 21 Screwdriver (small) 22 Spool cap (large) 23 Spool cap...
Part Name 1 Buttonhole foot "A" 2 Overcasting foot "G" 3 Monogramming foot "N" 4 Zipper foot "I" 5 Zigzag foot "J" (on this machine model NX-400/PC-420. ● The screw of the presser foot holder is available through your authorized dealer (Part code: XA4813-051). ● The organized accessory...19. 20. 21. 22. 23. 24. 25. 26. 27. 28. 29. 30. 31. 32. * 75/11 2 needles 90/14 2 needles 90/14 2 needles: Ball point needle (gold colored) No. Part Name 17 Twin needle 18 Cleaning brush 19 Eyelet punch 20 Screwdriver (large) 21 Screwdriver (small) 22 Spool cap (large) 23 Spool cap...

Users Manual - English
Page 3
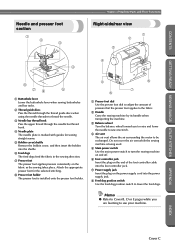
... their functions are described below. B Thread cutter Pass the threads through the thread cutter to thread the needle. D Thread tension dial Use the thread tension dial to start the sewing machine and automatically cut them. When sewing cylindrical pieces, remove the flat bed attachment. Front view 1 D C B 2 3 4 5 6 7 8 A 0 9 1 Thread guide plate / 2 Thread guide cover Pass the...
... their functions are described below. B Thread cutter Pass the threads through the thread cutter to thread the needle. D Thread tension dial Use the thread tension dial to start the sewing machine and automatically cut them. When sewing cylindrical pieces, remove the flat bed attachment. Front view 1 D C B 2 3 4 5 6 7 8 A 0 9 1 Thread guide plate / 2 Thread guide cover Pass the...
Users Manual - English
Page 4
...to the fabric. 2 Handle Carry the sewing machine by its handle when transporting the machine. 3 Balance wheel Turn the balance wheel toward you are learning to use your machine. Memo ● Refer to Cover B, D or E pages while you to raise and lower the needle to sew one stitch. 4 Air vent The air... Pass the upper thread through the needle bar thread hook. 4 Needle plate The needle plate is marked with guides for the selected stitching. 8 Presser foot holder The presser foot is being used. 5 Main power switch Use the main power switch to turn the sewing machine on and off. 6 Foot controller...
...to the fabric. 2 Handle Carry the sewing machine by its handle when transporting the machine. 3 Balance wheel Turn the balance wheel toward you are learning to use your machine. Memo ● Refer to Cover B, D or E pages while you to raise and lower the needle to sew one stitch. 4 Air vent The air... Pass the upper thread through the needle bar thread hook. 4 Needle plate The needle plate is marked with guides for the selected stitching. 8 Presser foot holder The presser foot is being used. 5 Main power switch Use the main power switch to turn the sewing machine on and off. 6 Foot controller...
Users Manual - English
Page 5
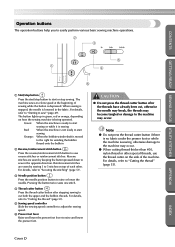
... or lower the needle. APPENDIX INDEX Cover D The machine sews at a slow speed at the beginning of sewing while the button is lowered in the fabric. When sewing is stopped, the needle is depressed. Reverse stitches are sewn by keeping the button pressed down to sew in green, red or orange, depending on how the sewing machine is moved...
... or lower the needle. APPENDIX INDEX Cover D The machine sews at a slow speed at the beginning of sewing while the button is lowered in the fabric. When sewing is stopped, the needle is depressed. Reverse stitches are sewn by keeping the button pressed down to sew in green, red or orange, depending on how the sewing machine is moved...
Users Manual - English
Page 8
...58) 3 One-touch lower threading You can start sewing without pulling up the bobbin thread. (page 22) 4 Simple bobbin-winding The bobbin can quickly and easily be threaded. In addition, after you for purchasing this sewing machine. In addition, the needle can be threaded with your knee, leaving both ...hands free to automatically cut the thread at the front of the sewing machine, the upper thread can select from the built-in stitches You...
...58) 3 One-touch lower threading You can start sewing without pulling up the bobbin thread. (page 22) 4 Simple bobbin-winding The bobbin can quickly and easily be threaded. In addition, after you for purchasing this sewing machine. In addition, the needle can be threaded with your knee, leaving both ...hands free to automatically cut the thread at the front of the sewing machine, the upper thread can select from the built-in stitches You...
Users Manual - English
Page 9
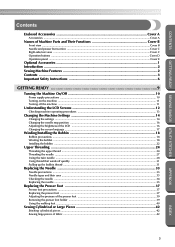
... E Optional Accessories ...1 Introduction ...2 Sewing Machine Features ...2 Contents ...3 Important Safety Instructions 6 GETTING READY 9 Turning the Machine On/Off 10 Power supply precautions ...10 Turning on the machine ...11 Turning off the machine ...11 Understanding the LCD Screens 12 Checking machine operating procedures ...13 Changing the Machine Settings 14 Changing the settings ...14 Changing the needle stop position ...16 Adjusting...
... E Optional Accessories ...1 Introduction ...2 Sewing Machine Features ...2 Contents ...3 Important Safety Instructions 6 GETTING READY 9 Turning the Machine On/Off 10 Power supply precautions ...10 Turning on the machine ...11 Turning off the machine ...11 Understanding the LCD Screens 12 Checking machine operating procedures ...13 Changing the Machine Settings 14 Changing the settings ...14 Changing the needle stop position ...16 Adjusting...

Users Manual - English
Page 12
... drop or insert any object into water. Do not use the proper needle plate. Do not pull or push fabric while stitching. Do not operate where aerosol (spray) products are being administered. 8. This sewing machine is damaged, it has been dropped or damaged, or dropped into any...required around the machine needle. 11. Return the machine to persons: 1. Do not use by or near children. 2. Use only accessories recommended by pulling on cord. Never operate this machine if it has a damaged cord or plug, if it to break. 12. CONTENTS GETTING READY SEWING BASICS UTILITY ...
... drop or insert any object into water. Do not use the proper needle plate. Do not pull or push fabric while stitching. Do not operate where aerosol (spray) products are being administered. 8. This sewing machine is damaged, it has been dropped or damaged, or dropped into any...required around the machine needle. 11. Return the machine to persons: 1. Do not use by or near children. 2. Use only accessories recommended by pulling on cord. Never operate this machine if it has a damaged cord or plug, if it to break. 12. CONTENTS GETTING READY SEWING BASICS UTILITY ...

Users Manual - English
Page 14
...CHOOSING OUR MACHINE Your machine is one of the operation manual to inspect and adjust the machine yourself. PLEASE READ BEFORE USING THIS MACHINE For safe operation 1. Be sure to keep your local authorized Brother dealer. Do not store anything on the needle while sewing. Always ...consult the operation manual when replacing or installing any other hot objects. 2. Do not use or store the machine near a space heater, iron, halogen lamp, ...
...CHOOSING OUR MACHINE Your machine is one of the operation manual to inspect and adjust the machine yourself. PLEASE READ BEFORE USING THIS MACHINE For safe operation 1. Be sure to keep your local authorized Brother dealer. Do not store anything on the needle while sewing. Always ...consult the operation manual when replacing or installing any other hot objects. 2. Do not use or store the machine near a space heater, iron, halogen lamp, ...
Users Manual - English
Page 15
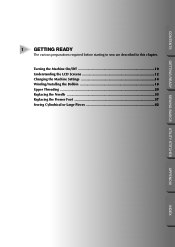
CONTENTS GETTING READY SEWING BASICS UTILITY STITCHES 1 GETTING READY The various preparations required before starting to sew are described in this chapter. Turning the Machine On/Off 10 Understanding the LCD Screens 12 Changing the Machine Settings 14 Winding/Installing the Bobbin 18 Upper Threading ...24 Replacing the Needle 33 Replacing the Presser Foot 37 Sewing Cylindrical or Large Pieces 42 APPENDIX INDEX
CONTENTS GETTING READY SEWING BASICS UTILITY STITCHES 1 GETTING READY The various preparations required before starting to sew are described in this chapter. Turning the Machine On/Off 10 Understanding the LCD Screens 12 Changing the Machine Settings 14 Winding/Installing the Bobbin 18 Upper Threading ...24 Replacing the Needle 33 Replacing the Presser Foot 37 Sewing Cylindrical or Large Pieces 42 APPENDIX INDEX
Users Manual - English
Page 18
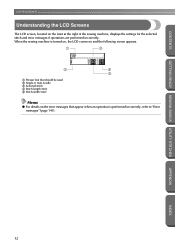
...located on the error messages that should be used 2 Single or twin needle 3 Selected stitch 4 Stitch length (mm) 5 Stitch width (mm) Memo ● For details on the front at the right of the sewing machine, displays the settings for the selected stitch and error messages if operations... are performed incorrectly. When the sewing machine is turned on, the LCD comes on and the following screen appears. 1 3 2 4 5 ...
...located on the error messages that should be used 2 Single or twin needle 3 Selected stitch 4 Stitch length (mm) 5 Stitch width (mm) Memo ● For details on the front at the right of the sewing machine, displays the settings for the selected stitch and error messages if operations... are performed incorrectly. When the sewing machine is turned on, the LCD comes on and the following screen appears. 1 3 2 4 5 ...
Users Manual - English
Page 21
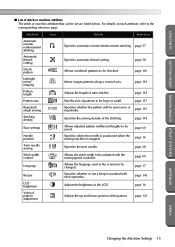
... checked. page 143 page 16 Vertical pattern adjustment Adjusts the up and down position of satin stitches. page 60 Needle position Specifies where the needle is positioned when the sewing machine is sounded with the sewing speed controller. page 17 Buzzer LCD brightness Specifies whether or not a beep is stopped. page 99 Language Allows the...
... checked. page 143 page 16 Vertical pattern adjustment Adjusts the up and down position of satin stitches. page 60 Needle position Specifies where the needle is positioned when the sewing machine is sounded with the sewing speed controller. page 17 Buzzer LCD brightness Specifies whether or not a beep is stopped. page 99 Language Allows the...

Users Manual - English
Page 22
... in the operation 1 panel, and then press , , and (arrow keys) until is selected. However, the machine can be set to instead leave the needle raised when sewing is stopped. Press (OK key). 2 X The screen for changing the brightness of the LCD is changed. Press (OK key).... appears again. To make the LCD darker, press (+). X The brightness of the LCD appears. APPENDIX INDEX 16 GETTING READY SEWING BASICS UTILITY STITCHES GETTING READY CONTENTS Changing the needle stop position When the sewing machine is purchased, it is set to stop position appears.
... in the operation 1 panel, and then press , , and (arrow keys) until is selected. However, the machine can be set to instead leave the needle raised when sewing is stopped. Press (OK key). 2 X The screen for changing the brightness of the LCD is changed. Press (OK key).... appears again. To make the LCD darker, press (+). X The brightness of the LCD appears. APPENDIX INDEX 16 GETTING READY SEWING BASICS UTILITY STITCHES GETTING READY CONTENTS Changing the needle stop position When the sewing machine is purchased, it is set to stop position appears.
Users Manual - English
Page 26
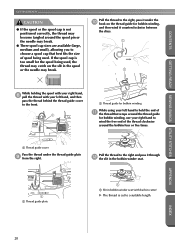
...spool being used , the thread may catch on the thread guide for bobbin winding, and then wind it counterclockwise between the discs. 1 1 GETTING READY SEWING BASICS UTILITY STITCHES While holding the spool with your right hand, 8 pull the thread with built-in the bobbin winder seat. APPENDIX 1 1 Thread ...tangled around the bobbin four or five times. 1 Thread guide cover Pass the thread under the 0 hook on the slit in the spool or the needle may break. ● Three spool cap sizes are available (large, medium and small), allowing you to choose a spool cap that wraps around the...
...spool being used , the thread may catch on the thread guide for bobbin winding, and then wind it counterclockwise between the discs. 1 1 GETTING READY SEWING BASICS UTILITY STITCHES While holding the spool with your right hand, 8 pull the thread with built-in the bobbin winder seat. APPENDIX 1 1 Thread ...tangled around the bobbin four or five times. 1 Thread guide cover Pass the thread under the 0 hook on the slit in the spool or the needle may break. ● Three spool cap sizes are available (large, medium and small), allowing you to choose a spool cap that wraps around the...
Users Manual - English
Page 27
...Remove the bobbin from the shaft. X The sewing machine stops. Slide the sewing speed controller back to the left. Memo ● When the sewing machine is started or the balance wheel is turned after winding the thread around the bobbin, the machine will be fast). this is full. APPENDIX INDEX... around the bobbin. X The bobbin stops spinning when it is not a malfunction. Slide the sewing speed controller to the right c (so that has been correctly wound, otherwise the needle may bend or break when the bobbin thread starts to run out. CONTENTS GETTING READY...
...Remove the bobbin from the shaft. X The sewing machine stops. Slide the sewing speed controller back to the left. Memo ● When the sewing machine is started or the balance wheel is turned after winding the thread around the bobbin, the machine will be fast). this is full. APPENDIX INDEX... around the bobbin. X The bobbin stops spinning when it is not a malfunction. Slide the sewing speed controller to the right c (so that has been correctly wound, otherwise the needle may bend or break when the bobbin thread starts to run out. CONTENTS GETTING READY...
Users Manual - English
Page 28
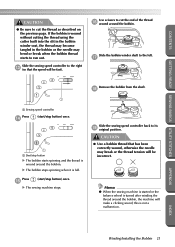
.... INDEX 22 Memo ● The order that the bobbin thread should be incorrect. ● The bobbin was designed specifically for this sewing machine. Use only the enclosed bobbin or bobbins of the thread with your left . • Be sure to drop the bobbin. GETTING READY... The bobbin cover opens. 1 1 Cutter X The cutter cuts the thread. Insert the bobbin into the shuttle so that has been correctly wound, otherwise the needle may break or the thread tension will not operate correctly. CAUTION ● Use a bobbin thread that the 4 thread unrolls to the left . • Be...
.... INDEX 22 Memo ● The order that the bobbin thread should be incorrect. ● The bobbin was designed specifically for this sewing machine. Use only the enclosed bobbin or bobbins of the thread with your left . • Be sure to drop the bobbin. GETTING READY... The bobbin cover opens. 1 1 Cutter X The cutter cuts the thread. Insert the bobbin into the shuttle so that has been correctly wound, otherwise the needle may break or the thread tension will not operate correctly. CAUTION ● Use a bobbin thread that the 4 thread unrolls to the left . • Be...

Users Manual - English
Page 30
...GETTING READY Upper Threading In this section, the procedures for positioning the spool for the upper thread and threading the needle are described. Threading the upper thread Turn on the sewing machine. Raise the presser foot lever. 2 1 1 Presser foot lever X The presser foot is indicated by a solid... line on the sewing machine. 1 Memo ● The order that the machine should be threaded is raised. 24 INDEX If the upper threading is not correct, the thread may become tangled or the needle may bend or break. Be sure to thread the...
...GETTING READY Upper Threading In this section, the procedures for positioning the spool for the upper thread and threading the needle are described. Threading the upper thread Turn on the sewing machine. Raise the presser foot lever. 2 1 1 Presser foot lever X The presser foot is indicated by a solid... line on the sewing machine. 1 Memo ● The order that the machine should be threaded is raised. 24 INDEX If the upper threading is not correct, the thread may become tangled or the needle may bend or break. Be sure to thread the...

Users Manual - English
Page 31
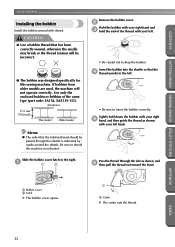
...thread may become tangled around the spool pin. CONTENTS GETTING READY SEWING BASICS UTILITY STITCHES 1 1 Needle position button • If the needle is not raised, the sewing machine cannot be sure to press the needle position button to raise the needle. Slide the spool cap onto the spool pin. 7 With ...medium) 3 Spool • When using the needle threader. • If the spool is not positioned so that the mark on the balance wheel is slightly larger than the diameter of the spool pin. 1 1 Mark on the spool pin when the sewing machine is purchased. 1 2 Remove the spool ...
...thread may become tangled around the spool pin. CONTENTS GETTING READY SEWING BASICS UTILITY STITCHES 1 1 Needle position button • If the needle is not raised, the sewing machine cannot be sure to press the needle position button to raise the needle. Slide the spool cap onto the spool pin. 7 With ...medium) 3 Spool • When using the needle threader. • If the spool is not positioned so that the mark on the balance wheel is slightly larger than the diameter of the spool pin. 1 1 Mark on the spool pin when the sewing machine is purchased. 1 2 Remove the spool ...

Users Manual - English
Page 32
...INDEX 26 GETTING READY SEWING BASICS UTILITY STITCHES GETTING READY CONTENTS CAUTION ● If the spool or the spool cap is not positioned correctly, the thread may become tangled around the spool pin or the needle may break. While holding the spool with your right hand to thread the machine. 1 APPENDIX 1 ...; down → up → left hand, and then pass the thread behind the thread guide cover to thread the needle. If the spool cap is lowered, the machine cannot be threaded. Since the shutter is closed when the presser foot is too small for the spool being used, the ...
...INDEX 26 GETTING READY SEWING BASICS UTILITY STITCHES GETTING READY CONTENTS CAUTION ● If the spool or the spool cap is not positioned correctly, the thread may become tangled around the spool pin or the needle may break. While holding the spool with your right hand to thread the machine. 1 APPENDIX 1 ...; down → up → left hand, and then pass the thread behind the thread guide cover to thread the needle. If the spool cap is lowered, the machine cannot be threaded. Since the shutter is closed when the presser foot is too small for the spool being used, the ...
Users Manual - English
Page 33
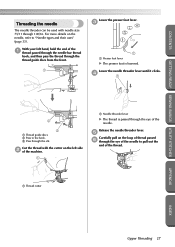
.... 1 Thread cutter APPENDIX INDEX Upper Threading 27 With your left side 2 of the machine. 1 5 1 Needle threader lever X The thread is lowered. CONTENTS GETTING READY SEWING BASICS UTILITY STITCHES Threading the needle The needle threader can be used with the cutter on the left hand, hold the end of ...the 1 thread passed through the needle bar thread hook, and then pass the thread ...
.... 1 Thread cutter APPENDIX INDEX Upper Threading 27 With your left side 2 of the machine. 1 5 1 Needle threader lever X The thread is lowered. CONTENTS GETTING READY SEWING BASICS UTILITY STITCHES Threading the needle The needle threader can be used with the cutter on the left hand, hold the end of ...the 1 thread passed through the needle bar thread hook, and then pass the thread ...
Users Manual - English
Page 34
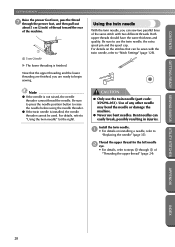
...machine. ● Never use the twin needle, the extra spool pin and the spool cap. Using the twin needle With the twin needle, you are ready to "Replacing the needle" (page 35). Now that can be used. Both upper threads should have the same thickness and quality. For details on installing a needle, refer to begin sewing...foot, and then pull out about 5 cm (2 inch) of thread toward the rear of the machine. 1 1 5 cm (2 inch) X The lower threading is finished. Install the twin needle. 1 • For details on the stitches that the upper threading and the lower threading are ...
...machine. ● Never use the twin needle, the extra spool pin and the spool cap. Using the twin needle With the twin needle, you are ready to "Replacing the needle" (page 35). Now that can be used. Both upper threads should have the same thickness and quality. For details on installing a needle, refer to begin sewing...foot, and then pull out about 5 cm (2 inch) of thread toward the rear of the machine. 1 1 5 cm (2 inch) X The lower threading is finished. Install the twin needle. 1 • For details on the stitches that the upper threading and the lower threading are ...


