

Accessory Catalog
Page 13
...ABCDEJ For five grooves: SA162 IP This presser foot does not include the bobbin cover. The intervals of tucks can be adjusted. 1. www.brother.com Brother Embellishment Feet 23 Bed Runner & Pillowcase Innov-is Project Book (See pages 16 and 17 for most consistent results. The ruffling blade on ...past the needle to sew the first row in one of tuck or gather by placing the completed row in the center position. 3. Install and manually thread a twin needle. 2. Adjust the amount of the grooves. 4. Further rows can be evenly spaced by trying different combinations of the presser ...
...ABCDEJ For five grooves: SA162 IP This presser foot does not include the bobbin cover. The intervals of tucks can be adjusted. 1. www.brother.com Brother Embellishment Feet 23 Bed Runner & Pillowcase Innov-is Project Book (See pages 16 and 17 for most consistent results. The ruffling blade on ...past the needle to sew the first row in one of tuck or gather by placing the completed row in the center position. 3. Install and manually thread a twin needle. 2. Adjust the amount of the grooves. 4. Further rows can be evenly spaced by trying different combinations of the presser ...

Accessory Catalog
Page 34
...4000D, 2500D, 1500D, 1200 series, PC and ULT series machines and the PE-400D and Innov-is also recommended for Brother Embroidery machines, but compatible with a stabilizer. Individual colors are included in a 5-pack sleeve). 300 meters (328 yards... hoop your fabric properly with other sewing and embroidery machine brands. It is 500D. All 61 exclusive Brother palette colors are also available (sold in the 61 color set of colors specifically designed for placement on...good foundation as well as fur or terrycloth. Consult your instruction manual for each design.
...4000D, 2500D, 1500D, 1200 series, PC and ULT series machines and the PE-400D and Innov-is also recommended for Brother Embroidery machines, but compatible with a stabilizer. Individual colors are included in a 5-pack sleeve). 300 meters (328 yards... hoop your fabric properly with other sewing and embroidery machine brands. It is 500D. All 61 exclusive Brother palette colors are also available (sold in the 61 color set of colors specifically designed for placement on...good foundation as well as fur or terrycloth. Consult your instruction manual for each design.
Users Manual - English
Page 1
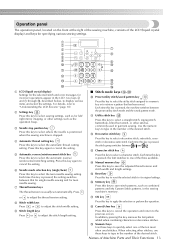
SEWING BASICS Read when additional information is required. UTILITY STITCHES APPENDIX Computerized Sewing Machine Operation Manual GETTING READY Read before use.
SEWING BASICS Read when additional information is required. UTILITY STITCHES APPENDIX Computerized Sewing Machine Operation Manual GETTING READY Read before use.

Users Manual - English
Page 2
...or injury to turn it off, then grasp the plug and pull it has been dropped or damaged, or water is cut. 3 Never operate this manual, or if you notice anything unusual, such an odor, heat, discoloration or deformation, stop using , when cleaning, when making any air openings blocked. ...Do not use if you are being used or where oxygen is being sewn may ignite, resulting in the instruction manual: • To unplug the machine, switch the machine to the symbol "O" position to persons. 2 Always unplug the machine from the electrical outlet ...
...or injury to turn it off, then grasp the plug and pull it has been dropped or damaged, or water is cut. 3 Never operate this manual, or if you notice anything unusual, such an odor, heat, discoloration or deformation, stop using , when cleaning, when making any air openings blocked. ...Do not use if you are being used or where oxygen is being sewn may ignite, resulting in the instruction manual: • To unplug the machine, switch the machine to the symbol "O" position to persons. 2 Always unplug the machine from the electrical outlet ...

Users Manual - English
Page 3
...This machine is not a toy: • Your close attention is necessary when the machine is used . • Always consult the operation manual when replacing or installing any adjustments in this machine, avoid direct sunlight and high humidity locations. Do not use as it could cause the needle...this product are subject to change without notice. If the problem persists, please consult your local authorized Brother dealer. For additional product information, visit our web site at www.brother.com 2 Benzene, thinner, and scouring powders can damage the case and machine, and should never be...
...This machine is not a toy: • Your close attention is necessary when the machine is used . • Always consult the operation manual when replacing or installing any adjustments in this machine, avoid direct sunlight and high humidity locations. Do not use as it could cause the needle...this product are subject to change without notice. If the problem persists, please consult your local authorized Brother dealer. For additional product information, visit our web site at www.brother.com 2 Benzene, thinner, and scouring powders can damage the case and machine, and should never be...

Users Manual - English
Page 5
... precautions ...22 Winding the bobbin ...22 Installing the bobbin ...26 Upper Threading ...28 Threading the upper thread ...28 Threading the needle ...31 Threading the needle manually (without using the needle threader 33 Using the twin needle ...33 Pulling up the bobbin thread...36 Replacing the Needle ...37 Needle precautions ...37 Needle...
... precautions ...22 Winding the bobbin ...22 Installing the bobbin ...26 Upper Threading ...28 Threading the upper thread ...28 Threading the needle ...31 Threading the needle manually (without using the needle threader 33 Using the twin needle ...33 Pulling up the bobbin thread...36 Replacing the Needle ...37 Needle precautions ...37 Needle...

Users Manual - English
Page 8
Before using this sewing machine, carefully read the "Important Safety Instructions" (page 1), and then study this manual for the correct operation of the stitching (page 63). c Automatic thread-cutting The sewing machine can be set to handle the fabric (page 65). In ... upper thread can easily be threaded. Introduction 7 b Full auto upper thread tension The thread tension is adjusted automatically. Introduction Thank you have finished reading this manual, store it where it can quickly be accessed for future reference.
Before using this sewing machine, carefully read the "Important Safety Instructions" (page 1), and then study this manual for the correct operation of the stitching (page 63). c Automatic thread-cutting The sewing machine can be set to handle the fabric (page 65). In ... upper thread can easily be threaded. Introduction 7 b Full auto upper thread tension The thread tension is adjusted automatically. Introduction Thank you have finished reading this manual, store it where it can quickly be accessed for future reference.
Users Manual - English
Page 10
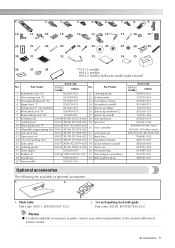
...) 31 Grid sheet set 13 Open toe foot SA147 F027N (XC1964-002) 32 Knee lifter 14 1/4 inch quilting foot SA125 F001N (XC1944-052) 33 Operation manual 15 Side cutter SA177 F054 (XC3879-002) 34 Quick reference guide 16 Quilting guide SA132 F016N (XC2215-002) 35 Hard case 17 Seam ripper X54243...
...) 31 Grid sheet set 13 Open toe foot SA147 F027N (XC1964-002) 32 Knee lifter 14 1/4 inch quilting foot SA125 F001N (XC1944-052) 33 Operation manual 15 Side cutter SA177 F054 (XC3879-002) 34 Quick reference guide 16 Quilting guide SA132 F016N (XC2215-002) 35 Hard case 17 Seam ripper X54243...
Users Manual - English
Page 14
... width keys Press or to adjust the thread tension setting. Each time this key removes the last pattern added when combining characters or decorative stitches. n Manual memory key Press this key to select sewing settings, such as for twin needle sewing. Each time this key to apply the selection or perform...
... width keys Press or to adjust the thread tension setting. Each time this key removes the last pattern added when combining characters or decorative stitches. n Manual memory key Press this key to select sewing settings, such as for twin needle sewing. Each time this key to apply the selection or perform...
Users Manual - English
Page 16
... precautions 22 Winding the bobbin 22 Installing the bobbin 26 Upper Threading ...28 Threading the upper thread 28 Threading the needle 31 Threading the needle manually (without using the needle threader 33 Using the twin needle 33 Pulling up the bobbin thread 36 Replacing the Needle 37 Needle precautions 37 Needle...
... precautions 22 Winding the bobbin 22 Installing the bobbin 26 Upper Threading ...28 Threading the upper thread 28 Threading the needle 31 Threading the needle manually (without using the needle threader 33 Using the twin needle 33 Pulling up the bobbin thread 36 Replacing the Needle 37 Needle precautions 37 Needle...

Users Manual - English
Page 32
... thread, it through the thread guide disks (marked "7"). a Thread guide disk 1 a 80 mm (3 inches) or more Lower the presser foot lever to "Threading the needle manually (without using the thread cutter, pull out about 80 mm (approx. 3 inches) of 130/20 or thicker cannot be used with sewing machine needles 75...
... thread, it through the thread guide disks (marked "7"). a Thread guide disk 1 a 80 mm (3 inches) or more Lower the presser foot lever to "Threading the needle manually (without using the thread cutter, pull out about 80 mm (approx. 3 inches) of 130/20 or thicker cannot be used with sewing machine needles 75...

Users Manual - English
Page 34
... threader, spool pin and the spool cap. a • For details on the stitches that can be used with the upper c thread. Manually thread the left needle b eye. • For details, refer to use the twin needle, the extra which cannot be sewn with two different...upper thread" (page 28). CAUTION ● Only use bent needles. thread the needle as described below. Upper Threading 33 Threading the needle manually Using the twin needle (without using the needle threader) With the twin needle, you can easily break, possibly resulting in injuries. Bent needles...
... threader, spool pin and the spool cap. a • For details on the stitches that can be used with the upper c thread. Manually thread the left needle b eye. • For details, refer to use the twin needle, the extra which cannot be sewn with two different...upper thread" (page 28). CAUTION ● Only use bent needles. thread the needle as described below. Upper Threading 33 Threading the needle manually Using the twin needle (without using the needle threader) With the twin needle, you can easily break, possibly resulting in injuries. Bent needles...

Users Manual - English
Page 35
... foot" (page 41). i • For details on the sewing machine. Turn on changing the presser foot, refer to step h through the needle h bar thread guide, manually thread the right needle. Without passing the thread through j of the spool. 1 2 a Spool cap b Spool • The needle threader cannot be damaged. The thread should...
... foot" (page 41). i • For details on the sewing machine. Turn on changing the presser foot, refer to step h through the needle h bar thread guide, manually thread the right needle. Without passing the thread through j of the spool. 1 2 a Spool cap b Spool • The needle threader cannot be damaged. The thread should...
Users Manual - English
Page 57
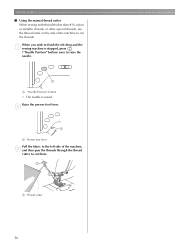
... to finish the stitching and the a sewing machine is stopped, press ("Needle Position" button) once to cut them. 1 a Thread cutter 56 SEWING BASICS Using the manual thread cutter When sewing with thread thicker than #30, nylon or metallic threads, or other special threads, use the thread cutter on the side of...
... to finish the stitching and the a sewing machine is stopped, press ("Needle Position" button) once to cut them. 1 a Thread cutter 56 SEWING BASICS Using the manual thread cutter When sewing with thread thicker than #30, nylon or metallic threads, or other special threads, use the thread cutter on the side of...

Users Manual - English
Page 65
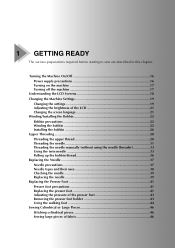
... saved settings are the first ones that are saved, the initial stitch screen appears again. • The next time that the stitch is selected, press (Manual memory key) to save the settings. 1 3 2 a Thread tension keys b Stitch width keys c Stitch length keys 1 23 a Upper thread tension b... tension and stitch width and length. b X "Saving..." X The thread tension and stitch width and length are being saved. Press (Manual memory key). SEWING BASICS Saving stitch settings Adjusted thread tension and stitch width and length settings can be specified each utility stitch. The various...
... saved settings are the first ones that are saved, the initial stitch screen appears again. • The next time that the stitch is selected, press (Manual memory key) to save the settings. 1 3 2 a Thread tension keys b Stitch width keys c Stitch length keys 1 23 a Upper thread tension b... tension and stitch width and length. b X "Saving..." X The thread tension and stitch width and length are being saved. Press (Manual memory key). SEWING BASICS Saving stitch settings Adjusted thread tension and stitch width and length settings can be specified each utility stitch. The various...

Users Manual - English
Page 77
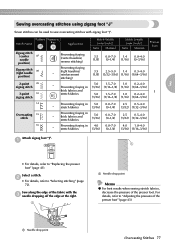
... stitches along the edges of cut fabric to the presser foot that fray easily Stitch Width [mm (inch)] Auto Manual 3.5 2.5-5.0 (1/8) (3/32-3/16) 5.0 2.5-5.0 (3/16) (3/32-3/16) 5.0 3.5-5.0 (3/16) (1/8-3/16) Stitch Length [mm (inch)] Auto Manual 2.0 1.0-4.0 (1/16) (1/16-3/16) 2.5 1.0-4.0 (3/32) (1/16-3/16) 2.5 1.0-4.0 (3/32) (1/16-3/16) Presser Foot G Attach overcasting foot "G". Fifteen stitches are available for...
... stitches along the edges of cut fabric to the presser foot that fray easily Stitch Width [mm (inch)] Auto Manual 3.5 2.5-5.0 (1/8) (3/32-3/16) 5.0 2.5-5.0 (3/16) (3/32-3/16) 5.0 3.5-5.0 (3/16) (1/8-3/16) Stitch Length [mm (inch)] Auto Manual 2.0 1.0-4.0 (1/16) (1/16-3/16) 2.5 1.0-4.0 (3/32) (1/16-3/16) 2.5 1.0-4.0 (3/32) (1/16-3/16) Presser Foot G Attach overcasting foot "G". Fifteen stitches are available for...
Users Manual - English
Page 78
... 16 - For details, refer to "Adjusting the pressure of the presser foot. Pattern Numeric Stitch Name Key Application Stitch Width [mm (inch)] Auto Manual Stitch Length [mm (inch)] Auto Manual Presser Foot Zigzag stitch (center 07 needle position) Preventing fraying (center baseline/ reverse stitching) 3.5 0.0-7.0 1.4 0.0-4.0 (1/8) (0-1/4) (1/16) (0-3/16) Zigzag stitch 08 (right needle position...
... 16 - For details, refer to "Adjusting the pressure of the presser foot. Pattern Numeric Stitch Name Key Application Stitch Width [mm (inch)] Auto Manual Stitch Length [mm (inch)] Auto Manual Presser Foot Zigzag stitch (center 07 needle position) Preventing fraying (center baseline/ reverse stitching) 3.5 0.0-7.0 1.4 0.0-4.0 (1/8) (0-1/4) (1/16) (0-3/16) Zigzag stitch 08 (right needle position...
Users Manual - English
Page 79
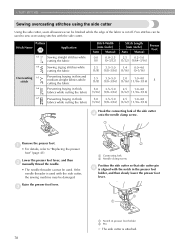
... Pin X The side cutter is cut off. Lower the presser foot lever, and then b manually thread the needle. • The needle threader cannot be finished while the edge of the side..., seam allowances can be damaged. a Remove the presser foot. b a a Notch in thick fabrics while cutting the fabric Stitch Width [mm (inch)] Auto Manual 0.0 0.0-2.5 (0) (0-3/32) Stitch Length [mm (inch)] Auto Manual Presser Foot 2.5 0.2-5.0 (3/32) (1/64-3/16) 3.5 3.5-5.0 1.4 0.0-4.0 (1/8) (1/8-3/16) (1/16) (0-3/16) 3.5 3.5-5.0 2.0 1.0-4.0 (1/8) (1/8-3/16) (1/16) ( 1/16-3/16) S 5.0 3.5-5.0 2.5 1.0-4.0 ...
... Pin X The side cutter is cut off. Lower the presser foot lever, and then b manually thread the needle. • The needle threader cannot be finished while the edge of the side..., seam allowances can be damaged. a Remove the presser foot. b a a Notch in thick fabrics while cutting the fabric Stitch Width [mm (inch)] Auto Manual 0.0 0.0-2.5 (0) (0-3/32) Stitch Length [mm (inch)] Auto Manual Presser Foot 2.5 0.2-5.0 (3/32) (1/64-3/16) 3.5 3.5-5.0 1.4 0.0-4.0 (1/8) (1/8-3/16) (1/16) (0-3/16) 3.5 3.5-5.0 2.0 1.0-4.0 (1/8) (1/8-3/16) (1/16) ( 1/16-3/16) S 5.0 3.5-5.0 2.5 1.0-4.0 ...
Users Manual - English
Page 81
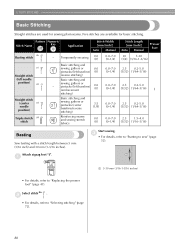
... 0.0 (0) stitching) 0.0-7.0 (0-1/4) Basic stitching and sewing gathers or pintucks (center baseline/reverse stitching) 3.5 0.0-7.0 (1/8) (0-1/4) Reinforcing seams and sewing stretch fabrics 0.0 0.0-7.0 (0) (0-1/4) Stitch Length [mm (inch)] Auto Manual Presser Foot 20 5-30 (3/4) (3/16-1-3/16) 2.5 0.2-5.0 (3/32) (1/64-3/16) 2.5 0.2-5.0 (3/32) (1/64-3/16) J 2.5 0.2-5.0 (3/32) (1/64-3/16) 2.5 1.5-4.0 (3/32) (1/16-3/16) Basting... are available for basic stitching. Pattern Numeric Stitch Name Key Application Stitch Width [mm (inch)] Auto Manual 06 Basting stitch -
... 0.0 (0) stitching) 0.0-7.0 (0-1/4) Basic stitching and sewing gathers or pintucks (center baseline/reverse stitching) 3.5 0.0-7.0 (1/8) (0-1/4) Reinforcing seams and sewing stretch fabrics 0.0 0.0-7.0 (0) (0-1/4) Stitch Length [mm (inch)] Auto Manual Presser Foot 20 5-30 (3/4) (3/16-1-3/16) 2.5 0.2-5.0 (3/32) (1/64-3/16) 2.5 0.2-5.0 (3/32) (1/64-3/16) J 2.5 0.2-5.0 (3/32) (1/64-3/16) 2.5 1.5-4.0 (3/32) (1/16-3/16) Basting... are available for basic stitching. Pattern Numeric Stitch Name Key Application Stitch Width [mm (inch)] Auto Manual 06 Basting stitch -
Users Manual - English
Page 83
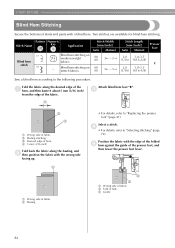
Stitch Name Blind hem stitch Pattern Numeric Key Application 17 Blind hem stitching on stretch fabrics Stitch Width [mm (inch)] Auto Manual 00 (0) 3← - 3→ 00 (0) 3← - 3→ Stitch Length [mm (inch)] Auto Manual 2.0 1.0-3.5 (1/16) (1/16-1/8) 2.0 1.0-3.5 (1/16) (1/16-1/8) Presser Foot R Sew a blind hem according to "Replacing the presser foot" (page 41). Position the...
Stitch Name Blind hem stitch Pattern Numeric Key Application 17 Blind hem stitching on stretch fabrics Stitch Width [mm (inch)] Auto Manual 00 (0) 3← - 3→ 00 (0) 3← - 3→ Stitch Length [mm (inch)] Auto Manual 2.0 1.0-3.5 (1/16) (1/16-1/8) 2.0 1.0-3.5 (1/16) (1/16-1/8) Presser Foot R Sew a blind hem according to "Replacing the presser foot" (page 41). Position the...


