Users Manual - English
Page 11
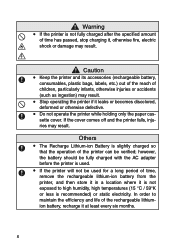
...exposed to maintain the efficiency and life of the printer can be fully charged with the AC adapter before the printer is recommended) or static electricity. In order to...a long period of time, remove the rechargeable lithium-ion battery from the printer, and then store it in a location where it , otherwise fire, electric shock or...damage may result. If the cover comes off and the printer falls, injuries may result. ! x If the printer is slightly charged so that the operation of the rechargeable ...operating the printer if it at least every six months. Others ! Do not operate the...
...exposed to maintain the efficiency and life of the printer can be fully charged with the AC adapter before the printer is recommended) or static electricity. In order to...a long period of time, remove the rechargeable lithium-ion battery from the printer, and then store it in a location where it , otherwise fire, electric shock or...damage may result. If the cover comes off and the printer falls, injuries may result. ! x If the printer is slightly charged so that the operation of the rechargeable ...operating the printer if it at least every six months. Others ! Do not operate the...
Users Manual - English
Page 15
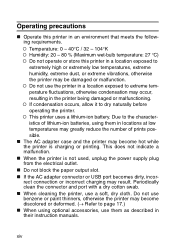
.... ! Do not use them in their instruction manuals. Do not use a soft, dry cloth. " When the printer is charging or printing. This does not indicate a malfunction. If condensation occurs, allow it to page 17.) " When using them as ...described in locations at low temperatures may result. " The AC adapter case and the printer may become discolored or deformed. (→ Refer to dry naturally before operating the printer. ! xiv " Do not block the paper...
.... ! Do not use them in their instruction manuals. Do not use a soft, dry cloth. " When the printer is charging or printing. This does not indicate a malfunction. If condensation occurs, allow it to page 17.) " When using them as ...described in locations at low temperatures may result. " The AC adapter case and the printer may become discolored or deformed. (→ Refer to dry naturally before operating the printer. ! xiv " Do not block the paper...
Users Manual - English
Page 16
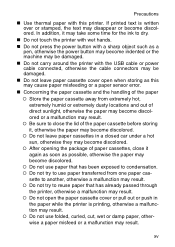
... " Concerning the paper cassette and the handling of direct sunlight, otherwise the paper may become discolored. After opening the package of paper cassettes, close the lid of the paper cassette before storing it, otherwise the paper may result. ! Do not use paper that has been exposed...not leave paper cassettes in the paper while the printer is written over or stamped, the text may become discolored. ! Do not try to dry. Store the paper cassette away from one paper cassette to another, otherwise a malfunction may become discolored. ! Precautions " Use thermal paper with wet ...
... " Concerning the paper cassette and the handling of direct sunlight, otherwise the paper may become discolored. After opening the package of paper cassettes, close the lid of the paper cassette before storing it, otherwise the paper may result. ! Do not use paper that has been exposed...not leave paper cassettes in the paper while the printer is written over or stamped, the text may become discolored. ! Do not try to dry. Store the paper cassette away from one paper cassette to another, otherwise a malfunction may become discolored. ! Precautions " Use thermal paper with wet ...

Users Manual - English
Page 18
Contents Contents Introduction i Precautions v Operating precautions xiv Contents 1 1 General Description 2 2 Operating Procedures 3 Removing the protective film 3 Inserting/removing the rechargeable battery 3 Charging 4 Using IrDA (infrared 6 Using Bluetooth 6 Turning on/off the printer 7 Bluetooth Functions Guide 8 Preparing the paper 9 Installing the paper cassette 11 Sending data from a Pocket PC or computer ..........13 Feeding paper 15 Using the paper guide 16 Maintenance 17 3 Appendix 19 Product specifications 19 Troubleshooting 20 Indicator lights 24 1
Contents Contents Introduction i Precautions v Operating precautions xiv Contents 1 1 General Description 2 2 Operating Procedures 3 Removing the protective film 3 Inserting/removing the rechargeable battery 3 Charging 4 Using IrDA (infrared 6 Using Bluetooth 6 Turning on/off the printer 7 Bluetooth Functions Guide 8 Preparing the paper 9 Installing the paper cassette 11 Sending data from a Pocket PC or computer ..........13 Feeding paper 15 Using the paper guide 16 Maintenance 17 3 Appendix 19 Product specifications 19 Troubleshooting 20 Indicator lights 24 1

Users Manual - English
Page 20
...removing the rechargeable battery Inserting the rechargeable battery 1 Slide the rechargeable battery cover (at the Lithium-ion battery b back of the printer) in the a directions shown at a. 2 Insert your finger at b, and c then remove the cover and battery. 3 Align the battery with the... connector (c), and then install the rechargeable lithium-ion battery. 4 Perform step 2, then step 1 to the paper check window. Before using the printer, remove...
...removing the rechargeable battery Inserting the rechargeable battery 1 Slide the rechargeable battery cover (at the Lithium-ion battery b back of the printer) in the a directions shown at a. 2 Insert your finger at b, and c then remove the cover and battery. 3 Align the battery with the... connector (c), and then install the rechargeable lithium-ion battery. 4 Perform step 2, then step 1 to the paper check window. Before using the printer, remove...

Users Manual - English
Page 26
Operating Procedures Preparing the paper Use only the paper cassette designed exclusively for this printer. Use of the cassette. 9 To prepare the paper cassette Prepare the paper cassette before installing it into the slit (2) at the back of any paper while the paper cassette is being prepared. 1 Firmly fold the lid back along the fold (1). Front Back 2 Insert the tab on the lid into the printer. • Be careful not to drop any other paper will result in damage.
Operating Procedures Preparing the paper Use only the paper cassette designed exclusively for this printer. Use of the cassette. 9 To prepare the paper cassette Prepare the paper cassette before installing it into the slit (2) at the back of any paper while the paper cassette is being prepared. 1 Firmly fold the lid back along the fold (1). Front Back 2 Insert the tab on the lid into the printer. • Be careful not to drop any other paper will result in damage.

Users Manual - English
Page 27
... for that has already passed through the printer. ! After all of the paper is made of the cassette according to close its lid. ! " Handling the paper cassette ! Do not transfer paper to reuse paper that type of direct sunlight. ! Do not try to a different paper cassette. ! Do not use a torn or deformed paper cassette, otherwise damage may result. !
... for that has already passed through the printer. ! After all of the paper is made of the cassette according to close its lid. ! " Handling the paper cassette ! Do not transfer paper to reuse paper that type of direct sunlight. ! Do not try to a different paper cassette. ! Do not use a torn or deformed paper cassette, otherwise damage may result. !

Users Manual - English
Page 28
The end of the paper should face up. Operating Procedures Installing the paper cassette 1 Slide the paper cassette cover (on the paper cassette should point toward you. The paper type indication on the top of the paper is not folded, otherwise a paper misfeed may result. 11 Paper type indication • When loading the paper cassette, make sure that it is correctly aligned and that the end of the printer) in direction 1. → The paper cassette cover will open in the direction indicated by 2. 2 Insert the paper cassette.
The end of the paper should face up. Operating Procedures Installing the paper cassette 1 Slide the paper cassette cover (on the paper cassette should point toward you. The paper type indication on the top of the paper is not folded, otherwise a paper misfeed may result. 11 Paper type indication • When loading the paper cassette, make sure that it is correctly aligned and that the end of the printer) in direction 1. → The paper cassette cover will open in the direction indicated by 2. 2 Insert the paper cassette.

Users Manual - English
Page 29
... indication • Do not remove the paper from the paper cassette and load it directly into the printer. • To change the paper type, install a different paper cassette. • While the printer is correctly loaded, the paper type indication on the printer. If the paper cassette is printing, do not apply pressure to the paper output slot or place anything on the...
... indication • Do not remove the paper from the paper cassette and load it directly into the printer. • To change the paper type, install a different paper cassette. • While the printer is correctly loaded, the paper type indication on the printer. If the paper cassette is printing, do not apply pressure to the paper output slot or place anything on the...

Users Manual - English
Page 32
sette. 3 Pull out the misfed paper. • When pulling out the paper, be sure not to tear it . • Pulling out the paper will not affect the operation of the printer. 15 If the paper has fed out of the paper output slot: 1 Open the paper cassette cover. 2 Remove the paper cas- If the paper has not fed out of the paper output slot: 1 Pull the paper out from the paper output slot. • When pulling out the paper, be sure not to the following procedure. Operating Procedures Feeding paper If a paper misfeed occurs, remove the paper according to tear it .
sette. 3 Pull out the misfed paper. • When pulling out the paper, be sure not to tear it . • Pulling out the paper will not affect the operation of the printer. 15 If the paper has fed out of the paper output slot: 1 Open the paper cassette cover. 2 Remove the paper cas- If the paper has not fed out of the paper output slot: 1 Pull the paper out from the paper output slot. • When pulling out the paper, be sure not to the following procedure. Operating Procedures Feeding paper If a paper misfeed occurs, remove the paper according to tear it .

Users Manual - English
Page 33
...at a time, use a standard (slotted) screwdriver to be frequently installed and removed. Using the paper guide Installing the paper guide *The paper guide (PG-200) is sold separately. 1 Position the paper guide so that the paper check window is visible. 2 Align the tabs on the left and right sides with the slots, ...and then press down until they snap into place. #The paper guide is not intended to unhook the paper guide tabs near the areas shown by 1 below. ① 16 Frequently installing and removing the paper guide may damage the printer or cause the cover or...
...at a time, use a standard (slotted) screwdriver to be frequently installed and removed. Using the paper guide Installing the paper guide *The paper guide (PG-200) is sold separately. 1 Position the paper guide so that the paper check window is visible. 2 Align the tabs on the left and right sides with the slots, ...and then press down until they snap into place. #The paper guide is not intended to unhook the paper guide tabs near the areas shown by 1 below. ① 16 Frequently installing and removing the paper guide may damage the printer or cause the cover or...

Users Manual - English
Page 34
... sensor If the sensor is extremely dirty, wipe it . Be sure to correctly detect the paper cassette, and a malfunction may become discolored or deformed. Paper cassette sensor 17 Cleaning the printer Clean the front of the printer. 1 Clean off the printer before cleaning it with a soft, dry cloth. Do not use benzene or paint thinners...
... sensor If the sensor is extremely dirty, wipe it . Be sure to correctly detect the paper cassette, and a malfunction may become discolored or deformed. Paper cassette sensor 17 Cleaning the printer Clean the front of the printer. 1 Clean off the printer before cleaning it with a soft, dry cloth. Do not use benzene or paint thinners...
Users Manual - English
Page 36
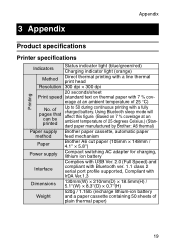
... an ambient temperature of 25 degrees Celsius.) (Standard paper manufactured by Brother: A6 thermal) Paper supply Brother paper cassette, automatic paper method feed mechanism Paper Brother A6 cut paper (105mm × 148mm / 4.1'' × 5.8'')...-ion battery Weight and a paper cassette containing 50 sheets of plain thermal paper) 19 3 Appendix Appendix Product specifications Printer specifications Printing Indicators Status indicator light (blue/green/red) Charging indicator light (orange) Method Direct thermal printing with a line thermal print head Resolution 300 dpi ×...
... an ambient temperature of 25 degrees Celsius.) (Standard paper manufactured by Brother: A6 thermal) Paper supply Brother paper cassette, automatic paper method feed mechanism Paper Brother A6 cut paper (105mm × 148mm / 4.1'' × 5.8'')...-ion battery Weight and a paper cassette containing 50 sheets of plain thermal paper) 19 3 Appendix Appendix Product specifications Printer specifications Printing Indicators Status indicator light (blue/green/red) Charging indicator light (orange) Method Direct thermal printing with a line thermal print head Resolution 300 dpi ×...
Users Manual - English
Page 37
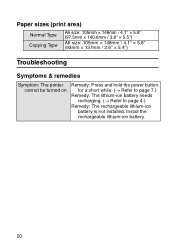
Paper sizes (print area) Normal Type Copying Type A6 size: 105mm × 148mm / 4.1'' × 5.8'' (97.5mm × 140.6mm / 3.8'' × 5.5'') A6 size: 105mm × 148mm / 4.1'' × 5.8'' (93mm × 137mm / 3.6'' × 5.4'') Troubleshooting Symptoms & remedies Symptom: The printer Remedy: Press and hold the power button cannot be turned on. for a short while. (→ Refer to page 7.) Remedy: The lithium-ion battery needs recharging. (→ Refer to page 4.) Remedy: The rechargeable lithium-ion battery is not installed. Install the rechargeable lithium-ion battery. 20
Paper sizes (print area) Normal Type Copying Type A6 size: 105mm × 148mm / 4.1'' × 5.8'' (97.5mm × 140.6mm / 3.8'' × 5.5'') A6 size: 105mm × 148mm / 4.1'' × 5.8'' (93mm × 137mm / 3.6'' × 5.4'') Troubleshooting Symptoms & remedies Symptom: The printer Remedy: Press and hold the power button cannot be turned on. for a short while. (→ Refer to page 7.) Remedy: The lithium-ion battery needs recharging. (→ Refer to page 4.) Remedy: The rechargeable lithium-ion battery is not installed. Install the rechargeable lithium-ion battery. 20
Users Manual - English
Page 39
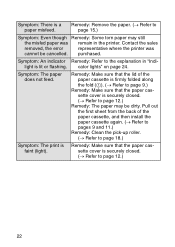
... flashing. purchased. cator lights" on page 24. Contact the sales removed, the error representative where the printer was remain in "Indilight is securely closed . (→ Refer to page 18.) Symptom: The print is faint (light). Symptom: The paper does not feed. Symptom: An indicator Remedy: Refer to page 9.) Remedy: Make sure that the...
... flashing. purchased. cator lights" on page 24. Contact the sales removed, the error representative where the printer was remain in "Indilight is securely closed . (→ Refer to page 18.) Symptom: The print is faint (light). Symptom: The paper does not feed. Symptom: An indicator Remedy: Refer to page 9.) Remedy: Make sure that the...

Users Manual - English
Page 41
... using the other interface until it is possible to overheat. When the status indicator light is complete. A paper misfeed occurred. A transmission error occurred. Wait until printing is blue, it cools down 24 Indicator lights " Status indicator light A blue or green light indicates the printer is installed facing the wrong direction. Check the transmission status.
... using the other interface until it is possible to overheat. When the status indicator light is complete. A paper misfeed occurred. A transmission error occurred. Wait until printing is blue, it cools down 24 Indicator lights " Status indicator light A blue or green light indicates the printer is installed facing the wrong direction. Check the transmission status.

Users Manual - English
Page 44
..., or it appears as USB Ver. 2.0 High Speed when compatible with portable telephone features have recently appeared. The Brother Mobile Software, included with this printer. Since the protocol allows communication between a USB host (mainly a PC with a USB connection) and a USB ...client, a PDA, which enables high-speed communication, is backwardly compatible with USB Ver. 1.1 or USB Ver. 2.0 devices. 27 Since they are not equipped to enable printing of a variety of paper...
..., or it appears as USB Ver. 2.0 High Speed when compatible with portable telephone features have recently appeared. The Brother Mobile Software, included with this printer. Since the protocol allows communication between a USB host (mainly a PC with a USB connection) and a USB ...client, a PDA, which enables high-speed communication, is backwardly compatible with USB Ver. 1.1 or USB Ver. 2.0 devices. 27 Since they are not equipped to enable printing of a variety of paper...
Software Users Manual - English
Page 22
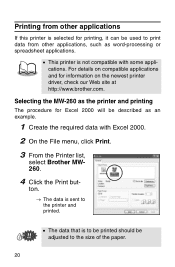
... menu, click Print. 3 From the Printer list, select Brother MW260. 4 Click the Print but- Selecting the MW-260 as the printer and printing The procedure for information on compatible applications and for Excel 2000 will be adjusted to the size of the paper. 20 Printing from other applications If this printer is selected for printing, it can be used to print data from...
... menu, click Print. 3 From the Printer list, select Brother MW260. 4 Click the Print but- Selecting the MW-260 as the printer and printing The procedure for information on compatible applications and for Excel 2000 will be adjusted to the size of the paper. 20 Printing from other applications If this printer is selected for printing, it can be used to print data from...
Software Users Manual - English
Page 31
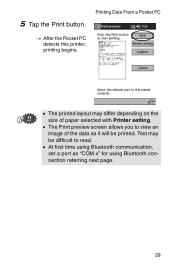
5 Tap the Print button. Text may differ depending on the size of the data as "COM x" for using Bluetooth communication, set a port as it will be difficult to view an image of paper selected with Printer setting. • The Print preview screen allows you to read. • At first time using Bluetooth connection referring next page. 29 Printing Data From a Pocket PC → After the Pocket PC detects this printer, printing begins. • The printed layout may be printed.
5 Tap the Print button. Text may differ depending on the size of the data as "COM x" for using Bluetooth communication, set a port as it will be difficult to view an image of paper selected with Printer setting. • The Print preview screen allows you to read. • At first time using Bluetooth connection referring next page. 29 Printing Data From a Pocket PC → After the Pocket PC detects this printer, printing begins. • The printed layout may be printed.
Software Users Manual - English
Page 32
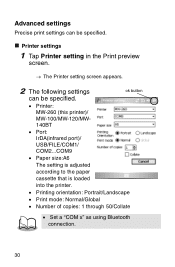
... following settings can be specified. ok button • Printer: MW-260 (this printer)/ MW-100/MW-120/MW- 140BT • Port: IrDA(infrared port)/ USB/FILE/COM1/ COM2...COM9 • Paper size:A6 The setting is adjusted according to the paper cassette that is loaded into the printer. • Printing orientation: Portrait/Landscape • Print mode: Normal/Global • Number of copies...
... following settings can be specified. ok button • Printer: MW-260 (this printer)/ MW-100/MW-120/MW- 140BT • Port: IrDA(infrared port)/ USB/FILE/COM1/ COM2...COM9 • Paper size:A6 The setting is adjusted according to the paper cassette that is loaded into the printer. • Printing orientation: Portrait/Landscape • Print mode: Normal/Global • Number of copies...


