Users Manual - English
Page 9
...Accessing the Software User's Guide and Network User's Guide 2 Viewing documentation 2 Accessing Brother support (for Windows 5 Control panel overview 6 2 Loading paper and documents 8 Loading paper and print media 8 Loading paper in the paper tray 8 Loading paper in the manual feed slot 10 Unprintable area 13 Acceptable paper ... Volume settings 21 Ring volume 21 Beeper volume 21 Speaker volume 21 Automatic daylight savings time 22 Ecology features 22 Toner save...22 Sleep time...22 LCD contrast...22 Dial prefix...23 Setting up the prefix number 23 Changing the prefix number 23 ...
...Accessing the Software User's Guide and Network User's Guide 2 Viewing documentation 2 Accessing Brother support (for Windows 5 Control panel overview 6 2 Loading paper and documents 8 Loading paper and print media 8 Loading paper in the paper tray 8 Loading paper in the manual feed slot 10 Unprintable area 13 Acceptable paper ... Volume settings 21 Ring volume 21 Beeper volume 21 Speaker volume 21 Automatic daylight savings time 22 Ecology features 22 Toner save...22 Sleep time...22 LCD contrast...22 Dial prefix...23 Setting up the prefix number 23 Changing the prefix number 23 ...
Users Manual - English
Page 111
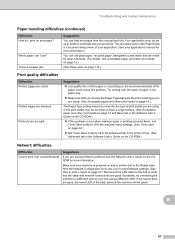
... the paper could cause this problem occurs when making copies or printing received faxes, turn Toner Save mode to off in the Advanced tab in the printer driver. (See Advanced tab...good, the lower LED of the back panel of your application. (See your application's manual for laser machines. (For details, see the Network User's Guide on the CD-ROM.) Network difficulties Difficulties ...Suggestions Cannot print over the stack of paper in the paper tray. „ Make sure that you choose the Paper Type that suits the print media type you ...
... the paper could cause this problem occurs when making copies or printing received faxes, turn Toner Save mode to off in the Advanced tab in the printer driver. (See Advanced tab...good, the lower LED of the back panel of your application. (See your application's manual for laser machines. (For details, see the Network User's Guide on the CD-ROM.) Network difficulties Difficulties ...Suggestions Cannot print over the stack of paper in the paper tray. „ Make sure that you choose the Paper Type that suits the print media type you ...
Users Manual - English
Page 115
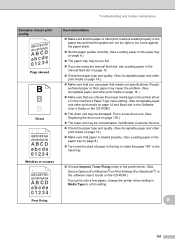
Call Brother Customer Service. „ Check the paper type and quality. (See Acceptable paper and other print media ... 01234 Poor fixing Recommendation „ Make sure that the paper or other print media is loaded properly in the paper tray and that the guides are not too tight or too loose against the paper stack. „ Set the paper guides...paper is loaded properly. (See Loading paper in the paper tray on page 8.) „ Turn over the stack of paper in the tray or rotate the paper 180° in the input tray. „ Choose Improve Toner Fixing mode in the printer driver. (See Device Options ...
Call Brother Customer Service. „ Check the paper type and quality. (See Acceptable paper and other print media ... 01234 Poor fixing Recommendation „ Make sure that the paper or other print media is loaded properly in the paper tray and that the guides are not too tight or too loose against the paper stack. „ Set the paper guides...paper is loaded properly. (See Loading paper in the paper tray on page 8.) „ Turn over the stack of paper in the tray or rotate the paper 180° in the input tray. „ Choose Improve Toner Fixing mode in the printer driver. (See Device Options ...
Users Manual - English
Page 121
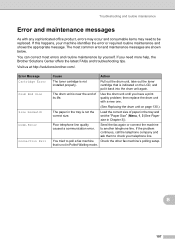
...3 (See Paper size in the tray is not in Polled Waiting mode. Poor telephone line quality caused a communication error. If the problem continues, call the telephone company and ask them to another telephone line. Pull out the drum unit, take out the toner cartridge that is not the correct... latest FAQs and troubleshooting tips. If this happens, your telephone line. Visit us at http://solutions.brother.com/. Troubleshooting and routine maintenance Error and maintenance messages B As with a new one. (See Replacing the drum unit on the LCD, and put it back into the drum unit ...
...3 (See Paper size in the tray is not in Polled Waiting mode. Poor telephone line quality caused a communication error. If the problem continues, call the telephone company and ask them to another telephone line. Pull out the drum unit, take out the toner cartridge that is not the correct... latest FAQs and troubleshooting tips. If this happens, your telephone line. Visit us at http://solutions.brother.com/. Troubleshooting and routine maintenance Error and maintenance messages B As with a new one. (See Replacing the drum unit on the LCD, and put it back into the drum unit ...
Users Manual - English
Page 128
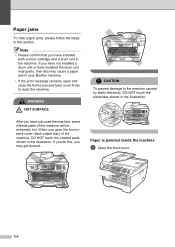
...To prevent damage to reset the machine. If you do this, you have installed both a toner cartridge and a drum unit in the machine. Note • Please confirm that you may cause a paper jam in your Brother machine. • If the error message remains, open the front or back cover (back ...output tray) of the machine will be extremely hot. After you have not installed a drum unit or have just used the machine, some internal parts of the machine, DO NOT ...
...To prevent damage to reset the machine. If you do this, you have installed both a toner cartridge and a drum unit in the machine. Note • Please confirm that you may cause a paper jam in your Brother machine. • If the error message remains, open the front or back cover (back ...output tray) of the machine will be extremely hot. After you have not installed a drum unit or have just used the machine, some internal parts of the machine, DO NOT ...
Users Manual - English
Page 129
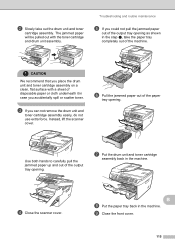
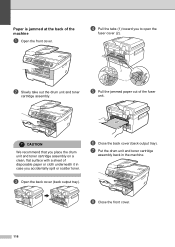
... both hands to carefully pull the jammed paper up and out of the output tray opening as shown in the machine. g Put the drum unit and toner cartridge assembly back in the step c, take out the drum unit and toner cartridge assembly. i Close the front cover. 115 c If you accidentally spill or... scatter toner. CAUTION We recommend that you could not pull the jammed paper out of the output tray opening . B h Put the paper tray back in case you can not remove the drum...
... both hands to carefully pull the jammed paper up and out of the output tray opening as shown in the machine. g Put the drum unit and toner cartridge assembly back in the step c, take out the drum unit and toner cartridge assembly. i Close the front cover. 115 c If you accidentally spill or... scatter toner. CAUTION We recommend that you could not pull the jammed paper out of the output tray opening . B h Put the paper tray back in case you can not remove the drum...
Users Manual - English
Page 130
...toward you place the drum unit and toner cartridge assembly on a clean, flat surface with a sheet of disposable paper or cloth underneath it in the machine. g Put the drum unit and toner cartridge assembly back in case you accidentally spill or scatter toner. CAUTION We recommend that you to... open the fuser cover (2). f Close the back cover (back output tray). c Open the back cover (back output tray). h Close the front cover. 116 Paper ...
...toward you place the drum unit and toner cartridge assembly on a clean, flat surface with a sheet of disposable paper or cloth underneath it in the machine. g Put the drum unit and toner cartridge assembly back in case you accidentally spill or scatter toner. CAUTION We recommend that you to... open the fuser cover (2). f Close the back cover (back output tray). c Open the back cover (back output tray). h Close the front cover. 116 Paper ...
Users Manual - English
Page 132
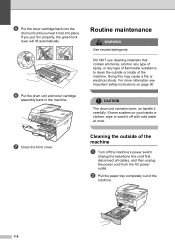
e Put the toner cartridge back into place. Cleaning the outside or inside of the machine B a Turn off...clean the outside of the machine. Doing this may cause a fire or electrical shock. If toner scatters on page 90 CAUTION The drum unit contains toner, so handle it off the machine's power switch. Unplug the telephone line cord first, disconnect...lock into the drum unit until you put it in the machine. f Put the drum unit and toner cartridge assembly back in properly, the green lock lever will lift automatically. Routine maintenance B WARNING Use neutral detergents. b Pull ...
e Put the toner cartridge back into place. Cleaning the outside or inside of the machine B a Turn off...clean the outside of the machine. Doing this may cause a fire or electrical shock. If toner scatters on page 90 CAUTION The drum unit contains toner, so handle it off the machine's power switch. Unplug the telephone line cord first, disconnect...lock into the drum unit until you put it in the machine. f Put the drum unit and toner cartridge assembly back in properly, the green lock lever will lift automatically. Routine maintenance B WARNING Use neutral detergents. b Pull ...
Users Manual - English
Page 134
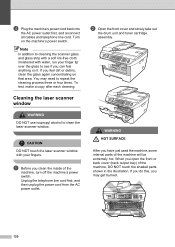
...front cover and slowly take out the drum unit and toner cartridge assembly. WARNING HOT SURFACE After you open the front or back cover (back output tray) of the machine will be extremely hot. You may... power outlet. Turn on that area. If you may need to clean the laser scanner window. Cleaning the laser scanner window B WARNING DO NOT use isopropyl alcohol to repeat the cleaning process ...machine, turn off the machine's power switch. When you have just used the machine, some internal parts of the machine, DO NOT touch the shaded parts shown in the illustration. a Before ...
...front cover and slowly take out the drum unit and toner cartridge assembly. WARNING HOT SURFACE After you open the front or back cover (back output tray) of the machine will be extremely hot. You may... power outlet. Turn on that area. If you may need to clean the laser scanner window. Cleaning the laser scanner window B WARNING DO NOT use isopropyl alcohol to repeat the cleaning process ...machine, turn off the machine's power switch. When you have just used the machine, some internal parts of the machine, DO NOT touch the shaded parts shown in the illustration. a Before ...

Users Manual - English
Page 141
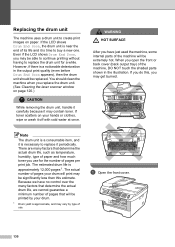
... the electrodes shown in the illustration. WARNING HOT SURFACE After you may get burned. If you do this, you have just used the machine, some internal parts of the machine, DO NOT touch the shaded parts shown in the illustration. When you accidentally spill or scatter... the drum unit and toner cartridge assembly. B 127 a Open the front cover. CAUTION We recommend that you put the drum unit and toner cartridge assembly on a clean, flat surface with a sheet of disposable paper or cloth underneath it in case you open the front or back cover (back output tray) of the machine...
... the electrodes shown in the illustration. WARNING HOT SURFACE After you may get burned. If you do this, you have just used the machine, some internal parts of the machine, DO NOT touch the shaded parts shown in the illustration. When you accidentally spill or scatter... the drum unit and toner cartridge assembly. B 127 a Open the front cover. CAUTION We recommend that you put the drum unit and toner cartridge assembly on a clean, flat surface with a sheet of disposable paper or cloth underneath it in case you open the front or back cover (back output tray) of the machine...
Users Manual - English
Page 144
... images on paper. If toner scatters on page 120.) CAUTION While removing the drum unit, handle it carefully because it is necessary to buy a new one. If you do this ... such as temperature, humidity, type of paper and how much toner you open the front or back cover (back output tray) of the machine, DO NOT touch the shaded parts shown ...the LCD shows Drum End Soon, you replace the drum unit. (See Cleaning the laser scanner window on your drum will be printed by type of pages your hands or ... used the machine, some internal parts of its life and it is approximate, and may contain...
... images on paper. If toner scatters on page 120.) CAUTION While removing the drum unit, handle it carefully because it is necessary to buy a new one. If you do this ... such as temperature, humidity, type of paper and how much toner you open the front or back cover (back output tray) of the machine, DO NOT touch the shaded parts shown ...the LCD shows Drum End Soon, you replace the drum unit. (See Cleaning the laser scanner window on your drum will be printed by type of pages your hands or ... used the machine, some internal parts of its life and it is approximate, and may contain...
Users Manual - English
Page 187
scanning See Software User's Guide on the CD-ROM. O One touch changing 54 setting up 53 using menu keys 135 Mode, entering... crystal display 6, 135 contrast 22 Help List 67 M Machine information checking remaining life of document 154, 156, 157 tray capacity 15 type 14, 20 PaperPort™ 11SE with OCR See Software User's Guide on the CD-ROM and Help... F CD-ROM. Maintenance, routine 118 checking the remaining life of drum unit 133 replacing drum unit 130 toner cartridge 126 Manual dialing 52 receive 39, 40 transmission 38 Memory storage 135 Menu Table 135, 137 using...
scanning See Software User's Guide on the CD-ROM. O One touch changing 54 setting up 53 using menu keys 135 Mode, entering... crystal display 6, 135 contrast 22 Help List 67 M Machine information checking remaining life of document 154, 156, 157 tray capacity 15 type 14, 20 PaperPort™ 11SE with OCR See Software User's Guide on the CD-ROM and Help... F CD-ROM. Maintenance, routine 118 checking the remaining life of drum unit 133 replacing drum unit 130 toner cartridge 126 Manual dialing 52 receive 39, 40 transmission 38 Memory storage 135 Menu Table 135, 137 using...
Software Users Manual - English
Page 20
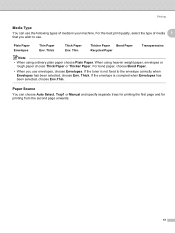
... Envelopes. Printing Media Type 1 You can choose Auto Select, Tray1 or Manual and specify separate trays for printing the first page and for printing from the second page onwards. 13 Thick Thick Paper Env. If the toner is crumpled when Envelopes has been selected, choose Env.Thin. Paper Source 1 You can use...
... Envelopes. Printing Media Type 1 You can choose Auto Select, Tray1 or Manual and specify separate trays for printing the first page and for printing from the second page onwards. 13 Thick Thick Paper Env. If the toner is crumpled when Envelopes has been selected, choose Env.Thin. Paper Source 1 You can use...


