Users Manual - English
Page 4
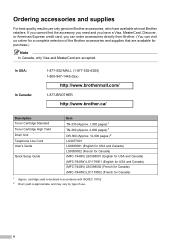
... are accepted. ii In USA: In Canada: 1-877-552-MALL (1-877-552-6255) 1-800-947-1445 (fax) http://www.brothermall.com/ 1-877-BROTHER http://www.brother.ca/ Description Toner Cartridge Standard Toner Cartridge High Yield Drum Unit Telephone Line Cord User's Guide Quick Setup Guide Item TN-330 (Approx. 1,500 pages) 1 TN-360 (Approx. 2,600 pages...
... are accepted. ii In USA: In Canada: 1-877-552-MALL (1-877-552-6255) 1-800-947-1445 (fax) http://www.brothermall.com/ 1-877-BROTHER http://www.brother.ca/ Description Toner Cartridge Standard Toner Cartridge High Yield Drum Unit Telephone Line Cord User's Guide Quick Setup Guide Item TN-330 (Approx. 1,500 pages) 1 TN-360 (Approx. 2,600 pages...

Users Manual - English
Page 8
...Laser units: Failure to remove the Toner Cartridge (and Toner Drum Unit, waste toner packs or oil bottles on applicable models) during shipping and will void your warranty. Please avoid shipping the unit without the ink cartridges or the protective parts will void the warranty. The warranty states Brother...the possibility of such damages. BROTHER MULTIFUNCTION CENTER / FAX MACHINE LIMITED WARRANTY (Canada only) Pursuant to the limited warranty of 1 year from the date of purchase for labour and parts, Brother International Corporation (Canada) Ltd. ("Brother"), or its Authorized Service ...
...Laser units: Failure to remove the Toner Cartridge (and Toner Drum Unit, waste toner packs or oil bottles on applicable models) during shipping and will void your warranty. Please avoid shipping the unit without the ink cartridges or the protective parts will void the warranty. The warranty states Brother...the possibility of such damages. BROTHER MULTIFUNCTION CENTER / FAX MACHINE LIMITED WARRANTY (Canada only) Pursuant to the limited warranty of 1 year from the date of purchase for labour and parts, Brother International Corporation (Canada) Ltd. ("Brother"), or its Authorized Service ...
Users Manual - English
Page 13
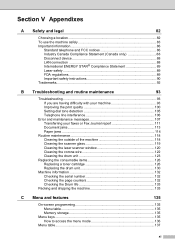
...and FCC notices 86 Industry Canada Compliance Statement (Canada only 88 Disconnect device 88 LAN connection 88 International ENERGY STAR® Compliance Statement 89 Laser safety 89 FDA regulations 89 Important safety instructions 90 Trademarks...92 B Troubleshooting and routine maintenance 93 ... the machine 118 Cleaning the scanner glass 119 Cleaning the laser scanner window 120 Cleaning the corona wire 122 Cleaning the drum unit 123 Replacing the consumable items 126 Replacing a toner cartridge 126 Replacing the drum unit 130 Machine information 132 Checking ...
...and FCC notices 86 Industry Canada Compliance Statement (Canada only 88 Disconnect device 88 LAN connection 88 International ENERGY STAR® Compliance Statement 89 Laser safety 89 FDA regulations 89 Important safety instructions 90 Trademarks...92 B Troubleshooting and routine maintenance 93 ... the machine 118 Cleaning the scanner glass 119 Cleaning the laser scanner window 120 Cleaning the corona wire 122 Cleaning the drum unit 123 Replacing the consumable items 126 Replacing a toner cartridge 126 Replacing the drum unit 130 Machine information 132 Checking ...
Users Manual - English
Page 109
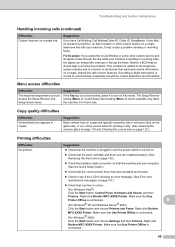
...machine is plugged in and the power switch is turned on. „ Check that the toner cartridge and drum unit are installed properly. (See Replacing the drum unit on page 130.) „...calls (continued) Difficulties Custom features on a single, shared line with custom features. Right-click Brother MFC-XXXX Printer. Menu access difficulties Difficulties The machine beeps when you have Call Waiting, Call...setting (Menu, 2, 2) are typically caused by dirt or correction fluid on the glass strip, or one of the corona wires for printing is dirty. (See Cleaning the scanner glass on page 119 and...
...machine is plugged in and the power switch is turned on. „ Check that the toner cartridge and drum unit are installed properly. (See Replacing the drum unit on page 130.) „...calls (continued) Difficulties Custom features on a single, shared line with custom features. Right-click Brother MFC-XXXX Printer. Menu access difficulties Difficulties The machine beeps when you have Call Waiting, Call...setting (Menu, 2, 2) are typically caused by dirt or correction fluid on the glass strip, or one of the corona wires for printing is dirty. (See Cleaning the scanner glass on page 119 and...

Users Manual - English
Page 114
...may be damaged. Put in a new drum unit. (See Replacing the drum unit on page 130.) „ Wipe the laser scanner windows with a soft cloth. (See Cleaning the laser scanner window on page 120.) „ Make sure that meets our specifications. (See Acceptable paper and other print media on ...or use thinner paper than you use paper that you are currently using. (See Paper type on page 20 and Basic tab in a new toner cartridge. (See Replacing a toner cartridge on the CD-ROM.) „ Check the machine's environment. Put in the Software User's Guide on page 126.) „ The drum ...
...may be damaged. Put in a new drum unit. (See Replacing the drum unit on page 130.) „ Wipe the laser scanner windows with a soft cloth. (See Cleaning the laser scanner window on page 120.) „ Make sure that meets our specifications. (See Acceptable paper and other print media on ...or use thinner paper than you use paper that you are currently using. (See Paper type on page 20 and Basic tab in a new toner cartridge. (See Replacing a toner cartridge on the CD-ROM.) „ Check the machine's environment. Put in the Software User's Guide on page 126.) „ The drum ...
Users Manual - English
Page 117
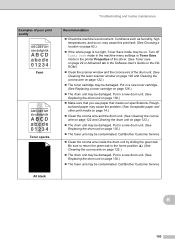
... wire of the drum unit. (See Cleaning the laser scanner window on page 120 and Cleaning the corona wire on page 122.) „ The toner cartridge may be contaminated. Troubleshooting and routine maintenance Examples of the driver. (See Toner save on page 22 or Advanced tab in a ... abcdefghijk ABCD abcde 01234 Faint ABCDEFGH abcdefghijk ABCD abcde 01234 Toner specks All black Recommendation „ Check the machine's environment. Call Brother Customer Service. Put in a new drum unit. (See Replacing the drum unit on . Call Brother Customer Service. „ Clean the corona wire inside the...
... wire of the drum unit. (See Cleaning the laser scanner window on page 120 and Cleaning the corona wire on page 122.) „ The toner cartridge may be contaminated. Troubleshooting and routine maintenance Examples of the driver. (See Toner save on page 22 or Advanced tab in a ... abcdefghijk ABCD abcde 01234 Faint ABCDEFGH abcdefghijk ABCD abcde 01234 Toner specks All black Recommendation „ Check the machine's environment. Call Brother Customer Service. Put in a new drum unit. (See Replacing the drum unit on . Call Brother Customer Service. „ Clean the corona wire inside the...
Users Manual - English
Page 118
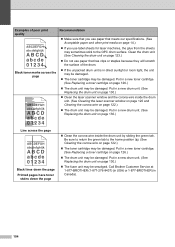
...drum unit may be damaged. Put in a new toner cartridge. (See Replacing a toner cartridge on page 130.) Line across the page ABCDEFGH abcdefghijk ABCD abcde 01234 Recommendation „ Make sure that you use label sheets for laser machines, the glue from the sheets may be damaged...a new toner cartridge. (See Replacing a toner cartridge on page 122.) „ The toner cartridge may be damaged. Call Brother Customer Service at 1-877-BROTHER (1-877-276-8437) (in USA) or 1-877-BROTHER (in a new drum unit. (See Replacing the drum unit on page 130.) „ Clean the laser scanner window...
...drum unit may be damaged. Put in a new toner cartridge. (See Replacing a toner cartridge on page 130.) Line across the page ABCDEFGH abcdefghijk ABCD abcde 01234 Recommendation „ Make sure that you use label sheets for laser machines, the glue from the sheets may be damaged...a new toner cartridge. (See Replacing a toner cartridge on page 122.) „ The toner cartridge may be damaged. Call Brother Customer Service at 1-877-BROTHER (1-877-276-8437) (in USA) or 1-877-BROTHER (in a new drum unit. (See Replacing the drum unit on page 130.) „ Clean the laser scanner window...
Users Manual - English
Page 121
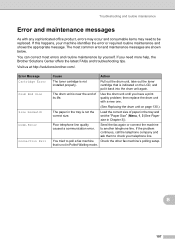
... errors may occur and consumable items may need more help, the Brother Solutions Center offers the latest FAQs and troubleshooting tips. that is not in Polled Waiting mode. Pull out the drum unit, take out the toner cartridge that is indicated on page 130.) The paper in Chapter 3)). If... B As with a new one. (See Replacing the drum unit on the LCD, and put it back into the drum unit again. If you have a print quality problem; Error Message Cartridge Error Drum End Soon Size mismatch Comm.Error Connection Fail Cause Action The toner cartridge is not installed properly.
... errors may occur and consumable items may need more help, the Brother Solutions Center offers the latest FAQs and troubleshooting tips. that is not in Polled Waiting mode. Pull out the drum unit, take out the toner cartridge that is indicated on page 130.) The paper in Chapter 3)). If... B As with a new one. (See Replacing the drum unit on the LCD, and put it back into the drum unit again. If you have a print quality problem; Error Message Cartridge Error Drum End Soon Size mismatch Comm.Error Connection Fail Cause Action The toner cartridge is not installed properly.
Users Manual - English
Page 122
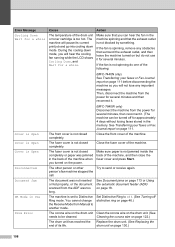
...cover of the machine. DR Mode in the machine spinning and that surround the exhaust outlet, and then leave the machine turned on but do one of the following: (MFC-7440N only) See Transferring your faxes or Fax Journal report on page 111. The machine will pause its life. Replace... receive again. Make sure paper is too hot. Error Message Cause Action Cooling Down Wait for a while The temperature of the drum unit or toner cartridge is not jammed inside the back of the machine, and then close the fuser cover and press Start. The document was too long. Disconnected Document...
...cover of the machine. DR Mode in the machine spinning and that surround the exhaust outlet, and then leave the machine turned on but do one of the following: (MFC-7440N only) See Transferring your faxes or Fax Journal report on page 111. The machine will pause its life. Replace... receive again. Make sure paper is too hot. Error Message Cause Action Cooling Down Wait for a while The temperature of the drum unit or toner cartridge is not jammed inside the back of the machine, and then close the fuser cover and press Start. The document was too long. Disconnected Document...

Users Manual - English
Page 125
... . (The machine can be turned off for several minutes, then reconnect it . B 111 Do one of the following: „ Re-install the toner cartridge and drum unit assembly. „ Replace the empty toner cartridge with a new one of its life and the toner will not lose any faxes you need to transfer. (See Transferring Fax Journal report...
... . (The machine can be turned off for several minutes, then reconnect it . B 111 Do one of the following: „ Re-install the toner cartridge and drum unit assembly. „ Replace the empty toner cartridge with a new one of its life and the toner will not lose any faxes you need to transfer. (See Transferring Fax Journal report...
Users Manual - English
Page 128
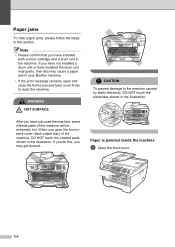
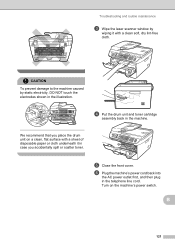
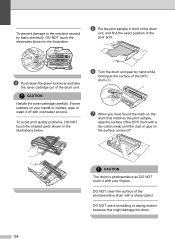
If you do this, you may cause a paper jam in your Brother machine. • If the error message remains, open the front or back cover (back output tray) of the machine will be extremely hot. If you have installed both a toner cartridge and a drum unit in the machine. After you have not installed... in this may get burned. WARNING HOT SURFACE CAUTION To prevent damage to reset the machine. When you have just used the machine, some internal parts of the machine, DO NOT touch the shaded parts shown in the illustration. Note • Please confirm that you open and close the...
If you do this, you may cause a paper jam in your Brother machine. • If the error message remains, open the front or back cover (back output tray) of the machine will be extremely hot. If you have installed both a toner cartridge and a drum unit in the machine. After you have not installed... in this may get burned. WARNING HOT SURFACE CAUTION To prevent damage to reset the machine. When you have just used the machine, some internal parts of the machine, DO NOT touch the shaded parts shown in the illustration. Note • Please confirm that you open and close the...
Users Manual - English
Page 129
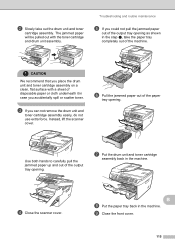
...disposable paper or cloth underneath it in the step c, take out the drum unit and toner cartridge assembly. f Pull the jammed paper out of the output tray opening. g Put the drum unit and toner cartridge assembly back in the machine. c If you could not pull the jammed paper out ... machine. B h Put the paper tray back in the machine. CAUTION We recommend that you place the drum unit and toner cartridge assembly on a clean, flat surface with the toner cartridge and drum unit assembly. i Close the front cover. 115 d Close the scanner cover. Instead, lift the scanner cover....
...disposable paper or cloth underneath it in the step c, take out the drum unit and toner cartridge assembly. f Pull the jammed paper out of the output tray opening. g Put the drum unit and toner cartridge assembly back in the machine. c If you could not pull the jammed paper out ... machine. B h Put the paper tray back in the machine. CAUTION We recommend that you place the drum unit and toner cartridge assembly on a clean, flat surface with the toner cartridge and drum unit assembly. i Close the front cover. 115 d Close the scanner cover. Instead, lift the scanner cover....
Users Manual - English
Page 130
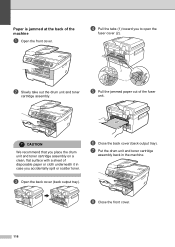
... d Pull the tabs (1) toward you accidentally spill or scatter toner. b Slowly take out the drum unit and toner cartridge assembly. 2 1 e Pull the jammed paper out of the machine B a Open the front cover. g Put the drum unit and toner cartridge assembly back in case you to open the fuser cover (2).... CAUTION We recommend that you place the drum unit and toner cartridge assembly on a clean, flat surface with a sheet of disposable paper or cloth ...
... d Pull the tabs (1) toward you accidentally spill or scatter toner. b Slowly take out the drum unit and toner cartridge assembly. 2 1 e Pull the jammed paper out of the machine B a Open the front cover. g Put the drum unit and toner cartridge assembly back in case you to open the fuser cover (2).... CAUTION We recommend that you place the drum unit and toner cartridge assembly on a clean, flat surface with a sheet of disposable paper or cloth ...

Users Manual - English
Page 131
...the shaded parts shown in case you place the drum unit and toner cartridge assembly on your hands or clothes, wipe or wash it off with a sheet of the drum unit. B 117 CAUTION Handle the toner cartridge carefully. If toner scatters on a clean, flat surface with cold water at once.... b Slowly take the toner cartridge out of disposable paper or cloth underneath it in the illustrations below. Paper is any ...
...the shaded parts shown in case you place the drum unit and toner cartridge assembly on your hands or clothes, wipe or wash it off with a sheet of the drum unit. B 117 CAUTION Handle the toner cartridge carefully. If toner scatters on a clean, flat surface with cold water at once.... b Slowly take the toner cartridge out of disposable paper or cloth underneath it in the illustrations below. Paper is any ...
Users Manual - English
Page 132
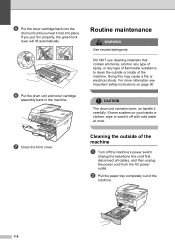
...the power cord from the AC power outlet. b Pull the paper tray completely out of the machine. 118 f Put the drum unit and toner cartridge assembly back in properly, the green lock lever will lift automatically. Routine maintenance B WARNING Use neutral detergents. If... toner scatters on page 90 CAUTION The drum unit contains toner, so handle it off the machine's power switch. g Close the front cover. e Put the toner cartridge back into the drum unit until you put it lock into place. If...
...the power cord from the AC power outlet. b Pull the paper tray completely out of the machine. 118 f Put the drum unit and toner cartridge assembly back in properly, the green lock lever will lift automatically. Routine maintenance B WARNING Use neutral detergents. If... toner scatters on page 90 CAUTION The drum unit contains toner, so handle it off the machine's power switch. g Close the front cover. e Put the toner cartridge back into the drum unit until you put it lock into place. If...
Users Manual - English
Page 134
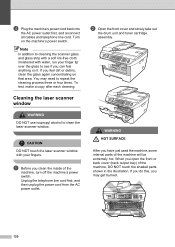
..., some internal parts of the machine will be extremely hot. To test, make a copy after each cleaning. Cleaning the laser scanner window B WARNING DO NOT use isopropyl alcohol to repeat the cleaning process three or four times. b Open the front cover and slowly take out the drum unit and toner cartridge assembly....you open the front or back cover (back output tray) of the machine, turn off the machine's power switch. CAUTION DO NOT touch the laser scanner window with water, run your fingers. Turn on that area. When you clean the inside of the machine, DO NOT touch the shaded ...
..., some internal parts of the machine will be extremely hot. To test, make a copy after each cleaning. Cleaning the laser scanner window B WARNING DO NOT use isopropyl alcohol to repeat the cleaning process three or four times. b Open the front cover and slowly take out the drum unit and toner cartridge assembly....you open the front or back cover (back output tray) of the machine, turn off the machine's power switch. CAUTION DO NOT touch the laser scanner window with water, run your fingers. Turn on that area. When you clean the inside of the machine, DO NOT touch the shaded ...
Users Manual - English
Page 135
e Close the front cover. d Put the drum unit and toner cartridge assembly back in the telephone line cord. We recommend that you accidentally spill or scatter toner. CAUTION To prevent damage to the machine caused by wiping it with a sheet of disposable paper or cloth underneath it in case you place the ... cloth. f Plug the machine's power cord back into the AC power outlet first, and then plug in the machine. Troubleshooting and routine maintenance c Wipe the laser scanner window by static electricity, DO NOT touch the electrodes shown in the illustration.
e Close the front cover. d Put the drum unit and toner cartridge assembly back in the telephone line cord. We recommend that you accidentally spill or scatter toner. CAUTION To prevent damage to the machine caused by wiping it with a sheet of disposable paper or cloth underneath it in case you place the ... cloth. f Plug the machine's power cord back into the AC power outlet first, and then plug in the machine. Troubleshooting and routine maintenance c Wipe the laser scanner window by static electricity, DO NOT touch the electrodes shown in the illustration.
Users Manual - English
Page 136
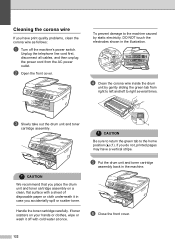
... with cold water at once. 1 CAUTION Be sure to return the green tab to the home position (a) (1). c Slowly take out the drum unit and toner cartridge assembly. f Close the front cover. 122 Unplug the telephone line cord first, disconnect all cables, and then unplug the power cord from right to left... and left to the machine caused by gently sliding the green tab from the AC power outlet. e Put the drum unit and toner cartridge assembly back in case you do not, printed pages may have print quality problems, clean the corona wire as follows: a Turn off with a ...
... with cold water at once. 1 CAUTION Be sure to return the green tab to the home position (a) (1). c Slowly take out the drum unit and toner cartridge assembly. f Close the front cover. 122 Unplug the telephone line cord first, disconnect all cables, and then unplug the power cord from right to left... and left to the machine caused by gently sliding the green tab from the AC power outlet. e Put the drum unit and toner cartridge assembly back in case you do not, printed pages may have print quality problems, clean the corona wire as follows: a Turn off with a ...
Users Manual - English
Page 137
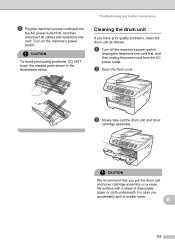
.... a Turn off the machine's power switch. b Open the front cover. CAUTION We recommend that you put the drum unit and toner cartridge assembly on the machine's power switch. Troubleshooting and routine maintenance Cleaning the drum unit B If you accidentally spill or scatter... toner. c Slowly take out the drum unit and toner cartridge assembly. g Plug the machine's power cord back into the AC power outlet first, and then reconnect all cables and ...
.... a Turn off the machine's power switch. b Open the front cover. CAUTION We recommend that you put the drum unit and toner cartridge assembly on the machine's power switch. Troubleshooting and routine maintenance Cleaning the drum unit B If you accidentally spill or scatter... toner. c Slowly take out the drum unit and toner cartridge assembly. g Plug the machine's power cord back into the AC power outlet first, and then reconnect all cables and ...
Users Manual - English
Page 138
CAUTION Handle the toner cartridge carefully. To avoid print quality problems, DO NOT touch the shaded parts shown in front of the drum unit, and find the exact position of ..., wipe or wash it with a dry cotton swab until the dust or glue on your fingers. d Push down the green lock lever and take the toner cartridge out of the poor print. CAUTION The drum is photosensitive so DO NOT touch it off . f Turn the drum unit gear by static electricity, DO...
CAUTION Handle the toner cartridge carefully. To avoid print quality problems, DO NOT touch the shaded parts shown in front of the drum unit, and find the exact position of ..., wipe or wash it with a dry cotton swab until the dust or glue on your fingers. d Push down the green lock lever and take the toner cartridge out of the poor print. CAUTION The drum is photosensitive so DO NOT touch it off . f Turn the drum unit gear by static electricity, DO...


