Users Manual - English
Page 4
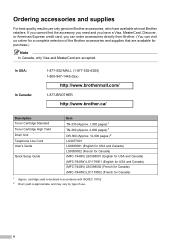
...In USA: In Canada: 1-877-552-MALL (1-877-552-6255) 1-800-947-1445 (fax) http://www.brothermall.com/ 1-877-BROTHER http://www.brother.ca/ Description Toner Cartridge Standard Toner Cartridge High Yield Drum Unit Telephone Line Cord User's Guide Quick Setup Guide Item TN-330 (Approx. 1,500 pages) 1 TN-360 (Approx. 2,...-7840W) LS1179002 (French for purchase.) Note In Canada, only Visa and MasterCard are accepted. cartridge yield is declared in accordance with ISO/IEC 19752. 2 Drum yield is approximate, and may vary by type of the Brother accessories and supplies that are available at most...
...In USA: In Canada: 1-877-552-MALL (1-877-552-6255) 1-800-947-1445 (fax) http://www.brothermall.com/ 1-877-BROTHER http://www.brother.ca/ Description Toner Cartridge Standard Toner Cartridge High Yield Drum Unit Telephone Line Cord User's Guide Quick Setup Guide Item TN-330 (Approx. 1,500 pages) 1 TN-360 (Approx. 2,...-7840W) LS1179002 (French for purchase.) Note In Canada, only Visa and MasterCard are accepted. cartridge yield is declared in accordance with ISO/IEC 19752. 2 Drum yield is approximate, and may vary by type of the Brother accessories and supplies that are available at most...

Users Manual - English
Page 6
...local Brother Authorized Service Center(s), call 1-877-BROTHER (1-877-276-8437) or visit www.brother-usa.com. You are not limited to print heads, toner, drums, ink...U.S. For products purchased in, but are responsible for parts or labor. Brother® One-Year Limited Warranty and Replacement Service (USA Only) Who is covered: ...Brother®-brand parts and Consumable and Accessory Items); 4 Consumable and Accessory Items that expired in accordance with a rated life; 5 Problems arising from other than defects in materials or workmanship; The decision as Paper Feeding Kit, Fuser and Laser...
...local Brother Authorized Service Center(s), call 1-877-BROTHER (1-877-276-8437) or visit www.brother-usa.com. You are not limited to print heads, toner, drums, ink...U.S. For products purchased in, but are responsible for parts or labor. Brother® One-Year Limited Warranty and Replacement Service (USA Only) Who is covered: ...Brother®-brand parts and Consumable and Accessory Items); 4 Consumable and Accessory Items that expired in accordance with a rated life; 5 Problems arising from other than defects in materials or workmanship; The decision as Paper Feeding Kit, Fuser and Laser...

Users Manual - English
Page 8
...of the possibility of such damages. For Laser units: Failure to remove the Toner Cartridge (and Toner Drum Unit, waste toner packs or oil bottles on applicable models) during shipping and will void the Warranty. Neither Brother nor anyone other rights which vary from...from the date of purchase for labour and parts, Brother International Corporation (Canada) Ltd. ("Brother"), or its Authorized Service Centres, Distributors, Dealers, Agents or employees, shall create another warranty or modify this machine is available at Brother's sole discretion) this MFC/Fax machine shall be ...
...of the possibility of such damages. For Laser units: Failure to remove the Toner Cartridge (and Toner Drum Unit, waste toner packs or oil bottles on applicable models) during shipping and will void the Warranty. Neither Brother nor anyone other rights which vary from...from the date of purchase for labour and parts, Brother International Corporation (Canada) Ltd. ("Brother"), or its Authorized Service Centres, Distributors, Dealers, Agents or employees, shall create another warranty or modify this machine is available at Brother's sole discretion) this MFC/Fax machine shall be ...
Users Manual - English
Page 13
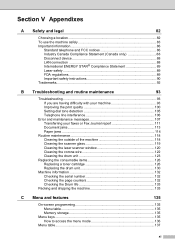
...and FCC notices 86 Industry Canada Compliance Statement (Canada only 88 Disconnect device 88 LAN connection 88 International ENERGY STAR® Compliance Statement 89 Laser safety 89 FDA regulations 89 Important safety instructions 90 Trademarks...92 B Troubleshooting and routine maintenance 93 Troubleshooting... 118 Cleaning the scanner glass 119 Cleaning the laser scanner window 120 Cleaning the corona wire 122 Cleaning the drum unit 123 Replacing the consumable items 126 Replacing a toner cartridge 126 Replacing the drum unit 130 Machine information 132 Checking the serial ...
...and FCC notices 86 Industry Canada Compliance Statement (Canada only 88 Disconnect device 88 LAN connection 88 International ENERGY STAR® Compliance Statement 89 Laser safety 89 FDA regulations 89 Important safety instructions 90 Trademarks...92 B Troubleshooting and routine maintenance 93 Troubleshooting... 118 Cleaning the scanner glass 119 Cleaning the laser scanner window 120 Cleaning the corona wire 122 Cleaning the drum unit 123 Replacing the consumable items 126 Replacing a toner cartridge 126 Replacing the drum unit 130 Machine information 132 Checking the serial ...
Users Manual - English
Page 32
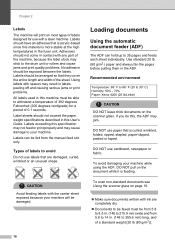
...centigrade) for a period of labels to avoid 2 Do not use labels that they cover the entire length and width of labels designed for use with a laser machine. Labels should be arranged so that are completely dry. „ Documents to be faxed must be from 5.8 to 8.5 in this machine must be ... the ADF. Labels exceeding this User's Guide. DO NOT use paper that is acrylic-based since this , the ADF may cause damage to the drum unit or rollers and cause jams and print quality problems. No adhesive should not come in the fuser unit. To avoid damaging your machine will...
...centigrade) for a period of labels to avoid 2 Do not use labels that they cover the entire length and width of labels designed for use with a laser machine. Labels should be arranged so that are completely dry. „ Documents to be faxed must be from 5.8 to 8.5 in this machine must be ... the ADF. Labels exceeding this User's Guide. DO NOT use paper that is acrylic-based since this , the ADF may cause damage to the drum unit or rollers and cause jams and print quality problems. No adhesive should not come in the fuser unit. To avoid damaging your machine will...
Users Manual - English
Page 98
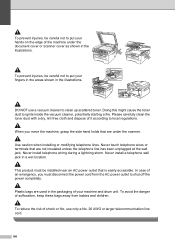
.... Never install a telephone wall jack in the illustrations. To prevent injuries, be careful not to put your hands on the edge of your machine and drum unit. This product must disconnect the power cord from babies and children. Doing this might cause the toner dust to shut off the power completely...
.... Never install a telephone wall jack in the illustrations. To prevent injuries, be careful not to put your hands on the edge of your machine and drum unit. This product must disconnect the power cord from babies and children. Doing this might cause the toner dust to shut off the power completely...
Users Manual - English
Page 109
...Offline is dirty. (See Cleaning the scanner glass on page 119 and Cleaning the corona wire on . „ Check that the toner cartridge and drum unit are available only when the machine is online: (For Windows Vista®) Click the Start button, Control Panel, Hardware and Sound, and ... installed and chosen. „ Check to Call Waiting or some other custom feature on the glass strip, or one of the corona wires for printing is unchecked. 95 Right-click Brother MFC-XXXX Printer. If avoiding a slight interruption is crucial to access the Setup Receive and Setup Send menus....
...Offline is dirty. (See Cleaning the scanner glass on page 119 and Cleaning the corona wire on . „ Check that the toner cartridge and drum unit are available only when the machine is online: (For Windows Vista®) Click the Start button, Control Panel, Hardware and Sound, and ... installed and chosen. „ Check to Call Waiting or some other custom feature on the glass strip, or one of the corona wires for printing is unchecked. 95 Right-click Brother MFC-XXXX Printer. If avoiding a slight interruption is crucial to access the Setup Receive and Setup Send menus....

Users Manual - English
Page 114
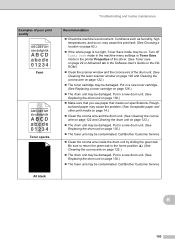
... a new toner cartridge. (See Replacing a toner cartridge on page 126.) „ The drum unit may be damaged. Put in a new drum unit. (See Replacing the drum unit on page 130.) „ Wipe the laser scanner windows with a soft cloth. (See Cleaning the laser scanner window on page 120.) „ Make sure that meets our specifications...
... a new toner cartridge. (See Replacing a toner cartridge on page 126.) „ The drum unit may be damaged. Put in a new drum unit. (See Replacing the drum unit on page 130.) „ Wipe the laser scanner windows with a soft cloth. (See Cleaning the laser scanner window on page 120.) „ Make sure that meets our specifications...
Users Manual - English
Page 115
... setting. (See Acceptable paper and other print media on page 14 and Basic tab in the Software User's Guide on the CD-ROM.) „ The drum unit may be too full. „ If you are not too tight or too loose against the paper stack. „ Set the paper guides correctly.... (See Loading paper in the paper tray on page 8.) „ The paper tray may be contaminated. B 101 Call Brother Customer Service. „ Check the paper type and quality. (See Acceptable paper and other print media on page 14.) „ Make sure that paper is...
... setting. (See Acceptable paper and other print media on page 14 and Basic tab in the Software User's Guide on the CD-ROM.) „ The drum unit may be too full. „ If you are not too tight or too loose against the paper stack. „ Set the paper guides correctly.... (See Loading paper in the paper tray on page 8.) „ The paper tray may be contaminated. B 101 Call Brother Customer Service. „ Check the paper type and quality. (See Acceptable paper and other print media on page 14.) „ Make sure that paper is...
Users Manual - English
Page 116
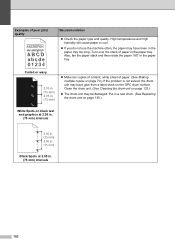
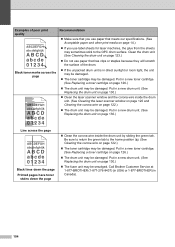
... and then rotate the paper 180° in the paper tray. Put in a new drum. (See Replacing the drum unit on page 130.) White Spots on page 123.) „ The drum unit may have been in the paper tray too long. Curled or wavy 2.95 in....(75 mm) „ Make ten copies of a blank, white sheet of paper. (See Making multiple copies on the OPC drum surface. Clean the drum unit. (See Cleaning the drum unit on black text and graphics at 2.95 in. (75 mm) intervals 2.95 in. (75 mm) 2.95 in.... may have glue from a label stuck on page 70.) If the problem is not solved, the drum unit may be damaged.
... and then rotate the paper 180° in the paper tray. Put in a new drum. (See Replacing the drum unit on page 130.) White Spots on page 123.) „ The drum unit may have been in the paper tray too long. Curled or wavy 2.95 in....(75 mm) „ Make ten copies of a blank, white sheet of paper. (See Making multiple copies on the OPC drum surface. Clean the drum unit. (See Cleaning the drum unit on black text and graphics at 2.95 in. (75 mm) intervals 2.95 in. (75 mm) 2.95 in.... may have glue from a label stuck on page 70.) If the problem is not solved, the drum unit may be damaged.
Users Manual - English
Page 117
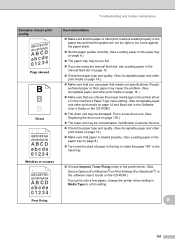
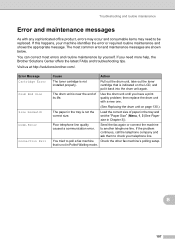
...black Recommendation „ Check the machine's environment. Call Brother Customer Service. „ Clean the corona wire inside the drum unit by sliding the green tab. Troubleshooting and routine maintenance Examples of the drum unit. (See Cleaning the laser scanner window on page 120 and Cleaning the corona ...may be damaged. Call Brother Customer Service. Conditions such as humidity, high temperatures, and so on, may cause this print fault. (See Choosing a location on page 130.) „ The fuser unit may be damaged. Put in a new drum unit. (See Replacing the drum unit on page 130.) ...
...black Recommendation „ Check the machine's environment. Call Brother Customer Service. „ Clean the corona wire inside the drum unit by sliding the green tab. Troubleshooting and routine maintenance Examples of the drum unit. (See Cleaning the laser scanner window on page 120 and Cleaning the corona ...may be damaged. Call Brother Customer Service. Conditions such as humidity, high temperatures, and so on, may cause this print fault. (See Choosing a location on page 130.) „ The fuser unit may be damaged. Put in a new drum unit. (See Replacing the drum unit on page 130.) ...
Users Manual - English
Page 118
... on page 130.) „ Clean the laser scanner window and the corona wire inside the drum unit by sliding the green tab. Be sure to return the green tab to the OPC drum surface. Call Brother Customer Service at 1-877-BROTHER (1-877-276-8437) (in USA) or 1-877-BROTHER (in a new toner cartridge. (See Replacing a toner...
... on page 130.) „ Clean the laser scanner window and the corona wire inside the drum unit by sliding the green tab. Be sure to return the green tab to the OPC drum surface. Call Brother Customer Service at 1-877-BROTHER (1-877-276-8437) (in USA) or 1-877-BROTHER (in a new toner cartridge. (See Replacing a toner...
Users Manual - English
Page 121
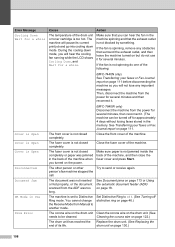
... routine maintenance Error and maintenance messages B As with a new one. (See Replacing the drum unit on the LCD, and put it back into the drum unit again. Visit us at http://solutions.brother.com/. The drum unit is not installed properly. Error Message Cartridge Error Drum End Soon Size mismatch Comm.Error Connection Fail Cause Action...
... routine maintenance Error and maintenance messages B As with a new one. (See Replacing the drum unit on the LCD, and put it back into the drum unit again. Visit us at http://solutions.brother.com/. The drum unit is not installed properly. Error Message Cartridge Error Drum End Soon Size mismatch Comm.Error Connection Fail Cause Action...
Users Manual - English
Page 122
..., and then close the fuser cover and press Start. Cleaning the corona wire on but do one of the following: (MFC-7440N only) See Transferring your faxes or Fax Journal report on the drum unit. (See needs to send or receive again. If the fan is spinning, remove any... important messages. Close the front cover of the machine. Replace the drum unit. (See Replacing the drum unit on page 18. During the cooling down mode. Then, disconnect the machine from the power for several minutes, then reconnect it...
..., and then close the fuser cover and press Start. Cleaning the corona wire on but do one of the following: (MFC-7440N only) See Transferring your faxes or Fax Journal report on the drum unit. (See needs to send or receive again. If the fan is spinning, remove any... important messages. Close the front cover of the machine. Replace the drum unit. (See Replacing the drum unit on page 18. During the cooling down mode. Then, disconnect the machine from the power for several minutes, then reconnect it...

Users Manual - English
Page 125
... the following: „ Re-install the toner cartridge and drum unit assembly. „ Replace the empty toner cartridge with a new one of its life and the toner will soon run out. Transferring your faxes or Fax Journal report B If the LCD shows: „ Init Unable XX &#... faxes you that the toner cartridge is telling you need to transfer. (See Transferring Fax Journal report to another fax machine on page 111.) The drum unit and toner cartridge assembly may have been transferred, disconnect the machine from the power for approximately 4 days without losing faxes stored in the memory...
... the following: „ Re-install the toner cartridge and drum unit assembly. „ Replace the empty toner cartridge with a new one of its life and the toner will soon run out. Transferring your faxes or Fax Journal report B If the LCD shows: „ Init Unable XX &#... faxes you that the toner cartridge is telling you need to transfer. (See Transferring Fax Journal report to another fax machine on page 111.) The drum unit and toner cartridge assembly may have been transferred, disconnect the machine from the power for approximately 4 days without losing faxes stored in the memory...
Users Manual - English
Page 128
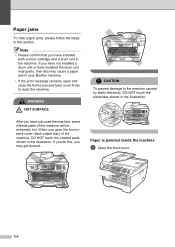
... jam in your Brother machine. • If the error message remains, open the front or back cover (back output tray) of the machine will be extremely hot. If you do this section. Note • Please confirm that you have installed both a toner cartridge and a drum unit in the illustration.... Paper is jammed inside the machine B a Open the front cover. 114 After you have just used the machine, some internal parts of the machine, DO NOT touch the shaded parts shown in the machine...
... jam in your Brother machine. • If the error message remains, open the front or back cover (back output tray) of the machine will be extremely hot. If you do this section. Note • Please confirm that you have installed both a toner cartridge and a drum unit in the illustration.... Paper is jammed inside the machine B a Open the front cover. 114 After you have just used the machine, some internal parts of the machine, DO NOT touch the shaded parts shown in the machine...
Users Manual - English
Page 129
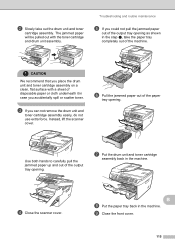
... in the machine. c If you could not pull the jammed paper out of disposable paper or cloth underneath it in the step c, take out the drum unit and toner cartridge assembly. d Close the scanner cover. Use both hands to carefully pull the jammed paper up and out of the paper tray... opening as shown in case you place the drum unit and toner cartridge assembly on a clean, flat surface with the toner cartridge and drum unit assembly. b Slowly take the paper tray completely out of the machine. CAUTION We recommend that you ...
... in the machine. c If you could not pull the jammed paper out of disposable paper or cloth underneath it in the step c, take out the drum unit and toner cartridge assembly. d Close the scanner cover. Use both hands to carefully pull the jammed paper up and out of the paper tray... opening as shown in case you place the drum unit and toner cartridge assembly on a clean, flat surface with the toner cartridge and drum unit assembly. b Slowly take the paper tray completely out of the machine. CAUTION We recommend that you ...
Users Manual - English
Page 130
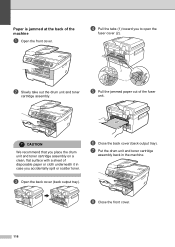
... or scatter toner. f Close the back cover (back output tray). CAUTION We recommend that you to open the fuser cover (2). b Slowly take out the drum unit and toner cartridge assembly. 2 1 e Pull the jammed paper out of disposable paper or cloth underneath it in the machine. h Close the front cover.... 116 c Open the back cover (back output tray). d Pull the tabs (1) toward you place the drum unit and toner cartridge assembly on a clean, flat surface with a sheet of the fuser unit. Paper is jammed at the back of the machine B a ...
... or scatter toner. f Close the back cover (back output tray). CAUTION We recommend that you to open the fuser cover (2). b Slowly take out the drum unit and toner cartridge assembly. 2 1 e Pull the jammed paper out of disposable paper or cloth underneath it in the machine. h Close the front cover.... 116 c Open the back cover (back output tray). d Pull the tabs (1) toward you place the drum unit and toner cartridge assembly on a clean, flat surface with a sheet of the fuser unit. Paper is jammed at the back of the machine B a ...

Users Manual - English
Page 131
... the toner cartridge carefully. d Clear the jammed paper if there is jammed inside the drum unit. b Slowly take the toner cartridge out of disposable paper or cloth underneath it ... problems, DO NOT touch the shaded parts shown in case you place the drum unit and toner cartridge assembly on your hands or clothes, wipe or wash it off with a sheet of the... drum unit. Troubleshooting and routine maintenance c Push down the green lock lever and take out the drum unit and toner cartridge assembly. B 117 CAUTION We recommend that you...
... the toner cartridge carefully. d Clear the jammed paper if there is jammed inside the drum unit. b Slowly take the toner cartridge out of disposable paper or cloth underneath it ... problems, DO NOT touch the shaded parts shown in case you place the drum unit and toner cartridge assembly on your hands or clothes, wipe or wash it off with a sheet of the... drum unit. Troubleshooting and routine maintenance c Push down the green lock lever and take out the drum unit and toner cartridge assembly. B 117 CAUTION We recommend that you...
Users Manual - English
Page 132
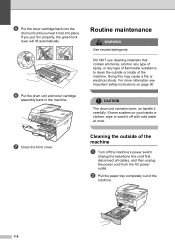
... may cause a fire or electrical shock. If you hear it carefully. If toner scatters on page 90 CAUTION The drum unit contains toner, so handle it lock into the drum unit until you put it off the machine's power switch. DO NOT use cleaning materials that contain ammonia, alcohol, ... disconnect all cables, and then unplug the power cord from the AC power outlet. e Put the toner cartridge back into place. f Put the drum unit and toner cartridge assembly back in properly, the green lock lever will lift automatically. For more infomation see Important safety instructions on your hands...
... may cause a fire or electrical shock. If you hear it carefully. If toner scatters on page 90 CAUTION The drum unit contains toner, so handle it lock into the drum unit until you put it off the machine's power switch. DO NOT use cleaning materials that contain ammonia, alcohol, ... disconnect all cables, and then unplug the power cord from the AC power outlet. e Put the toner cartridge back into place. f Put the drum unit and toner cartridge assembly back in properly, the green lock lever will lift automatically. For more infomation see Important safety instructions on your hands...


