Basic Users Guide
Page 14
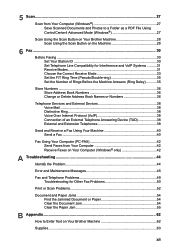
... and Photos to a Folder as a PDF File Using ControlCenter4 Advanced Mode (Windows 27 Scan Using the Scan Button on Your Brother Machine 28 Scan Using the Scan Button on the Machine 28 6 Fax ...30 Before Faxing ...30 Set Your Station ID 30 Set Telephone Line Compatibility for Interference and VoIP... Troubleshooting 44 Identify the Problem 44 Error and Maintenance Messages 45 Fax and Telephone Problems 49 Troubleshooting for Other Fax Problems 50 Print or Scan Problems 52 Document and Paper Jams 54 Find the Jammed Document or Paper 54 Clear the Document Jam 54 Clear the Paper Jam 55 ...
... and Photos to a Folder as a PDF File Using ControlCenter4 Advanced Mode (Windows 27 Scan Using the Scan Button on Your Brother Machine 28 Scan Using the Scan Button on the Machine 28 6 Fax ...30 Before Faxing ...30 Set Your Station ID 30 Set Telephone Line Compatibility for Interference and VoIP... Troubleshooting 44 Identify the Problem 44 Error and Maintenance Messages 45 Fax and Telephone Problems 49 Troubleshooting for Other Fax Problems 50 Print or Scan Problems 52 Document and Paper Jams 54 Find the Jammed Document or Paper 54 Clear the Document Jam 54 Clear the Paper Jam 55 ...

Basic Users Guide
Page 16
... number of copies. 3. Power On/Off • Turn on this Touchscreen. 2. 1 General Information 1 General Information Control Panel Overview 1 2 3 4 00:00 01.01.2014 Fax Copy Scan Shortcuts Settings 1.
... number of copies. 3. Power On/Off • Turn on this Touchscreen. 2. 1 General Information 1 General Information Control Panel Overview 1 2 3 4 00:00 01.01.2014 Fax Copy Scan Shortcuts Settings 1.
Basic Users Guide
Page 18
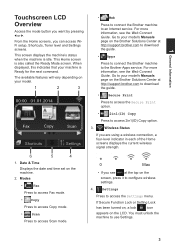
...Modes • Fax Press to access Fax mode. • Copy Press to access Copy mode. • Scan Press to access Scan mode. • Web Press to connect the Brother machine to use Settings. 3 You must unlock the machine to an Internet service. The available features will vary...Settings Press to the Brother Apps service. This Home screen is idle. If Secure Function Lock or Setting Lock has been turned on, a lock icon appears on the machine. 2. When displayed, this indicates that your model. 1 2 3 00:00 01.01.2014 Fax Copy Scan Shortcuts Settings 6 5...
...Modes • Fax Press to access Fax mode. • Copy Press to access Copy mode. • Scan Press to access Scan mode. • Web Press to connect the Brother machine to use Settings. 3 You must unlock the machine to an Internet service. The available features will vary...Settings Press to the Brother Apps service. This Home screen is idle. If Secure Function Lock or Setting Lock has been turned on, a lock icon appears on the machine. 2. When displayed, this indicates that your model. 1 2 3 00:00 01.01.2014 Fax Copy Scan Shortcuts Settings 6 5...

Basic Users Guide
Page 19
...faxes in the power cord or turning on the LCD to create Shortcuts for frequentlyused operations such as sending a fax, making a copy, scanning and using Web Connect. • Three Shortcuts screens are available. • To display the other Shortcuts screens, press d or c. Shortcuts... Press to scroll through changing a machine setting. Press Print to navigate through them. Detail Fax Copy Scan Shortcuts Settings The warning icon appears when there is Open. The following steps explain how to print the faxes. press Detail to Med....
...faxes in the power cord or turning on the LCD to create Shortcuts for frequentlyused operations such as sending a fax, making a copy, scanning and using Web Connect. • Three Shortcuts screens are available. • To display the other Shortcuts screens, press d or c. Shortcuts... Press to scroll through changing a machine setting. Press Print to navigate through them. Detail Fax Copy Scan Shortcuts Settings The warning icon appears when there is Open. The following steps explain how to print the faxes. press Detail to Med....

Basic Users Guide
Page 38
Option Description Scan Press Scan to print the second side. Copy a 2-sided Document Using the ADF Related Models: MFC-L2740DW You must choose a 2-sided copy layout from the following layout options, and then press the option you can start 2-sided... b to display the following options before you want. • 1-sided->2-sided Long Edge Flip • 1-sided->2-sided Short Edge Flip 8 Press OK. 9 Press Start to scan the page. Portrait 2-sided > 2-sided 1 1 2 2 Landscape 2-sided > 2-sided 1 1 2 2 1 Make sure you have loaded the correct size paper in the paper tray...
Option Description Scan Press Scan to print the second side. Copy a 2-sided Document Using the ADF Related Models: MFC-L2740DW You must choose a 2-sided copy layout from the following layout options, and then press the option you can start 2-sided... b to display the following options before you want. • 1-sided->2-sided Long Edge Flip • 1-sided->2-sided Short Edge Flip 8 Press OK. 9 Press Start to scan the page. Portrait 2-sided > 2-sided 1 1 2 2 Landscape 2-sided > 2-sided 1 1 2 2 1 Make sure you have loaded the correct size paper in the paper tray...

Basic Users Guide
Page 39
The machine feeds and scans the pages and starts printing. Copy a 2-sided Document Using the Scanner Glass You must choose a 2-sided copy layout from the following layout options, and then .... 3 Press (Copy). 4 Enter the number of copies. 5 Press Options. 6 Press a or b to display the 2-sided Copy option, and then press 2-sided Copy. 7 Press a or b to scan the page.
The machine feeds and scans the pages and starts printing. Copy a 2-sided Document Using the Scanner Glass You must choose a 2-sided copy layout from the following layout options, and then .... 3 Press (Copy). 4 Enter the number of copies. 5 Press Options. 6 Press a or b to display the 2-sided Copy option, and then press 2-sided Copy. 7 Press a or b to scan the page.

Basic Users Guide
Page 40
..., and then press 2in1(ID)Copy. 3 Enter the number of the scanner glass. 1 4 Copy 1 0.16 in. (4.0 mm) or greater (top, left) 2 Press d or c to scan the next page. For more information, see the Product Safety Guide. 1 Place your identification card face down near the upper left corner of copies. 25... Complete Press Complete when you have scanned all the pages. • Copy an identification card only to copy both sides of an ID Card onto One Page Use the 2in1 (ID) ...
..., and then press 2in1(ID)Copy. 3 Enter the number of the scanner glass. 1 4 Copy 1 0.16 in. (4.0 mm) or greater (top, left) 2 Press d or c to scan the next page. For more information, see the Product Safety Guide. 1 Place your identification card face down near the upper left corner of copies. 25... Complete Press Complete when you have scanned all the pages. • Copy an identification card only to copy both sides of an ID Card onto One Page Use the 2in1 (ID) ...

Basic Users Guide
Page 41
The machine scans one side of the identification card. 5 After the machine has scanned the first side, press Yes. 6 Turn over the identification card and press OK to scan the other side. 26 4 Press Start.
The machine scans one side of the identification card. 5 After the machine has scanned the first side, press Yes. 6 Turn over the identification card and press OK to scan the other side. 26 4 Press Start.

Basic Users Guide
Page 42
...Advanced Mode (Windows®) Scan documents and save them to scan photos and documents on your computer as PDF files. 2 Click Start > All Programs > Brother > Brother Utilities, and then click the drop-down list and select your favorite scanning application. The ControlCenter4 application opens.... 3 When you can use your model name (if not already selected). 5 Scan Scan from Your Computer (Windows®) ...
...Advanced Mode (Windows®) Scan documents and save them to scan photos and documents on your computer as PDF files. 2 Click Start > All Programs > Brother > Brother Utilities, and then click the drop-down list and select your favorite scanning application. The ControlCenter4 application opens.... 3 When you can use your model name (if not already selected). 5 Scan Scan from Your Computer (Windows®) ...

Basic Users Guide
Page 43
... the document face down on the Machine 6 Change the scan settings if needed, and then click Scan. The scan settings dialog box appears. Scan Using the Scan Button on Your Brother Machine Scan Using the Scan Button on the scanner glass. 2 Press (Scan). 28 5 Click the File button. The machine scans the document and saves the file in the ADF...
... the document face down on the Machine 6 Change the scan settings if needed, and then click Scan. The scan settings dialog box appears. Scan Using the Scan Button on Your Brother Machine Scan Using the Scan Button on the scanner glass. 2 Press (Scan). 28 5 Click the File button. The machine scans the document and saves the file in the ADF...
Basic Users Guide
Page 44
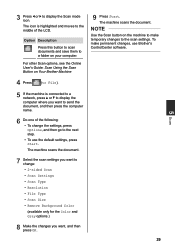
... to change the settings, press Options, and then go to File). 9 Press Start. Option Description Press this button to scan documents and save them to a folder on Your Brother Machine 4 Press (to the next step. • To use the default settings, press Start. To make temporary changes... one of the LCD. The icon is connected to a network, press a or b to display the computer where you want to the scan settings. NOTE Use the Scan button on the machine to make permanent changes, use Brother's ControlCenter software. 5 Scan 5 If the machine is highlighted and moves to display the...
... to change the settings, press Options, and then go to File). 9 Press Start. Option Description Press this button to scan documents and save them to a folder on Your Brother Machine 4 Press (to the next step. • To use the default settings, press Start. To make temporary changes... one of the LCD. The icon is connected to a network, press a or b to display the computer where you want to the scan settings. NOTE Use the Scan button on the machine to make permanent changes, use Brother's ControlCenter software. 5 Scan 5 If the machine is highlighted and moves to display the...

Basic Users Guide
Page 51
...then press OK. e. Change or Delete Address Book Names or Numbers Related Models: MFC-L2720DW/MFC-L2740DW 1 Press Edit. (Fax) > Address Book > 2 Do one of the following steps: a. Store Numbers Related Models: MFC-L2720DW/MFC-L2740DW Store fax and telephone numbers in the machine's memory will not be lost. ...Press Add New Address. Press Name. Enter the new fax or telephone number (up to 20 digits) using the LCD (up to 200 Addresses with Internet Fax or Scan to display...
...then press OK. e. Change or Delete Address Book Names or Numbers Related Models: MFC-L2720DW/MFC-L2740DW 1 Press Edit. (Fax) > Address Book > 2 Do one of the following steps: a. Store Numbers Related Models: MFC-L2720DW/MFC-L2740DW Store fax and telephone numbers in the machine's memory will not be lost. ...Press Add New Address. Press Name. Enter the new fax or telephone number (up to 20 digits) using the LCD (up to 200 Addresses with Internet Fax or Scan to display...

Basic Users Guide
Page 56
5 Press Fax Start. If you have scanned the last page, press the No option. The machine sends the document. To stop faxing, press . 6 Fax 41 No After you placed the document on the scanner glass. Press OK to scan the page. The machine scans and sends the document. Option Description Yes To scan the next page, press the Yes option, and then place the next page on the scanner glass, follow the instructions in the table.
5 Press Fax Start. If you have scanned the last page, press the No option. The machine sends the document. To stop faxing, press . 6 Fax 41 No After you placed the document on the scanner glass. Press OK to scan the page. The machine scans and sends the document. Option Description Yes To scan the next page, press the Yes option, and then place the next page on the scanner glass, follow the instructions in the table.
Basic Users Guide
Page 60
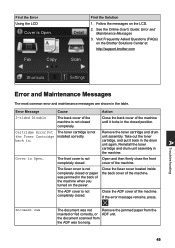
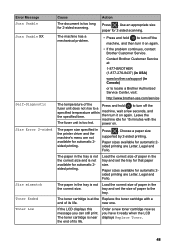
... then firmly close the front cover of the machine. Close the fuser cover located inside the back cover of the machine. the document scanned from the ADF was not Remove the jammed paper from the inserted or fed correctly, or ADF unit. Error Message 2-sided Disable Cartridge...Put the Toner Cartridge back in the machine. Cause The back cover of the machine when you turned on the Brother Solutions Center at http://support.brother.com Scan A Troubleshooting Shortcuts Settings Error and Maintenance Messages The most common error and maintenance messages are shown in the back of...
... then firmly close the front cover of the machine. Close the fuser cover located inside the back cover of the machine. the document scanned from the ADF was not Remove the jammed paper from the inserted or fed correctly, or ADF unit. Error Message 2-sided Disable Cartridge...Put the Toner Cartridge back in the machine. Cause The back cover of the machine when you turned on the Brother Solutions Center at http://support.brother.com Scan A Troubleshooting Shortcuts Settings Error and Maintenance Messages The most common error and maintenance messages are shown in the back of...
Basic Users Guide
Page 63
...the specified time. The paper in the tray is not Load the correct size of paper in Canada) or to locate a Brother Authorized Service Center, visit: http://www.brother-usa.com/service The temperature of its life. tray and set the tray for automatic 2sided printing are not available for automatic...USA) www.brother.ca/support (in the the correct size. The paper in the printer driver and the machine's menu are Letter, Legal and Folio. Load the correct size of paper in the tray and set the size of its life. Use an appropriate size paper for 2‑sided scanning. new ...
...the specified time. The paper in the tray is not Load the correct size of paper in Canada) or to locate a Brother Authorized Service Center, visit: http://www.brother-usa.com/service The temperature of its life. tray and set the tray for automatic 2sided printing are not available for automatic...USA) www.brother.ca/support (in the the correct size. The paper in the printer driver and the machine's menu are Letter, Legal and Folio. Load the correct size of paper in the tray and set the size of its life. Use an appropriate size paper for 2‑sided scanning. new ...
Basic Users Guide
Page 67
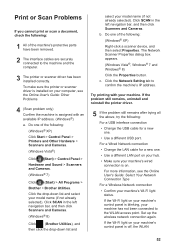
...up the wireless network connection again. Click SCAN in the left navigation bar, and then click Scanners and Cameras. (Windows® 8) Click (Brother Utilities), and then click the drop-down list and select your machine. Click SCAN in the left navigation bar, and then ... and Sound > Scanners and Cameras. (Windows® 7) Click (Start) > All Programs > Brother > Brother Utilities. Click the Network Setting tab to the WLAN access point. Print or Scan Problems If you cannot print or scan a document, check the following: 1 All of the following: (Windows® XP) Right-click...
...up the wireless network connection again. Click SCAN in the left navigation bar, and then click Scanners and Cameras. (Windows® 8) Click (Brother Utilities), and then click the drop-down list and select your machine. Click SCAN in the left navigation bar, and then ... and Sound > Scanners and Cameras. (Windows® 7) Click (Start) > All Programs > Brother > Brother Utilities. Click the Network Setting tab to the WLAN access point. Print or Scan Problems If you cannot print or scan a document, check the following: 1 All of the following: (Windows® XP) Right-click...
Basic Users Guide
Page 79
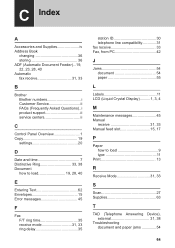
... Accessories and Supplies iv Address Book changing 36 storing 36 ADF (Automatic Document Feeder)...19, 22, 23, 28, 40 Automatic fax receive 31, 33 B Brother Brother numbers i Customer Service ii FAQs (Frequently Asked Questions)..i product support ii service centers ii C Control Panel Overview 1 Copy 19 settings 20 D Date and...Maintenance messages 45 Manual receive 31, 33 Manual feed slot 15, 17 P Paper how to load 9 type 11 Print 13 R Receive Mode 31, 33 S Scan 27 Supplies 63 T TAD (Telephone Answering Device), external 31, 38 Troubleshooting document and paper jams 54 64
... Accessories and Supplies iv Address Book changing 36 storing 36 ADF (Automatic Document Feeder)...19, 22, 23, 28, 40 Automatic fax receive 31, 33 B Brother Brother numbers i Customer Service ii FAQs (Frequently Asked Questions)..i product support ii service centers ii C Control Panel Overview 1 Copy 19 settings 20 D Date and...Maintenance messages 45 Manual receive 31, 33 Manual feed slot 15, 17 P Paper how to load 9 type 11 Print 13 R Receive Mode 31, 33 S Scan 27 Supplies 63 T TAD (Telephone Answering Device), external 31, 38 Troubleshooting document and paper jams 54 64

Basic Users Guide
Page 80
Disclaimer v 65 C Index Error and Maintenance Messages . 45 fax and telephone problems ...........49 print or scan problems 52 V Voice Mail 33, 38 VoIP systems 31, 38 Volume 7 W Warranties Notice -
Disclaimer v 65 C Index Error and Maintenance Messages . 45 fax and telephone problems ...........49 print or scan problems 52 V Voice Mail 33, 38 VoIP systems 31, 38 Volume 7 W Warranties Notice -
Quick Setup Guide
Page 2
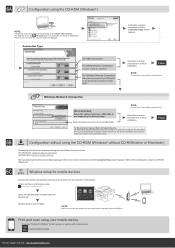
...not have a USB cable to use network tools/utilities securely and to protect your machine with your mobile device, download "Brother iPrint&Scan." Follow the on -screen instructions until the Connection Type screen appears. For Wireless Network Connection We recommend preparing a USB... cable to use your machine with mobile devices. Print and scan using your mobile device Download "Brother iPrint&Scan" to start .exe. Connection Type For USB Connection For Wired Network Connection Connect a network cable first. Follow...
...not have a USB cable to use network tools/utilities securely and to protect your machine with your mobile device, download "Brother iPrint&Scan." Follow the on -screen instructions until the Connection Type screen appears. For Wireless Network Connection We recommend preparing a USB... cable to use your machine with mobile devices. Print and scan using your mobile device Download "Brother iPrint&Scan" to start .exe. Connection Type For USB Connection For Wired Network Connection Connect a network cable first. Follow...


