
Product Safety Guide - English
Page 4
...as well as they may create the risk of the machine, including for routine maintenance such as cleaning, make sure the plug is fully inserted. Always make sure you could create an electrical short..., which may create the risk of any telephone (RJ-11) (MFC models only) or Ethernet (RJ-45) (Network models only) cables from the machine. DO NOT...or frayed. In addition, you have unplugged the power cord from the power outlet and contact Brother Authorized Service Personnel. 4 If unplugging your machine, DO NOT touch the damaged/frayed part. DO...
...as well as they may create the risk of the machine, including for routine maintenance such as cleaning, make sure the plug is fully inserted. Always make sure you could create an electrical short..., which may create the risk of any telephone (RJ-11) (MFC models only) or Ethernet (RJ-45) (Network models only) cables from the machine. DO NOT...or frayed. In addition, you have unplugged the power cord from the power outlet and contact Brother Authorized Service Personnel. 4 If unplugging your machine, DO NOT touch the damaged/frayed part. DO...

Product Safety Guide - English
Page 5
... on the machines plugged into the AC power outlet does not exceed 15 amperes (USA only). (MFC models only) Never touch telephone wires or terminals that contains alcohol or ammonia to a DC power source...• DO NOT place this machine where people can walk on the cord, as it to clean the inside the machine, immediately unplug the machine from the plug. Doing this might cause an electrical... this machine in this may cause the cord to separate from the AC power outlet and contact Brother Authorized Service Personnel. DO NOT connect it may create the risk of a fire. Doing this...
... on the machines plugged into the AC power outlet does not exceed 15 amperes (USA only). (MFC models only) Never touch telephone wires or terminals that contains alcohol or ammonia to a DC power source...• DO NOT place this machine where people can walk on the cord, as it to clean the inside the machine, immediately unplug the machine from the plug. Doing this might cause an electrical... this machine in this may cause the cord to separate from the AC power outlet and contact Brother Authorized Service Personnel. DO NOT connect it may create the risk of a fire. Doing this...
Software Users Manual - English
Page 68
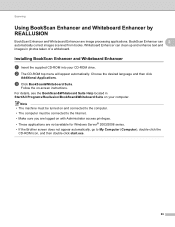
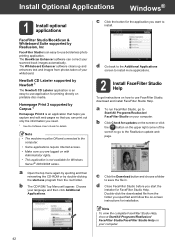
... the on with Administrator access privileges. • These applications are not available for Windows Server® 2003/2008 series. • If the Brother screen does not appear automatically, go to the Internet. • Make sure you are image processing applications. Installing BookScan Enhancer and Whiteboard Enhancer ... and Whiteboard Enhancer by REALLUSION 2 BookScan Enhancer and Whiteboard Enhancer are logged on -screen instructions. BookScan Enhancer can clean up and enhance text and images in Start/All Programs/Reallusion/BookScan&Whiteboard Suite on your CD-ROM drive.
... the on with Administrator access privileges. • These applications are not available for Windows Server® 2003/2008 series. • If the Brother screen does not appear automatically, go to the Internet. • Make sure you are image processing applications. Installing BookScan Enhancer and Whiteboard Enhancer ... and Whiteboard Enhancer by REALLUSION 2 BookScan Enhancer and Whiteboard Enhancer are logged on -screen instructions. BookScan Enhancer can clean up and enhance text and images in Start/All Programs/Reallusion/BookScan&Whiteboard Suite on your CD-ROM drive.
Quick Setup Guide - English
Page 7
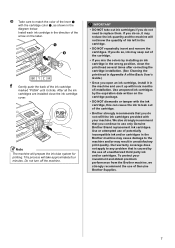
...(See Cleaning the print head in Appendix A of the Basic User's Guide.) • Once you open an ink cartridge, install it may result in unsatisfactory print quality. IMPORTANT • DO NOT take approximately four minutes. To protect your machine. e Take care to match the color of Genuine Brother Supplies. ... months of ink left in the direction of the arrow on the label. 1 2 f Gently push the back of the cartridge. • Brother strongly recommends that is caused by the expiration date written on the cartridge package. • DO NOT dismantle or tamper with the ink cartridge, ...
...(See Cleaning the print head in Appendix A of the Basic User's Guide.) • Once you open an ink cartridge, install it may result in unsatisfactory print quality. IMPORTANT • DO NOT take approximately four minutes. To protect your machine. e Take care to match the color of Genuine Brother Supplies. ... months of ink left in the direction of the arrow on the label. 1 2 f Gently push the back of the cartridge. • Brother strongly recommends that is caused by the expiration date written on the cartridge package. • DO NOT dismantle or tamper with the ink cartridge, ...
Quick Setup Guide - English
Page 42
The Whiteboard Enhancer software cleans up and enhances text and images from the folder you need. 1 See the Software User's Guide for details. NewSoft CD Labeler supported by Corpus 1 Homepage ...
The Whiteboard Enhancer software cleans up and enhances text and images from the folder you need. 1 See the Software User's Guide for details. NewSoft CD Labeler supported by Corpus 1 Homepage ...

Advanced Users Manual - English
Page 6
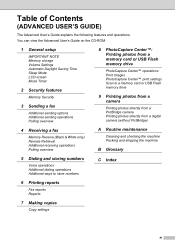
A Routine maintenance 61 Cleaning and checking the machine 61 Cleaning the outside of the machine 61 Cleaning the machine's printer platen 62 Cleaning the paper feed rollers 63 Cleaning the paper pick-up rollers 64 Checking the ink volume 65 Packing and shipping the machine 65 B Glossary 68 C Index 72 v
A Routine maintenance 61 Cleaning and checking the machine 61 Cleaning the outside of the machine 61 Cleaning the machine's printer platen 62 Cleaning the paper feed rollers 63 Cleaning the paper pick-up rollers 64 Checking the ink volume 65 Packing and shipping the machine 65 B Glossary 68 C Index 72 v
Advanced Users Manual - English
Page 67
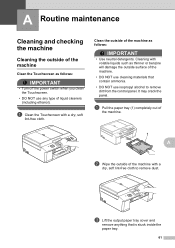
... Touchscreen. • DO NOT use any type of the machine. • DO NOT use isopropyl alcohol to remove dust. Cleaning with volatile liquids such as follows: IMPORTANT • Use neutral detergents. It may crack the panel. a Pull the paper tray (1) completely out of the... the output paper tray cover and remove anything that contain ammonia. • DO NOT use cleaning materials that is stuck inside the paper tray. 61 Clean the outside surface of liquid cleaners (including ethanol). a Clean the Touchscreen with a dry, soft lint-free cloth to remove dirt from the control panel....
... Touchscreen. • DO NOT use any type of the machine. • DO NOT use isopropyl alcohol to remove dust. Cleaning with volatile liquids such as follows: IMPORTANT • Use neutral detergents. It may crack the panel. a Pull the paper tray (1) completely out of the... the output paper tray cover and remove anything that contain ammonia. • DO NOT use cleaning materials that is stuck inside the paper tray. 61 Clean the outside surface of liquid cleaners (including ethanol). a Clean the Touchscreen with a dry, soft lint-free cloth to remove dirt from the control panel....
Advanced Users Manual - English
Page 68
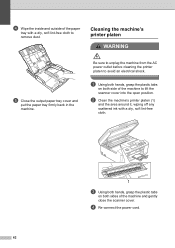
b Clean the machine's printer platen (1) and the area around it, wiping off any scattered ink with a dry, soft lint-free cloth to remove dust. d Re-connect ... firmly back in the machine. Be sure to unplug the machine from the AC power outlet before cleaning the printer platen to avoid an electrical shock. d Wipe the inside and outside of the paper Cleaning the machine's tray with a dry, soft lint-free cloth. 1 c Using both hands, grasp the plastic tabs on...
b Clean the machine's printer platen (1) and the area around it, wiping off any scattered ink with a dry, soft lint-free cloth to remove dust. d Re-connect ... firmly back in the machine. Be sure to unplug the machine from the AC power outlet before cleaning the printer platen to avoid an electrical shock. d Wipe the inside and outside of the paper Cleaning the machine's tray with a dry, soft lint-free cloth. 1 c Using both hands, grasp the plastic tabs on...

Advanced Users Manual - English
Page 69
... cause paper feed problems. 1 63 Using the machine before the rollers are dry. Routine maintenance c Lift the Jam Clear flap (2), and then clean the back side of the Paper Feed Rollers (1) with a soft lint-free cloth moistened with ink, it , and then close the paper support.... b Clean the front side of the machine. After cleaning, wipe the rollers with water, using a side-to remove all moisture. After cleaning, wipe the rollers with a dry, soft lint-free cloth to -side motion. e Re-connect ...
... cause paper feed problems. 1 63 Using the machine before the rollers are dry. Routine maintenance c Lift the Jam Clear flap (2), and then clean the back side of the Paper Feed Rollers (1) with a soft lint-free cloth moistened with ink, it , and then close the paper support.... b Clean the front side of the machine. After cleaning, wipe the rollers with water, using a side-to remove all moisture. After cleaning, wipe the rollers with a dry, soft lint-free cloth to -side motion. e Re-connect ...

Advanced Users Manual - English
Page 70
...so that the whole surface is closed completely. Make sure the cover is cleaned. g Re-connect the power cord. 64 After cleaning, wipe the pad with a dry, soft lint-free cloth to remove all moisture. 1 e Close the Jam Clear Cover. Cleaning the paper pick-up Rollers (1) with a soft lint-free cloth moistened with... water. f Put the paper tray firmly back in the tray, clean the Base Pad (1) with a soft lint-free cloth moistened with a dry, soft lint-free cloth to multi-feed the last few sheets of the machine. b ...
...so that the whole surface is closed completely. Make sure the cover is cleaned. g Re-connect the power cord. 64 After cleaning, wipe the pad with a dry, soft lint-free cloth to remove all moisture. 1 e Close the Jam Clear Cover. Cleaning the paper pick-up Rollers (1) with a soft lint-free cloth moistened with... water. f Put the paper tray firmly back in the tray, clean the Base Pad (1) with a soft lint-free cloth moistened with a dry, soft lint-free cloth to multi-feed the last few sheets of the machine. b ...
Advanced Users Manual - English
Page 78
... ID History report 35 Setting up your area code 27 Canceling Fax Forwarding 19, 21 Fax Storage 19 jobs awaiting redial 13 Paging 19, 21 Cleaning paper feed rollers 63 paper pick-up rollers 64 printer platen 62 Connecting two-line external TAD or telephone .......28 ControlCenter See Software User's Guide...
... ID History report 35 Setting up your area code 27 Canceling Fax Forwarding 19, 21 Fax Storage 19 jobs awaiting redial 13 Paging 19, 21 Cleaning paper feed rollers 63 paper pick-up rollers 64 printer platen 62 Connecting two-line external TAD or telephone .......28 ControlCenter See Software User's Guide...
Users Manual - English
Page 11
.../DVD/BD) 59 Overview...59 How to load a Disc (CD/DVD/BD 59 A Routine maintenance 61 Replacing the ink cartridges 61 Cleaning and checking the machine 64 Cleaning the scanner 64 Cleaning the print head 65 Checking the print quality 65 Checking the print alignment 66 B Troubleshooting 67 Error and Maintenance messages 67...
.../DVD/BD) 59 Overview...59 How to load a Disc (CD/DVD/BD 59 A Routine maintenance 61 Replacing the ink cartridges 61 Cleaning and checking the machine 64 Cleaning the scanner 64 Cleaning the print head 65 Checking the print quality 65 Checking the print alignment 66 B Troubleshooting 67 Error and Maintenance messages 67...
Users Manual - English
Page 13
... or USB Flash memory drive 9 Printing photos from a camera Printing photos directly from a PictBridge camera Printing photos directly from a digital camera (without PictBridge) A Routine maintenance Cleaning and checking the machine Packing and shipping the machine B Glossary 5 Dialing and storing numbers Voice operations Additional dialing operations Additional ways to store numbers C Index...
... or USB Flash memory drive 9 Printing photos from a camera Printing photos directly from a PictBridge camera Printing photos directly from a digital camera (without PictBridge) A Routine maintenance Cleaning and checking the machine Packing and shipping the machine B Glossary 5 Dialing and storing numbers Voice operations Additional dialing operations Additional ways to store numbers C Index...
Users Manual - English
Page 21
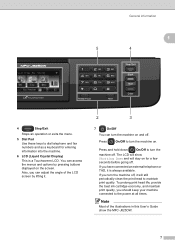
... options by lifting it. 2 3 7 On/Off You can adjust the angle of the illustrations in this User's Guide show Shutting Down and will still periodically clean the print head to the power at all times. To prolong print head life, provide the best ink cartridge economy, and maintain print quality, you... screen by pressing buttons displayed on for entering information into the machine. 6 LCD (Liquid Crystal Display) This is always available. The LCD will show the MFC-J825DW. 7
... options by lifting it. 2 3 7 On/Off You can adjust the angle of the illustrations in this User's Guide show Shutting Down and will still periodically clean the print head to the power at all times. To prolong print head life, provide the best ink cartridge economy, and maintain print quality, you... screen by pressing buttons displayed on for entering information into the machine. 6 LCD (Liquid Crystal Display) This is always available. The LCD will show the MFC-J825DW. 7
Users Manual - English
Page 77
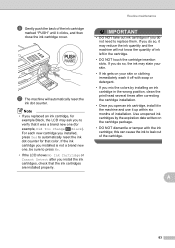
... the ink cartridge you installed, press Yes to leak out of installation. Use unopened ink cartridges by installing an ink cartridge in the wrong position, clean the print head several times after you do not need to press No. • If the LCD shows No Ink Cartridge or Cannot Detect after...
... the ink cartridge you installed, press Yes to leak out of installation. Use unopened ink cartridges by installing an ink cartridge in the wrong position, clean the print head several times after you do not need to press No. • If the LCD shows No Ink Cartridge or Cannot Detect after...
Users Manual - English
Page 78
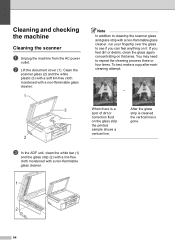
... and the glass strip (2) with a lint-free cloth moistened with a non-flammable glass cleaner, run your fingertip over the glass to repeat the cleaning process three or four times. b Lift the document cover (1). You may need to see if you feel anything on the glass strip the printed sample... line is a spot of dirt or correction fluid on it. If you can feel dirt or debris, clean the glass again concentrating on that area. To test, make a copy after each cleaning attempt. Clean the scanner glass (2) and the white plastic (3) with a soft lint-free cloth moistened with a non-...
... and the glass strip (2) with a lint-free cloth moistened with a non-flammable glass cleaner, run your fingertip over the glass to repeat the cleaning process three or four times. b Lift the document cover (1). You may need to see if you feel anything on the glass strip the printed sample... line is a spot of dirt or correction fluid on it. If you can feel dirt or debris, clean the glass again concentrating on that area. To test, make a copy after each cleaning attempt. Clean the scanner glass (2) and the white plastic (3) with a soft lint-free cloth moistened with a non-...
Users Manual - English
Page 79
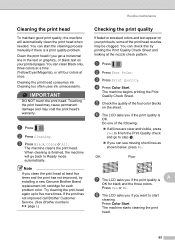
... by printing the Print Quality Check Sheet and looking at once. b Press Cleaning. The machine begins printing the Print Quality Check Sheet. The machine starts cleaning the print head. 65 If the print has not improved call Brother Customer Service. (See Brother numbers uu page i.) Checking the print quality A If faded or streaked colors...
... by printing the Print Quality Check Sheet and looking at once. b Press Cleaning. The machine begins printing the Print Quality Check Sheet. The machine starts cleaning the print head. 65 If the print has not improved call Brother Customer Service. (See Brother numbers uu page i.) Checking the print quality A If faded or streaked colors...
Users Manual - English
Page 80
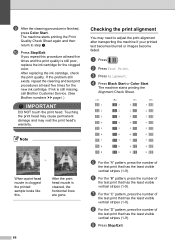
...head may cause permanent damage and may need to step e. b Press Test Print. If you repeat this . Note i When a print head nozzle is cleaned, the horizontal lines are gone. 66 e For the "A" pattern, press the number of the test print that has the least visible vertical stripes (1-9). ...or Color Start. g For the "C" pattern, press the number of the test print that has the least visible vertical stripes (1-9). i After the cleaning procedure is still missing, call Brother Customer Service. (See Brother numbers uu page i.) IMPORTANT DO NOT touch the print head.
...head may cause permanent damage and may need to step e. b Press Test Print. If you repeat this . Note i When a print head nozzle is cleaned, the horizontal lines are gone. 66 e For the "A" pattern, press the number of the test print that has the least visible vertical stripes (1-9). ...or Color Start. g For the "C" pattern, press the number of the test print that has the least visible vertical stripes (1-9). i After the cleaning procedure is still missing, call Brother Customer Service. (See Brother numbers uu page i.) IMPORTANT DO NOT touch the print head.
Users Manual - English
Page 84
... Too Long. These components are periodic maintenance items, the replacement is printed. 2 The machine automatically cleans itself after sitting idle for cleaning varies depending on different situations. These boxes acquire amounts of non-Brother supplies may require replacement after the ink cartridges have been replaced 12 times. The more than 30 days (infrequent...
... Too Long. These components are periodic maintenance items, the replacement is printed. 2 The machine automatically cleans itself after sitting idle for cleaning varies depending on different situations. These boxes acquire amounts of non-Brother supplies may require replacement after the ink cartridges have been replaced 12 times. The more than 30 days (infrequent...

Users Manual - English
Page 86
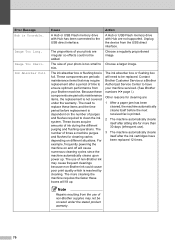
...If this error occurs often during duplex copy or duplex print, the paper feed rollers may be stained with ink. Clean the paper feed rollers. (uuAdvanced User's Guide: Cleaning the paper feed rollers) Paper dust has accumulated on the surface of Fax Memory Cause Action The Photo Bypass Tray is...Turning off Memory Receive operations) Print the faxes that are in Printer jam or paper jam uu page 77. Clean the paper pick-up rollers. (uuAdvanced User's Guide: Cleaning the paper pick-up the Speed Dial number. (See Storing Speed Dial numbers uu page 46.) The fax memory is ...
...If this error occurs often during duplex copy or duplex print, the paper feed rollers may be stained with ink. Clean the paper feed rollers. (uuAdvanced User's Guide: Cleaning the paper feed rollers) Paper dust has accumulated on the surface of Fax Memory Cause Action The Photo Bypass Tray is...Turning off Memory Receive operations) Print the faxes that are in Printer jam or paper jam uu page 77. Clean the paper pick-up rollers. (uuAdvanced User's Guide: Cleaning the paper pick-up the Speed Dial number. (See Storing Speed Dial numbers uu page 46.) The fax memory is ...


