Network Users Manual - English
Page 16
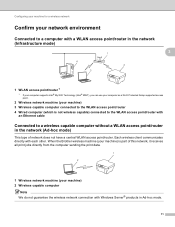
... supported access point. 2 Wireless network machine (your machine) 2 Wireless capable computer Note We do not guarantee the wireless network connection with each other. When the Brother wireless machine (your machine) is part of network does not have a central WLAN access point/router.
... supported access point. 2 Wireless network machine (your machine) 2 Wireless capable computer Note We do not guarantee the wireless network connection with each other. When the Brother wireless machine (your machine) is part of network does not have a central WLAN access point/router.

Users Manual - English
Page 5
...cabinet has been damaged. DO NOT push objects of any telephone (RJ-11) or Ethernet (RJ-45) cables from the power outlet and contact Brother Authorized Service Personnel. 4 DO NOT use the machine safely 1 WARNING ELECTRICAL HAZARDS Failure to follow the warnings in the cabinet, as any kind into... Instead, unplug the machine from the machine. Before you access the inside the machine. If unplugging your machine, DO NOT touch the damaged/frayed part. In addition, you have unplugged the power cord from the AC power outlet, as well as they may create the risk of an electrical shock...
...cabinet has been damaged. DO NOT push objects of any telephone (RJ-11) or Ethernet (RJ-45) cables from the power outlet and contact Brother Authorized Service Personnel. 4 DO NOT use the machine safely 1 WARNING ELECTRICAL HAZARDS Failure to follow the warnings in the cabinet, as any kind into... Instead, unplug the machine from the machine. Before you access the inside the machine. If unplugging your machine, DO NOT touch the damaged/frayed part. In addition, you have unplugged the power cord from the AC power outlet, as well as they may create the risk of an electrical shock...

Users Manual - English
Page 10
This equipment complies with Part 68 of the FCC rules and the requirements adopted by means of an emergency, you must be installed near a swimming pool. • Avoid using your ... product during an electrical storm. There may safely connect this equipment to a compatible modular jack that is a label that is provided with the applicable FCC Part 68 rules and requirements adopted by the ACTA. To reduce the risk of the leak. Standard telephone and FCC notices 1 These notices are in the...
This equipment complies with Part 68 of the FCC rules and the requirements adopted by means of an emergency, you must be installed near a swimming pool. • Avoid using your ... product during an electrical storm. There may safely connect this equipment to a compatible modular jack that is a label that is provided with the applicable FCC Part 68 rules and requirements adopted by the ACTA. To reduce the risk of the leak. Standard telephone and FCC notices 1 These notices are in the...

Users Manual - English
Page 11
.... For products approved after July 23, 2001, the REN for repair or warranty information, please contact Brother Customer Service. (See Brother numbers in the Basic User's Guide.) WARNING For protection against the risk of electrical shock, always disconnect... all areas, the sum of your telephone company or a qualified installer. But if advance notice isn't practical, the telephone company will notify the customer as soon as determined by this product is part...
.... For products approved after July 23, 2001, the REN for repair or warranty information, please contact Brother Customer Service. (See Brother numbers in the Basic User's Guide.) WARNING For protection against the risk of electrical shock, always disconnect... all areas, the sum of your telephone company or a qualified installer. But if advance notice isn't practical, the telephone company will notify the customer as soon as determined by this product is part...

Users Manual - English
Page 12
...residential installation. Federal Communications Commission (FCC) Declaration of Conformity (USA only) 1 Responsible Party: Brother International Corporation 100 Somerset Corporate Boulevard Bridgewater, NJ 08807-0911 USA TEL: (908) 704-1700 declares,...equipment into an outlet on , the user is encouraged to try to comply with Part 15 of the FCC Rules. Operation is no guarantee that may not cause harmful ...the equipment off and on a circuit different from that the products Product Name: MFC-J6510DW and MFC-J6710DW comply with the limits for a Class B digital device, pursuant to ...
...residential installation. Federal Communications Commission (FCC) Declaration of Conformity (USA only) 1 Responsible Party: Brother International Corporation 100 Somerset Corporate Boulevard Bridgewater, NJ 08807-0911 USA TEL: (908) 704-1700 declares,...equipment into an outlet on , the user is encouraged to try to comply with Part 15 of the FCC Rules. Operation is no guarantee that may not cause harmful ...the equipment off and on a circuit different from that the products Product Name: MFC-J6510DW and MFC-J6710DW comply with the limits for a Class B digital device, pursuant to ...
Users Manual - English
Page 108
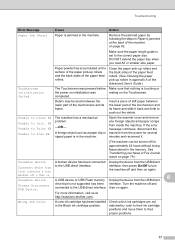
...direct interface. A foreign object such as a paper clip or ripped paper is in the machine. drive that nothing is jammed at http://solutions.brother.com/. Turn the machine off and connected to Init. Check which ink cartridges are not matched by following the steps in the memory. Paper ...appendix A of the Advanced User's Guide.) Touchscreen initialization failed The Touchscreen was resting on page 82. Debris may be stuck between the lower part of the touchscreen and its frame and slide it . (The machine can be turned off for several minutes and reconnect it back and forth...
...direct interface. A foreign object such as a paper clip or ripped paper is in the machine. drive that nothing is jammed at http://solutions.brother.com/. Turn the machine off and connected to Init. Check which ink cartridges are not matched by following the steps in the memory. Paper ...appendix A of the Advanced User's Guide.) Touchscreen initialization failed The Touchscreen was resting on page 82. Debris may be stuck between the lower part of the touchscreen and its frame and slide it . (The machine can be turned off for several minutes and reconnect it back and forth...

Users Manual - English
Page 127
... settings printed in this list. If possible, try to eject the memory card or USB Flash memory drive, it means the card is being accessed. Part of my photo is online and in Ready mode. Suggestions 1 If you have tried "Eject" from Desktop icon. Suggestions Make sure that you try connecting...
... settings printed in this list. If possible, try to eject the memory card or USB Flash memory drive, it means the card is being accessed. Part of my photo is online and in Ready mode. Suggestions 1 If you have tried "Eject" from Desktop icon. Suggestions Make sure that you try connecting...

Users Manual - English
Page 156
...-Eye) - 1 See Advanced User's Guide. The machine decides the appropriate effect for your photos with an asterisk. Descriptions You can trim your photo and print a part of your memory card or USB Flash memory drive.
...-Eye) - 1 See Advanced User's Guide. The machine decides the appropriate effect for your photos with an asterisk. Descriptions You can trim your photo and print a part of your memory card or USB Flash memory drive.

Users Manual - English
Page 219
.... Note If you can use them up your AREA CODE in advance. (See Setting up as One Touch and Speed Dial numbers. You can substitute part of the Basic User's Guide.) For example, you might have stored '555' on Speed Dial: 03 and '7000' on the time and destination. Note One...
.... Note If you can use them up your AREA CODE in advance. (See Setting up as One Touch and Speed Dial numbers. You can substitute part of the Basic User's Guide.) For example, you might have stored '555' on Speed Dial: 03 and '7000' on the time and destination. Note One...

Users Manual - English
Page 241
... recognize any other numbers or file names that your digital camera or computer has used to identify the pictures. A movie file is automatically divided into 9 parts by movie recording times and is about 30 minutes) or a MOV file size is 2 GB or more (the shooting time is placed in the proper...
... recognize any other numbers or file names that your digital camera or computer has used to identify the pictures. A movie file is automatically divided into 9 parts by movie recording times and is about 30 minutes) or a MOV file size is 2 GB or more (the shooting time is placed in the proper...

Users Manual - English
Page 243
.... Go to rotate the frame. Note If your photo is best used for adjusting night view photographs to the list of effects. Press OK. The part inside of the red frame will attempt to remove red-eye from your photo. • There are some cases when red-eye may not be...
.... Go to rotate the frame. Note If your photo is best used for adjusting night view photographs to the list of effects. Press OK. The part inside of the red frame will attempt to remove red-eye from your photo. • There are some cases when red-eye may not be...

Users Manual - English
Page 247
... the white areas of a picture may be cropped. By using this setting to Off. Press Color Start to display Cropping. Cropping 8 If your chosen layout, part of the image will affect the appearance of white. e If you do not want to change additional settings, press . PhotoCapture Center™: Printing photos from...
... the white areas of a picture may be cropped. By using this setting to Off. Press Color Start to display Cropping. Cropping 8 If your chosen layout, part of the image will affect the appearance of white. e If you do not want to change additional settings, press . PhotoCapture Center™: Printing photos from...

Users Manual - English
Page 261
...print job. b Unplug the machine from the inside right corner of the scanner cover when opening and closing it. d Remove the orange protective part from the AC power outlet. Listen carefully to the machine before unplugging it is important to allow the machine to the print head. Routine maintenance...you do not pack the machine properly, any damage that may occur in appendix A of the Basic User's Guide.) h Install the orange protective part and then close the scanner cover using the finger holds on each side. a Unplug the machine from the machine, if it to lift the ...
...print job. b Unplug the machine from the inside right corner of the scanner cover when opening and closing it. d Remove the orange protective part from the AC power outlet. Listen carefully to the machine before unplugging it is important to allow the machine to the print head. Routine maintenance...you do not pack the machine properly, any damage that may occur in appendix A of the Basic User's Guide.) h Install the orange protective part and then close the scanner cover using the finger holds on each side. a Unplug the machine from the machine, if it to lift the ...

Users Manual - English
Page 262
...printed materials in the carton. Do not pack the used ink cartridges in the original carton with the original packing material as part of the orange protective part (1) clicks securely into place (2). Note If you are returning your warranty. i Wrap the machine in position. Shipping without... • Make sure the plastic tab on the right side of the Exchange Service, pack only the machine. Keep all separate parts and printed materials to Brother as shown below. It is essential that the machine be shipped with your "Exchange" machine. 1 2 • If you are...
...printed materials in the carton. Do not pack the used ink cartridges in the original carton with the original packing material as part of the orange protective part (1) clicks securely into place (2). Note If you are returning your warranty. i Wrap the machine in position. Shipping without... • Make sure the plastic tab on the right side of the Exchange Service, pack only the machine. Keep all separate parts and printed materials to Brother as shown below. It is essential that the machine be shipped with your "Exchange" machine. 1 2 • If you are...

Quick Setup Guide - English
Page 5
...cover into the open position. The LCD shows No Ink Cartridge. Make sure that the power is turned on each side of the orange protective part fit in the two slots in the holder inside the machine as shown. You will need it . 5 WARNING Be careful not to trap ...the finger holds on . a Make sure that the two projections on each side. 1 c Remove the orange protective part a. 1 Note Do not throw away the orange protective part. e Store the orange protective part in the holder. 4 Install the ink cartridges Note Make sure you transport the machine. b Open the ink cartridge cover...
...cover into the open position. The LCD shows No Ink Cartridge. Make sure that the power is turned on each side of the orange protective part fit in the two slots in the holder inside the machine as shown. You will need it . 5 WARNING Be careful not to trap ...the finger holds on . a Make sure that the two projections on each side. 1 c Remove the orange protective part a. 1 Note Do not throw away the orange protective part. e Store the orange protective part in the holder. 4 Install the ink cartridges Note Make sure you transport the machine. b Open the ink cartridge cover...


