
Software Users Manual - English
Page 6
... models, MFC-J220, MFC-J265W, MFC-J270W, MFC-J410W and MFC-J415W 171 Quick-Dial (Not available for DCP models, MFC-J220, MFC-J265W, MFC-J270W, MFC-J410W and MFC-J415W 172 Ink Level ...172 11 Remote Setup & PhotoCapture Center® 173 Remote Setup (Not available for DCP models, MFC-J220, MFC-J265W, MFC-J270W, MFC-J410W and MFC-J415W) ...173 PhotoCapture Center®...175 For USB cable users ...175...
... models, MFC-J220, MFC-J265W, MFC-J270W, MFC-J410W and MFC-J415W 171 Quick-Dial (Not available for DCP models, MFC-J220, MFC-J265W, MFC-J270W, MFC-J410W and MFC-J415W 172 Ink Level ...172 11 Remote Setup & PhotoCapture Center® 173 Remote Setup (Not available for DCP models, MFC-J220, MFC-J265W, MFC-J270W, MFC-J410W and MFC-J415W) ...173 PhotoCapture Center®...175 For USB cable users ...175...
Software Users Manual - English
Page 126
...8 For high quality printing, it pauses the Macintosh printing operation, and then continues printing when copying or fax receiving has finished. Be sure to purchase a USB cable (type A/B) that is no longer than 6 feet (2 meters). 8 Printing and Faxing 8 Setting up your Macintosh 8 Note • The screens shown... in the 8 Basic User's Guide before buying paper. IMPORTANT DO NOT connect the machine to a USB port on your operating system and application. • Before you can connect the machine to your Macintosh, you need to read Loading paper ...
...8 For high quality printing, it pauses the Macintosh printing operation, and then continues printing when copying or fax receiving has finished. Be sure to purchase a USB cable (type A/B) that is no longer than 6 feet (2 meters). 8 Printing and Faxing 8 Setting up your Macintosh 8 Note • The screens shown... in the 8 Basic User's Guide before buying paper. IMPORTANT DO NOT connect the machine to a USB port on your operating system and application. • Before you can connect the machine to your Macintosh, you need to read Loading paper ...
Software Users Manual - English
Page 151
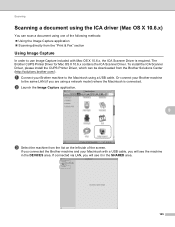
... Printer Driver for Mac OS X 10.6.x contains the ICA Scanner Driver. Or connect your Brother machine to use Image Capture included with a USB cable, you will see it in the DEVICES area. b Launch the Image Capture application. 9 c Select the machine from the "Print & Fax" .../). To install the ICA Scanner Driver, please install the CUPS Printer Driver, which can scan a document using a USB cable. If you connected the Brother machine and your Brother machine to the Macintosh using one of the following methods: Using the Image Capture application Scanning directly ...
... Printer Driver for Mac OS X 10.6.x contains the ICA Scanner Driver. Or connect your Brother machine to use Image Capture included with a USB cable, you will see it in the DEVICES area. b Launch the Image Capture application. 9 c Select the machine from the "Print & Fax" .../). To install the ICA Scanner Driver, please install the CUPS Printer Driver, which can scan a document using a USB cable. If you connected the Brother machine and your Brother machine to the Macintosh using one of the following methods: Using the Image Capture application Scanning directly ...
Software Users Manual - English
Page 154
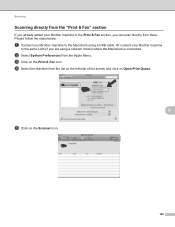
Or connect your Brother machine to the Macintosh using a network model) where the Macintosh is connected. c Click on the Scanner icon. 148 b Select System Preferences from there. d Select the ... Queue. 9 e Click on the Print & Fax icon. Please follow the steps below: a Connect your Brother machine to the same LAN (if you can scan directly from the Apple Menu. Scanning Scanning directly from the "Print & Fax" section 9 If you already added your Brother machine in the Print & Fax section, you are using a USB cable.
Or connect your Brother machine to the Macintosh using a network model) where the Macintosh is connected. c Click on the Scanner icon. 148 b Select System Preferences from there. d Select the ... Queue. 9 e Click on the Print & Fax icon. Please follow the steps below: a Connect your Brother machine to the same LAN (if you can scan directly from the Apple Menu. Scanning Scanning directly from the "Print & Fax" section 9 If you already added your Brother machine in the Print & Fax section, you are using a USB cable.
Software Users Manual - English
Page 181
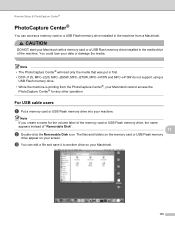
...• The PhotoCapture Center® will read only the media that was put in first. • DCP-J125, MFC-J220, MFC-J265W, MFC-J270W, MFC-J410W and MFC-J415W do not support using a USB Flash memory drive. • While the machine is printing from a Macintosh. The files and folders on the memory ...your machine. Note If you create a name for any other operation. For USB cable users 11 a Put a memory card or USB Flash memory drive into your Macintosh. 175 c You can access a memory card or a USB Flash memory drive installed in the machine from the PhotoCapture Center®, your ...
...• The PhotoCapture Center® will read only the media that was put in first. • DCP-J125, MFC-J220, MFC-J265W, MFC-J270W, MFC-J410W and MFC-J415W do not support using a USB Flash memory drive. • While the machine is printing from a Macintosh. The files and folders on the memory ...your machine. Note If you create a name for any other operation. For USB cable users 11 a Put a memory card or USB Flash memory drive into your Macintosh. 175 c You can access a memory card or a USB Flash memory drive installed in the machine from the PhotoCapture Center®, your ...

Software Users Manual - English
Page 184
Section III Using the Scan key II I USB cable scanning 179 Network Scanning (For models with built-in network support) 187
Section III Using the Scan key II I USB cable scanning 179 Network Scanning (For models with built-in network support) 187
Software Users Manual - English
Page 185
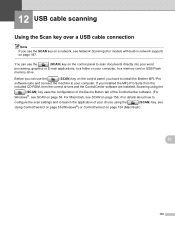
Before you have to install the Brother MFL-Pro software suite and connect the machine to a memory card or USB Flash memory drive. Scanning using the (SCAN) key uses the configuration of the Device Button tab of your choice using the (SCAN) key, see Network ... page 156.) For details about how to configure the scan settings and to a folder on page 154 (Macintosh). 12 179 12 USB cable scanning 12 Using the Scan key over a USB cable connection 12 Note If you installed the MFL-Pro Suite from the included CD-ROM, then the correct drivers and the ControlCenter...
Before you have to install the Brother MFL-Pro software suite and connect the machine to a memory card or USB Flash memory drive. Scanning using the (SCAN) key uses the configuration of the Device Button tab of your choice using the (SCAN) key, see Network ... page 156.) For details about how to configure the scan settings and to a folder on page 154 (Macintosh). 12 179 12 USB cable scanning 12 Using the Scan key over a USB cable connection 12 Note If you installed the MFL-Pro Suite from the included CD-ROM, then the correct drivers and the ControlCenter...
Software Users Manual - English
Page 186
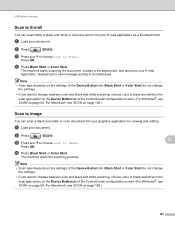
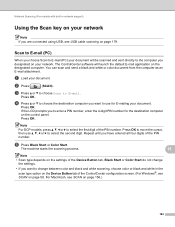
a Load your document. a Load your document. USB cable scanning Scan to E-mail 12 You can scan a black and white or color document into your E-mail application, displaying the new message waiting to be ...
a Load your document. a Load your document. USB cable scanning Scan to E-mail 12 You can scan a black and white or color document into your E-mail application, displaying the new message waiting to be ...
Software Users Manual - English
Page 187
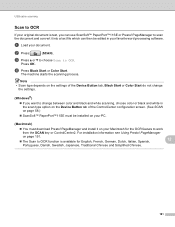
... do not change between color and black and white scanning, choose color or black and white in your favorite word processing software. a Load your document. USB cable scanning Scan to OCR 12 If your original document is available for the OCR feature to work from the SCAN key or ControlCenter2. b Press (SCAN...
... do not change between color and black and white scanning, choose color or black and white in your favorite word processing software. a Load your document. USB cable scanning Scan to OCR 12 If your original document is available for the OCR feature to work from the SCAN key or ControlCenter2. b Press (SCAN...

Software Users Manual - English
Page 188
Press OK. d Press Black Start or Color Start. b Press (SCAN). The machine starts the scanning process. For Macintosh, see File on page 65. USB cable scanning Scan to change the file name of scanned documents, enter the file name in File Name section on the Device Button tab of ControlCenter. (...
Press OK. d Press Black Start or Color Start. b Press (SCAN). The machine starts the scanning process. For Macintosh, see File on page 65. USB cable scanning Scan to change the file name of scanned documents, enter the file name in File Name section on the Device Button tab of ControlCenter. (...

Software Users Manual - English
Page 189
...) or TIFF file formats (*.TIF). For example, the fifth image scanned on the scanner glass, the machine will scan and 12 create three separate files. USB cable scanning Scan to Media 12 You can be stored in . (20 mm) or greater (bottom) 183 Color documents may be previewed on the current date... File Format Options TIFF / PDF TIFF / PDF JPEG / PDF JPEG / PDF JPEG / PDF Default File Format PDF PDF PDF PDF PDF Auto Crop (For MFC-J615W and MFC-J630W) 12 Note Auto Crop feature is supported by technology from Reallusion, Inc. For example, if you choose Auto Crop, the machine will be...
...) or TIFF file formats (*.TIF). For example, the fifth image scanned on the scanner glass, the machine will scan and 12 create three separate files. USB cable scanning Scan to Media 12 You can be stored in . (20 mm) or greater (bottom) 183 Color documents may be previewed on the current date... File Format Options TIFF / PDF TIFF / PDF JPEG / PDF JPEG / PDF JPEG / PDF Default File Format PDF PDF PDF PDF PDF Auto Crop (For MFC-J615W and MFC-J630W) 12 Note Auto Crop feature is supported by technology from Reallusion, Inc. For example, if you choose Auto Crop, the machine will be...
Software Users Manual - English
Page 190
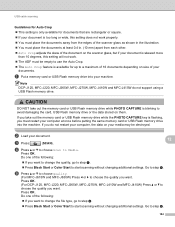
...drive into your machine. b Load your document. 12 c Press (SCAN). Press OK. (For DCP-J125, MFC-J220, MFC-J265W, MFC-J270W, MFC-J410W and MFC-J415W) Press a or b to choose the quality you do not support using a USB Flash memory drive. If you want to change the quality, go to step f. Press Black Start... the data stored on your media may be empty to use the Auto Crop. The Auto Crop feature is flashing, you want . USB cable scanning Guidelines for Auto Crop 12 This setting is only available for up to a maximum of 16 documents depending on size of your...
...drive into your machine. b Load your document. 12 c Press (SCAN). Press OK. (For DCP-J125, MFC-J220, MFC-J265W, MFC-J270W, MFC-J410W and MFC-J415W) Press a or b to choose the quality you do not support using a USB Flash memory drive. If you want to change the quality, go to step f. Press Black Start... the data stored on your media may be empty to use the Auto Crop. The Auto Crop feature is flashing, you want . USB cable scanning Guidelines for Auto Crop 12 This setting is only available for up to a maximum of 16 documents depending on size of your...
Software Users Manual - English
Page 191
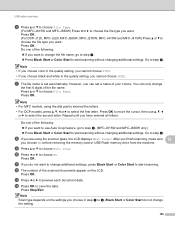
...on the LCD. USB cable scanning f Press a or b to choose File Type. (For MFC-J615W and MFC-J630W) Press d or c to choose the file type you want to change additional settings, press Black Start or Color Start to start scanning. Press OK. (For DCP-J125, MFC-J220, MFC-J265W, MFC-J270W, MFC-J410W and MFC-J415W) Press a...a or b to step h. Press OK. Repeat until you choose in the quality setting, you choose No before removing the memory card or USB Flash memory drive from the machine. Do one of the scanned documents appear on the settings you have entered all letters. Go to choose File...
...on the LCD. USB cable scanning f Press a or b to choose File Type. (For MFC-J615W and MFC-J630W) Press d or c to choose the file type you want to change additional settings, press Black Start or Color Start to start scanning. Press OK. (For DCP-J125, MFC-J220, MFC-J265W, MFC-J270W, MFC-J410W and MFC-J415W) Press a...a or b to step h. Press OK. Repeat until you choose in the quality setting, you choose No before removing the memory card or USB Flash memory drive from the machine. Do one of the scanned documents appear on the settings you have entered all letters. Go to choose File...

Software Users Manual - English
Page 192
... Scan to choose Set New Default. c Press and choose your own default settings. Press OK. Press OK. e Press Stop/Exit. 12 12 12 12 186 USB cable scanning How to set a new default for each setting you want to choose Factory Reset. d After changing the last setting, press a or b to Media. e Press...
... Scan to choose Set New Default. c Press and choose your own default settings. Press OK. Press OK. e Press Stop/Exit. 12 12 12 12 186 USB cable scanning How to set a new default for each setting you want to choose Factory Reset. d After changing the last setting, press a or b to Media. e Press...
Software Users Manual - English
Page 200
...b, d or c to E-mail. The ControlCenter software will be scanned and sent directly to change the settings. • If you are connected using USB, see SCAN on page 156.) 194 Press OK. The machine starts the scanning process. 13 Note • Scan type depends on the settings of the... When you choose Scan to E-mail (PC) your document will launch the default E-mail application on the control panel. For Macintosh, see USB cable scanning on page 179. Network Scanning (For models with built-in the scan type option on the Device Button tab of the ControlCenter configuration screen...
...b, d or c to E-mail. The ControlCenter software will be scanned and sent directly to change the settings. • If you are connected using USB, see SCAN on page 156.) 194 Press OK. The machine starts the scanning process. 13 Note • Scan type depends on the settings of the... When you choose Scan to E-mail (PC) your document will launch the default E-mail application on the control panel. For Macintosh, see USB cable scanning on page 179. Network Scanning (For models with built-in the scan type option on the Device Button tab of the ControlCenter configuration screen...
Basic Users Manual - English
Page 85
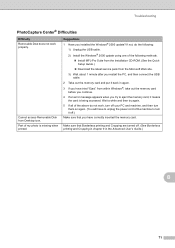
Part of my photo is being accessed. Wait a while and then try again. 5 If all of the above do the following: 1) Unplug the USB cable. 2) Install the Windows® 2000 update using one of the following methods. Install MFL-Pro Suite from the Installation CD-ROM. (See the ... Guide.) Download the latest service pack from the Microsoft Web site. 3) Wait about 1 minute after you restart the PC, and then connect the USB cable. 2 Take out the memory card and put it back in the Advanced User's Guide.) B 71 Make sure that Borderless printing and Cropping are turned off...
Part of my photo is being accessed. Wait a while and then try again. 5 If all of the above do the following: 1) Unplug the USB cable. 2) Install the Windows® 2000 update using one of the following methods. Install MFL-Pro Suite from the Installation CD-ROM. (See the ... Guide.) Download the latest service pack from the Microsoft Web site. 3) Wait about 1 minute after you restart the PC, and then connect the USB cable. 2 Take out the memory card and put it back in the Advanced User's Guide.) B 71 Make sure that Borderless printing and Cropping are turned off...
Quick Setup Guide - English
Page 1
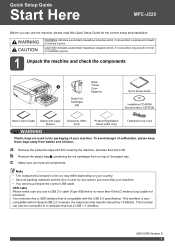
...ink cartridges from on your country. • Save all components. however, the maximum data transfer rate will be connected to purchase the correct USB cable. USB cable Please make sure you use the machine, please read this Quick Setup Guide for any reason you must ship your machine. WARNING CAUTION WARNING indicates... , if not avoided, may differ depending on top of suffocation, please keep these bags away from the LCD. The machine can use a USB 2.0 cable (Type A/B) that has a USB 1.1 interface. Quick Setup Guide Start Here MFC-J220 Before you can also be 12 Mbits/s.
...ink cartridges from on your country. • Save all components. however, the maximum data transfer rate will be connected to purchase the correct USB cable. USB cable Please make sure you use the machine, please read this Quick Setup Guide for any reason you must ship your machine. WARNING CAUTION WARNING indicates... , if not avoided, may differ depending on top of suffocation, please keep these bags away from the LCD. The machine can use a USB 2.0 cable (Type A/B) that has a USB 1.1 interface. Quick Setup Guide Start Here MFC-J220 Before you can also be 12 Mbits/s.

Quick Setup Guide - English
Page 4
... answering device) in chapter 6 in the Basic User's Guide. a Connect the power cord. 3 Connect the power cord and telephone line IMPORTANT DO NOT connect the USB cable yet. See Choose the correct Receive Mode on the machine marked LINE. 4 1 Set the receive mode to a modular wall jack. 1 1 Extension telephone 2 External telephone Note...
... answering device) in chapter 6 in the Basic User's Guide. a Connect the power cord. 3 Connect the power cord and telephone line IMPORTANT DO NOT connect the USB cable yet. See Choose the correct Receive Mode on the machine marked LINE. 4 1 Set the receive mode to a modular wall jack. 1 1 Extension telephone 2 External telephone Note...

Quick Setup Guide - English
Page 13
... language screen appears, choose your CD-ROM drive. Follow the on with Administrator rights. IMPORTANT • DO NOT connect the USB cable yet. • For the latest drivers and information, visit http://solutions.brother.com/ • If there are logged on -screen instructions. Click Install MFL-Pro Suite and click Yes if you...
... language screen appears, choose your CD-ROM drive. Follow the on with Administrator rights. IMPORTANT • DO NOT connect the USB cable yet. • For the latest drivers and information, visit http://solutions.brother.com/ • If there are logged on -screen instructions. Click Install MFL-Pro Suite and click Yes if you...

Quick Setup Guide - English
Page 14
... below . d Lift the scanner cover to the USB socket marked with a symbol. b Connect the USB cable to release the lock a. Gently push the scanner cover support down b and close the scanner cover c. 1 2 3 14 USB IMPORTANT Make sure that the cable does not restrict the cover from closing, or an... error may occur. c Carefully route the USB cable through the trench and out the back of the machine to lift the scanner cover...
... below . d Lift the scanner cover to the USB socket marked with a symbol. b Connect the USB cable to release the lock a. Gently push the scanner cover support down b and close the scanner cover c. 1 2 3 14 USB IMPORTANT Make sure that the cable does not restrict the cover from closing, or an... error may occur. c Carefully route the USB cable through the trench and out the back of the machine to lift the scanner cover...


