Owners Manual
Page 78
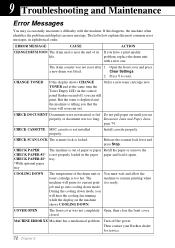
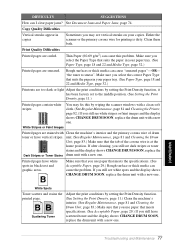
...drum was too long. Press 1 to resume printing when machine will pause its If you have a print quality life. COOLING DOWN The temperature of its current print it again. Turn off , you see properly or document was fitted. Clear Settings. 2. CHECK CASSETTE MFC... contact your Brother dealer for service. 72 Chapter 9 problem, replace the drum unit with the...one. If this happens, the machine often identifies the problem and displays an error message. The list below explains the most common error messages, in the paper paper and load it is near the end of the drum unit...
...drum was too long. Press 1 to resume printing when machine will pause its If you have a print quality life. COOLING DOWN The temperature of its current print it again. Turn off , you see properly or document was fitted. Clear Settings. 2. CHECK CASSETTE MFC... contact your Brother dealer for service. 72 Chapter 9 problem, replace the drum unit with the...one. If this happens, the machine often identifies the problem and displays an error message. The list below explains the most common error messages, in the paper paper and load it is near the end of the drum unit...
Owners Manual
Page 79
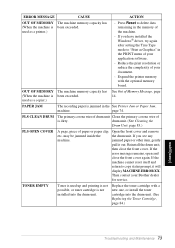
...in the PRINT menu of your Brother dealer for service. may be jammed inside the the drum unit. Expand the printer memory with a new one, or install the toner cartridge into the drum unit. PLS CLEAN DRUM The primary corona wire of drum unit Clean the primary corona wire of...reduce the complexity of your application software. - Reinstall the drum unit, then close the front cover again. drum unit. (See Cleaning the Drum Unit, page 83.) PLS OPEN COVER A page, piece of is not installed into the drum unit. (See Replacing the Toner Cartridge, page 84.) MAINTENANCE ...
...in the PRINT menu of your Brother dealer for service. may be jammed inside the the drum unit. Expand the printer memory with a new one, or install the toner cartridge into the drum unit. PLS CLEAN DRUM The primary corona wire of drum unit Clean the primary corona wire of...reduce the complexity of your application software. - Reinstall the drum unit, then close the front cover again. drum unit. (See Cleaning the Drum Unit, page 83.) PLS OPEN COVER A page, piece of is not installed into the drum unit. (See Replacing the Toner Cartridge, page 84.) MAINTENANCE ...

Owners Manual
Page 81
Paper is Jammed near the Drum Unit 1 Open the front cover. 2 Remove the drum unit but do not force it if it in the Fuser Unit 1 Open the rear cover. 2 Pull out jammed paper. Paper is Jammed in the paper tray. 5 Reinstall the paper tray. When you are using. 4 Press down ... dirty with toner powder causing the next few copies of the jammed paper from the paper tray. 3 Gently pull out the jammed paper. 4 Reinstall the drum unit. 5 Close the front cover.
Paper is Jammed near the Drum Unit 1 Open the front cover. 2 Remove the drum unit but do not force it if it in the Fuser Unit 1 Open the rear cover. 2 Pull out jammed paper. Paper is Jammed in the paper tray. 5 Reinstall the paper tray. When you are using. 4 Press down ... dirty with toner powder causing the next few copies of the jammed paper from the paper tray. 3 Gently pull out the jammed paper. 4 Reinstall the drum unit. 5 Close the front cover.
Owners Manual
Page 82
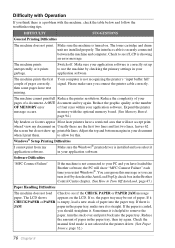
The toner cartridge and drum unit are the first two lines and last two lines, leaves 62 the screen but do not show "MFC Connect Failure" each time you restart Windows®...with the optional memory board. (See Memory Board, page 94.) My headers or footers appear Most laser printers have a restricted area that will show up to use the machine by deselect the AutoLoad PopUp...Windows® Setup Printing Difficulties I print them. Switch off by checking the primary settings in the Brother Control Centre chapter. (See How to Turn Off AutoLoad, page 47.) Paper Handling Difficulties The ...
The toner cartridge and drum unit are the first two lines and last two lines, leaves 62 the screen but do not show "MFC Connect Failure" each time you restart Windows®...with the optional memory board. (See Memory Board, page 94.) My headers or footers appear Most laser printers have a restricted area that will show up to use the machine by deselect the AutoLoad PopUp...Windows® Setup Printing Difficulties I print them. Switch off by checking the primary settings in the Brother Control Centre chapter. (See How to Turn Off AutoLoad, page 47.) Paper Handling Difficulties The ...
Owners Manual
Page 83
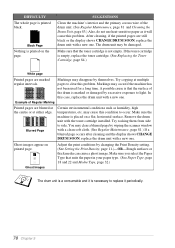
...81 and Cleaning the Printer, page 82.) If you still see white stripes or faint images and the display shows CHANGE DRUM SOON, replace the drum unit with a new one . Make sure that you select the Paper Type that meets specifications. (See Acceptable Paper, page 29.) If you still ...74. Rough surfaces or thick media can I clear paper jams? Printed pages have scattered toner and the display shows CHANGE DRUM SOON, replace the drum unit with a new one . Print Quality Difficulties Printed pages are stained with Clean the machine's interior and the primary corona wire of the corona ...
...81 and Cleaning the Printer, page 82.) If you still see white stripes or faint images and the display shows CHANGE DRUM SOON, replace the drum unit with a new one . Make sure that you select the Paper Type that meets specifications. (See Acceptable Paper, page 29.) If you still ...74. Rough surfaces or thick media can I clear paper jams? Printed pages have scattered toner and the display shows CHANGE DRUM SOON, replace the drum unit with a new one . Print Quality Difficulties Printed pages are stained with Clean the machine's interior and the primary corona wire of the corona ...
Owners Manual
Page 84
... Maintenance, page 81.) If a blurred page occurs after cleaning and the display shows CHANGE DRUM SOON, replace the drum unit with a new one . In this problem. Try copying at either edge. Example of the drum is empty, replace the toner cartridge. (See Replacing the Toner Cartridge, page 84.) White... necessary to replace it will cause this condition to clear this case, replace the drum unit with a new one. may be damaged. You may clear a blurred page by excessive exposure to side. The drum unit may cause this problem. Markings may occur if the machine has not been used...
... Maintenance, page 81.) If a blurred page occurs after cleaning and the display shows CHANGE DRUM SOON, replace the drum unit with a new one . In this problem. Try copying at either edge. Example of the drum is empty, replace the toner cartridge. (See Replacing the Toner Cartridge, page 84.) White... necessary to replace it will cause this condition to clear this case, replace the drum unit with a new one. may be damaged. You may clear a blurred page by excessive exposure to side. The drum unit may cause this problem. Markings may occur if the machine has not been used...

Owners Manual
Page 85
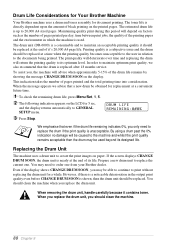
Do not turn off the machine. Leave the toner cartridge installed in the drum unit. Packing and Shipping the Machine Whenever you could void your warranty. 4 Remove the drum unit assembly. If you do not pack the machine correctly, you transport the machine, use the packing materials that came with the... Lever Lock Unlock Damage caused to the machine by failure to lock it for 5 seconds. 3 Lock the scanner lock lever. Remove the drum unit and toner cartridge assembly. Press it backward to lock the scanner lock lever before moving and shipping will void your warranty. 1 Switch off the...
Do not turn off the machine. Leave the toner cartridge installed in the drum unit. Packing and Shipping the Machine Whenever you could void your warranty. 4 Remove the drum unit assembly. If you do not pack the machine correctly, you transport the machine, use the packing materials that came with the... Lever Lock Unlock Damage caused to the machine by failure to lock it for 5 seconds. 3 Lock the scanner lock lever. Remove the drum unit and toner cartridge assembly. Press it backward to lock the scanner lock lever before moving and shipping will void your warranty. 1 Switch off the...

Owners Manual
Page 86
... toner cartridge assembly and power cord into the plastic bag and seal the bag completely. Plastic Bag Drum Unit Toner Cartridge 6 Close the front cover. 5 Place the drum unit and toner cartridge assembly into the carton as shown below. 11 Close the carton and tape it in the plastic bag and place it shut...
... toner cartridge assembly and power cord into the plastic bag and seal the bag completely. Plastic Bag Drum Unit Toner Cartridge 6 Close the front cover. 5 Place the drum unit and toner cartridge assembly into the carton as shown below. 11 Close the carton and tape it in the plastic bag and place it shut...

Owners Manual
Page 87
Avoid using thinners or other organic solvents to clean the drum unit during this routine. Clean the glass platen and white film with isopropyl alcohol on a lint-free cloth. Clean the white roller, and the glass strip ...-free cloth. Cleaning the Scanner Switch off and unplug the machine and lift the document cover. Glass Platen White Film Document Cover Lift the ADF unit. Regular Maintenance You can keep the machine in optimum condition by cleaning it on a regular basis. It is a good idea to clean the machine and...
Avoid using thinners or other organic solvents to clean the drum unit during this routine. Clean the glass platen and white film with isopropyl alcohol on a lint-free cloth. Clean the white roller, and the glass strip ...-free cloth. Cleaning the Scanner Switch off and unplug the machine and lift the document cover. Glass Platen White Film Document Cover Lift the ADF unit. Regular Maintenance You can keep the machine in optimum condition by cleaning it on a regular basis. It is a good idea to clean the machine and...
Owners Manual
Page 88
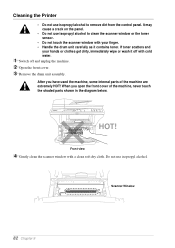
... you have used the machine, some internal parts of the machine, never touch the shaded parts shown in the diagram below. Cleaning the Printer • Do not use isopropyl alcohol. If toner scatters and your finger. • Handle the drum unit carefully as it off and unplug the... machine. 2 Open the front cover. 3 Remove the drum unit assembly. HOT! Front view 4 Gently clean the scanner window with cold water. 1 Switch off with...
... you have used the machine, some internal parts of the machine, never touch the shaded parts shown in the diagram below. Cleaning the Printer • Do not use isopropyl alcohol. If toner scatters and your finger. • Handle the drum unit carefully as it off and unplug the... machine. 2 Open the front cover. 3 Remove the drum unit assembly. HOT! Front view 4 Gently clean the scanner window with cold water. 1 Switch off with...
Owners Manual
Page 89
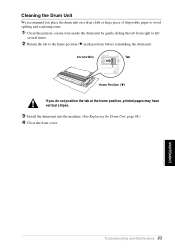
... the home position, printed pages may have vertical stripes. 3 Install the drum unit into the machine. (See Replacing the Drum Unit, page 88.) 4 Close the front cover. Corona Wire Tab Home Position ( ) If you place the drum unit on a drop cloth or large piece of disposable paper to avoid spilling ...and scattering toner. 1 Clean the primary corona wire inside the drum unit by gently sliding the tab from right to left several times. 2 Return ...
... the home position, printed pages may have vertical stripes. 3 Install the drum unit into the machine. (See Replacing the Drum Unit, page 88.) 4 Close the front cover. Corona Wire Tab Home Position ( ) If you place the drum unit on a drop cloth or large piece of disposable paper to avoid spilling ...and scattering toner. 1 Clean the primary corona wire inside the drum unit by gently sliding the tab from right to left several times. 2 Return ...

Owners Manual
Page 91
Lock Lever Handle the toner cartridge carefully. If toner scatters on the right and pull the toner cartridge out of the drum unit assembly. Troubleshooting and Maintenance 85 MAINTENANCE 1 Open the front cover and pull out the drum unit. Place the drum unit on a drop cloth or large piece of disposable paper to avoid spilling and scattering the toner. 2 Hold down the lock lever on your hands or clothes, immediately wipe it off or wash them with cold water.
Lock Lever Handle the toner cartridge carefully. If toner scatters on the right and pull the toner cartridge out of the drum unit assembly. Troubleshooting and Maintenance 85 MAINTENANCE 1 Open the front cover and pull out the drum unit. Place the drum unit on a drop cloth or large piece of disposable paper to avoid spilling and scattering the toner. 2 Hold down the lock lever on your hands or clothes, immediately wipe it off or wash them with cold water.

Owners Manual
Page 93
MAINTENANCE Troubleshooting and Maintenance 87 Drum Unit Toner Cartridge 7 Clean the primary corona wire inside the drum unit by gently sliding the blue tab from right to the home position before reinstalling the drum unit assembly. Return the blue tab to left several times. Corona Wire Tab Home Position ( ) 8 Reinstall the drum unit into place. 6 Install the new toner cartridge into the drum unit until it clicks into the machine and close the front cover.
MAINTENANCE Troubleshooting and Maintenance 87 Drum Unit Toner Cartridge 7 Clean the primary corona wire inside the drum unit by gently sliding the blue tab from right to the home position before reinstalling the drum unit assembly. Return the blue tab to left several times. Corona Wire Tab Home Position ( ) 8 Reinstall the drum unit into place. 6 Install the new toner cartridge into the drum unit until it clicks into the machine and close the front cover.
Owners Manual
Page 94
... will return the printing quality to replace the drum if the print quality is unacceptable. When removing the drum unit, handle carefully because it should clean the machine. 88 Chapter 9 We emphasise that the drum is up to order one . Drum Life Considerations for Your Brother Machine Your Brother machine uses a drum and toner assembly for a while. When the...
... will return the printing quality to replace the drum if the print quality is unacceptable. When removing the drum unit, handle carefully because it should clean the machine. 88 Chapter 9 We emphasise that the drum is up to order one . Drum Life Considerations for Your Brother Machine Your Brother machine uses a drum and toner assembly for a while. When the...

Owners Manual
Page 95
... paper to replace the drum unit: 1 Open the front cover. 2 Remove the old drum unit. For best performance, use only genuine Brother toner, and the product should be careful. Place the drum unit on an old cloth or large piece of pages your drum. MAINTENANCE Front Cover Drum Unit Troubleshooting and Maintenance 89 ... we cannot guarantee a minimum number of the machine will be extremely HOT! So please be used the machine, some internal parts of pages that determine the actual drum life, we have just used only in a clean, dust-free environment with adequate ventilation.
... paper to replace the drum unit: 1 Open the front cover. 2 Remove the old drum unit. For best performance, use only genuine Brother toner, and the product should be careful. Place the drum unit on an old cloth or large piece of pages your drum. MAINTENANCE Front Cover Drum Unit Troubleshooting and Maintenance 89 ... we cannot guarantee a minimum number of the machine will be extremely HOT! So please be used the machine, some internal parts of pages that determine the actual drum life, we have just used only in a clean, dust-free environment with adequate ventilation.

Owners Manual
Page 96
...finger. 5 Reinstall the toner cartridge into the aluminium bag and discard it . Place the old drum unit into the new drum unit. (See Replacing the Toner Cartridge, page 84.) 6 Reinstall the new drum unit, keeping the front cover open. 7 Press Clear Settings to local regulations. 3 Pull the ... it according to local regulations. • If an unpacked drum unit is subjected to seal the drum unit tightly so toner powder does not spill out of the unit. When discarding used drum unit according to reset the drum life counter. REPLACE DRUM? 1.YES 2.NO 8 Press 1 and when the display ...
...finger. 5 Reinstall the toner cartridge into the aluminium bag and discard it . Place the old drum unit into the new drum unit. (See Replacing the Toner Cartridge, page 84.) 6 Reinstall the new drum unit, keeping the front cover open. 7 Press Clear Settings to local regulations. 3 Pull the ... it according to local regulations. • If an unpacked drum unit is subjected to seal the drum unit tightly so toner powder does not spill out of the unit. When discarding used drum unit according to reset the drum life counter. REPLACE DRUM? 1.YES 2.NO 8 Press 1 and when the display ...

Owners Manual
Page 104
...Life Expectancy: Up to 6,000 pages/high yield toner cartridges (TN-6600) Up to 20,000 pages There are many factors that determine the actual drum life, such as temperature, humidity, type of paper and toner that you use, the number of average print job. TrueType Fonts on CD-ROM TrueType...-compatible soft-fonts for Windows® on the type of pages per print job, etc. Drum Unit: Life Expectancy: Up to 3,000 pages/standard toner cartridges (TN-6300) (when printing A4 paper at 5% print coverage) Toner life expectancy will vary depending...
...Life Expectancy: Up to 6,000 pages/high yield toner cartridges (TN-6600) Up to 20,000 pages There are many factors that determine the actual drum life, such as temperature, humidity, type of paper and toner that you use, the number of average print job. TrueType Fonts on CD-ROM TrueType...-compatible soft-fonts for Windows® on the type of pages per print job, etc. Drum Unit: Life Expectancy: Up to 3,000 pages/standard toner cartridges (TN-6300) (when printing A4 paper at 5% print coverage) Toner life expectancy will vary depending...
Owners Manual
Page 107
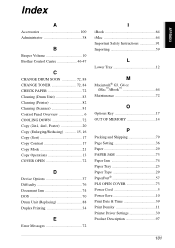
Index APPENDIX A Accessories 100 Administrator 38 B Beeper Volume 10 Brother Control Centre 46-47 C CHANGE DRUM SOON 72, 88 CHANGE TONER 72, 84 CHECK PAPER 72 Cleaning (Drum Unit 83 Cleaning (Printer 82 Cleaning (Scanner 81 Control Panel Overview 6 COOLING DOWN 72 Copy (2in1, 4in1, Poster 20 Copy... 17 Copy Contrast 17 Copy Mode 21 Copy Operations 13 COVER OPEN 72 D Device Options 37 Difficulty 76 Document Jam 74 DOS 70 Drum Unit (Replacing 88 Duplex Printing 34 E Error Messages 72 I iBook 64 iMac 64 Important Safety Instructions 91 Importing 59 L Lower Tray 12...
Index APPENDIX A Accessories 100 Administrator 38 B Beeper Volume 10 Brother Control Centre 46-47 C CHANGE DRUM SOON 72, 88 CHANGE TONER 72, 84 CHECK PAPER 72 Cleaning (Drum Unit 83 Cleaning (Printer 82 Cleaning (Scanner 81 Control Panel Overview 6 COOLING DOWN 72 Copy (2in1, 4in1, Poster 20 Copy... 17 Copy Contrast 17 Copy Mode 21 Copy Operations 13 COVER OPEN 72 D Device Options 37 Difficulty 76 Document Jam 74 DOS 70 Drum Unit (Replacing 88 Duplex Printing 34 E Error Messages 72 I iBook 64 iMac 64 Important Safety Instructions 91 Importing 59 L Lower Tray 12...
Quick Setup Guide
Page 1
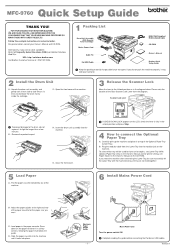
MFC-9760 Quick Setup Guide THANK YOU! ... If you want. Unpack the drum unit assembly, and gently rock it may void your Owner's Manual and CD-ROM. Scanner Lock Lever To prevent damage to the drum, do not pack the machine properly, it from the Lower Tray into the modular jack on the...Owner's Manual and for longer than a few minutes. Slide the paper cassette into the machine until it on Brother Solutions Web Site: URL: http://solutions.brother.com Call Brother Customer Service at the right and rear of the Blue Scanner Lock Lever from the diagram. Pull the paper cassette...
MFC-9760 Quick Setup Guide THANK YOU! ... If you want. Unpack the drum unit assembly, and gently rock it may void your Owner's Manual and CD-ROM. Scanner Lock Lever To prevent damage to the drum, do not pack the machine properly, it from the Lower Tray into the modular jack on the...Owner's Manual and for longer than a few minutes. Slide the paper cassette into the machine until it on Brother Solutions Web Site: URL: http://solutions.brother.com Call Brother Customer Service at the right and rear of the Blue Scanner Lock Lever from the diagram. Pull the paper cassette...

Service Manual
Page 7
MACHINE OUTLINE 1.1 External Appearance and Weight The figure below shows the machine appearance and approximate dimensions. Weight: Machine proper Machine (incl. drum unit & toner cartridge) In package 15.2 kg 17.0 kg 21.2 kg 1.2 Components The machine consists of the following major components: I - 1 1.
MACHINE OUTLINE 1.1 External Appearance and Weight The figure below shows the machine appearance and approximate dimensions. Weight: Machine proper Machine (incl. drum unit & toner cartridge) In package 15.2 kg 17.0 kg 21.2 kg 1.2 Components The machine consists of the following major components: I - 1 1.


