
Owners Manual
Page 3
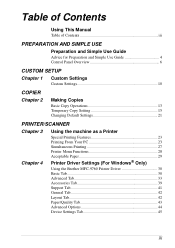
... additional information. Using This Manual Thank you must take to avoid possible personal injury. Warnings detail precautions you for purchasing a Brother machine. This machine has been designed to be simple to use the machine to its fullest potential by checking the Index at the back of this manual, you will also be damaged or... choose the correct key-presses. Also, throughout this manual. However, you can use , with LCD screen prompts to read this is not observed. ii The machine may not work correctly if this manual. Illustrations of Contents.
... additional information. Using This Manual Thank you must take to avoid possible personal injury. Warnings detail precautions you for purchasing a Brother machine. This machine has been designed to be simple to use the machine to its fullest potential by checking the Index at the back of this manual, you will also be damaged or... choose the correct key-presses. Also, throughout this manual. However, you can use , with LCD screen prompts to read this is not observed. ii The machine may not work correctly if this manual. Illustrations of Contents.
Owners Manual
Page 4
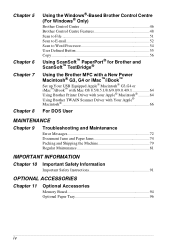
... Changing Default Settings 21 PRINTER/SCANNER Chapter 3 Chapter 4 Using the machine as a Printer Special Printing Features 23 Printing From Your PC 23 Simultaneous Printing 27 Printer Menu Functions 28 Acceptable Paper 29 Printer Driver Settings (For Windows® Only) Using the Brother MFC-9760 Printer Driver 30 Basic Tab 30 Advanced Tab 33 Accessories...
... Changing Default Settings 21 PRINTER/SCANNER Chapter 3 Chapter 4 Using the machine as a Printer Special Printing Features 23 Printing From Your PC 23 Simultaneous Printing 27 Printer Menu Functions 28 Acceptable Paper 29 Printer Driver Settings (For Windows® Only) Using the Brother MFC-9760 Printer Driver 30 Basic Tab 30 Advanced Tab 33 Accessories...
Owners Manual
Page 5
...E-mail 52 Scan to Word Processor 54 User Defined Button 55 Copy 56 Using ScanSoft™ PaperPort® for Brother and ScanSoft™ TextBridge® Using the Brother MFC with a New Power Macintosh® G3, G4 or iMac™/iBook™ Set up Your USB Equipped Apple&#...with your Apple® Macintosh 64 Using Brother TWAIN Scanner Driver with Your Apple® Macintosh 66 For DOS User MAINTENANCE Chapter 9 Troubleshooting and Maintenance Error Messages 72 Document Jams and Paper Jams 74 Packing and Shipping the Machine 79 Regular Maintenance 81 IMPORTANT INFORMATION Chapter...
...E-mail 52 Scan to Word Processor 54 User Defined Button 55 Copy 56 Using ScanSoft™ PaperPort® for Brother and ScanSoft™ TextBridge® Using the Brother MFC with a New Power Macintosh® G3, G4 or iMac™/iBook™ Set up Your USB Equipped Apple&#...with your Apple® Macintosh 64 Using Brother TWAIN Scanner Driver with Your Apple® Macintosh 66 For DOS User MAINTENANCE Chapter 9 Troubleshooting and Maintenance Error Messages 72 Document Jams and Paper Jams 74 Packing and Shipping the Machine 79 Regular Maintenance 81 IMPORTANT INFORMATION Chapter...
Owners Manual
Page 7
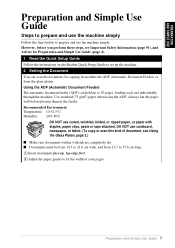
...page 91), and Advice for Preparation and Simple Use Guide (page 4). 1 Read the Quick Setup Guide Follow the instructions on the Brother Quick Setup Guide to set up the machine. 2 Setting the Document You can hold up , top edge first. 2 Adjust the paper guides to fit the width of your ...pages. s Documents must be from 14.7 to 50 pages, feeding each one individually through the machine. Using the ADF (Automatic Document Feeder) The automatic document feeder (ADF) can scan the document for copying from either the ADF (Automatic ...
...page 91), and Advice for Preparation and Simple Use Guide (page 4). 1 Read the Quick Setup Guide Follow the instructions on the Brother Quick Setup Guide to set up the machine. 2 Setting the Document You can hold up , top edge first. 2 Adjust the paper guides to fit the width of your ...pages. s Documents must be from 14.7 to 50 pages, feeding each one individually through the machine. Using the ADF (Automatic Document Feeder) The automatic document feeder (ADF) can scan the document for copying from either the ADF (Automatic ...

Owners Manual
Page 10
...device to electrical outlets on the same circuit as disruption of power can wipe out information in the unit's memory. Do not expose the machine to electrical outlets controlled by a lightning strike. 4 Ensure the airflow from the fan on a flat, stable surface, such as speakers...wall switches or automatic timers as large appliances or other equipment that is not impeded. Locate the machine near heaters, air conditioners, water, chemicals or refrigerators. Do not connect the machine to direct sunlight, excessive heat, moisture or dust. Select a place that might disrupt the power...
...device to electrical outlets on the same circuit as disruption of power can wipe out information in the unit's memory. Do not expose the machine to electrical outlets controlled by a lightning strike. 4 Ensure the airflow from the fan on a flat, stable surface, such as speakers...wall switches or automatic timers as large appliances or other equipment that is not impeded. Locate the machine near heaters, air conditioners, water, chemicals or refrigerators. Do not connect the machine to direct sunlight, excessive heat, moisture or dust. Select a place that might disrupt the power...

Owners Manual
Page 11
... green-and-yellow. The wire which is coloured blue must be fitted with an earthed plug. PREPARATION AND SIMPLE USE Connecting the Power Cord This machine must be connected to the terminal which is marked with the letter "N" or coloured black.
... green-and-yellow. The wire which is coloured blue must be fitted with an earthed plug. PREPARATION AND SIMPLE USE Connecting the Power Cord This machine must be connected to the terminal which is marked with the letter "N" or coloured black.

Owners Manual
Page 13
Use this key when you do not want to wait 45 seconds for the temporary settings to help you set up and operate your machine. LCD (Liquid Crystal Display): C Status Displays messages to clear automatically. E Contrast This area shows the degree of contrast you access the menu and programming mode ... lit when toner is empty. PREPARATION AND SIMPLE USE 9 Options You can quickly and easily select temporary settings. 0 Clear Settings Resets your settings in the machine.
Use this key when you do not want to wait 45 seconds for the temporary settings to help you set up and operate your machine. LCD (Liquid Crystal Display): C Status Displays messages to clear automatically. E Contrast This area shows the degree of contrast you access the menu and programming mode ... lit when toner is empty. PREPARATION AND SIMPLE USE 9 Options You can quickly and easily select temporary settings. 0 Clear Settings Resets your settings in the machine.
Owners Manual
Page 14
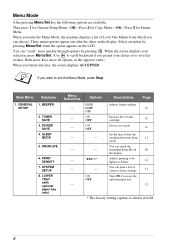
... the Menu Mode, press Stop. Both arrow keys show all options, in bold. 8 Adjusts printing to save mode. 10 Set the time before the machine drops into sleep 11 mode. Select an option by pressing . POWER SAVE 4. SYSTEM SETUP 8. LOWER TRAY (with optional paper tray only) Menu Selections ...Menu-OR-Press 3 for Printer Menu. Options HIGH LOW OFF ON OFF ON OFF - - - - - - + - - You can choose. These menu options appear one after the other on 88 the display. If you finish selection, the screen displays ACCEPTED. BEEPER SETUP 2. Page 10 Increase life of Level...
... the Menu Mode, press Stop. Both arrow keys show all options, in bold. 8 Adjusts printing to save mode. 10 Set the time before the machine drops into sleep 11 mode. Select an option by pressing . POWER SAVE 4. SYSTEM SETUP 8. LOWER TRAY (with optional paper tray only) Menu Selections ...Menu-OR-Press 3 for Printer Menu. Options HIGH LOW OFF ON OFF ON OFF - - - - - - + - - You can choose. These menu options appear one after the other on 88 the display. If you finish selection, the screen displays ACCEPTED. BEEPER SETUP 2. Page 10 Increase life of Level...
Owners Manual
Page 16
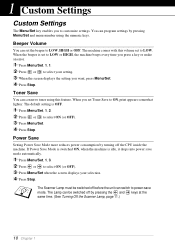
... OFF. The default setting is idle, it drops into power save mode. If Power Save Mode is switched ON, when the machine is OFF. 1 Press Menu/Set, 1, 2. 2 Press or to select ON (or OFF). 3 Press Menu/Set. 4...error. 1 Press Menu/Set, 1, 1. 2 Press or to select your selection. 4 Press Stop. The machine comes with this feature. The Lamp can be switched off before the unit can set to LOW or HIGH, the... machine beeps every time you want, press Menu/Set. 4 Press Stop. 1 Custom Settings Custom Settings...
... OFF. The default setting is idle, it drops into power save mode. If Power Save Mode is switched ON, when the machine is OFF. 1 Press Menu/Set, 1, 2. 2 Press or to select ON (or OFF). 3 Press Menu/Set. 4...error. 1 Press Menu/Set, 1, 1. 2 Press or to select your selection. 4 Press Stop. The machine comes with this feature. The Lamp can be switched off before the unit can set to LOW or HIGH, the... machine beeps every time you want, press Menu/Set. 4 Press Stop. 1 Custom Settings Custom Settings...
Owners Manual
Page 17
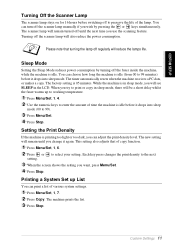
... lamp off regularly will see SLEEP in sleep mode, you change it drops into sleep mode. Turning off the fuser inside the machine, while the machine is in the LCD. Custom Settings 11 Sleep Mode Setting the Sleep Mode reduces power consumption by pressing the or keys simultaneously. ...The timer automatically resets when the machine receives a PC data, or makes a copy. When you try to preserve the life of time the machine is printing too light or too dark, you want, press Menu/Set. 4 Press Stop....
... lamp off regularly will see SLEEP in sleep mode, you change it drops into sleep mode. Turning off the fuser inside the machine, while the machine is in the LCD. Custom Settings 11 Sleep Mode Setting the Sleep Mode reduces power consumption by pressing the or keys simultaneously. ...The timer automatically resets when the machine receives a PC data, or makes a copy. When you try to preserve the life of time the machine is printing too light or too dark, you want, press Menu/Set. 4 Press Stop....

Owners Manual
Page 19
.... (4 mm) (4 mm) Non-scannable area Making a Single Copy 1 Insert the document face up to 99). The scannable area of the machine begins at a time. To sort the copies, use the machine as a Copier You can use Options key. (See Sorting Multiple Copies (Using ADF), page 17.) Making Copies 13 To stop the... copy process and release the document, press Stop. Do NOT pull on the glass platen. 2 Press Copy. COPIER 2 Making Copies Basic Copy Operations Using the Machine as a copy machine, making up in the ADF, or face down on the paper while copying is in progress.
.... (4 mm) (4 mm) Non-scannable area Making a Single Copy 1 Insert the document face up to 99). The scannable area of the machine begins at a time. To sort the copies, use the machine as a Copier You can use Options key. (See Sorting Multiple Copies (Using ADF), page 17.) Making Copies 13 To stop the... copy process and release the document, press Stop. Do NOT pull on the glass platen. 2 Press Copy. COPIER 2 Making Copies Basic Copy Operations Using the Machine as a copy machine, making up in the ADF, or face down on the paper while copying is in progress.

Owners Manual
Page 21
... temporary settings again, place the next document in the ADF, or face down on the selected paper size. -OR- These settings are temporary, and the machine returns to enter 53%. 5 Press Menu/Set. 6 Press Copy. For example, press 5, 3 to its default settings 45 seconds after it finishes copying...
... temporary settings again, place the next document in the ADF, or face down on the selected paper size. -OR- These settings are temporary, and the machine returns to enter 53%. 5 Press Menu/Set. 6 Press Copy. For example, press 5, 3 to its default settings 45 seconds after it finishes copying...

Owners Manual
Page 22
.... Selecting Recomended Ratio A4 → A5 A5 → A6 71% B5 → B6 When you selected AUTO in your copying by scanning from ADF, the machine will detect the document size automatically, calculate how much to reduce it and print it to fit on the glass platen. 2 Using the numeric keys...
.... Selecting Recomended Ratio A4 → A5 A5 → A6 71% B5 → B6 When you selected AUTO in your copying by scanning from ADF, the machine will detect the document size automatically, calculate how much to reduce it and print it to fit on the glass platen. 2 Using the numeric keys...

Owners Manual
Page 24
... types of paper for Upper Tray Only), B5 or B6 size paper. 1 Press Options and or to select your copying by scanning from ADF, the machine will detect the document size automatically, calculate how much to reduce it and print it to fit on the output paper size selected in this...
... types of paper for Upper Tray Only), B5 or B6 size paper. 1 Press Options and or to select your copying by scanning from ADF, the machine will detect the document size automatically, calculate how much to reduce it and print it to fit on the output paper size selected in this...
Owners Manual
Page 29
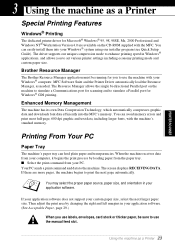
... begins the print process by changing the right and left margins in your application software. PRINTER/SCANNER 3 Using the machine as needed. Brother Resource Manager The Brother Resource Manager application must be sure to use the manual feed slot. Your PC sends a print command and data ...paper and transparencies. Then adjust the print area by loading paper from your custom paper size, select the next larger paper size. MFC Software Suite and the Printer Driver automatically load the Resource Manager, as a Printer Special Printing Features Windows® Printing The dedicated...
... begins the print process by changing the right and left margins in your application software. PRINTER/SCANNER 3 Using the machine as needed. Brother Resource Manager The Brother Resource Manager application must be sure to use the manual feed slot. Your PC sends a print command and data ...paper and transparencies. Then adjust the print area by loading paper from your custom paper size, select the next larger paper size. MFC Software Suite and the Printer Driver automatically load the Resource Manager, as a Printer Special Printing Features Windows® Printing The dedicated...
Owners Manual
Page 30
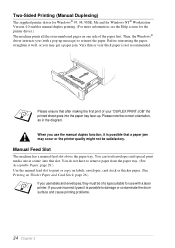
... it well, or you may occur or the printer quality might not be of a type suitable for the printer driver.) The machine prints all the even-numbered pages on one at a time into the paper tray face-up message) to print or copy on labels, envelopes, card stock or thicker paper...they must be satisfactory. Very thin or very thick paper is possible that after making the first print of the paper first. When you (with a laser printer. Then, the Windows® driver instructs you use the manual duplex function, it is not recommended. Two-Sided Printing (Manual Duplexing) The supplied ...
... it well, or you may occur or the printer quality might not be of a type suitable for the printer driver.) The machine prints all the even-numbered pages on one at a time into the paper tray face-up message) to print or copy on labels, envelopes, card stock or thicker paper...they must be satisfactory. Very thin or very thick paper is possible that after making the first print of the paper first. When you (with a laser printer. Then, the Windows® driver instructs you use the manual duplex function, it is not recommended. Two-Sided Printing (Manual Duplexing) The supplied ...

Owners Manual
Page 31
...the manual feed slot to choose manual feed in the Setup dialog box of your printer driver. The machine starts printing automatically. 2 After the first page is printed, the screen displays: Insert the next ...sheet of paper to load the first page. PRINTER/SCANNER Using the machine as a Printer 25 Insert the sheet of paper for Portrait (vertical) or Landscape (horizontal), with ...the paper you're using. Loading One Sheet of Paper You do not select manual paper feed, and insert a page in the manual feed slot, the machine will load the first page from ...
...the manual feed slot to choose manual feed in the Setup dialog box of your printer driver. The machine starts printing automatically. 2 After the first page is printed, the screen displays: Insert the next ...sheet of paper to load the first page. PRINTER/SCANNER Using the machine as a Printer 25 Insert the sheet of paper for Portrait (vertical) or Landscape (horizontal), with ...the paper you're using. Loading One Sheet of Paper You do not select manual paper feed, and insert a page in the manual feed slot, the machine will load the first page from ...
Owners Manual
Page 32
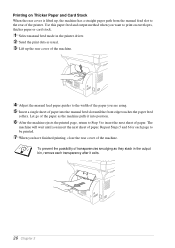
... on envelopes, thicker paper or card stock. 1 Select manual feed mode in the output bin, remove each page to the rear of the printer. The machine will wait until the front edge touches the paper feed rollers. Use this paper feed and output method when you want to print on Thicker... Paper and Card Stock When the rear cover is lifted up the rear cover of the machine. 4 Adjust the manual feed paper guides to the width of the paper you are using. 5 Insert a single sheet of paper into position. 6 After the...
... on envelopes, thicker paper or card stock. 1 Select manual feed mode in the output bin, remove each page to the rear of the printer. The machine will wait until the front edge touches the paper feed rollers. Use this paper feed and output method when you want to print on Thicker... Paper and Card Stock When the rear cover is lifted up the rear cover of the machine. 4 Adjust the manual feed paper guides to the width of the paper you are using. 5 Insert a single sheet of paper into position. 6 After the...

Owners Manual
Page 33
... paper with printed surfaces face down into the computer. However, when the machine is complete. Pull out the output bin extension to clear data from your computer while scanning information into the output bin in the output bin, ...remove each transparency after it pauses the PC printing operation, and resumes when copying is copying, it exits. To prevent the possibility of the machine. Simultaneous Printing The machine can print data from the memory. Reset Key Press this key to support the printed pages. Using the...
... paper with printed surfaces face down into the computer. However, when the machine is complete. Pull out the output bin extension to clear data from your computer while scanning information into the output bin in the output bin, ...remove each transparency after it pauses the PC printing operation, and resumes when copying is copying, it exits. To prevent the possibility of the machine. Simultaneous Printing The machine can print data from the memory. Reset Key Press this key to support the printed pages. Using the...

Owners Manual
Page 34
...a list of current settings for the printer. 1 Press Menu/Set, 3, 1, 2. 2 Press Copy. Printer Menu Functions Printing the Internal Font List You can print a list of the machine's internal (or resident) fonts to see how each font looks before you select it. 1 Press Menu/Set, 3, 1, 1. 2 Press ...Copy. The machine prints the settings. 3 Press Stop. Permanent fonts are restored, macros in the temporary settings are cleared. Restoring...
...a list of current settings for the printer. 1 Press Menu/Set, 3, 1, 2. 2 Press Copy. Printer Menu Functions Printing the Internal Font List You can print a list of the machine's internal (or resident) fonts to see how each font looks before you select it. 1 Press Menu/Set, 3, 1, 1. 2 Press ...Copy. The machine prints the settings. 3 Press Stop. Permanent fonts are restored, macros in the temporary settings are cleared. Restoring...


