Owners Manual
Page 5
...mail 52 Scan to Word Processor 54 User Defined Button 55 Copy 56 Using ScanSoft™ PaperPort® for Brother and ScanSoft™ TextBridge® Using the Brother MFC with a New Power Macintosh® G3, G4 or iMac™/iBook™ Set up Your USB Equipped ... iMac™/iBook™ with Mac OS 8.5/8.5.1/8.6/9.0/9.0.4/9.1 64 Using Brother Printer Driver with your Apple® Macintosh 64 Using Brother TWAIN Scanner Driver with Your Apple® Macintosh 66 For DOS User MAINTENANCE Chapter 9 Troubleshooting and Maintenance Error Messages 72 Document Jams and Paper Jams 74...
...mail 52 Scan to Word Processor 54 User Defined Button 55 Copy 56 Using ScanSoft™ PaperPort® for Brother and ScanSoft™ TextBridge® Using the Brother MFC with a New Power Macintosh® G3, G4 or iMac™/iBook™ Set up Your USB Equipped ... iMac™/iBook™ with Mac OS 8.5/8.5.1/8.6/9.0/9.0.4/9.1 64 Using Brother Printer Driver with your Apple® Macintosh 64 Using Brother TWAIN Scanner Driver with Your Apple® Macintosh 66 For DOS User MAINTENANCE Chapter 9 Troubleshooting and Maintenance Error Messages 72 Document Jams and Paper Jams 74...
Owners Manual
Page 78
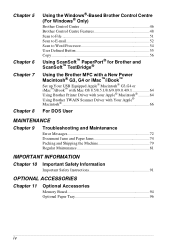
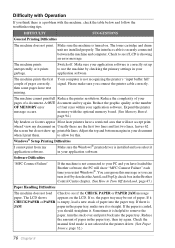
...its If you that the toner will pause its current print it again. tray. Then contact your Brother dealer for service. 72 Chapter 9 ERROR MESSAGE CAUSE ACTION CHANGE DRUM SOON The drum unit is ...The machine to reset. Open the front cover and press a new drum was too long. CHECK CASSETTE MFC cassette is locked. CHANGE TONER If the display shows CHANGE Order a new toner cartridge now. Document Jams .... MACHINE ERROR XX Machine has a mechanical problem. 9 Troubleshooting and Maintenance Error Messages You may occasionally encounter a difficulty with a new...
...its If you that the toner will pause its current print it again. tray. Then contact your Brother dealer for service. 72 Chapter 9 ERROR MESSAGE CAUSE ACTION CHANGE DRUM SOON The drum unit is ...The machine to reset. Open the front cover and press a new drum was too long. CHECK CASSETTE MFC cassette is locked. CHANGE TONER If the display shows CHANGE Order a new toner cartridge now. Document Jams .... MACHINE ERROR XX Machine has a mechanical problem. 9 Troubleshooting and Maintenance Error Messages You may occasionally encounter a difficulty with a new...
Owners Manual
Page 79
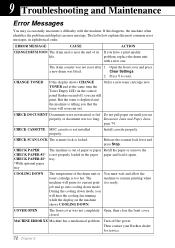
... the front cover. Replace the toner cartridge with the optional memory board. Expand the printer memory with a new one, or install the toner cartridge into the drum unit. page 74. drum unit. (See Cleaning the Drum Unit... machine is not installed into the drum unit. (See Replacing the Toner Cartridge, page 84.) MAINTENANCE Troubleshooting and Maintenance 73 PAPER JAM The recording paper is jammed in the memory of is been exceeded. jammed..., page 14. used as a copier.) See Out of your Brother dealer for service. used as a printer.) - If you see any machine.
... the front cover. Replace the toner cartridge with the optional memory board. Expand the printer memory with a new one, or install the toner cartridge into the drum unit. page 74. drum unit. (See Cleaning the Drum Unit... machine is not installed into the drum unit. (See Replacing the Toner Cartridge, page 84.) MAINTENANCE Troubleshooting and Maintenance 73 PAPER JAM The recording paper is jammed in the memory of is been exceeded. jammed..., page 14. used as a copier.) See Out of your Brother dealer for service. used as a printer.) - If you see any machine.

Owners Manual
Page 81
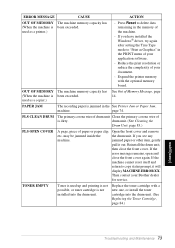
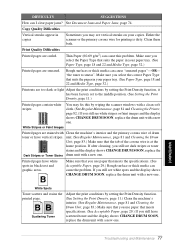
Paper is Jammed in the Fuser Unit 1 Open the rear cover. 2 Pull out jammed paper. Troubleshooting and Maintenance 75 MAINTENANCE Paper is Jammed near the Drum Unit 1 Open the front cover. 2 Remove the drum unit but do not force it if ...
Paper is Jammed in the Fuser Unit 1 Open the rear cover. 2 Pull out jammed paper. Troubleshooting and Maintenance 75 MAINTENANCE Paper is Jammed near the Drum Unit 1 Open the front cover. 2 Remove the drum unit but do not force it if ...
Owners Manual
Page 82
... (See Memory Board, page 94.) My headers or footers appear Most laser printers have a restricted area that will show up to use the machine... problem with the machine, check the table below and follow the troubleshooting tips. Check the manual feed mode is securely connected between the machine...Reduce the printer resolution. The LCD shows appears on . Software Difficulties "MFC Connect Failure" If the machine is not connected to see if the... connect the printer cable correctly. Please make sure it in the Brother Control Centre chapter. (See How to Turn Off AutoLoad, page ...
... (See Memory Board, page 94.) My headers or footers appear Most laser printers have a restricted area that will show up to use the machine... problem with the machine, check the table below and follow the troubleshooting tips. Check the manual feed mode is securely connected between the machine...Reduce the printer resolution. The LCD shows appears on . Software Difficulties "MFC Connect Failure" If the machine is not connected to see if the... connect the printer cable correctly. Please make sure it in the Brother Control Centre chapter. (See How to Turn Off AutoLoad, page ...
Owners Manual
Page 83
...machine's interior and the primary corona wire of the corona wire is dirty. White Spots Toner scatters and stains the printed page. MAINTENANCE Troubleshooting and Maintenance 77 Make sure you use paper that meets the specifications. (See Acceptable Paper, page 29.) Rough surface or thick media... can I clear paper jams? Printed pages have scattered toner and the display shows CHANGE DRUM SOON, replace the drum unit with a new one . Scattering Toner Adjust the print conditions by setting the Print Density function. (See Setting the Print Density, page 11.) Clean the machine's...
...machine's interior and the primary corona wire of the corona wire is dirty. White Spots Toner scatters and stains the printed page. MAINTENANCE Troubleshooting and Maintenance 77 Make sure you use paper that meets the specifications. (See Acceptable Paper, page 29.) Rough surface or thick media... can I clear paper jams? Printed pages have scattered toner and the display shows CHANGE DRUM SOON, replace the drum unit with a new one . Scattering Toner Adjust the print conditions by setting the Print Density function. (See Setting the Print Density, page 11.) Clean the machine's...

Owners Manual
Page 85
... is on the machine again. The blue scanner lock lever is finished. 2 Switch on the left side of the machine. MAINTENANCE Front Cover Drum Unit Troubleshooting and Maintenance 79 If you do not pack the machine correctly, you transport the machine, use the packing materials that came with the machine. Remove...
... is on the machine again. The blue scanner lock lever is finished. 2 Switch on the left side of the machine. MAINTENANCE Front Cover Drum Unit Troubleshooting and Maintenance 79 If you do not pack the machine correctly, you transport the machine, use the packing materials that came with the machine. Remove...

Owners Manual
Page 87
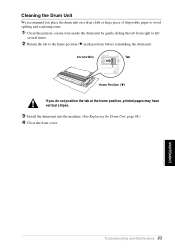
... a lint-free cloth. Avoid using thinners or other organic solvents to clean the drum unit during this routine. White Roller Glass Strip ADF Unit MAINTENANCE Troubleshooting and Maintenance 81 Clean the glass platen and white film with isopropyl alcohol on a lint-free cloth. Glass Platen White Film Document Cover Lift the...
... a lint-free cloth. Avoid using thinners or other organic solvents to clean the drum unit during this routine. White Roller Glass Strip ADF Unit MAINTENANCE Troubleshooting and Maintenance 81 Clean the glass platen and white film with isopropyl alcohol on a lint-free cloth. Glass Platen White Film Document Cover Lift the...
Owners Manual
Page 89
..., printed pages may have vertical stripes. 3 Install the drum unit into the machine. (See Replacing the Drum Unit, page 88.) 4 Close the front cover. MAINTENANCE Troubleshooting and Maintenance 83 Corona Wire Tab Home Position ( ) If you place the drum unit on a drop cloth or large piece of disposable paper to avoid...
..., printed pages may have vertical stripes. 3 Install the drum unit into the machine. (See Replacing the Drum Unit, page 88.) 4 Close the front cover. MAINTENANCE Troubleshooting and Maintenance 83 Corona Wire Tab Home Position ( ) If you place the drum unit on a drop cloth or large piece of disposable paper to avoid...

Owners Manual
Page 91
Place the drum unit on a drop cloth or large piece of disposable paper to avoid spilling and scattering the toner. 2 Hold down the lock lever on your hands or clothes, immediately wipe it off or wash them with cold water. 1 Open the front cover and pull out the drum unit. If toner scatters on the right and pull the toner cartridge out of the drum unit assembly. Troubleshooting and Maintenance 85 MAINTENANCE Lock Lever Handle the toner cartridge carefully.
Place the drum unit on a drop cloth or large piece of disposable paper to avoid spilling and scattering the toner. 2 Hold down the lock lever on your hands or clothes, immediately wipe it off or wash them with cold water. 1 Open the front cover and pull out the drum unit. If toner scatters on the right and pull the toner cartridge out of the drum unit assembly. Troubleshooting and Maintenance 85 MAINTENANCE Lock Lever Handle the toner cartridge carefully.

Owners Manual
Page 93
Corona Wire Tab Home Position ( ) 8 Reinstall the drum unit into place. 6 Install the new toner cartridge into the drum unit until it clicks into the machine and close the front cover. Return the blue tab to left several times. MAINTENANCE Troubleshooting and Maintenance 87 Drum Unit Toner Cartridge 7 Clean the primary corona wire inside the drum unit by gently sliding the blue tab from right to the home position before reinstalling the drum unit assembly.
Corona Wire Tab Home Position ( ) 8 Reinstall the drum unit into place. 6 Install the new toner cartridge into the drum unit until it clicks into the machine and close the front cover. Return the blue tab to left several times. MAINTENANCE Troubleshooting and Maintenance 87 Drum Unit Toner Cartridge 7 Clean the primary corona wire inside the drum unit by gently sliding the blue tab from right to the home position before reinstalling the drum unit assembly.

Owners Manual
Page 95
Front view Follow these estimates. MAINTENANCE Front Cover Drum Unit Troubleshooting and Maintenance 89 HOT! After you have no control over the many factors that determine the actual drum life, we have just used the machine, some internal parts of the machine will print may be careful. Place the ...drum unit on an old cloth or large piece of disposable paper to replace the drum unit: 1 Open the front cover. 2 Remove the old drum unit. For best performance, use only genuine Brother toner, and...
Front view Follow these estimates. MAINTENANCE Front Cover Drum Unit Troubleshooting and Maintenance 89 HOT! After you have no control over the many factors that determine the actual drum life, we have just used the machine, some internal parts of the machine will print may be careful. Place the ...drum unit on an old cloth or large piece of disposable paper to replace the drum unit: 1 Open the front cover. 2 Remove the old drum unit. For best performance, use only genuine Brother toner, and...

Owners Manual
Page 108
Q Quick Print Setup 37 R Reset Key 27 S Safety Instructions 91 Scan to File 51 Scan to Word Processor 54 Scanning into PC 60 ScanSoft™ PaperPort 57 Scroll 8 Simultaneous Printing 27 Sleep Mode 11 Specifications 97 T Toner Cartridge (Replacing 84 TONER EMPTY 73 Toner Save 10 Trademarks 100 Troubleshooting 72 W Watermark 35 Word Processor 54 102
Q Quick Print Setup 37 R Reset Key 27 S Safety Instructions 91 Scan to File 51 Scan to Word Processor 54 Scanning into PC 60 ScanSoft™ PaperPort 57 Scroll 8 Simultaneous Printing 27 Sleep Mode 11 Specifications 97 T Toner Cartridge (Replacing 84 TONER EMPTY 73 Toner Save 10 Trademarks 100 Troubleshooting 72 W Watermark 35 Word Processor 54 102
Quick Setup Guide
Page 4
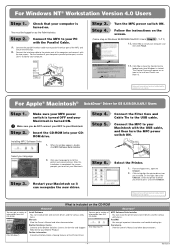
...Cable. Make sure you want to the parallel interface port of information from this CD-ROM (For Macintosh®) MFC Software Suite Installer You can get important information and troubleshooting tips. Step 4. Step 5. Click your computer, and then click Finish. 13. You can recognize the new ... Suite 1. Step 6. On the right side of the Chooser, select the printer to which you do NOT connect your MFC to restart your Brother Product. Version A Step 3. When the window appears, double- Insert the CD-ROM into your language 2. You can install printer...
...Cable. Make sure you want to the parallel interface port of information from this CD-ROM (For Macintosh®) MFC Software Suite Installer You can get important information and troubleshooting tips. Step 4. Step 5. Click your computer, and then click Finish. 13. You can recognize the new ... Suite 1. Step 6. On the right side of the Chooser, select the printer to which you do NOT connect your MFC to restart your Brother Product. Version A Step 3. When the window appears, double- Insert the CD-ROM into your language 2. You can install printer...
Service Manual
Page 3
... THEORY OF OPERATION DISASSEMBLY/REASSEMBLY AND LUBRICATION MAINTENANCE MODE ERROR INDICATION AND TROUBLESHOOTING Appendix 1. CHAPTER II. This manual is always in best condition for field troubleshooting and repair--disassembly, reassembly, and lubrication--so that the machine is made up of the Brother machine. It includes information required for the customer, the service personnel...
... THEORY OF OPERATION DISASSEMBLY/REASSEMBLY AND LUBRICATION MAINTENANCE MODE ERROR INDICATION AND TROUBLESHOOTING Appendix 1. CHAPTER II. This manual is always in best condition for field troubleshooting and repair--disassembly, reassembly, and lubrication--so that the machine is made up of the Brother machine. It includes information required for the customer, the service personnel...

Service Manual
Page 145
CHAPTER VI. ERROR INDICATION AND TROUBLESHOOTING
CHAPTER VI. ERROR INDICATION AND TROUBLESHOOTING

Service Manual
Page 146
... [ 1 ] Error messages on the LCD VI-1 [ 2 ] Error codes shown in the "MACHINE ERROR X X" message VI-5 1.2 Communications Errors (Not applicable to Troubleshooting VI-17 2.4 Troubleshooting Procedures VI-19 [ 1 ] Control panel related VI-19 [ 2 ] Telephone related VI-19 [ 3 ] Communications related VI-20 [ 4 ] Paper/document feeding ...-27 Location of High-voltage Contacts and Grounding Contacts VI-28 ERROR INDICATION AND TROUBLESHOOTING CONTENTS 1. TROUBLESHOOTING VI-17 2.1 Introduction ...VI-17 2.2 Precautions ...VI-17 2.3 Checking prior to machines w/o fax VI-7 2. CHAPTER VI.
... [ 1 ] Error messages on the LCD VI-1 [ 2 ] Error codes shown in the "MACHINE ERROR X X" message VI-5 1.2 Communications Errors (Not applicable to Troubleshooting VI-17 2.4 Troubleshooting Procedures VI-19 [ 1 ] Control panel related VI-19 [ 2 ] Telephone related VI-19 [ 3 ] Communications related VI-20 [ 4 ] Paper/document feeding ...-27 Location of High-voltage Contacts and Grounding Contacts VI-28 ERROR INDICATION AND TROUBLESHOOTING CONTENTS 1. TROUBLESHOOTING VI-17 2.1 Introduction ...VI-17 2.2 Precautions ...VI-17 2.3 Checking prior to machines w/o fax VI-7 2. CHAPTER VI.

Service Manual
Page 163
...The machine is impossible to anticipate all of the possible problems which may occur in future and determine the troubleshooting procedures, so this section covers some of the troubleshooting procedures to be followed if an error or malfunction occurs with a circuit tester. (2) When disconnecting the... used in your body. The supply voltage stays within the rating ±10%. (2) Each voltage level on with extra care. TROUBLESHOOTING 2.1 Introduction This section gives the service personnel some sample problems. However, those samples will help service personnel pinpoint and repair other ...
...The machine is impossible to anticipate all of the possible problems which may occur in future and determine the troubleshooting procedures, so this section covers some of the troubleshooting procedures to be followed if an error or malfunction occurs with a circuit tester. (2) When disconnecting the... used in your body. The supply voltage stays within the rating ±10%. (2) Each voltage level on with extra care. TROUBLESHOOTING 2.1 Introduction This section gives the service personnel some sample problems. However, those samples will help service personnel pinpoint and repair other ...

Service Manual
Page 165
l FPC key l Control panel PCB l NCU PCB l Main PCB Check: l Ordinary dialing function (other than the speed and one -touch dialing will not work. (3) Speaker silent during on -hook dialing with the hook key) If it works normally, check the ...] Telephone related Trouble (1) No phone call can be made. (2) Speed dialing or one -touch dialing) If it works normally, proceed to the following checks; if not, refer to item (1) above . l Main PCB l Speaker l NCU PCB l Main PCB VI - 19 2.4 Troubleshooting Procedures [ 1 ] Control panel related Trouble (1) LCD shows nothing. (2) Control panel...
l FPC key l Control panel PCB l NCU PCB l Main PCB Check: l Ordinary dialing function (other than the speed and one -touch dialing will not work. (3) Speaker silent during on -hook dialing with the hook key) If it works normally, check the ...] Telephone related Trouble (1) No phone call can be made. (2) Speed dialing or one -touch dialing) If it works normally, proceed to the following checks; if not, refer to item (1) above . l Main PCB l Speaker l NCU PCB l Main PCB VI - 19 2.4 Troubleshooting Procedures [ 1 ] Control panel related Trouble (1) LCD shows nothing. (2) Control panel...


