
Owners Manual
Page 3
... Tones and Handshake 2 ECM (Error Correction Mode 3 FAX-8350P Control Panel Overview 4 MFC-9650 Control Panel Overview 6 FAX-8750P Control Panel Overview 8 Packing List 11 Choosing a Location 12 Caution 13 Assembly 13 Install the Drum Unit Assembly (with Toner Cartridge 13 Attach the Trays 15 Loading Paper in Multi-purpose Paper Cassette 16...
... Tones and Handshake 2 ECM (Error Correction Mode 3 FAX-8350P Control Panel Overview 4 MFC-9650 Control Panel Overview 6 FAX-8750P Control Panel Overview 8 Packing List 11 Choosing a Location 12 Caution 13 Assembly 13 Install the Drum Unit Assembly (with Toner Cartridge 13 Attach the Trays 15 Loading Paper in Multi-purpose Paper Cassette 16...
Owners Manual
Page 9
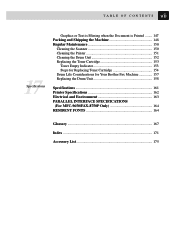
... Cleaning the Drum Unit 152 Replacing the Toner Cartridge 153 Toner Empty Indicator 153 Steps for Replacing Toner Cartridge 154 Drum Life Considerations for Your Brother Fax Machine 157 Replacing the Drum Unit 158 Specifications 161 Printer Specifications 162 Electrical and Environment 163 PARALLEL INTERFACE SPECIFICATIONS (For MFC-9650/FAX-8750P Only 164 RESIDENT FONTS 164...
... Cleaning the Drum Unit 152 Replacing the Toner Cartridge 153 Toner Empty Indicator 153 Steps for Replacing Toner Cartridge 154 Drum Life Considerations for Your Brother Fax Machine 157 Replacing the Drum Unit 158 Specifications 161 Printer Specifications 162 Electrical and Environment 163 PARALLEL INTERFACE SPECIFICATIONS (For MFC-9650/FAX-8750P Only 164 RESIDENT FONTS 164...

Owners Manual
Page 15
... next menu option/function. Set Stores a function setting into the machine. 17 Tone Lets you switch the dialling type during a telephone call to another toner cartridge. Photo This key is used to copy photographs. Sort Use this key when you want to send a fax to several different locations (maximum 182 locations...
... next menu option/function. Set Stores a function setting into the machine. 17 Tone Lets you switch the dialling type during a telephone call to another toner cartridge. Photo This key is used to copy photographs. Sort Use this key when you want to send a fax to several different locations (maximum 182 locations...

Owners Manual
Page 17
...will handle incoming calls. 7 Help/Broadcast Prints a quick reference Help List. FF/Cont When the LCD shows REMAINED DATA, you can turn the printer online (ready to receive PC data) and offline (not ready to receive PC data) alternately. Set Stores a function setting into the machine.... 18 Tone Lets you switch the dialling type during a telephone call to another toner cartridge. Reduce Reduces copies depending upon the ratio you select: AUTO, 100%, 50%, 75%, 87%, 93% and MANUAL. MANUAL allows you to ...
...will handle incoming calls. 7 Help/Broadcast Prints a quick reference Help List. FF/Cont When the LCD shows REMAINED DATA, you can turn the printer online (ready to receive PC data) and offline (not ready to receive PC data) alternately. Set Stores a function setting into the machine.... 18 Tone Lets you switch the dialling type during a telephone call to another toner cartridge. Reduce Reduces copies depending upon the ratio you select: AUTO, 100%, 50%, 75%, 87%, 93% and MANUAL. MANUAL allows you to ...
Owners Manual
Page 19
... speaker and ring volume. 23 Programming Keys: Menu Lets you access the function and programming mode. (Left Arrow) Moves the LCD cursor to another toner cartridge. INTRODUCTION 9 1 Liquid Crystal Display Displays messages to help you set up and operate your machine. 2 Toner Empty LED The Toner Indicator flashes on the ratio...
... speaker and ring volume. 23 Programming Keys: Menu Lets you access the function and programming mode. (Left Arrow) Moves the LCD cursor to another toner cartridge. INTRODUCTION 9 1 Liquid Crystal Display Displays messages to help you set up and operate your machine. 2 Toner Empty LED The Toner Indicator flashes on the ratio...

Owners Manual
Page 23
.... 4 Do not use the telephone to report a gas leak in the vicinity of the leak. There may be used with Toner Cartridge) 1 Unpack the drum unit assembly, including the toner cartridge, and gently rock it to light for longer than a cordless type) during an electrical storm. Assembly Install the Drum Unit Assembly...
.... 4 Do not use the telephone to report a gas leak in the vicinity of the leak. There may be used with Toner Cartridge) 1 Unpack the drum unit assembly, including the toner cartridge, and gently rock it to light for longer than a cordless type) during an electrical storm. Assembly Install the Drum Unit Assembly...

Owners Manual
Page 37
... Set Polled Transmission for MFC-9650/ PC. TONER SAVE Increase life of image. MEM. PC INTERFACE Allows fax reception into your -- 6 documents later. 8. COVERPAGE NOTE Program a customized message -- 6 for international OFF 6 transmissions. ...machine to send your ON 5 (Only for -- 6 someone to -- 5 receive a fax from a remote location. 5. REDUCTION Reduces size of toner cartridge. PRINT DENSITY Adjusts printing to change resolutions page by page. COVERPG SETUP Automatically sends a OFF 6 programmable cover page or prints a sample coverpage. 2. ...
... Set Polled Transmission for MFC-9650/ PC. TONER SAVE Increase life of image. MEM. PC INTERFACE Allows fax reception into your -- 6 documents later. 8. COVERPAGE NOTE Program a customized message -- 6 for international OFF 6 transmissions. ...machine to send your ON 5 (Only for -- 6 someone to -- 5 receive a fax from a remote location. 5. REDUCTION Reduces size of toner cartridge. PRINT DENSITY Adjusts printing to change resolutions page by page. COVERPG SETUP Automatically sends a OFF 6 programmable cover page or prints a sample coverpage. 2. ...

Owners Manual
Page 144
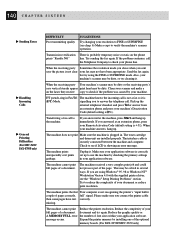
...Machine has a mechanical problem. plug it back in . Then contact your document. • Expand the printer memory with the optional memory board. (ME2050 or ME4050) (Only FAX8350P/MFC-9650) During the cooling down mode. DOWNLOAD FULL (May occur when the fax machine is full. Unplug the... Reduce the print resolution or reduce the complexity of your Brother dealer for service. 134 C H A P T E R S I X T E E N ERROR MESSAGE CAUSE ACTION COOLING DOWN The temperature of the drum You must wait and allow unit or toner cartridge is ready. The machine will be deleted. its current ...
...Machine has a mechanical problem. plug it back in . Then contact your document. • Expand the printer memory with the optional memory board. (ME2050 or ME4050) (Only FAX8350P/MFC-9650) During the cooling down mode. DOWNLOAD FULL (May occur when the fax machine is full. Unplug the... Reduce the print resolution or reduce the complexity of your Brother dealer for service. 134 C H A P T E R S I X T E E N ERROR MESSAGE CAUSE ACTION COOLING DOWN The temperature of the drum You must wait and allow unit or toner cartridge is ready. The machine will be deleted. its current ...

Owners Manual
Page 145
...Speed Dial number. If the display shows Order a new toner cartridge CHANGE TONER and at now. 135 T R O U B L E S H O O T I N G A N D M A I N T E N A N C E ERROR MESSAGE NO RESPONSE/BUSY NOT ASSIGNED PLS CLEAN DRUM PLS OPEN COVER PRINTER JAM TONER EMPTY CHANGE TONER CAUSE ACTION The number you called ...does Check the number and try not answer or is not possible. You tried to access a One Set up and printing is busy. If the error message remains, open and close the scanner unit. Please call your Brother...
...Speed Dial number. If the display shows Order a new toner cartridge CHANGE TONER and at now. 135 T R O U B L E S H O O T I N G A N D M A I N T E N A N C E ERROR MESSAGE NO RESPONSE/BUSY NOT ASSIGNED PLS CLEAN DRUM PLS OPEN COVER PRINTER JAM TONER EMPTY CHANGE TONER CAUSE ACTION The number you called ...does Check the number and try not answer or is not possible. You tried to access a One Set up and printing is busy. If the error message remains, open and close the scanner unit. Please call your Brother...
Owners Manual
Page 150
... caused by installing one of the optional memory boards. (For FAX-8350P/MFC-9650 only) If you connect the printer cable then some pages have been appropriate. The toner cartridge and drum unit are using the FINE or SUPERFINE mode. The machine cannot... 98 or Windows NT® Workstation Version 4.0 with the supplied printer driver, see the "Windows® Setup Printing Problems" section. 140 C H A P T E R S I X T E E N Sending Faxes Handling Incoming Calls General Printing Difficulties (For MFC-9650/ FAX-8750P only) DIFFICULTY Poor transmitting quality SUGGESTIONS Try changing your...
... caused by installing one of the optional memory boards. (For FAX-8350P/MFC-9650 only) If you connect the printer cable then some pages have been appropriate. The toner cartridge and drum unit are using the FINE or SUPERFINE mode. The machine cannot... 98 or Windows NT® Workstation Version 4.0 with the supplied printer driver, see the "Windows® Setup Printing Problems" section. 140 C H A P T E R S I X T E E N Sending Faxes Handling Incoming Calls General Printing Difficulties (For MFC-9650/ FAX-8750P only) DIFFICULTY Poor transmitting quality SUGGESTIONS Try changing your...

Owners Manual
Page 152
... on the page. White page Make sure that a torn piece of the corona wire is printed on the scanner window. Make sure that the toner cartridge is printed black. Markings may be damaged. See "Regular Maintenance" and "Cleaning the Drum Unit" in this chapter. Make sure that you still see dark...
... on the page. White page Make sure that a torn piece of the corona wire is printed on the scanner window. Make sure that the toner cartridge is printed black. Markings may be damaged. See "Regular Maintenance" and "Cleaning the Drum Unit" in this chapter. Make sure that you still see dark...

Owners Manual
Page 153
.... You may cause this chapter.) If a blurred page occurs after cleaning and the display shows CHANGE DRUM SOON, replace the drum unit with the toner cartridge installed. Make sure that meets the specifications. may clear a blurred page by setting the Print Density function. 143 T R O U B L E S H O O T I N G A N D M A I N T E...windows with a clean soft cloth. (See "Regular Maintenance" and "Cleaning the Blurred Page Drum Unit" in the printer driver (MFC-9650/FAX-8750P). Make sure the machine is necessary to side. Try rocking them from side to replace it is placed ...
.... You may cause this chapter.) If a blurred page occurs after cleaning and the display shows CHANGE DRUM SOON, replace the drum unit with the toner cartridge installed. Make sure that meets the specifications. may clear a blurred page by setting the Print Density function. 143 T R O U B L E S H O O T I N G A N D M A I N T E...windows with a clean soft cloth. (See "Regular Maintenance" and "Cleaning the Blurred Page Drum Unit" in the printer driver (MFC-9650/FAX-8750P). Make sure the machine is necessary to side. Try rocking them from side to replace it is placed ...

Owners Manual
Page 158
Remove the telephone line cord, document tray, document support and pack them. Leave the toner cartridge installed in the drum unit. 4 Place the drum unit and toner cartridge assembly into the plastic bag and seal the bag completely. 5 Close the front cover. Fold down the front output bin extension. 148 C H A P T E R S I X T E E N Packing and Shipping... cord and unplug the machine from the AC outlet. 2 Open the front cover. 3 Remove the drum unit assembly. WARNING Remove the drum unit and toner cartridge assembly.
Remove the telephone line cord, document tray, document support and pack them. Leave the toner cartridge installed in the drum unit. 4 Place the drum unit and toner cartridge assembly into the plastic bag and seal the bag completely. 5 Close the front cover. Fold down the front output bin extension. 148 C H A P T E R S I X T E E N Packing and Shipping... cord and unplug the machine from the AC outlet. 2 Open the front cover. 3 Remove the drum unit assembly. WARNING Remove the drum unit and toner cartridge assembly.

Owners Manual
Page 159
149 T R O U B L E S H O O T I N G A N D M A I N T E N A N C E 6 Wrap the machine in the plastic bag and place it in the original carton with the original packing material. 7 Place documents (manual and printed material) and the cables (MFC-9650), document tray and document support, drum unit and toner cartridge assembly into the carton as shown below. (FAX-8750P only) (MFC-9650 only) 8 Close the carton and tape it shut.
149 T R O U B L E S H O O T I N G A N D M A I N T E N A N C E 6 Wrap the machine in the plastic bag and place it in the original carton with the original packing material. 7 Place documents (manual and printed material) and the cables (MFC-9650), document tray and document support, drum unit and toner cartridge assembly into the carton as shown below. (FAX-8750P only) (MFC-9650 only) 8 Close the carton and tape it shut.

Owners Manual
Page 163
... machine can print up to local regulations. If you replace the toner. Discard the used toner cartridges, keep a new toner cartridge ready for service. It is supplied with Brother dealer for use when you have installed a new toner cartridge. Actual page count will not resume printing until you see the toner low warning. When...
... machine can print up to local regulations. If you replace the toner. Discard the used toner cartridges, keep a new toner cartridge ready for service. It is supplied with Brother dealer for use when you have installed a new toner cartridge. Actual page count will not resume printing until you see the toner low warning. When...

Owners Manual
Page 164
154 C H A P T E R S I X T E E N Steps for Replacing Toner Cartridge WARNING After you have just used the machine, some internal parts of the drum unit assembly. HOT! 1 Open the front cover and pull out the drum unit. Lock Lever So, never touch the shaded parts shown in the illustration below. Place the drum unit on a drop cloth or large piece of disposable paper to avoid spilling and scattering the toner. 2 Hold down the lock lever on the right and pull the toner cartridge out of the machine will be extremely HOT!
154 C H A P T E R S I X T E E N Steps for Replacing Toner Cartridge WARNING After you have just used the machine, some internal parts of the drum unit assembly. HOT! 1 Open the front cover and pull out the drum unit. Lock Lever So, never touch the shaded parts shown in the illustration below. Place the drum unit on a drop cloth or large piece of disposable paper to avoid spilling and scattering the toner. 2 Hold down the lock lever on the right and pull the toner cartridge out of the machine will be extremely HOT!

Owners Manual
Page 165
... void your hands or clothes, immediately wipe it off or wash it according to local regulations. s You should use only a genuine Brother toner cartridge (TN-6300/ TN-6600 series), which is shortened. Using another brand of time, the toner life is specially formulated to side five or six times. 5... Remove the protective cover. If toner scatters on your machine's warranty. 4 Gently rock the toner cartridge from side to ensure top print quality. 155 T R O U B L E S H O O T I N G A N D M A I N T E N A N C E WARNING Handle the toner...
... void your hands or clothes, immediately wipe it off or wash it according to local regulations. s You should use only a genuine Brother toner cartridge (TN-6300/ TN-6600 series), which is shortened. Using another brand of time, the toner life is specially formulated to side five or six times. 5... Remove the protective cover. If toner scatters on your machine's warranty. 4 Gently rock the toner cartridge from side to ensure top print quality. 155 T R O U B L E S H O O T I N G A N D M A I N T E N A N C E WARNING Handle the toner...

Owners Manual
Page 166
Corona Wire Tab Home Position ( ) 8 Reinstall the drum unit into place. Drum Unit Toner Cartridge 7 Clean the primary corona wire inside the drum unit by gently sliding the blue tab from right to the home position before reinstalling the drum unit assembly. 156 C H A P T E R S I X T E E N 6 Install the new toner cartridge into the drum unit until it clicks into the machine and close the front cover. Return the blue tab to left several times.
Corona Wire Tab Home Position ( ) 8 Reinstall the drum unit into place. Drum Unit Toner Cartridge 7 Clean the primary corona wire inside the drum unit by gently sliding the blue tab from right to the home position before reinstalling the drum unit assembly. 156 C H A P T E R S I X T E E N 6 Install the new toner cartridge into the drum unit until it clicks into the machine and close the front cover. Return the blue tab to left several times.

Owners Manual
Page 169
159 T R O U B L E S H O O T I N G A N D M A I N T E N A N C E Follow these steps to local regulations. Be sure to avoid spilling and scattering the toner. 3 Pull the toner cartridge out of the unit. When discarding used drum unit according to replace the drum unit: 1 Open the front cover. 2 Remove the old drum unit. Place ... not spill out of the drum unit assembly while holding down the lock lever with your right hand. For more information, see "Replacing the Toner Cartridge" in this chapter. Lock Lever Discard the used drum units, keep them separate from domestic rubbish.
159 T R O U B L E S H O O T I N G A N D M A I N T E N A N C E Follow these steps to local regulations. Be sure to avoid spilling and scattering the toner. 3 Pull the toner cartridge out of the unit. When discarding used drum unit according to replace the drum unit: 1 Open the front cover. 2 Remove the old drum unit. Place ... not spill out of the drum unit assembly while holding down the lock lever with your right hand. For more information, see "Replacing the Toner Cartridge" in this chapter. Lock Lever Discard the used drum units, keep them separate from domestic rubbish.

Owners Manual
Page 170
... hands or clothes get dirty, immediately wipe or wash with cold water. Caution If toner scatters and your finger. 5 Reinstall the toner cartridge into the aluminium bag and discard it . If toner scatters and your hands or clothes get dirty, immediately wipe off or wash with ...NO 8 Press 1 and when the display shows ACCEPTED, and close the front cover. s Handle the toner cartridge and the drum unit carefully because they contain toner. For more information, see "Replacing the Toner Cartridge" in this chapter. 6 Reinstall the new drum unit, keeping the front cover open. 7 Press Clear....
... hands or clothes get dirty, immediately wipe or wash with cold water. Caution If toner scatters and your finger. 5 Reinstall the toner cartridge into the aluminium bag and discard it . If toner scatters and your hands or clothes get dirty, immediately wipe off or wash with ...NO 8 Press 1 and when the display shows ACCEPTED, and close the front cover. s Handle the toner cartridge and the drum unit carefully because they contain toner. For more information, see "Replacing the Toner Cartridge" in this chapter. 6 Reinstall the new drum unit, keeping the front cover open. 7 Press Clear....


