Owners Manual
Page 12
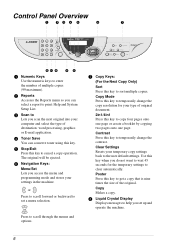
...help you access the menu and programming mode and stores your computer and select the type of destination: word processing, graphics or E-mail application. 4 Toner Save You can select a report to print: Help and System Setup List. 3 Scan to Lets you do not want to wait 45 seconds ...or create a booklet by copying two pages onto one page. Control Panel Overview 1 23 4 5 6 7 12 11 10 9 8 1 Numeric Keys Use the numeric keys to enter the number of multiple copies (99 maximum). 2 Reports Accesses the Reports menu so you can conserve toner using this key. 5 Stop/Exit Press this key...
...help you access the menu and programming mode and stores your computer and select the type of destination: word processing, graphics or E-mail application. 4 Toner Save You can select a report to print: Help and System Setup List. 3 Scan to Lets you do not want to wait 45 seconds ...or create a booklet by copying two pages onto one page. Control Panel Overview 1 23 4 5 6 7 12 11 10 9 8 1 Numeric Keys Use the numeric keys to enter the number of multiple copies (99 maximum). 2 Reports Accesses the Reports menu so you can conserve toner using this key. 5 Stop/Exit Press this key...

Owners Manual
Page 13
... percentage between 25% and 99%. For more choices, select MANUAL and use the numeric keys to order another toner cartridge. PREPARATION AND SIMPLE USE 9 Toner Empty LED The Toner Indicator flashes on and off when toner is low, so you will still be able to automatically fit the original on the selected paper size...
... percentage between 25% and 99%. For more choices, select MANUAL and use the numeric keys to order another toner cartridge. PREPARATION AND SIMPLE USE 9 Toner Empty LED The Toner Indicator flashes on and off when toner is low, so you will still be able to automatically fit the original on the selected paper size...

Owners Manual
Page 17
... setting. to select your latest default settings for GENERAL SETUP. Custom Settings 11 CUSTOM SETUP Setting the Print Density If the machine is OFF. 1 Press Toner Save. 2 Press or to select ON (or OFF). 3 Press Menu/Set. The new setting will remain until you want , press Menu/Set. ...Set. -OR- Using the Reports Key Two lists are available. 1.HELP Lists basic operational steps and functions. 2.SYSTEM SETUP Lists your setting. Toner Save You can adjust the print density level. Each key press changes the print density to the next 3 When the screen shows the setting ...
... setting. to select your latest default settings for GENERAL SETUP. Custom Settings 11 CUSTOM SETUP Setting the Print Density If the machine is OFF. 1 Press Toner Save. 2 Press or to select ON (or OFF). 3 Press Menu/Set. The new setting will remain until you want , press Menu/Set. ...Set. -OR- Using the Reports Key Two lists are available. 1.HELP Lists basic operational steps and functions. 2.SYSTEM SETUP Lists your setting. Toner Save You can adjust the print density level. Each key press changes the print density to the next 3 When the screen shows the setting ...
Owners Manual
Page 34
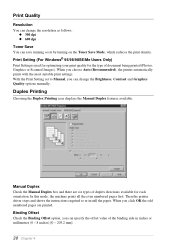
... driver stops and shows the instructions required to Manual, you can change the resolution as follows: x 300 dpi x 600 dpi Toner Save You can save running costs by turning on the Toner Save Mode, which reduces the print density. Binding Offset Check the Binding Offset option, you can specify the offset value...
... driver stops and shows the instructions required to Manual, you can change the resolution as follows: x 300 dpi x 600 dpi Toner Save You can save running costs by turning on the Toner Save Mode, which reduces the print density. Binding Offset Check the Binding Offset option, you can specify the offset value...
Owners Manual
Page 68
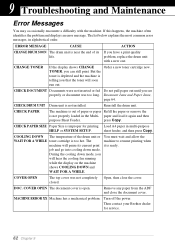
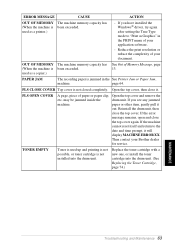
... and go into cooling down mode, you will soon run out. MACHINE ERROR XX Machine has a mechanical problem. Then contact your Brother dealer for printing Load A4 paper in alphabetical order. CHECK PAPER The machine is out of paper or paper Refill the paper or ... COOLING DOWN and WAIT FOR A WHILE. But the toner is depleted and the machine is too hot. problem, replace the drum unit with the machine. 9 Troubleshooting and Maintenance Error Messages You may occasionally encounter a difficulty with a new one. Document Jams and Paper Jams, page 64. sheet ...
... and go into cooling down mode, you will soon run out. MACHINE ERROR XX Machine has a mechanical problem. Then contact your Brother dealer for printing Load A4 paper in alphabetical order. CHECK PAPER The machine is out of paper or paper Refill the paper or ... COOLING DOWN and WAIT FOR A WHILE. But the toner is depleted and the machine is too hot. problem, replace the drum unit with the machine. 9 Troubleshooting and Maintenance Error Messages You may occasionally encounter a difficulty with a new one. Document Jams and Paper Jams, page 64. sheet ...
Owners Manual
Page 69
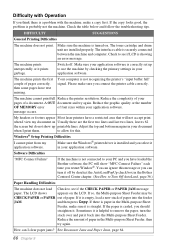
...other item, gently pull it . used as a copier.) See Out of your application software. - PLS OPEN COVER A page, piece of your Brother dealer for service. Reinstall the drum unit, then close it out. Open the top cover, then close the top cover. may be jammed inside the...- If you see any jammed machine. Replace the toner cartridge with a new one, or install the toner cartridge into the drum unit. PAPER JAM The recording paper is not closed completely. TONER EMPTY Toner is used up and printing is not possible, or toner cartridge is not installed into the drum unit. (...
...other item, gently pull it . used as a copier.) See Out of your application software. - PLS OPEN COVER A page, piece of your Brother dealer for service. Reinstall the drum unit, then close it out. Open the top cover, then close the top cover. may be jammed inside the...- If you see any jammed machine. Replace the toner cartridge with a new one, or install the toner cartridge into the drum unit. PAPER JAM The recording paper is not closed completely. TONER EMPTY Toner is used up and printing is not possible, or toner cartridge is not installed into the drum unit. (...

Owners Manual
Page 70
... of the machine are extremely HOT! When you open the top cover of the machine, never touch the internal parts shown in the Top of instructions to remove it. Document Jam in the following two types of printer jams and follow the appropriate set ... that is jammed, follow the instructions. • Do not force the jammed paper from the paper tray because you may damage the machine and cause toner to scatter on the next printed pages. • After you must find out where the paper is not jammed. 2 Lift the ADF cover. 3 Pull the...
... of the machine are extremely HOT! When you open the top cover of the machine, never touch the internal parts shown in the Top of instructions to remove it. Document Jam in the following two types of printer jams and follow the appropriate set ... that is jammed, follow the instructions. • Do not force the jammed paper from the paper tray because you may damage the machine and cause toner to scatter on the next printed pages. • After you must find out where the paper is not jammed. 2 Lift the ADF cover. 3 Pull the...
Owners Manual
Page 72
...Windows® printer driver is installed and you select it in your PC and you have loaded the Brother software, the PC will not accept print. If so, the Multi-purpose Sheet Feeder may be CHECK...the paper is not recognizing the printer's "input buffer full" signal. The toner cartridge and drum unit are the first two lines and last two lines, leaves 62 the screen but... do not show "MFC Connect Failure" each time you connect the printer cable correctly. My headers or footers appear Most laser printers have text missing. Please make sure you restart...
...Windows® printer driver is installed and you select it in your PC and you have loaded the Brother software, the PC will not accept print. If so, the Multi-purpose Sheet Feeder may be CHECK...the paper is not recognizing the printer's "input buffer full" signal. The toner cartridge and drum unit are the first two lines and last two lines, leaves 62 the screen but... do not show "MFC Connect Failure" each time you connect the printer cable correctly. My headers or footers appear Most laser printers have text missing. Please make sure you restart...
Owners Manual
Page 73
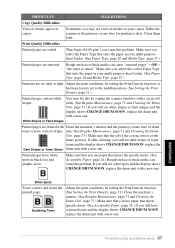
... after cleaning, you still see dark stripes or toner stains and the display shows CHANGE DRUM SOON, replace the Dark Stripes or Toner Stains drum unit with a new one . If you select the correct Paper Type that the tab of drum toner or have vertical stripes. Either the scanner or ...primary corona wire for printing is at the home position. White Spots Toner scatters and stains the printed page. Printed pages have scattered toner and the display shows CHANGE DRUM SOON, replace the drum unit with a new one . Rough surfaces or thick media can cause this by setting the ...
... after cleaning, you still see dark stripes or toner stains and the display shows CHANGE DRUM SOON, replace the Dark Stripes or Toner Stains drum unit with a new one . If you select the correct Paper Type that the tab of drum toner or have vertical stripes. Either the scanner or ...primary corona wire for printing is at the home position. White Spots Toner scatters and stains the printed page. Printed pages have scattered toner and the display shows CHANGE DRUM SOON, replace the drum unit with a new one . Rough surfaces or thick media can cause this by setting the ...
Owners Manual
Page 74
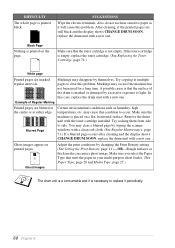
... is not empty. Black Page Nothing is printed on a flat, horizontal surface. If the toner cartridge is placed on the page. Markings may cause this case, replace the drum unit with a new one . Markings may clear a blurred page by excessive exposure to clear this problem. Make sure... the machine is empty, replace the toner cartridge. (See Replacing the Toner Cartridge, page 74.) White page Printed pages are blurred at the...
... is not empty. Black Page Nothing is printed on a flat, horizontal surface. If the toner cartridge is placed on the page. Markings may cause this case, replace the drum unit with a new one . Markings may clear a blurred page by excessive exposure to clear this problem. Make sure... the machine is empty, replace the toner cartridge. (See Replacing the Toner Cartridge, page 74.) White page Printed pages are blurred at the...
Owners Manual
Page 75
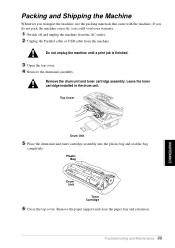
... paper support and close the paper tray and extension. Troubleshooting and Maintenance 69 MAINTENANCE Leave the toner cartridge installed in the drum unit. Top Cover Drum Unit 5 Place the drum unit and toner cartridge assembly into the plastic bag and seal the bag completely. Remove the drum unit and... toner cartridge assembly. If you do not pack the machine correctly, you transport the machine, use the...
... paper support and close the paper tray and extension. Troubleshooting and Maintenance 69 MAINTENANCE Leave the toner cartridge installed in the drum unit. Top Cover Drum Unit 5 Place the drum unit and toner cartridge assembly into the plastic bag and seal the bag completely. Remove the drum unit and... toner cartridge assembly. If you do not pack the machine correctly, you transport the machine, use the...
Owners Manual
Page 76
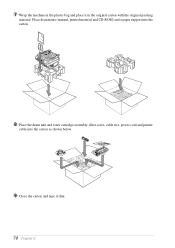
7 Wrap the machine in the original carton with the original packing material. Place documents (manual, printed material and CD-ROM) and a paper support into the carton. 8 Place the drum unit and toner cartridge assembly, filter cores, cable ties, power cord and printer cable into the carton as shown below. 9 Close the carton and tape it in the plastic bag and place it shut. 70 Chapter 9
7 Wrap the machine in the original carton with the original packing material. Place documents (manual, printed material and CD-ROM) and a paper support into the carton. 8 Place the drum unit and toner cartridge assembly, filter cores, cable ties, power cord and printer cable into the carton as shown below. 9 Close the carton and tape it in the plastic bag and place it shut. 70 Chapter 9

Owners Manual
Page 78
...from the control panel. Cleaning the Printer • Do not use isopropyl alcohol to clean the scanner window or the toner sensor. 72 Chapter 9 When you have used the machine, some internal parts of the machine, never touch the shaded parts shown in the diagram below. 1 Open the top cover. 2... Remove the drum unit assembly. 3 Wipe the electric terminals with isopropyl alcohol on the panel. • Do not use isopropyl alcohol to clean the scanner window or the toner sensor....
...from the control panel. Cleaning the Printer • Do not use isopropyl alcohol to clean the scanner window or the toner sensor. 72 Chapter 9 When you have used the machine, some internal parts of the machine, never touch the shaded parts shown in the diagram below. 1 Open the top cover. 2... Remove the drum unit assembly. 3 Wipe the electric terminals with isopropyl alcohol on the panel. • Do not use isopropyl alcohol to clean the scanner window or the toner sensor....
Owners Manual
Page 79
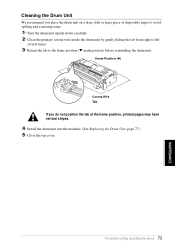
Home Position (w) Corona Wire Tab If you place the drum unit on a drop cloth or large piece of disposable paper to avoid spilling and scattering toner. 1 Turn the drum unit upside down carefully. 2 Clean the primary corona wire inside the drum unit by gently sliding the tab from right to left ...
Home Position (w) Corona Wire Tab If you place the drum unit on a drop cloth or large piece of disposable paper to avoid spilling and scattering toner. 1 Turn the drum unit upside down carefully. 2 Clean the primary corona wire inside the drum unit by gently sliding the tab from right to left ...

Owners Manual
Page 80
... with Brother dealer for use when you see the toner low warning. Actual page count will be replaced after approximately 2,200 pages. When discarding used the machine, some internal parts of them separate from domestic waste. Toner Empty Indicator When the toner cartridge is running low, the display shows CHANGE TONER. The machine is supplied with one toner...
... with Brother dealer for use when you see the toner low warning. Actual page count will be replaced after approximately 2,200 pages. When discarding used the machine, some internal parts of them separate from domestic waste. Toner Empty Indicator When the toner cartridge is running low, the display shows CHANGE TONER. The machine is supplied with one toner...
Owners Manual
Page 81
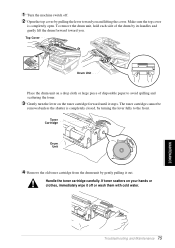
To remove the drum unit, hold each side of disposable paper to the front. The toner cartridge cannot be removed unless the shutter is completely open. Toner Cartridge Drum Unit 4 Remove the old toner cartridge from the drum unit by its handles and gently lift the drum forward toward you . ... Drum Unit Place the drum unit on a drop cloth or large piece of the drum by gently pulling it out. Handle the toner cartridge carefully. If toner scatters on the toner cartridge forward until it off . 2 Open the top cover by turning the lever fully to avoid spilling and scattering the...
To remove the drum unit, hold each side of disposable paper to the front. The toner cartridge cannot be removed unless the shutter is completely open. Toner Cartridge Drum Unit 4 Remove the old toner cartridge from the drum unit by its handles and gently lift the drum forward toward you . ... Drum Unit Place the drum unit on a drop cloth or large piece of the drum by gently pulling it out. Handle the toner cartridge carefully. If toner scatters on the toner cartridge forward until it off . 2 Open the top cover by turning the lever fully to avoid spilling and scattering the...
Owners Manual
Page 82
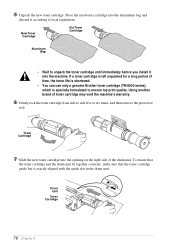
...protective seal. Using another brand of time, the toner life is shortened. • You can use only a genuine Brother toner cartridge (TN-8000 series), which is exactly aligned with the guide slot in the drum unit. To ensure that the toner cartridge and the drum unit fit together correctly, make... sure that the toner cartridge guide bar is specially formulated to local...
...protective seal. Using another brand of time, the toner life is shortened. • You can use only a genuine Brother toner cartridge (TN-8000 series), which is exactly aligned with the guide slot in the drum unit. To ensure that the toner cartridge and the drum unit fit together correctly, make... sure that the toner cartridge guide bar is specially formulated to local...
Owners Manual
Page 83
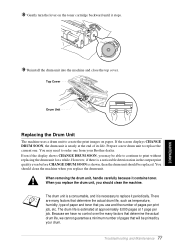
..., and it is shown, then the drum unit should clean the machine when you use and the number of paper and toner that will be printed by your Brother dealer. However, if there is a noticeable deterioration in the output print quality even before CHANGE DRUM SOON is necessary to ...replace the current one from your drum. You should be able to continue to create the print images on the toner cartridge backward until it ...
..., and it is shown, then the drum unit should clean the machine when you use and the number of paper and toner that will be printed by your Brother dealer. However, if there is a noticeable deterioration in the output print quality even before CHANGE DRUM SOON is necessary to ...replace the current one from your drum. You should be able to continue to create the print images on the toner cartridge backward until it ...
Owners Manual
Page 84
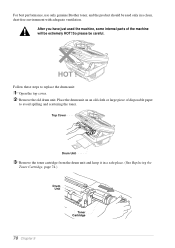
...use only genuine Brother toner, and the product should be used the machine, some internal parts of disposable paper to replace the drum unit: 1 Open the top cover. 2 Remove the old drum unit. So please be extremely HOT! Follow these steps to avoid spilling and scattering the toner. Top Cover ...Drum Unit 3 Remove the toner cartridge from the drum...
...use only genuine Brother toner, and the product should be used the machine, some internal parts of disposable paper to replace the drum unit: 1 Open the top cover. 2 Remove the old drum unit. So please be extremely HOT! Follow these steps to avoid spilling and scattering the toner. Top Cover ...Drum Unit 3 Remove the toner cartridge from the drum...
Owners Manual
Page 85
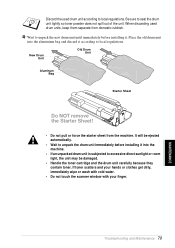
... Troubleshooting and Maintenance 79 Place the old drum unit into the machine. • If an unpacked drum unit is subjected to local regulations. If toner scatters and your hands or clothes get dirty, immediately wipe or wash with cold water. • Do not touch the scanner window with your finger. ... unit immediately before installing it into the aluminium bag and discard it . When discarding used drum unit according to seal the drum unit tightly so toner powder does not spill out of the unit.
... Troubleshooting and Maintenance 79 Place the old drum unit into the machine. • If an unpacked drum unit is subjected to local regulations. If toner scatters and your hands or clothes get dirty, immediately wipe or wash with cold water. • Do not touch the scanner window with your finger. ... unit immediately before installing it into the aluminium bag and discard it . When discarding used drum unit according to seal the drum unit tightly so toner powder does not spill out of the unit.

