Users Manual - English
Page 6
...and has caused damage to the manufacturer's specifications for consumable items, such as the original Product. For the name of the Product; BROTHER ONE YEAR LIMITED WARRANTY and EXCHANGE SERVICE (USA Only) This warranty gives you certain rights and you may also have been used with this... may vary from state to ): ribbons, ink or toner cartridges, toner drum units, print heads, cleaning and/or instances where no defects in the Product, etc. (8) Damage caused by Brother for repairs or replacements made necessary due to follow operational instructions, improper set up to the cost...
...and has caused damage to the manufacturer's specifications for consumable items, such as the original Product. For the name of the Product; BROTHER ONE YEAR LIMITED WARRANTY and EXCHANGE SERVICE (USA Only) This warranty gives you certain rights and you may also have been used with this... may vary from state to ): ribbons, ink or toner cartridges, toner drum units, print heads, cleaning and/or instances where no defects in the Product, etc. (8) Damage caused by Brother for repairs or replacements made necessary due to follow operational instructions, improper set up to the cost...
Users Manual - English
Page 22
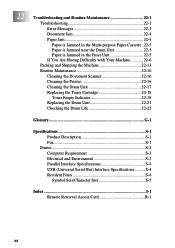
... 22-1 Document Jam 22-4 Paper Jam 22-4 Paper is Jammed in the Multi-purpose Paper Cassette . 22-5 Paper is Jammed near the Drum Unit 22-5 Paper is Jammed in the Fuser Unit 22-5 If You Are Having Difficulty with Your Machine 22-6 Packing and Shipping the Machine... Maintenance 22-16 Cleaning the Document Scanner 22-16 Cleaning the Printer 22-16 Cleaning the Drum Unit 22-17 Replacing the Toner Cartridge 22-18 Toner Empty Indicator 22-18 Replacing the Drum Unit 22-21 Checking the Drum Life 22-22 23 Glossary G-1 24 Specifications S-1 Product Description S-1 Fax S-1 Printer S-2 ...
... 22-1 Document Jam 22-4 Paper Jam 22-4 Paper is Jammed in the Multi-purpose Paper Cassette . 22-5 Paper is Jammed near the Drum Unit 22-5 Paper is Jammed in the Fuser Unit 22-5 If You Are Having Difficulty with Your Machine 22-6 Packing and Shipping the Machine... Maintenance 22-16 Cleaning the Document Scanner 22-16 Cleaning the Printer 22-16 Cleaning the Drum Unit 22-17 Replacing the Toner Cartridge 22-18 Toner Empty Indicator 22-18 Replacing the Drum Unit 22-21 Checking the Drum Life 22-22 23 Glossary G-1 24 Specifications S-1 Product Description S-1 Fax S-1 Printer S-2 ...
Users Manual - English
Page 194
... with a new one. Try the call the Brother fax-back system. (See Brother Numbers, page i.) Error Messages Error Message Cause Action CHANGE DRUM SOON The drum unit is near the end of paper or paper is not in Verify the other party's polling Polled Waiting mode. then replace the drum unit with your ... must call the country where you polled is not properly loaded in the paper cassette. CONNECTION FAIL The fax machine you purchased the MFC. Error Messages You may not be made from within that country. You can correct most common error messages. Open the front cover and...
... with a new one. Try the call the Brother fax-back system. (See Brother Numbers, page i.) Error Messages Error Message Cause Action CHANGE DRUM SOON The drum unit is near the end of paper or paper is not in Verify the other party's polling Polled Waiting mode. then replace the drum unit with your ... must call the country where you polled is not properly loaded in the paper cassette. CONNECTION FAIL The fax machine you purchased the MFC. Error Messages You may not be made from within that country. You can correct most common error messages. Open the front cover and...
Users Manual - English
Page 204
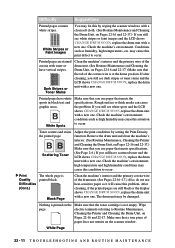
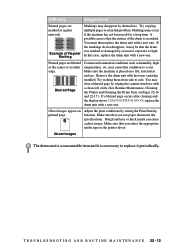
...that you use paper that you still see white spots and the LCD shows CHANGE DRUM SOON, replace the drum unit with a new one . After cleaning, if the printed pages are stained corona with a new one. Nothing is printed black. Printed pages have vertical stripes. If you use heat...white stripes or faint images and the LCD shows CHANGE DRUM SOON, replace the drum unit with a new one . If after cleaning, you still see dark stripes or toner stains and the LCD shows CHANGE DRUM SOON, replace the drum unit with a new one . Wipe electric terminals referring to occur. Check the machine...
...that you use paper that you still see white spots and the LCD shows CHANGE DRUM SOON, replace the drum unit with a new one . After cleaning, if the printed pages are stained corona with a new one. Nothing is printed black. Printed pages have vertical stripes. If you use heat...white stripes or faint images and the LCD shows CHANGE DRUM SOON, replace the drum unit with a new one . If after cleaning, you still see dark stripes or toner stains and the LCD shows CHANGE DRUM SOON, replace the drum unit with a new one . Wipe electric terminals referring to occur. Check the machine...
Users Manual - English
Page 205
... that the surface of Regular Marking Markings may be that meets the specifications. Markings may clear a blurred page by themselves. You must then replace the drum unit with a new one. You may occur if the machine has not been used for a long time. T R O U B L E S H O O T I N G A N D R O U T I N E M A I N T E N A N C....) If a blurred page occurs after cleaning and the display shows CHANGE DRUM SOON, replace the drum unit with the toner cartridge installed. In this case, replace the drum unit with a new one . Try rocking them from side to occur. Try copying multiple pages ...
... that the surface of Regular Marking Markings may be that meets the specifications. Markings may clear a blurred page by themselves. You must then replace the drum unit with a new one. You may occur if the machine has not been used for a long time. T R O U B L E S H O O T I N G A N D R O U T I N E M A I N T E N A N C....) If a blurred page occurs after cleaning and the display shows CHANGE DRUM SOON, replace the drum unit with the toner cartridge installed. In this case, replace the drum unit with a new one . Try rocking them from side to occur. Try copying multiple pages ...
Users Manual - English
Page 211
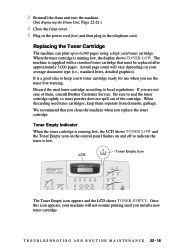
... does not spill out of them separate from domestic garbage. When discarding used toner cartridge according to keep them , consult Brother Customer Service. 3 Reinstall the drum unit into the machine. (See Replacing the Drum Unit, Page 22-21.) 4 Close the front cover. 5 Plug in the power cord first, and then plug in the telephone...
... does not spill out of them separate from domestic garbage. When discarding used toner cartridge according to keep them , consult Brother Customer Service. 3 Reinstall the drum unit into the machine. (See Replacing the Drum Unit, Page 22-21.) 4 Close the front cover. 5 Plug in the power cord first, and then plug in the telephone...
Users Manual - English
Page 214
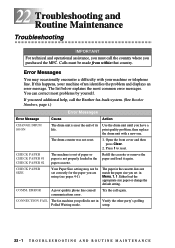
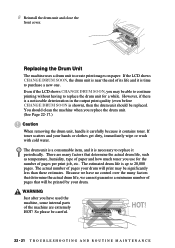
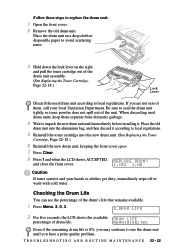
...output print quality (even before CHANGE DRUM SOON is up to purchase a new one. There are extremely HOT! WARNING Just after you replace the drum unit. (See Page 22-17.) Caution When removing the drum unit, handle it carefully because it contains toner. The drum unit is a consumable item, and ..., humidity, type of pages that determine the actual drum life, we have used the machine, some internal parts of pages per print job, etc. So please be careful. Replacing the Drum Unit The machine uses a drum unit to replace the drum unit for the number of the machine are many factors...
...output print quality (even before CHANGE DRUM SOON is up to purchase a new one. There are extremely HOT! WARNING Just after you replace the drum unit. (See Page 22-17.) Caution When removing the drum unit, handle it carefully because it contains toner. The drum unit is a consumable item, and ..., humidity, type of pages that determine the actual drum life, we have used the machine, some internal parts of pages per print job, etc. So please be careful. Replacing the Drum Unit The machine uses a drum unit to replace the drum unit for the number of the machine are many factors...
Users Manual - English
Page 215
... your local Sanitation Department. If you are not sure of the drum unit assembly. (See Replacing the Toner Cartridge, Page 22-18.) Lock Lever Discard the used drum units, keep them , call your hands or clothes get dirty,... I N G A N D R O U T I N E M A I N T E N A N C E 22 - 22 Place the old drum unit into the new drum unit. (See Replacing the Toner Cartridge, Page 22-18.) 6 Reinstall the new drum unit, keeping the front cover open. 7 Press Clear. 8 Press 1 and when the LCD shows ACCEPTED, REPLACE DRUM? Follow these steps to local regulations. 5 Reinstall the toner cartridge into...
... your local Sanitation Department. If you are not sure of the drum unit assembly. (See Replacing the Toner Cartridge, Page 22-18.) Lock Lever Discard the used drum units, keep them , call your hands or clothes get dirty,... I N G A N D R O U T I N E M A I N T E N A N C E 22 - 22 Place the old drum unit into the new drum unit. (See Replacing the Toner Cartridge, Page 22-18.) 6 Reinstall the new drum unit, keeping the front cover open. 7 Press Clear. 8 Press 1 and when the LCD shows ACCEPTED, REPLACE DRUM? Follow these steps to local regulations. 5 Reinstall the toner cartridge into...
Users Manual - English
Page 227
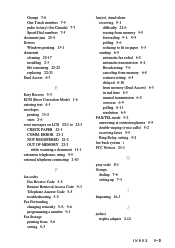
... S-1 Groups dialing 7-6 setting up 7-3 I Importing 16-3 J jack(s) triplex adapter 2-12 INDEX I-2 Groups 7-6 One Touch numbers 7-5 pulse (rotary) (for Canada) 7-7 Speed Dial numbers 7-5 document jam 22-4 Drivers Windows printing 13-1 drum unit cleaning 22-17 installing 2-3 life remaining 22-22 replacing 22-21 Dual Access 6-3 E Easy Receive 5-3 ECM (Error Correction Mode) 1-6 entering text 4-3 envelopes...
... S-1 Groups dialing 7-6 setting up 7-3 I Importing 16-3 J jack(s) triplex adapter 2-12 INDEX I-2 Groups 7-6 One Touch numbers 7-5 pulse (rotary) (for Canada) 7-7 Speed Dial numbers 7-5 document jam 22-4 Drivers Windows printing 13-1 drum unit cleaning 22-17 installing 2-3 life remaining 22-22 replacing 22-21 Dual Access 6-3 E Easy Receive 5-3 ECM (Error Correction Mode) 1-6 entering text 4-3 envelopes...
Service Manual
Page 130
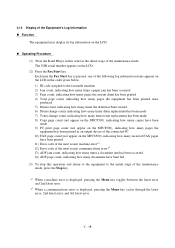
...error is displayed, pressing the Menu key toggles between the latest error and 2nd latest error. *2 When a communications error is pressed, one of the following log information items appears on the LCD in the initial stage of the Equipment's Log Information n Function The equipment may... pages the equipment has been printed since produced 5) Drum count, indicating how many times the drum has been rotated 6) Drum change count, indicating how many times drum replacement has been made 7) Toner change count, indicating how many times toner replacement has been made 8) Copy page count (not appear...
...error is displayed, pressing the Menu key toggles between the latest error and 2nd latest error. *2 When a communications error is pressed, one of the following log information items appears on the LCD in the initial stage of the Equipment's Log Information n Function The equipment may... pages the equipment has been printed since produced 5) Drum count, indicating how many times the drum has been rotated 6) Drum change count, indicating how many times drum replacement has been made 7) Toner change count, indicating how many times toner replacement has been made 8) Copy page count (not appear...
Service Manual
Page 155
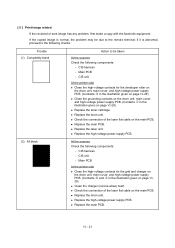
...the following checks: Trouble (1) Completely blank (2) All black Action to be due to the remote terminal; Main PCB - l Replace the laser unit. l Replace the drum unit. if it is normal, the problem may be taken At the scanner Check the following components: - At the scanner ...Check the following components: - l Replace the drum unit. l Check the connection of the laser flat cable on the main PCB. l Replace the main PCB. CIS unit - l Check the connection of the laser flat cable on the main PCB. l Replace the high-voltage power supply PCB.
...the following checks: Trouble (1) Completely blank (2) All black Action to be due to the remote terminal; Main PCB - l Replace the laser unit. l Replace the drum unit. if it is normal, the problem may be taken At the scanner Check the following components: - At the scanner ...Check the following components: - l Replace the drum unit. l Check the connection of the laser flat cable on the main PCB. l Replace the main PCB. CIS unit - l Check the connection of the laser flat cable on the main PCB. l Replace the high-voltage power supply PCB.
Service Manual
Page 156
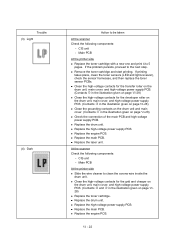
... and charger on the drum unit, main cover, and high-voltage power supply PCB. (Contacts T and R in the illustration given on page VI- 28) l Replace the toner cartridge. l Replace the laser unit. Main PCB At the printer side l Replace the toner cartridge with a new one and print 4 to ...clean the corona wire inside the drum unit. l Clean the high-voltage contacts for the developer roller on...
... and charger on the drum unit, main cover, and high-voltage power supply PCB. (Contacts T and R in the illustration given on page VI- 28) l Replace the toner cartridge. l Replace the laser unit. Main PCB At the printer side l Replace the toner cartridge with a new one and print 4 to ...clean the corona wire inside the drum unit. l Clean the high-voltage contacts for the developer roller on...
Service Manual
Page 157
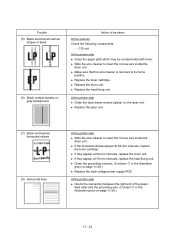
... the wire cleaner is returned to clean the corona wire inside the drum unit. l Replace the heat-fixing unit. l If they appear at 79-mm intervals, replace the heat-fixing unit. l If they appear at 39-mm intervals, replace the toner cartridge. l Replace the laser unit. (7) Black and blurred horizontal stripes (8) Horizontal lines At the printer...
... the wire cleaner is returned to clean the corona wire inside the drum unit. l Replace the heat-fixing unit. l If they appear at 79-mm intervals, replace the heat-fixing unit. l If they appear at 39-mm intervals, replace the toner cartridge. l Replace the laser unit. (7) Black and blurred horizontal stripes (8) Horizontal lines At the printer...
Service Manual
Page 158
...) Dropout, white spots, or hollow print At the printer side l Check the connection of the photo-sensitive drum with a cotton swab. CIS unit At the printer side l Clean the laser beam window on the laser unit. l Replace the drum unit. Trouble (9) White vertical streaks (10) White horizontal stripes Action to be taken At the scanner...
...) Dropout, white spots, or hollow print At the printer side l Check the connection of the photo-sensitive drum with a cotton swab. CIS unit At the printer side l Clean the laser beam window on the laser unit. l Replace the drum unit. Trouble (9) White vertical streaks (10) White horizontal stripes Action to be taken At the scanner...
Service Manual
Page 160
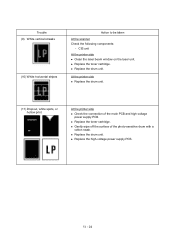
...to be taken At the printer side l Clean the pressure roller in the heat-fixing unit. fixing unit. l Replace the high-voltage power supply PCB. l Replace the drum unit. Replace the heat- At the printer side l Instruct the user to use paper of paper (16) Poor fixing (17... wipe off the surface of the heater thermistor. l Replace the drum unit. l Replace the low-voltage power supply PCB. l Replace the heat-fixing unit. VI - 26 l Check the fitting of the photo-sensitive drum with a cotton swab. l Replace the drum unit. Trouble (15) Dirt back of the recommended weight...
...to be taken At the printer side l Clean the pressure roller in the heat-fixing unit. fixing unit. l Replace the high-voltage power supply PCB. l Replace the drum unit. Replace the heat- At the printer side l Instruct the user to use paper of paper (16) Poor fixing (17... wipe off the surface of the heater thermistor. l Replace the drum unit. l Replace the low-voltage power supply PCB. l Replace the heat-fixing unit. VI - 26 l Check the fitting of the photo-sensitive drum with a cotton swab. l Replace the drum unit. Trouble (15) Dirt back of the recommended weight...
Service Manual
Page 161
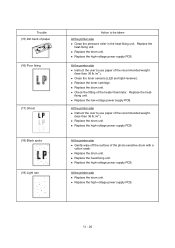
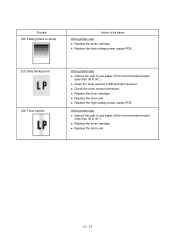
... (black to white) Action to use paper of the recommended weight (less than 36 lb./m2). l Replace the high-voltage power supply PCB. l Replace the toner cartridge. l Check the toner sensor harnesses. l Replace the drum unit.. l Replace the drum unit. At the printer side l Instruct the user to use paper of the recommended weight (less than...
... (black to white) Action to use paper of the recommended weight (less than 36 lb./m2). l Replace the high-voltage power supply PCB. l Replace the toner cartridge. l Check the toner sensor harnesses. l Replace the drum unit.. l Replace the drum unit. At the printer side l Instruct the user to use paper of the recommended weight (less than...


