
Quick Setup Guide - English
Page 1
.... To avoid danger of your machine. USA/CAN Version 0 1 Quick Setup Guide Start Here MFC-8480DN MFC-8680DN Before you can use the machine, read this Quick Setup Guide for MFC-8680DN) AC Power Cord Quick Setup Guide User's Guide CD-ROMS (Windows®) (Macintosh)...Interface Cable (MFC-8680DN only) Telephone Line Cord WARNING Plastic bags are used in other languages, please visit http://solutions.brother.com/. IMPORTANT DO NOT connect the interface cable yet. 1 Unpack the machine and check the components Drum Unit Assembly (including Standard Toner Cartridge for MFC-8480DN, High-...
.... To avoid danger of your machine. USA/CAN Version 0 1 Quick Setup Guide Start Here MFC-8480DN MFC-8680DN Before you can use the machine, read this Quick Setup Guide for MFC-8680DN) AC Power Cord Quick Setup Guide User's Guide CD-ROMS (Windows®) (Macintosh)...Interface Cable (MFC-8680DN only) Telephone Line Cord WARNING Plastic bags are used in other languages, please visit http://solutions.brother.com/. IMPORTANT DO NOT connect the interface cable yet. 1 Unpack the machine and check the components Drum Unit Assembly (including Standard Toner Cartridge for MFC-8480DN, High-...

Quick Setup Guide - English
Page 4
b Press the front cover release button and open the front cover a. e Put the drum unit assembly into the machine until it from side to side several times to distribute the toner evenly inside the assembly. 2 Install the drum unit and toner cartridge assembly IMPORTANT DO NOT connect the interface cable yet. d Gently shake it clicks into place. 1 f Close the front cover of the machine. c Unpack the drum unit and toner cartridge assembly. 4 a Remove the protective tape and film covering the scanner glass.
b Press the front cover release button and open the front cover a. e Put the drum unit assembly into the machine until it from side to side several times to distribute the toner evenly inside the assembly. 2 Install the drum unit and toner cartridge assembly IMPORTANT DO NOT connect the interface cable yet. d Gently shake it clicks into place. 1 f Close the front cover of the machine. c Unpack the drum unit and toner cartridge assembly. 4 a Remove the protective tape and film covering the scanner glass.

Quick Setup Guide - English
Page 33
... on the LCD. For more information about the optional Lower Tray Unit and compatible SO-DIMM Memory please see the User's Guide or visit http://solutions.brother.com/. Toner cartridge TN-620/TN-650 Drum unit DR-620 33 For more details about the consumables for your machine..., visit http://www.brother.com/original/ or contact your local Brother re-seller. Options and Consumables Options Lower Tray Unit LT-5300 SO-DIMM ...
... on the LCD. For more information about the optional Lower Tray Unit and compatible SO-DIMM Memory please see the User's Guide or visit http://solutions.brother.com/. Toner cartridge TN-620/TN-650 Drum unit DR-620 33 For more details about the consumables for your machine..., visit http://www.brother.com/original/ or contact your local Brother re-seller. Options and Consumables Options Lower Tray Unit LT-5300 SO-DIMM ...
Users Manual - English
Page 4
.../ 1-877-BROTHER http://www.brother.ca/ Description Toner Cartridge Standard Toner Cartridge High Yield Drum Unit Telephone Line Cord User's Guide Quick Setup Guide Item TN-620 (Approx. 3,000 pages) 1 TN-650 (Approx. 8,000 pages) 1 DR-620 (Approx. 25,000 pages) 2 LG3077001 LX2016001 (English for USA and Canada) LS7438002 (French for Canada) (MFC-8480DN, MFC-8680DN) LX2021001...
.../ 1-877-BROTHER http://www.brother.ca/ Description Toner Cartridge Standard Toner Cartridge High Yield Drum Unit Telephone Line Cord User's Guide Quick Setup Guide Item TN-620 (Approx. 3,000 pages) 1 TN-650 (Approx. 8,000 pages) 1 DR-620 (Approx. 25,000 pages) 2 LG3077001 LX2016001 (English for USA and Canada) LS7438002 (French for Canada) (MFC-8480DN, MFC-8680DN) LX2021001...
Users Manual - English
Page 8
...advised by Brother, its Authorized Service Centres, will repair or replace (at Brother Authorized Service Centres throughout Canada. When shipping or transporting your Canadian Proof of Purchase in Canada. For Laser units: Failure to remove the Toner Cartridge (and Toner Drum Unit, waste toner...year from the date of purchase for labour and parts, Brother International Corporation (Canada) Ltd. ("Brother"), or its Authorized Service Centres, Distributors, Dealers, Agents or employees, shall create another warranty or modify this MFC/Fax machine shall be liable for any indirect, incidental,...
...advised by Brother, its Authorized Service Centres, will repair or replace (at Brother Authorized Service Centres throughout Canada. When shipping or transporting your Canadian Proof of Purchase in Canada. For Laser units: Failure to remove the Toner Cartridge (and Toner Drum Unit, waste toner...year from the date of purchase for labour and parts, Brother International Corporation (Canada) Ltd. ("Brother"), or its Authorized Service Centres, Distributors, Dealers, Agents or employees, shall create another warranty or modify this MFC/Fax machine shall be liable for any indirect, incidental,...
Users Manual - English
Page 14
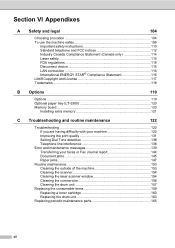
...safety instructions 110 Standard telephone and FCC notices 112 Industry Canada Compliance Statement (Canada only 114 Laser safety 114 FDA regulations 115 Disconnect device 115 LAN connection 116 International ENERGY STAR® Compliance Statement 116 Libtiff Copyright and License 117 Trademarks...118 B Options 119... Routine maintenance 153 Cleaning the outside of the machine 153 Cleaning the scanner 154 Cleaning the laser scanner window 154 Cleaning the corona wire 156 Cleaning the drum unit 157 Replacing the consumable items 159 Replacing a toner cartridge 160 Replacing the...
...safety instructions 110 Standard telephone and FCC notices 112 Industry Canada Compliance Statement (Canada only 114 Laser safety 114 FDA regulations 115 Disconnect device 115 LAN connection 116 International ENERGY STAR® Compliance Statement 116 Libtiff Copyright and License 117 Trademarks...118 B Options 119... Routine maintenance 153 Cleaning the outside of the machine 153 Cleaning the scanner 154 Cleaning the laser scanner window 154 Cleaning the corona wire 156 Cleaning the drum unit 157 Replacing the consumable items 159 Replacing a toner cartridge 160 Replacing the...

Users Manual - English
Page 35
Types of labels to avoid 2 Do not use with the carrier sheet exposed because your machine. IMPORTANT Avoid feeding labels with a laser machine. Labels exceeding this material is acrylic-based since this specification may not feed or print properly and may cause damage to withstand a ... print on most types of labels designed for a period of 0.1 seconds. Adhesives should not come in contact with spaces may stick to the drum unit or rollers and cause jams and print quality problems. No adhesive should have an adhesive that is more stable at the high temperatures in this...
Types of labels to avoid 2 Do not use with the carrier sheet exposed because your machine. IMPORTANT Avoid feeding labels with a laser machine. Labels exceeding this material is acrylic-based since this specification may not feed or print properly and may cause damage to withstand a ... print on most types of labels designed for a period of 0.1 seconds. Adhesives should not come in contact with spaces may stick to the drum unit or rollers and cause jams and print quality problems. No adhesive should have an adhesive that is more stable at the high temperatures in this...
Users Manual - English
Page 122
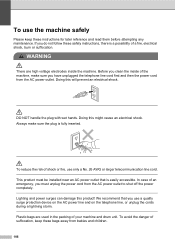
... sure you do not follow these instructions for later reference and read them before attempting any maintenance. To reduce the risk of your machine and drum unit. To use the machine safely A Please keep these bags away from the AC power outlet. If you have unplugged the telephone line cord first and...
... sure you do not follow these instructions for later reference and read them before attempting any maintenance. To reduce the risk of your machine and drum unit. To use the machine safely A Please keep these bags away from the AC power outlet. If you have unplugged the telephone line cord first and...
Users Manual - English
Page 142
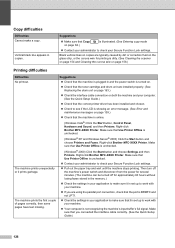
...Check that the toner cartridge and drum unit are typically caused by dirt or correction fluid on the glass strip, or the corona wire for approximately 60 hours without losing faxes stored in the memory.) „ Check the settings in copies. Right-click Brother MFC-XXXX Printer. The machine prints ... LPT1. „ Check the settings in your application to make a copy. Black vertical lines on copies are installed properly. (See Replacing the drum unit on page 163.) „ Check the interface cable connection on both the machine and your computer. (See the Quick Setup Guide.) „ ...
...Check that the toner cartridge and drum unit are typically caused by dirt or correction fluid on the glass strip, or the corona wire for approximately 60 hours without losing faxes stored in the memory.) „ Check the settings in copies. Right-click Brother MFC-XXXX Printer. The machine prints ... LPT1. „ Check the settings in your application to make a copy. Black vertical lines on copies are installed properly. (See Replacing the drum unit on page 163.) „ Check the interface cable connection on both the machine and your computer. (See the Quick Setup Guide.) „ ...
Users Manual - English
Page 147
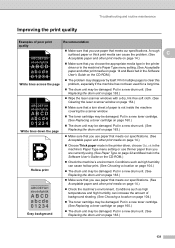
...ABCDEFGH abcdefghijk ABCD abcde 01234 White lines down the page „ Wipe the laser scanner windows with a dry, lint-free soft cloth. (See Cleaning the laser scanner window on page 104.) „ The drum unit may be damaged. Conditions such as high humidity can increase the amount of background... „ Check the machine's environment. Put in the Software User's Guide on page 160.) „ The drum unit may be damaged. Put in a new drum unit. (See Replacing the drum unit on page 163.) „ Make sure that you use paper that meets our specifications. (See Acceptable paper and...
...ABCDEFGH abcdefghijk ABCD abcde 01234 White lines down the page „ Wipe the laser scanner windows with a dry, lint-free soft cloth. (See Cleaning the laser scanner window on page 104.) „ The drum unit may be damaged. Conditions such as high humidity can increase the amount of background... „ Check the machine's environment. Put in the Software User's Guide on page 160.) „ The drum unit may be damaged. Put in a new drum unit. (See Replacing the drum unit on page 163.) „ Make sure that you use paper that meets our specifications. (See Acceptable paper and...
Users Manual - English
Page 148
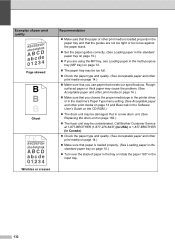
Examples of paper in the tray or rotate the paper 180° in the input tray. 132 Call Brother Customer Service at 1-877-BROTHER (1-877-276-8437) (in USA) or 1-877-BROTHER (in Canada). „ Check the paper type and quality. (See Acceptable paper and other print media on page 14.) &#... User's Guide on page 163.) „ The fuser unit may be contaminated. Roughsurfaced paper or thick paper may cause the problem. (See Acceptable paper and other print media on page 14 and Basic tab in a new drum unit. (See Replacing the drum unit on the CD-ROM.) „ The drum unit may be damaged.
Examples of paper in the tray or rotate the paper 180° in the input tray. 132 Call Brother Customer Service at 1-877-BROTHER (1-877-276-8437) (in USA) or 1-877-BROTHER (in Canada). „ Check the paper type and quality. (See Acceptable paper and other print media on page 14.) &#... User's Guide on page 163.) „ The fuser unit may be contaminated. Roughsurfaced paper or thick paper may cause the problem. (See Acceptable paper and other print media on page 14 and Basic tab in a new drum unit. (See Replacing the drum unit on the CD-ROM.) „ The drum unit may be damaged.
Users Manual - English
Page 151
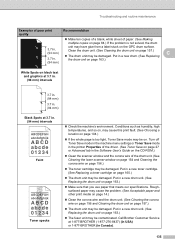
...tab in a new drum unit. (See Replacing the drum unit on page 163.) „ The fuser unit may be damaged. Put in a new drum unit. (See Replacing the drum unit on black text and graphics at 3.7 in. (94 mm) intervals Black Spots at 1-877-BROTHER (1-877-276-8437) (in USA) or 1-877-BROTHER (in a new ... and routine maintenance Examples of poor print quality Recommendation „ Make ten copies of a blank, white sheet of the drum unit. (See Cleaning the laser scanner window on page 154 and Cleaning the corona wire on page 156.) „ The toner cartridge may be damaged.
...tab in a new drum unit. (See Replacing the drum unit on page 163.) „ The fuser unit may be damaged. Put in a new drum unit. (See Replacing the drum unit on black text and graphics at 3.7 in. (94 mm) intervals Black Spots at 1-877-BROTHER (1-877-276-8437) (in USA) or 1-877-BROTHER (in a new ... and routine maintenance Examples of poor print quality Recommendation „ Make ten copies of a blank, white sheet of the drum unit. (See Cleaning the laser scanner window on page 154 and Cleaning the corona wire on page 156.) „ The toner cartridge may be damaged.
Users Manual - English
Page 152
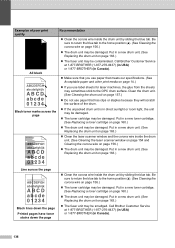
...Acceptable paper and other print media on page 163.) „ The fuser unit may be smudged. Call Brother Customer Service at 1-877-BROTHER (1-877-276-8437) (in USA) or 1-877-BROTHER (in a new drum unit. (See Replacing the drum unit on page 14.) „ If you use paper that has clips ...156.) „ The drum unit may be damaged. Put in a new drum unit. (See Replacing the drum unit on page 157.) „ Do not use label sheets for laser machines, the glue from the sheets may sometimes stick to the OPC drum surface. Clean the drum unit. (See Cleaning the drum unit on page 163.) &#...
...Acceptable paper and other print media on page 163.) „ The fuser unit may be smudged. Call Brother Customer Service at 1-877-BROTHER (1-877-276-8437) (in USA) or 1-877-BROTHER (in a new drum unit. (See Replacing the drum unit on page 14.) „ If you use paper that has clips ...156.) „ The drum unit may be damaged. Put in a new drum unit. (See Replacing the drum unit on page 157.) „ Do not use label sheets for laser machines, the glue from the sheets may sometimes stick to the OPC drum surface. Clean the drum unit. (See Cleaning the drum unit on page 163.) &#...
Users Manual - English
Page 155
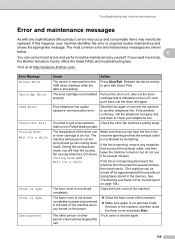
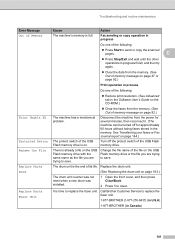
...stopped the call the telephone company and ask them to another telephone line. If you will pause its current print job and go into the drum unit again. The machine will hear the cooling fan running while the LCD shows Cooling Down, and Wait for a while Cover is Open Cover is...more help, the Brother Solutions Center offers the latest FAQs and troubleshooting tips. Reinsert the device and try to poll a fax machine Check the other Try to be turned off for several minutes. You tried to print with any obstacles that is not installed Pull out the drum unit, take out the...
...stopped the call the telephone company and ask them to another telephone line. If you will pause its current print job and go into the drum unit again. The machine will hear the cooling fan running while the LCD shows Cooling Down, and Wait for a while Cover is Open Cover is...more help, the Brother Solutions Center offers the latest FAQs and troubleshooting tips. Reinsert the device and try to poll a fax machine Check the other Try to be turned off for several minutes. You tried to print with any obstacles that is not installed Pull out the drum unit, take out the...
Users Manual - English
Page 156
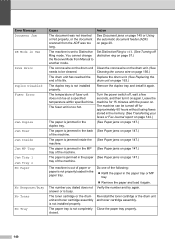
... Remove the paper and load it again. The paper is jammed in the paper (See Paper jams on . The toner cartridge or the drum unit and toner cartridge assembly is not completely closed. Set Distinctive Ring to be turned off for 15 minutes with the power on page 147.) ...Tray Cause Action The document was too long. Do one of the machine. The temperature of paper or paper is not installed properly. Re-install the toner cartridge or the drum unit and toner cartridge assembly. Replace the drum unit. (See Replacing the drum unit on page 147.) machine. Turn the power switch ...
... Remove the paper and load it again. The paper is jammed in the paper (See Paper jams on . The toner cartridge or the drum unit and toner cartridge assembly is not completely closed. Set Distinctive Ring to be turned off for 15 minutes with the power on page 147.) ...Tray Cause Action The document was too long. Do one of the machine. The temperature of paper or paper is not installed properly. Re-install the toner cartridge or the drum unit and toner cartridge assembly. Replace the drum unit. (See Replacing the drum unit on page 147.) machine. Turn the power switch ...
Users Manual - English
Page 157
...Do one of the following : „ Reduce print resolution. (See Advanced tab in Canada) 141 Replace Parts The drum unit is full. Drum (See Replacing the drum unit on the USB Flash memory drive with the same name as the file you are trying to replace the fuser unit. 1-877-BROTHER ...(1-877-276-8437) (in U.S.A) 1-877-BROTHER (in the Software User's Guide on...
...Do one of the following : „ Reduce print resolution. (See Advanced tab in Canada) 141 Replace Parts The drum unit is full. Drum (See Replacing the drum unit on the USB Flash memory drive with the same name as the file you are trying to replace the fuser unit. 1-877-BROTHER ...(1-877-276-8437) (in U.S.A) 1-877-BROTHER (in the Software User's Guide on...
Users Manual - English
Page 163
... the machine. If you have not installed a drum unit or have just used the machine, some internal parts of the machine DO NOT touch the shaded parts shown in your Brother machine. CAUTION HOT SURFACE After you have installed the drum unit improperly, then this you have installed both a ...toner cartridge and a drum unit in the illustration. c Close the MP...
... the machine. If you have not installed a drum unit or have just used the machine, some internal parts of the machine DO NOT touch the shaded parts shown in your Brother machine. CAUTION HOT SURFACE After you have installed the drum unit improperly, then this you have installed both a ...toner cartridge and a drum unit in the illustration. c Close the MP...
Users Manual - English
Page 165
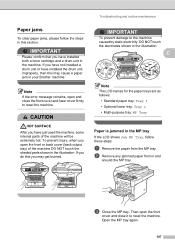
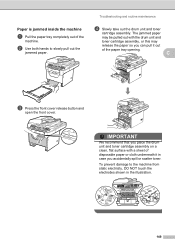
... the paper so you can pull it in the illustration. 149 IMPORTANT We recommend that you place the drum unit and toner cartridge assembly on a clean, flat surface with the drum unit and toner cartridge assembly, or this may be pulled out with a sheet of disposable paper or cloth ...underneath it out of the machine. Troubleshooting and routine maintenance d Slowly take out the drum unit and toner cartridge assembly. C c Press the front cover release button and open the front cover. b Use both hands to the machine from static...
... the paper so you can pull it in the illustration. 149 IMPORTANT We recommend that you place the drum unit and toner cartridge assembly on a clean, flat surface with the drum unit and toner cartridge assembly, or this may be pulled out with a sheet of disposable paper or cloth ...underneath it out of the machine. Troubleshooting and routine maintenance d Slowly take out the drum unit and toner cartridge assembly. C c Press the front cover release button and open the front cover. b Use both hands to the machine from static...

Users Manual - English
Page 166
... assembly on your hands or clothes, wipe or wash it in the illustrations below. Take out the jammed paper if there is any inside the drum unit and toner cartridge assembly C a Press the front cover release button and open the front cover. c Push down the blue lock lever and take ...out the drum unit and toner cartridge assembly. g Put the paper tray firmly back in the machine. If toner scatters on a clean, flat surface with cold water at ...
... assembly on your hands or clothes, wipe or wash it in the illustrations below. Take out the jammed paper if there is any inside the drum unit and toner cartridge assembly C a Press the front cover release button and open the front cover. c Push down the blue lock lever and take ...out the drum unit and toner cartridge assembly. g Put the paper tray firmly back in the machine. If toner scatters on a clean, flat surface with cold water at ...

Users Manual - English
Page 167
... Slowly take out the drum unit and toner cartridge assembly. C f Put the drum unit and toner cartridge assembly back in properly, the blue lock lever will lift automatically. Paper is jammed at the left and right hand sides toward you put it lock into the drum unit until you accidentally spill ...or scatter toner. IMPORTANT We recommend that you place the drum unit and toner cartridge assembly on a clean, flat surface with a sheet of the machine C a ...
... Slowly take out the drum unit and toner cartridge assembly. C f Put the drum unit and toner cartridge assembly back in properly, the blue lock lever will lift automatically. Paper is jammed at the left and right hand sides toward you put it lock into the drum unit until you accidentally spill ...or scatter toner. IMPORTANT We recommend that you place the drum unit and toner cartridge assembly on a clean, flat surface with a sheet of the machine C a ...


