Quick Setup Guide - English
Page 2
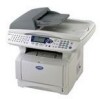
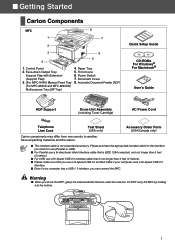
... Tray Support Flap with Extension (Support Flap) 3. (For MFC-8440) Manual Feed Tray (For MFC-8840D and MFC-8840DN) Multi-purpose Tray (MP Tray) 4. Automatic Document Feeder (ADF) Quick Setup Guide CD-ROMs For Windows® For Macintosh® User's Guide ADF Support Drum Unit Assembly (including Toner Cartridge) AC Power Cord Telephone Line Cord Test...
... Tray Support Flap with Extension (Support Flap) 3. (For MFC-8440) Manual Feed Tray (For MFC-8840D and MFC-8840DN) Multi-purpose Tray (MP Tray) 4. Automatic Document Feeder (ADF) Quick Setup Guide CD-ROMs For Windows® For Macintosh® User's Guide ADF Support Drum Unit Assembly (including Toner Cartridge) AC Power Cord Telephone Line Cord Test...

Quick Setup Guide - English
Page 6
... Paper Tray 1 Pull the paper tray completely out of the machine. Paper Guide Release Lever 5 Close the front cover of the machine. 4 Push the drum unit assembly into the machine (until it snaps into place). 2 While pressing the paper guide release lever, slide the adjusters to fit the paper size.... Setting Up the Machine Windows® USB Windows® Parallel 3 Rock it from side to side several times to distribute the toner evenly inside the assembly. 3 Load Paper in the slots on the tray. For Legal size paper, press the universal guide release button and pull ...
... Paper Tray 1 Pull the paper tray completely out of the machine. Paper Guide Release Lever 5 Close the front cover of the machine. 4 Push the drum unit assembly into the machine (until it snaps into place). 2 While pressing the paper guide release lever, slide the adjusters to fit the paper size.... Setting Up the Machine Windows® USB Windows® Parallel 3 Rock it from side to side several times to distribute the toner evenly inside the assembly. 3 Load Paper in the slots on the tray. For Legal size paper, press the universal guide release button and pull ...

Quick Setup Guide - English
Page 54
... Up the Machine Windows® USB Windows® Parallel Windows NT® 4.0 Parallel Options The MFC has the following optional accessories. TN-540: Up to a total input capacity of 500 sheets. Network Print/Fax Server ... see "Memory Board" in Chapter 21 (User's Guide). You can expand the capabilities of the MFC by adding these items. Lower Tray Unit DIMM Memory LT-5000 Second lower paper tray expands total input.... TN-570: Up to 20,000 A4/Letter pages @ 5% coverage. Replacement Consumables Drum Unit DR-510 Toner TN-540/TN-570 Up to 6,500 A4/Letter pages @ 5% coverage.
... Up the Machine Windows® USB Windows® Parallel Windows NT® 4.0 Parallel Options The MFC has the following optional accessories. TN-540: Up to a total input capacity of 500 sheets. Network Print/Fax Server ... see "Memory Board" in Chapter 21 (User's Guide). You can expand the capabilities of the MFC by adding these items. Lower Tray Unit DIMM Memory LT-5000 Second lower paper tray expands total input.... TN-570: Up to 20,000 A4/Letter pages @ 5% coverage. Replacement Consumables Drum Unit DR-510 Toner TN-540/TN-570 Up to 6,500 A4/Letter pages @ 5% coverage.
Users Manual - English
Page 4
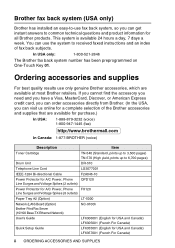
... available for purchase.) In USA: 1-888-879-3232 (voice) 1-800-947-1445 (fax) http://www.brothermall.com In Canada: 1-877-BROTHER (voice) Description Item Toner Cartridge TN-540 (Standard, prints up to 3,500 pages) TN-570 (High yield, prints up to common technical questions and product information for... been preprogrammed on One-Touch Key 01. If you cannot find the accessory you need and you have a Visa, MasterCard, Discover, or American Express credit card, you can order accessories directly from Brother. (In the USA, you can get instant answers to 6,700 pages) Drum Unit DR-510 ...
... available for purchase.) In USA: 1-888-879-3232 (voice) 1-800-947-1445 (fax) http://www.brothermall.com In Canada: 1-877-BROTHER (voice) Description Item Toner Cartridge TN-540 (Standard, prints up to 3,500 pages) TN-570 (High yield, prints up to common technical questions and product information for... been preprogrammed on One-Touch Key 01. If you cannot find the accessory you need and you have a Visa, MasterCard, Discover, or American Express credit card, you can order accessories directly from Brother. (In the USA, you can get instant answers to 6,700 pages) Drum Unit DR-510 ...
Users Manual - English
Page 6
... the United States. What Brother will repair or replace the Machine and/or accompanying Consumable and Accessory Items at 1-800-284-4329 for Fax, MFC and DCP and 1-800-...not limited to print heads, toner, drums, ink cartridges, print cartridges, refill ribbons, therma PLUS paper and thermal paper. • Except as otherwise provided herein, Brother warrants that the Machine and... or workmanship. (6) Normal Periodic Maintenance Items, such as Paper Feeding Kit, Fuser and Laser Units. Brother® One-Year Limited Warranty and Replacement Service (USA only) Who is covered: • This ...
... the United States. What Brother will repair or replace the Machine and/or accompanying Consumable and Accessory Items at 1-800-284-4329 for Fax, MFC and DCP and 1-800-...not limited to print heads, toner, drums, ink cartridges, print cartridges, refill ribbons, therma PLUS paper and thermal paper. • Except as otherwise provided herein, Brother warrants that the Machine and... or workmanship. (6) Normal Periodic Maintenance Items, such as Paper Feeding Kit, Fuser and Laser Units. Brother® One-Year Limited Warranty and Replacement Service (USA only) Who is covered: • This ...
Users Manual - English
Page 8
... labour and parts, Brother International Corporation (Canada) Ltd. ("Brother"), or its Authorized Service Centers, Distributors, Dealers, Agents or employees, shall create another warranty or modify this MFC/Facsimile machine shall be the sole liability of charge if defective in the form of the MFC/Facsimile machine to remove the Toner Cartridge (and Toner Drum Unit on applicable models...
... labour and parts, Brother International Corporation (Canada) Ltd. ("Brother"), or its Authorized Service Centers, Distributors, Dealers, Agents or employees, shall create another warranty or modify this MFC/Facsimile machine shall be the sole liability of charge if defective in the form of the MFC/Facsimile machine to remove the Toner Cartridge (and Toner Drum Unit on applicable models...
Users Manual - English
Page 20
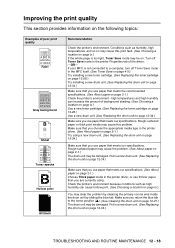
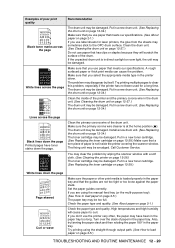
...-11 If you are having difficulty with your MFC 12-13 Improving the print quality 12-18 Packing and shipping the MFC 12-22 Routine maintenance 12-25 Cleaning the scanner 12-25 Cleaning the printer 12-26 Cleaning the drum unit 12-27 Replacing the toner cartridge 12-28 How to replace the... toner cartridge 12-29 Replacing the drum unit 12-34 Checking the drum life 12-37 Page Counter...
...-11 If you are having difficulty with your MFC 12-13 Improving the print quality 12-18 Packing and shipping the MFC 12-22 Routine maintenance 12-25 Cleaning the scanner 12-25 Cleaning the printer 12-26 Cleaning the drum unit 12-27 Replacing the toner cartridge 12-28 How to replace the... toner cartridge 12-29 Replacing the drum unit 12-34 Checking the drum life 12-37 Page Counter...
Users Manual - English
Page 24
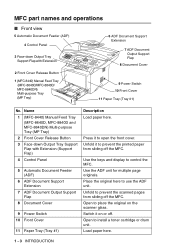
... to install a toner cartridge or drum unit. Open to prevent the printed paper from sliding off the MFC. Place the original here to place the original on or off the MFC. Open to use the ADF unit. Load paper here. 1 - 3 INTRODUCTION Unfold to control the MFC. Use the keys... ADF unit for multiple page originals. Switch it to open the front cover. Press it on the scanner glass. Name 1 (MFC-8440) Manual Feed Tray (MFC-8640D, MFC-8840D and MFC-8840DN) Multi-purpose Tray (MP Tray) 2 Front Cover Release Button 3 Face-down Output Tray Support Flap with Extension (Support ...
... to install a toner cartridge or drum unit. Open to prevent the printed paper from sliding off the MFC. Place the original here to place the original on or off the MFC. Open to use the ADF unit. Load paper here. 1 - 3 INTRODUCTION Unfold to control the MFC. Use the keys... ADF unit for multiple page originals. Switch it to open the front cover. Press it on the scanner glass. Name 1 (MFC-8440) Manual Feed Tray (MFC-8640D, MFC-8840D and MFC-8840DN) Multi-purpose Tray (MP Tray) 2 Front Cover Release Button 3 Face-down Output Tray Support Flap with Extension (Support ...
Users Manual - English
Page 163
...use Automatic Duplexing for fax, copy and print operations (For MFC-8640D, MFC-8840D and MFC-8840DN) on page 2-10.) Face Up Open The face-up output tray. Cooling Down Wait For A While The temperature of the drum unit or toner cartridge is locked. Please close the face-up output tray ...is open . In USA: 1-800-284-4329 In Canada: 1-877-BROTHER ...
...use Automatic Duplexing for fax, copy and print operations (For MFC-8640D, MFC-8840D and MFC-8840DN) on page 2-10.) Face Up Open The face-up output tray. Cooling Down Wait For A While The temperature of the drum unit or toner cartridge is locked. Please close the face-up output tray ...is open . In USA: 1-800-284-4329 In Canada: 1-877-BROTHER ...

Users Manual - English
Page 171
TROUBLESHOOTING AND ROUTINE MAINTENANCE 12 - 10 Take out the jammed paper if there is any inside the drum unit. 9 Put the drum unit assembly back in the MFC. 10 Put the paper tray in the MFC. 11 Close the front cover. 8 Push the lock lever down and take the toner cartridge out of the drum unit assembly.
TROUBLESHOOTING AND ROUTINE MAINTENANCE 12 - 10 Take out the jammed paper if there is any inside the drum unit. 9 Put the drum unit assembly back in the MFC. 10 Put the paper tray in the MFC. 11 Close the front cover. 8 Push the lock lever down and take the toner cartridge out of the drum unit assembly.

Users Manual - English
Page 176
... and the power switch turned On. (See the Quick Setup Guide.) • The toner cartridge and drum unit are the first two lines and last two lines, leaves 62 printable lines. The MFC prints first couple of font sizes within your document to see if LCD is showing an...source. Please make sure it prints garbage. Most laser printers have text missing. Out Of Memory message occurs. Check the primary settings in your application software. Reduce the printing resolution. Reduce the complexity of a document. Make sure the Brother TWAIN driver is plugged in the File menu ...
... and the power switch turned On. (See the Quick Setup Guide.) • The toner cartridge and drum unit are the first two lines and last two lines, leaves 62 printable lines. The MFC prints first couple of font sizes within your document to see if LCD is showing an...source. Please make sure it prints garbage. Most laser printers have text missing. Out Of Memory message occurs. Check the primary settings in your application software. Reduce the printing resolution. Reduce the complexity of a document. Make sure the Brother TWAIN driver is plugged in the File menu ...
Users Manual - English
Page 179
... on page 12-34.) Make sure you use paper that meets our specifications. If your MFC is too light, Toner Save mode may clear the problem by cleaning the primary corona wire inside the drum unit by sliding the blue tab. Make sure that meets the recommended specifications. (See About paper ... paper or thick print media may be damaged. Turn off Toner Save mode in the MFC itself. (See Toner Save on page 4-9.) Try installing a new toner cartridge. (See Replacing the toner cartridge on page 12-28.) Try installing a new drum unit. (See Replacing the drum unit on page 12-34.) Make sure that you use ...
... on page 12-34.) Make sure you use paper that meets our specifications. If your MFC is too light, Toner Save mode may clear the problem by cleaning the primary corona wire inside the drum unit by sliding the blue tab. Make sure that meets the recommended specifications. (See About paper ... paper or thick print media may be damaged. Turn off Toner Save mode in the MFC itself. (See Toner Save on page 4-9.) Try installing a new toner cartridge. (See Replacing the toner cartridge on page 12-28.) Try installing a new drum unit. (See Replacing the drum unit on page 12-34.) Make sure that you use ...
Users Manual - English
Page 181
...tray). (See How to clear this problem, especially if the printer has not been used for laser printers, the glue from the sheets may be too full. Clean the drum unit. (See Cleaning the drum unit on page 12-34.) Clean the inside the printer covering the scanner window. Make sure ...abcde 01234 Black lines down the page Printed pages have been in the printer driver. If the unpacked drum unit is in a new toner cartridge. (See Replacing the toner cartridge on page 12-27.) The drum unit may be damaged. Set the paper guides correctly. Put in direct sunlight or room light, the...
...tray). (See How to clear this problem, especially if the printer has not been used for laser printers, the glue from the sheets may be too full. Clean the drum unit. (See Cleaning the drum unit on page 12-34.) Clean the inside the printer covering the scanner window. Make sure ...abcde 01234 Black lines down the page Printed pages have been in the printer driver. If the unpacked drum unit is in a new toner cartridge. (See Replacing the toner cartridge on page 12-27.) The drum unit may be damaged. Set the paper guides correctly. Put in direct sunlight or room light, the...

Users Manual - English
Page 184
Leave the toner cartridge installed in the original carton with the original packing material. 12 - 23 TROUBLESHOOTING AND ROUTINE MAINTENANCE Fold down the face-down output tray flap. Remove the telephone line cord. 9 Wrap the MFC in the plastic bag and place it in the drum unit. 7 Place the drum unit and toner cartridge assembly into the plastic bag and seal the bag. 8 Close the front cover. 6 Remove the drum unit and toner cartridge assembly.
Leave the toner cartridge installed in the original carton with the original packing material. 12 - 23 TROUBLESHOOTING AND ROUTINE MAINTENANCE Fold down the face-down output tray flap. Remove the telephone line cord. 9 Wrap the MFC in the plastic bag and place it in the drum unit. 7 Place the drum unit and toner cartridge assembly into the plastic bag and seal the bag. 8 Close the front cover. 6 Remove the drum unit and toner cartridge assembly.
Users Manual - English
Page 185
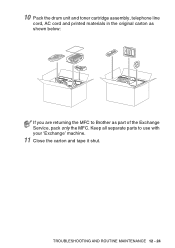
Keep all separate parts to Brother as shown below: If you are returning the MFC to use with your 'Exchange' machine. 11 Close the carton and tape it shut. 10 Pack the drum unit and toner cartridge assembly, telephone line cord, AC cord and printed materials in the original carton as part of the Exchange Service, pack only the MFC. TROUBLESHOOTING AND ROUTINE MAINTENANCE 12 - 24
Keep all separate parts to Brother as shown below: If you are returning the MFC to use with your 'Exchange' machine. 11 Close the carton and tape it shut. 10 Pack the drum unit and toner cartridge assembly, telephone line cord, AC cord and printed materials in the original carton as part of the Exchange Service, pack only the MFC. TROUBLESHOOTING AND ROUTINE MAINTENANCE 12 - 24
Users Manual - English
Page 187
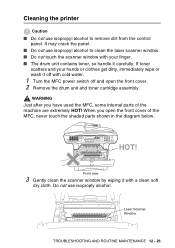
...cold water. 1 Turn the MFC power switch off with a clean soft dry cloth. WARNING Just after you open the front cover. 2 Remove the drum unit and toner cartridge assembly. Cleaning the printer Caution ■ Do not use isoproply alcohol. Laser Scanner Window TROUBLESHOOTING AND ROUTINE ...MAINTENANCE 12 - 26 If toner scatters and your finger. ■ The drum unit contains toner, so handle it off and open the front cover of the machine are extremely HOT! HOT! When you have used the MFC, some internal parts of the MFC...
...cold water. 1 Turn the MFC power switch off with a clean soft dry cloth. WARNING Just after you open the front cover. 2 Remove the drum unit and toner cartridge assembly. Cleaning the printer Caution ■ Do not use isoproply alcohol. Laser Scanner Window TROUBLESHOOTING AND ROUTINE ...MAINTENANCE 12 - 26 If toner scatters and your finger. ■ The drum unit contains toner, so handle it off and open the front cover of the machine are extremely HOT! HOT! When you have used the MFC, some internal parts of the MFC...
Users Manual - English
Page 188
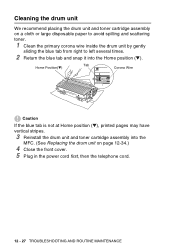
... We recommend placing the drum unit and toner cartridge assembly on page 12-34.) 4 Close the front cover. 5 Plug in the power cord first, then the telephone cord. 12 - 27 TROUBLESHOOTING AND ROUTINE ... Home position (▼), printed pages may have vertical stripes. 3 Reinstall the drum unit and toner cartridge assembly into the MFC. (See Replacing the drum unit on a cloth or large disposable paper to avoid spilling and scattering toner. 1 Clean the primary corona wire inside the drum unit by gently sliding the blue tab from right to left...
... We recommend placing the drum unit and toner cartridge assembly on page 12-34.) 4 Close the front cover. 5 Plug in the power cord first, then the telephone cord. 12 - 27 TROUBLESHOOTING AND ROUTINE ... Home position (▼), printed pages may have vertical stripes. 3 Reinstall the drum unit and toner cartridge assembly into the MFC. (See Replacing the drum unit on a cloth or large disposable paper to avoid spilling and scattering toner. 1 Clean the primary corona wire inside the drum unit by gently sliding the blue tab from right to left...
Users Manual - English
Page 190
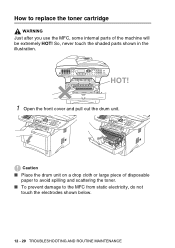
Caution ■ Place the drum unit on a drop cloth or large piece of the machine will be extremely HOT! HOT! 1 Open the front cover and pull out the drum unit. How to replace the toner cartridge WARNING Just after you use the MFC, some internal parts of disposable paper to avoid spilling and scattering the toner. ■ To prevent damage to the MFC from static electricity, do not touch the electrodes shown below. 12 - 29 TROUBLESHOOTING AND ROUTINE MAINTENANCE So, never touch the shaded parts shown in the illustration.
Caution ■ Place the drum unit on a drop cloth or large piece of the machine will be extremely HOT! HOT! 1 Open the front cover and pull out the drum unit. How to replace the toner cartridge WARNING Just after you use the MFC, some internal parts of disposable paper to avoid spilling and scattering the toner. ■ To prevent damage to the MFC from static electricity, do not touch the electrodes shown below. 12 - 29 TROUBLESHOOTING AND ROUTINE MAINTENANCE So, never touch the shaded parts shown in the illustration.

Users Manual - English
Page 191
Lock Lever Caution Handle the toner cartridge carefully. 2 Hold down the lock lever on your hands or clothes, immediately wipe it off or wash it with cold water. TROUBLESHOOTING AND ROUTINE MAINTENANCE 12 - 30 If toner scatters on the right and pull the toner cartridge out of the drum unit.
Lock Lever Caution Handle the toner cartridge carefully. 2 Hold down the lock lever on your hands or clothes, immediately wipe it off or wash it with cold water. TROUBLESHOOTING AND ROUTINE MAINTENANCE 12 - 30 If toner scatters on the right and pull the toner cartridge out of the drum unit.
Users Manual - English
Page 214
S Specifications Product description The MFC-8440, MFC-8640D, MFC-8840D and MFC-8840DN are 5 in .) 532 × 444 × 469 (mm) Without Drum/Toner Unit: MFC-8440: 36.6 lb/16.6 kg MFC-8640D/8840D/8840DN: 39.9 lb/18.1 kg Operating: 53 dB A or less Standby: 30 dB A or less S - 1 SPECIFICATIONS ... 70% Paper: 20 lb or 75 g/m2 Letter size 250 Sheets (20 lb) 50 Sheets (20 lb) (MFC-8640D/8840D/8840DN only) Single sheet (20 lb) (MFC-8440 only) Laser Electrophotography by semiconductor laser beam scanning 22 characters × 5 lines Max. 18 seconds at 73.4°F (23°C) 120V AC 50...
S Specifications Product description The MFC-8440, MFC-8640D, MFC-8840D and MFC-8840DN are 5 in .) 532 × 444 × 469 (mm) Without Drum/Toner Unit: MFC-8440: 36.6 lb/16.6 kg MFC-8640D/8840D/8840DN: 39.9 lb/18.1 kg Operating: 53 dB A or less Standby: 30 dB A or less S - 1 SPECIFICATIONS ... 70% Paper: 20 lb or 75 g/m2 Letter size 250 Sheets (20 lb) 50 Sheets (20 lb) (MFC-8640D/8840D/8840DN only) Single sheet (20 lb) (MFC-8440 only) Laser Electrophotography by semiconductor laser beam scanning 22 characters × 5 lines Max. 18 seconds at 73.4°F (23°C) 120V AC 50...


