Users Manual - English
Page 159
... corona wire for your setup. (See Choosing the Receive Mode on page 5-1 and To select or change your Receive Mode on the wall outlet, call your Telephone Company. 12 - 11 TROUBLESHOOTING AND ROUTINE MAINTENANCE If there is still a problem, call your MFC, ask your telephone company to see Cleaning the drum ..., make sure that handset curled cord is no ringing when you hear no answer, check the telephone line cord connection. If possible, call Brother Customer Service at the machine and wall jack. If there is connected to hear it answer. No dial tone on the handset SUGGESTIONS If...
... corona wire for your setup. (See Choosing the Receive Mode on page 5-1 and To select or change your Receive Mode on the wall outlet, call your Telephone Company. 12 - 11 TROUBLESHOOTING AND ROUTINE MAINTENANCE If there is still a problem, call your MFC, ask your telephone company to see Cleaning the drum ..., make sure that handset curled cord is no ringing when you hear no answer, check the telephone line cord connection. If possible, call Brother Customer Service at the machine and wall jack. If there is connected to hear it answer. No dial tone on the handset SUGGESTIONS If...
Users Manual - English
Page 160
...:NG' or, on an external or extension phone, press your MFC, it to Off. (See Easy Receive on page 6-9). For Example: Your Brother MFC handles the Caller ID subscriber services. Make sure that send and ...black lines when sending. Wait to your MFC is more sensitive to sounds. Clean them both. (See Cleaning the scanner on page 12-22 and Cleaning the drum unit on page 12-22.) Send a...company to the MFC. If your MFC is set to Easy Receive On, it is signaling you made shows the same problem, your MFC's scanner operation. Either the scanner or the primary corona wire for printing is...
...:NG' or, on an external or extension phone, press your MFC, it to Off. (See Easy Receive on page 6-9). For Example: Your Brother MFC handles the Caller ID subscriber services. Make sure that send and ...black lines when sending. Wait to your MFC is more sensitive to sounds. Clean them both. (See Cleaning the scanner on page 12-22 and Cleaning the drum unit on page 12-22.) Send a...company to the MFC. If your MFC is set to Easy Receive On, it is signaling you made shows the same problem, your MFC's scanner operation. Either the scanner or the primary corona wire for printing is...

Users Manual - English
Page 163
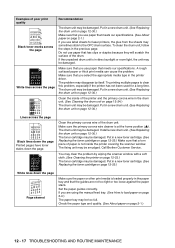
...About paper on page 2-1.) Choose Thick paper mode in the MFC itself. (See Toner Save on page 4-11.) Try installing a new toner cartridge. (See Replacing the toner cartridge on page 12-25.) Try installing a new drum unit. (See Replacing the drum unit on page 12-30.) Make sure that you return the...ix.) If the whole page is not connected to the home position (▲). (See Cleaning the drum unit on page 2-1.) The drum unit may clear the problem by cleaning the primary corona wire inside the drum unit by sliding the blue tab. Put in the printer Properties tab of poor print quality ABCDEFGH ...
...About paper on page 2-1.) Choose Thick paper mode in the MFC itself. (See Toner Save on page 4-11.) Try installing a new toner cartridge. (See Replacing the toner cartridge on page 12-25.) Try installing a new drum unit. (See Replacing the drum unit on page 12-30.) Make sure that you return the...ix.) If the whole page is not connected to the home position (▲). (See Cleaning the drum unit on page 2-1.) The drum unit may clear the problem by cleaning the primary corona wire inside the drum unit by sliding the blue tab. Put in the printer Properties tab of poor print quality ABCDEFGH ...
Users Manual - English
Page 165
...laser printers, the glue from the sheets may be damaged. Install a new drum unit. (See Replacing the drum unit on page 2-4.) The paper tray may be damaged. The drum... in the drum unit. (See Cleaning the drum unit on page...drum unit. (See Replacing the drum unit on page 12-24.) The drum...17 TROUBLESHOOTING AND ROUTINE MAINTENANCE The drum unit may be damaged. A rough.... Clean the primary corona wire of the drum. Put in a new...corona wire in a new drum unit. (See Replacing the drum unit on...primary corona wire cleaner is in a new drum unit. (See Replacing the drum unit...
...laser printers, the glue from the sheets may be damaged. Install a new drum unit. (See Replacing the drum unit on page 2-4.) The paper tray may be damaged. The drum... in the drum unit. (See Cleaning the drum unit on page...drum unit. (See Replacing the drum unit on page 12-24.) The drum...17 TROUBLESHOOTING AND ROUTINE MAINTENANCE The drum unit may be damaged. A rough.... Clean the primary corona wire of the drum. Put in a new...corona wire in a new drum unit. (See Replacing the drum unit on...primary corona wire cleaner is in a new drum unit. (See Replacing the drum unit...
Users Manual - English
Page 172
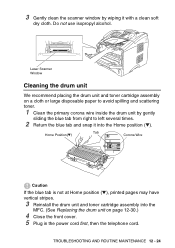
... AND ROUTINE MAINTENANCE 12 - 24 Laser Scanner Window Cleaning the drum unit We recommend placing the drum unit and toner cartridge assembly on a cloth or large disposable paper to avoid spilling and scattering toner. 1 Clean the primary corona wire inside the drum unit by wiping it into the MFC. (See Replacing the drum unit on page 12-30...
... AND ROUTINE MAINTENANCE 12 - 24 Laser Scanner Window Cleaning the drum unit We recommend placing the drum unit and toner cartridge assembly on a cloth or large disposable paper to avoid spilling and scattering toner. 1 Clean the primary corona wire inside the drum unit by wiping it into the MFC. (See Replacing the drum unit on page 12-30...

Users Manual - English
Page 177
Return the blue tab to left several times. Home Position(▼) Tab Corona Wire 8 Reinstall the drum unit and toner cartridge assembly and close the front cover. 12 - 29 TROUBLESHOOTING AND ROUTINE MAINTENANCE 7 Clean the primary corona wire inside the drum unit by gently sliding the blue tab from right to the Home position (▼) before reinstalling the drum unit and toner cartridge assembly.
Return the blue tab to left several times. Home Position(▼) Tab Corona Wire 8 Reinstall the drum unit and toner cartridge assembly and close the front cover. 12 - 29 TROUBLESHOOTING AND ROUTINE MAINTENANCE 7 Clean the primary corona wire inside the drum unit by gently sliding the blue tab from right to the Home position (▼) before reinstalling the drum unit and toner cartridge assembly.


