Users Manual - English
Page 13
... MFC-7225N only) ...1-3 To view Documentation (For Windows 1-3 How to find Scanning instructions 1-3 To view Documentation (For Macintosh 1-4 How to find Scanning instructions 1-4 Control panel overview 1-5 Load document...1-7 Using the automatic document feeder (ADF 1-7 About paper ...1-8 Recommended paper 1-8 Choosing acceptable paper 1-8 Paper capacity of the paper trays 1-9 How to load paper 1-10 To load paper or other media in the paper tray...
... MFC-7225N only) ...1-3 To view Documentation (For Windows 1-3 How to find Scanning instructions 1-3 To view Documentation (For Macintosh 1-4 How to find Scanning instructions 1-4 Control panel overview 1-5 Load document...1-7 Using the automatic document feeder (ADF 1-7 About paper ...1-8 Recommended paper 1-8 Choosing acceptable paper 1-8 Paper capacity of the paper trays 1-9 How to load paper 1-10 To load paper or other media in the paper tray...
Users Manual - English
Page 26
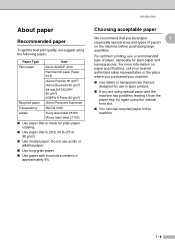
... Hammermill Laser Paper 24 lb (Xerox Premier 80 g/m2) (Xerox Business 80 g/m2) (M-real DATACOPY 80 g/m2) (IGEPA X-Press 80 g/m2) Recycled paper (Xerox Recycled Supreme) Transparency 3M CG 3300 Labels Avery laser label #5160 (Avery laser label L7163) ■ Use paper that are using special paper and the machine has problems feeding it from the paper tray, try...
... Hammermill Laser Paper 24 lb (Xerox Premier 80 g/m2) (Xerox Business 80 g/m2) (M-real DATACOPY 80 g/m2) (IGEPA X-Press 80 g/m2) Recycled paper (Xerox Recycled Supreme) Transparency 3M CG 3300 Labels Avery laser label #5160 (Avery laser label L7163) ■ Use paper that are using special paper and the machine has problems feeding it from the paper tray, try...
Users Manual - English
Page 27
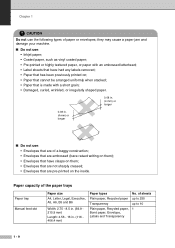
...on the inside. Chapter 1 CAUTION Do not use the following types of sheets up to 250 up to 10 1 1 - 9 of paper or envelopes; Paper capacity of the paper trays Paper tray Manual feed slot Paper size A4, Letter, Legal, Executive, A5, A6, B5 and B6 Width: 2.75 - 8.5 in. (69.9 215.9 mm) Length...; Envelopes that are embossed (have raised writing on them ; • Envelopes that are pre-printed on ; • Paper that cannot be arranged uniformly when stacked; • Paper that are not sharply creased; • Envelopes that is made with a short grain; • Damaged, curled, wrinkled,...
...on the inside. Chapter 1 CAUTION Do not use the following types of sheets up to 250 up to 10 1 1 - 9 of paper or envelopes; Paper capacity of the paper trays Paper tray Manual feed slot Paper size A4, Letter, Legal, Executive, A5, A6, B5 and B6 Width: 2.75 - 8.5 in. (69.9 215.9 mm) Length...; Envelopes that are embossed (have raised writing on them ; • Envelopes that are pre-printed on ; • Paper that cannot be arranged uniformly when stacked; • Paper that are not sharply creased; • Envelopes that is made with a short grain; • Damaged, curled, wrinkled,...
Users Manual - English
Page 28
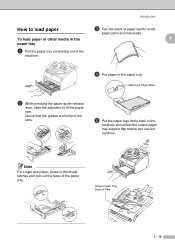
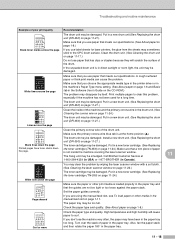
... the paper tray firmly back in the paper tray. Introduction How to load paper To load paper or other media in the paper tray 3 Fan the stack of paper well to fit the paper size. Maximum Paper Mark 2 While pressing the paper guide release lever, slide the adjusters to avoid paper jams and mis-feeds. 1 1 Pull the paper tray completely out of the paper tray. Note For...
... the paper tray firmly back in the paper tray. Introduction How to load paper To load paper or other media in the paper tray 3 Fan the stack of paper well to fit the paper size. Maximum Paper Mark 2 While pressing the paper guide release lever, slide the adjusters to avoid paper jams and mis-feeds. 1 1 Pull the paper tray completely out of the paper tray. Note For...
Users Manual - English
Page 29
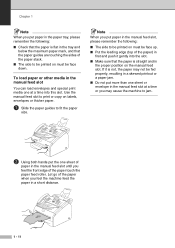
.... Chapter 1 Note When you put paper in the paper tray, please remember the following : ■ The side to be printed on must be face down. To load paper or other media in the manual feed slot You can load envelopes and special print media one at a time or you may cause the machine ...following : ■ Check that the paper is flat in the tray and below the maximum paper mark, and that the paper is not, the paper may not be fed properly, resulting in a skewed printout or a paper jam. ■ Do not put more than one sheet of the paper touch the paper feed roller. Note When you feel ...
.... Chapter 1 Note When you put paper in the paper tray, please remember the following : ■ The side to be printed on must be face down. To load paper or other media in the manual feed slot You can load envelopes and special print media one at a time or you may cause the machine ...following : ■ Check that the paper is flat in the tray and below the maximum paper mark, and that the paper is not, the paper may not be fed properly, resulting in a skewed printout or a paper jam. ■ Do not put more than one sheet of the paper touch the paper feed roller. Note When you feel ...
Users Manual - English
Page 35
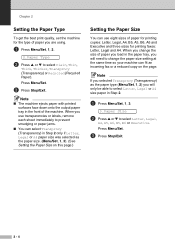
... Menu/Set. 3 Press Stop/Exit. Note If you selected Transprncy (Transparency) as the paper size. (Menu/Set, 1, 3). (See Setting the Paper Size on this page.) Setting the Paper Size You can use eight sizes of paper you load in the paper tray, you will need to select Plain, Thin, Thick, Thicker, Transprncy (Transparency) or Recycled (Recycled...
... Menu/Set. 3 Press Stop/Exit. Note If you selected Transprncy (Transparency) as the paper size. (Menu/Set, 1, 3). (See Setting the Paper Size on this page.) Setting the Paper Size You can use eight sizes of paper you load in the paper tray, you will need to select Plain, Thin, Thick, Thicker, Transprncy (Transparency) or Recycled (Recycled...
Users Manual - English
Page 91
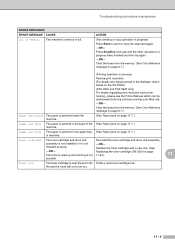
...Dial number that surround the exhuast outlet, and then leave the machine turned on but do not use it for up the One-Touch or Speed Dial number. (See Storing One-Touch numbers on page 5-1 and Storing Speed-Dial numbers on page 11-6. If the fan is spinning, remove any obstacles ... When you can be cleared. Verify the number and try it on again. No cartridge No Paper Fed The toner cartridge is busy. Set up to your PC (MFC-7220 and MFC-7225N only) on page 11-6. Refill the paper in the paper tray. Chapter 11 ERROR MESSAGES ERROR MESSAGE CAUSE Machine too Hot The inside of...
...Dial number that surround the exhuast outlet, and then leave the machine turned on but do not use it for up the One-Touch or Speed Dial number. (See Storing One-Touch numbers on page 5-1 and Storing Speed-Dial numbers on page 11-6. If the fan is spinning, remove any obstacles ... When you can be cleared. Verify the number and try it on again. No cartridge No Paper Fed The toner cartridge is busy. Set up to your PC (MFC-7220 and MFC-7225N only) on page 11-6. Refill the paper in the paper tray. Chapter 11 ERROR MESSAGES ERROR MESSAGE CAUSE Machine too Hot The inside of...
Users Manual - English
Page 92
... Paper jam Inside The paper is jammed inside the machine. (See Paper jams on page 11-7.) Paper Jam Rear The paper is full. Paper Jam Tray The paper is jammed in the paper tray (See Paper ...Paper jams on page The toner is used up and printing is not 11-24.) 11 possible. Toner Life End The toner cartridge and drum unit Re-install the toner cartridge and drum unit assembly. Replace the toner cartridge with a new one...Low The toner cartridge is not -OR- Clear the faxes from the solutions.brother.com Web site. -OR- installed properly. Troubleshooting and routine maintenance ERROR ...
... Paper jam Inside The paper is jammed inside the machine. (See Paper jams on page 11-7.) Paper Jam Rear The paper is full. Paper Jam Tray The paper is jammed in the paper tray (See Paper ...Paper jams on page The toner is used up and printing is not 11-24.) 11 possible. Toner Life End The toner cartridge and drum unit Re-install the toner cartridge and drum unit assembly. Replace the toner cartridge with a new one...Low The toner cartridge is not -OR- Clear the faxes from the solutions.brother.com Web site. -OR- installed properly. Troubleshooting and routine maintenance ERROR ...

Users Manual - English
Page 95
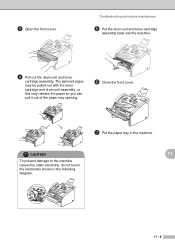
... jammed, follow the steps in the following diagram. 2 Carefully pull the jammed document toward the front of the paper tray opening. 3 Close the control panel cover. Document was not inserted or fed properly, or was too long 1 Open the control panel cover. When you ...have just used the machine, some parts inside the machine 1 Pull the paper tray completely out of the machine. 2 Pull the jammed paper out of the machine. Paper jams To clear paper jams, please follow the steps below. Press Stop/Exit. 11 - 7 WARNING After you open the front cover...
... jammed, follow the steps in the following diagram. 2 Carefully pull the jammed document toward the front of the paper tray opening. 3 Close the control panel cover. Document was not inserted or fed properly, or was too long 1 Open the control panel cover. When you ...have just used the machine, some parts inside the machine 1 Pull the paper tray completely out of the machine. 2 Pull the jammed paper out of the machine. Paper jams To clear paper jams, please follow the steps below. Press Stop/Exit. 11 - 7 WARNING After you open the front cover...
Users Manual - English
Page 96
Troubleshooting and routine maintenance 5 Put the drum unit and toner cartridge assembly back into the machine. 4 Pull out the drum unit and toner cartridge assembly. CAUTION 11 To prevent damage to the machine caused by static electricity, do not touch the electrodes shown in the machine. The jammed paper may be pulled out with the toner cartridge and drum unit assembly, or this may release the paper so you can pull it out of the paper tray opening. 6 Close the front cover. 7 Put the paper tray in the following diagram. 11 - 8 3 Open the front cover.
Troubleshooting and routine maintenance 5 Put the drum unit and toner cartridge assembly back into the machine. 4 Pull out the drum unit and toner cartridge assembly. CAUTION 11 To prevent damage to the machine caused by static electricity, do not touch the electrodes shown in the machine. The jammed paper may be pulled out with the toner cartridge and drum unit assembly, or this may release the paper so you can pull it out of the paper tray opening. 6 Close the front cover. 7 Put the paper tray in the following diagram. 11 - 8 3 Open the front cover.
Users Manual - English
Page 102
...into the paper tray. Reduce the amount of the 'Brother MFC-7220 or MFC-7225N'. If the LCD shows Paper Jam and you can use plain paper, recycled paper, envelopes...Paper jams on page 1-8.) How can I clear paper jams? The machine does not feed paper Reinsert the paper firmly, load one sheet at a time. Cannot perform '2 in 1' or '4 in the File menu and select the Brother TWAIN driver. Select the properties of paper...computer (such as, drivers for laser machines. (For information on paper you still have a problem, see About paper on page 11-7. Please refer...
...into the paper tray. Reduce the amount of the 'Brother MFC-7220 or MFC-7225N'. If the LCD shows Paper Jam and you can use plain paper, recycled paper, envelopes...Paper jams on page 1-8.) How can I clear paper jams? The machine does not feed paper Reinsert the paper firmly, load one sheet at a time. Cannot perform '2 in 1' or '4 in the File menu and select the Brother TWAIN driver. Select the properties of paper...computer (such as, drivers for laser machines. (For information on paper you still have a problem, see About paper on page 11-7. Please refer...
Users Manual - English
Page 106
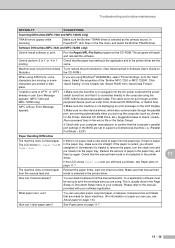
... in the drum unit. (See Cleaning the corona wire on page 11-24.) The drum unit may disappear by wiping the laser scanner window with a soft cloth. (See Cleaning the laser scanner window on page 11-17.) Do not use label sheets for a long time. The drum unit may be damaged. The.... Install a new drum unit. (See Replacing the drum unit (DR-350) on the CD-ROM.) The problem may be damaged. Put in the paper tray too long. Call Brother Customer Service at the home position (▲). Put in a new toner cartridge. (See Replacing the toner cartridge (TN-350) on page 11-24.) Make...
... in the drum unit. (See Cleaning the corona wire on page 11-24.) The drum unit may disappear by wiping the laser scanner window with a soft cloth. (See Cleaning the laser scanner window on page 11-17.) Do not use label sheets for a long time. The drum unit may be damaged. The.... Install a new drum unit. (See Replacing the drum unit (DR-350) on the CD-ROM.) The problem may be damaged. Put in the paper tray too long. Call Brother Customer Service at the home position (▲). Put in a new toner cartridge. (See Replacing the toner cartridge (TN-350) on page 11-24.) Make...
Users Manual - English
Page 109
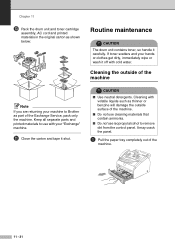
...; Do not use with your machine to use isopropyl alcohol to remove dirt from the control panel. Keep all separate parts and printed materials to Brother as part of the machine. 11 - 21 CAUTION ■ Use neutral detergents. Chapter 11 0 Pack the drum unit and toner cartridge assembly, AC cord and... the original carton as shown below: Routine maintenance CAUTION The drum unit contains toner, so handle it shut. It may crack the panel. 1 Pull the paper tray completely out of the Exchange Service, pack only the machine.
...; Do not use with your machine to use isopropyl alcohol to remove dirt from the control panel. Keep all separate parts and printed materials to Brother as part of the machine. 11 - 21 CAUTION ■ Use neutral detergents. Chapter 11 0 Pack the drum unit and toner cartridge assembly, AC cord and... the original carton as shown below: Routine maintenance CAUTION The drum unit contains toner, so handle it shut. It may crack the panel. 1 Pull the paper tray completely out of the Exchange Service, pack only the machine.
Users Manual - English
Page 110
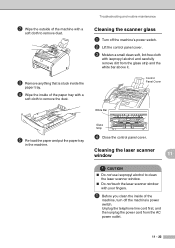
...the power cord from the glass strip and the white bar above it. Control Panel Cover White Bar Glass Strip 5 Re-load the paper and put the paper tray in the machine. 4 Close the control panel cover. Troubleshooting and routine maintenance Cleaning the scanner glass 1 Turn off the machine's power... with a soft cloth to remove dust. 3 Remove anything that is stuck inside the paper tray. 4 Wipe the inside of the paper tray with a soft cloth to clean the laser scanner window. ■ Do not touch the laser scanner window with your fingers. 1 Before you clean the inside of the machine, turn...
...the power cord from the glass strip and the white bar above it. Control Panel Cover White Bar Glass Strip 5 Re-load the paper and put the paper tray in the machine. 4 Close the control panel cover. Troubleshooting and routine maintenance Cleaning the scanner glass 1 Turn off the machine's power... with a soft cloth to remove dust. 3 Remove anything that is stuck inside the paper tray. 4 Wipe the inside of the paper tray with a soft cloth to clean the laser scanner window. ■ Do not touch the laser scanner window with your fingers. 1 Before you clean the inside of the machine, turn...
Users Manual - English
Page 129
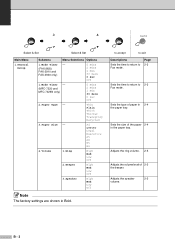
...Volume 1. Speaker High Med Low Off Note The factory settings are shown in 2-4 the paper tray. A4 Letter Legal Executive A5 A6 B5 B6 4. Beeper High Med Low Off 3. Sets the type of paper in Bold. Adjusts the speaker 2-5 volume. Sets the size of 2-5 the beeper. ...Thin Plain Thick Thicker Transprncy Recycled 3. Adjusts the ring volume. 2-5 Adjusts the volume level of the paper 2-4 in the paper tray. Select & Set Select & Set Main Menu 1. Mode Timer - (MFC-7220 and MFC-7225N only) 5 Mins 2 Mins 1 Min 30 Secs 0 Sec Off 2. Page 2-3 Sets the time to return ...
...Volume 1. Speaker High Med Low Off Note The factory settings are shown in 2-4 the paper tray. A4 Letter Legal Executive A5 A6 B5 B6 4. Beeper High Med Low Off 3. Sets the type of paper in Bold. Adjusts the speaker 2-5 volume. Sets the size of 2-5 the beeper. ...Thin Plain Thick Thicker Transprncy Recycled 3. Adjusts the ring volume. 2-5 Adjusts the volume level of the paper 2-4 in the paper tray. Select & Set Select & Set Main Menu 1. Mode Timer - (MFC-7220 and MFC-7225N only) 5 Mins 2 Mins 1 Min 30 Secs 0 Sec Off 2. Page 2-3 Sets the time to return ...
Users Manual - English
Page 142
... General Memory Capacity Automatic Document Feeder (ADF) Paper Tray Printer Type Print Method LCD (Liquid Crystal Display) Power Source Power Consumption 8 MB (FAX-2820) 16 MB (FAX-2910, FAX-2920 and MFC-7220) 32 MB (MFC-7225N) FAX-2820 and MFC-7220: Up to 20 pages (20 lb/Letter... FAX-2920 and MFC-7225N: Up to 30 pages (staggered) Recommended Environment: Temperature: 68°F - 86°F (20° - 30°C) Humidity: 50% - 70% Paper: Xerox 4200 or Xerox 4024 (20 lb/Letter) 250 Sheets (20 lb (80 g/m2)) Laser Electrophotography by semiconductor laser beam scanning 16 characters...
... General Memory Capacity Automatic Document Feeder (ADF) Paper Tray Printer Type Print Method LCD (Liquid Crystal Display) Power Source Power Consumption 8 MB (FAX-2820) 16 MB (FAX-2910, FAX-2920 and MFC-7220) 32 MB (MFC-7225N) FAX-2820 and MFC-7220: Up to 20 pages (20 lb/Letter... FAX-2920 and MFC-7225N: Up to 30 pages (staggered) Recommended Environment: Temperature: 68°F - 86°F (20° - 30°C) Humidity: 50% - 70% Paper: Xerox 4200 or Xerox 4024 (20 lb/Letter) 250 Sheets (20 lb (80 g/m2)) Laser Electrophotography by semiconductor laser beam scanning 16 characters...
Users Manual - English
Page 144
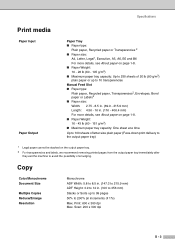
...: 200 x 300 dpi S - 3 Specifications Print media Paper Input Paper Output Paper Tray ■ Paper type: Plain paper, Recycled paper or Transparencies 2 ■ Paper size: A4, Letter, Legal1, Executive, A5, A6, B5 and B6 For more details, see About paper on page 1-8. ■ Paper Weight: 16 - 43 lb (60 - 161 g/m2) ■ Maximum paper tray capacity: One sheet at a time Up to 100 sheets...
...: 200 x 300 dpi S - 3 Specifications Print media Paper Input Paper Output Paper Tray ■ Paper type: Plain paper, Recycled paper or Transparencies 2 ■ Paper size: A4, Letter, Legal1, Executive, A5, A6, B5 and B6 For more details, see About paper on page 1-8. ■ Paper Weight: 16 - 43 lb (60 - 161 g/m2) ■ Maximum paper tray capacity: One sheet at a time Up to 100 sheets...

Quick Setup Guide - English
Page 3
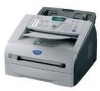
... to a USB port on a keyboard or non-powered USB hub. ■ Getting Started Carton Components MFC 11 1 10 2 9 3 4 8 7 5 6 1. Telephone Handset 2. Power Switch 7. Manual Feed Slot 5. Paper Tray 6. Front Cover 8. ADF Document Support Quick Setup Guide CD-ROMs For Windows® For Macintosh®...Line Cord Telephone Handset Curled Handset Cord Test Sheet (USA only) Accessory Order Form (USA/Canada only) Carton components may differ from one country to use a USB 2.0 interface cable that is not a standard accessory. Do NOT connect the interface cable at this time...
... to a USB port on a keyboard or non-powered USB hub. ■ Getting Started Carton Components MFC 11 1 10 2 9 3 4 8 7 5 6 1. Telephone Handset 2. Power Switch 7. Manual Feed Slot 5. Paper Tray 6. Front Cover 8. ADF Document Support Quick Setup Guide CD-ROMs For Windows® For Macintosh®...Line Cord Telephone Handset Curled Handset Cord Test Sheet (USA only) Accessory Order Form (USA/Canada only) Carton components may differ from one country to use a USB 2.0 interface cable that is not a standard accessory. Do NOT connect the interface cable at this time...

Quick Setup Guide - English
Page 5
.../2000 Professional/XP 17 For Windows NT® Workstation Version 4.0 Users 20 For Network Interface Cable Users (MFC-7225N and Optional NC-2200w only) ■ For Windows® 98/98SE/Me/NT/2000 Professional/XP 22 For...OS® 9.1 to 9.2 24 ■ For Mac OS® X 10.2.4 or greater 26 For Network Interface Cable Users (MFC-7225N and Optional NC-2200w only) ■ For Mac OS® 9.1 to 9.2 29 ■ For Mac OS® X ... Assembly 5 4. Set the Date and Time 8 7. Install the Handset 4 3. Load Paper in the Paper Tray 6 5. Table of Contents Step 1 Setting Up the MFC 1.
.../2000 Professional/XP 17 For Windows NT® Workstation Version 4.0 Users 20 For Network Interface Cable Users (MFC-7225N and Optional NC-2200w only) ■ For Windows® 98/98SE/Me/NT/2000 Professional/XP 22 For...OS® 9.1 to 9.2 24 ■ For Mac OS® X 10.2.4 or greater 26 For Network Interface Cable Users (MFC-7225N and Optional NC-2200w only) ■ For Mac OS® 9.1 to 9.2 29 ■ For Mac OS® X ... Assembly 5 4. Set the Date and Time 8 7. Install the Handset 4 3. Load Paper in the Paper Tray 6 5. Table of Contents Step 1 Setting Up the MFC 1.
Quick Setup Guide - English
Page 8
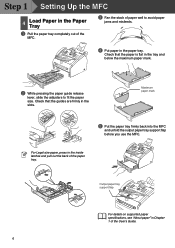
... 1 Setting Up the MFC 4 Load Paper in the Paper Tray 1 Pull the paper tray completely out of the MFC. 3 Fan the stack of paper well to fit the paper size. Maximum paper mark 5 Put the paper tray firmly back into the MFC and unfold the output paper tray support flap before you use the MFC. Check that the paper is flat in the tray and below the maximum...
... 1 Setting Up the MFC 4 Load Paper in the Paper Tray 1 Pull the paper tray completely out of the MFC. 3 Fan the stack of paper well to fit the paper size. Maximum paper mark 5 Put the paper tray firmly back into the MFC and unfold the output paper tray support flap before you use the MFC. Check that the paper is flat in the tray and below the maximum...


