Users Manual - English
Page 6
...this warranty. The decision as Paper Feeding Kit, Fuser and Laser Units. What Brother will do: If the problem reported concerning your Product is...or packaging); (3)Damage caused by improper installation, improper or abnormal use of the Warranty Periods: • Machines: one year from the original purchase date. ...• Accompanying Consumable and Accessory Items: 90 days from other than defects in shipping. What is NOT covered: This warranty does not cover: (1)Physical damage to this Product; (2)Damage caused by another device or software...
...this warranty. The decision as Paper Feeding Kit, Fuser and Laser Units. What Brother will do: If the problem reported concerning your Product is...or packaging); (3)Damage caused by improper installation, improper or abnormal use of the Warranty Periods: • Machines: one year from the original purchase date. ...• Accompanying Consumable and Accessory Items: 90 days from other than defects in shipping. What is NOT covered: This warranty does not cover: (1)Physical damage to this Product; (2)Damage caused by another device or software...

Users Manual - English
Page 21
... User's Guide (MFC-7220 and MFC-7225N only) This User's Guide does not contain all the information about these operations, read . • Quick Setup Guide: Setup and Software Installation Instructions • User...'s Guide (2 or 3 manuals): User's Guide for stand-alone operations, Software User's Guide and Network* User's Guide *MFC-7225N only • PaperPort® User's Guide: Document Management Software How to find the instructions as how to use Windows® Explorer to run the setup.exe program from the root directory of the Brother...
... User's Guide (MFC-7220 and MFC-7225N only) This User's Guide does not contain all the information about these operations, read . • Quick Setup Guide: Setup and Software Installation Instructions • User...'s Guide (2 or 3 manuals): User's Guide for stand-alone operations, Software User's Guide and Network* User's Guide *MFC-7225N only • PaperPort® User's Guide: Document Management Software How to find the instructions as how to use Windows® Explorer to run the setup.exe program from the root directory of the Brother...

Users Manual - English
Page 22
Insert the Brother CD-ROM labeled Macintosh® into your language. 4 Click the documentation you want to read. • Quick Setup Guide: Setup and Software Installation Instructions • User's Guide (2 or 3 manuals): User's Guide for scanning directly from a Macintosh® on page 7-13....scan server required) Presto!® PageManager® User's Guide ■ Instructions for stand-alone operations, Software User's Guide and Network* User's Guide *MFC-7225N only Introduction How to find Scanning instructions There are several ways you can find the instructions as 1 follows...
Insert the Brother CD-ROM labeled Macintosh® into your language. 4 Click the documentation you want to read. • Quick Setup Guide: Setup and Software Installation Instructions • User's Guide (2 or 3 manuals): User's Guide for scanning directly from a Macintosh® on page 7-13....scan server required) Presto!® PageManager® User's Guide ■ Instructions for stand-alone operations, Software User's Guide and Network* User's Guide *MFC-7225N only Introduction How to find Scanning instructions There are several ways you can find the instructions as 1 follows...
Users Manual - English
Page 92
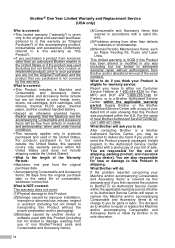
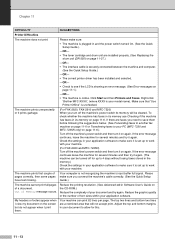
... in the Software User's Guide on page 11-7.) Paper Jam Rear The paper is jammed in progress) Press Start to send or copy the scanned pages. -OR- life and the toner will soon run out. 11 - 4 Clear the faxes from the solutions.brother.com Web site. -OR- installed properly. Toner... of its Order a new toner cartridge now. Toner Life End The toner cartridge and drum unit Re-install the toner cartridge and drum unit assembly. Replace the toner cartridge with a new one. (See -OR- Troubleshooting and routine maintenance ERROR MESSAGES ERROR MESSAGE CAUSE Out of Memory The machine's ...
... in the Software User's Guide on page 11-7.) Paper Jam Rear The paper is jammed in progress) Press Start to send or copy the scanned pages. -OR- life and the toner will soon run out. 11 - 4 Clear the faxes from the solutions.brother.com Web site. -OR- installed properly. Toner... of its Order a new toner cartridge now. Toner Life End The toner cartridge and drum unit Re-install the toner cartridge and drum unit assembly. Replace the toner cartridge with a new one. (See -OR- Troubleshooting and routine maintenance ERROR MESSAGES ERROR MESSAGE CAUSE Out of Memory The machine's ...
Users Manual - English
Page 94
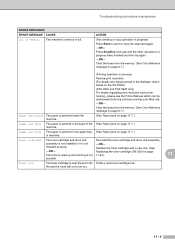
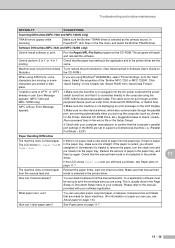
Transferring faxes to your PC (MFC-7220 and MFC-7225N only) You can transfer the Fax Journal report to your PC, press 1. -OR- Note You can transfer the faxes from your machine's memory to your PC. 1 Press Stop/Exit. 2 Make sure you have installed MFL Pro Suite on your PC, and then turn on..., see Using Brother PC-Fax Software in the Software User's Guide on page 6-3.) During setup the LCD will be forwarded. 2 Press Start. Note If there is an error on the machine's LCD, after the faxes have not set PC Fax Receive on the machine. (See PC Fax Receive (MFC-7220 and MFC-7225N only) on...
Transferring faxes to your PC (MFC-7220 and MFC-7225N only) You can transfer the Fax Journal report to your PC, press 1. -OR- Note You can transfer the faxes from your machine's memory to your PC. 1 Press Stop/Exit. 2 Make sure you have installed MFL Pro Suite on your PC, and then turn on..., see Using Brother PC-Fax Software in the Software User's Guide on page 6-3.) During setup the LCD will be forwarded. 2 Press Start. Note If there is an error on the machine's LCD, after the faxes have not set PC Fax Receive on the machine. (See PC Fax Receive (MFC-7220 and MFC-7225N only) on...
Users Manual - English
Page 101
... On. (See the Quick Setup Guide.) -OR- • The toner cartridge and drum unit are installed properly. (See Replacing the drum unit (DR-350) on page 11-27.) -OR- • ... is unchecked. Right-click 'Brother MFC-XXXX,' (where XXXX is not recognizing the machine's input buffer full signal. Out of font sizes within your application software to see Checking if the machine...to your application software to make sure it is showing an error message. (See Error messages on page 11-6. Reduce the printing resolution. (See Advanced tab in your PC (MFC-7220 and MFC-7225N only) on page...
... On. (See the Quick Setup Guide.) -OR- • The toner cartridge and drum unit are installed properly. (See Replacing the drum unit (DR-350) on page 11-27.) -OR- • ... is unchecked. Right-click 'Brother MFC-XXXX,' (where XXXX is not recognizing the machine's input buffer full signal. Out of font sizes within your application software to see Checking if the machine...to your application software to make sure it is showing an error message. (See Error messages on page 11-6. Reduce the printing resolution. (See Advanced tab in your PC (MFC-7220 and MFC-7225N only) on page...
Users Manual - English
Page 102
... paper Reinsert the paper firmly, load one sheet at a time. Sometimes it . Software Difficulties (MFC-7220 and MFC-7225N only) Cannot install software or print. Make sure that are printed in use' Error Message appears. (MFC-7220 and MFC-7225N only) 'MFC is Busy' Error Message appears. 1.Make sure the machine is selected as , drivers for laser machines. (For information on paper...
... paper Reinsert the paper firmly, load one sheet at a time. Sometimes it . Software Difficulties (MFC-7220 and MFC-7225N only) Cannot install software or print. Make sure that are printed in use' Error Message appears. (MFC-7220 and MFC-7225N only) 'MFC is Busy' Error Message appears. 1.Make sure the machine is selected as , drivers for laser machines. (For information on paper...
Users Manual - English
Page 104
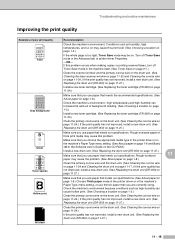
... paper on page 1-8.) Choose Thick paper mode in the printer driver or in the Software User's Guide on the CD-ROM.) Install a new drum unit. (See Replacing the drum unit (DR-350) on page 11...the drum unit. (See Cleaning the laser scanner window on page 11-22 and Cleaning the corona wire on page 11-24.) If the print quality has not improved, install a new drum unit. (See ...Conditions such as high humidity can increase the amount of background shading. (See Choosing a location on page 1-2.) Install a new toner cartridge. (See Replacing the toner cartridge (TN-350) on page 11-24.) Clean the...
... paper on page 1-8.) Choose Thick paper mode in the printer driver or in the Software User's Guide on the CD-ROM.) Install a new drum unit. (See Replacing the drum unit (DR-350) on page 11...the drum unit. (See Cleaning the laser scanner window on page 11-22 and Cleaning the corona wire on page 11-24.) If the print quality has not improved, install a new drum unit. (See ...Conditions such as high humidity can increase the amount of background shading. (See Choosing a location on page 1-2.) Install a new toner cartridge. (See Replacing the toner cartridge (TN-350) on page 11-24.) Clean the...
Users Manual - English
Page 106
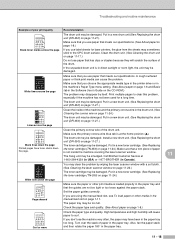
...has clips or staples because they will cause paper to the OPC drum surface. Install a new drum unit. (See Replacing the drum unit (DR-350) on page...to clear this problem, especially if the machine has not been used for laser printers, the glue from the sheets may be smudged. You may clear ...fan the paper stack and then rotate the paper 180° in the Software User's Guide on page 11-27.) Clean the primary corona wire of... paper that meets our specifications. The drum unit may be damaged. Call Brother Customer Service at the home position (▲). Set the paper guides correctly....
...has clips or staples because they will cause paper to the OPC drum surface. Install a new drum unit. (See Replacing the drum unit (DR-350) on page...to clear this problem, especially if the machine has not been used for laser printers, the glue from the sheets may be smudged. You may clear ...fan the paper stack and then rotate the paper 180° in the Software User's Guide on page 11-27.) Clean the primary corona wire of... paper that meets our specifications. The drum unit may be damaged. Call Brother Customer Service at the home position (▲). Set the paper guides correctly....

Quick Setup Guide - English
Page 1
Step 1 Setting Up the MFC Step 2 Installing the Drivers & Software Windows® Parallel Windows NT® 4.0 Parallel Installing the Drivers & Software Quick Setup Guide Windows® Network Setup is Complete! Macintosh® USB Macintosh® Network For Network Users ... in a convenient place for the correct setup procedure and installation instructions. Keep this "Quick Setup Guide" for quick and easy reference at all times. Setting Up the MFC MFC-7220 MFC-7225N Windows® USB Before you can use the MFC, you must set up the hardware and install the software.
Step 1 Setting Up the MFC Step 2 Installing the Drivers & Software Windows® Parallel Windows NT® 4.0 Parallel Installing the Drivers & Software Quick Setup Guide Windows® Network Setup is Complete! Macintosh® USB Macintosh® Network For Network Users ... in a convenient place for the correct setup procedure and installation instructions. Keep this "Quick Setup Guide" for quick and easy reference at all times. Setting Up the MFC MFC-7220 MFC-7225N Windows® USB Before you can use the MFC, you must set up the hardware and install the software.

Quick Setup Guide - English
Page 3
...(USA/Canada only) Carton components may differ from one country to a USB port on a keyboard or non-powered USB hub. Save all packing materials and the carton. Connecting the interface cable is done during the software installation process. ■ Parallel interface cable Please make sure... you use a USB cable, make sure you connect it to the USB port of your computer and not to another. ■ Getting Started Carton Components MFC 11 1 10 2 9 3 4 8 7 5 6 1. Control Panel Cover 3. The interface cable is no longer than 6 feet (2.0 meters). Power Switch 7. When...
...(USA/Canada only) Carton components may differ from one country to a USB port on a keyboard or non-powered USB hub. Save all packing materials and the carton. Connecting the interface cable is done during the software installation process. ■ Parallel interface cable Please make sure... you use a USB cable, make sure you connect it to the USB port of your computer and not to another. ■ Getting Started Carton Components MFC 11 1 10 2 9 3 4 8 7 5 6 1. Control Panel Cover 3. The interface cable is no longer than 6 feet (2.0 meters). Power Switch 7. When...

Quick Setup Guide - English
Page 5
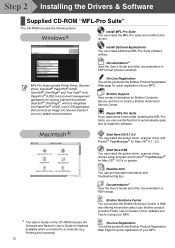
...the Paper Tray 6 5. Select Your Language (Canada only 11 10. Send the Product Registration and Test Sheet (USA Only 11 Step 2 Installing the Drivers & Software Supplied CD-ROM "MFL-Pro Suite 12 For USB Interface Cable Users ■ For Windows® 98/98SE/Me/2000 Professional/XP 14...X 10.2.4 or greater 26 For Network Interface Cable Users (MFC-7225N and Optional NC-2200w only) ■ For Mac OS® 9.1 to 9.2 29 ■ For Mac OS® X 10.2.4 or greater 31 ■ For Network Users Installing the BRAdmin Professional Configuration Utility (Windows® Users Only 34 ...
...the Paper Tray 6 5. Select Your Language (Canada only 11 10. Send the Product Registration and Test Sheet (USA Only 11 Step 2 Installing the Drivers & Software Supplied CD-ROM "MFL-Pro Suite 12 For USB Interface Cable Users ■ For Windows® 98/98SE/Me/2000 Professional/XP 14...X 10.2.4 or greater 26 For Network Interface Cable Users (MFC-7225N and Optional NC-2200w only) ■ For Mac OS® 9.1 to 9.2 29 ■ For Mac OS® X 10.2.4 or greater 31 ■ For Network Users Installing the BRAdmin Professional Configuration Utility (Windows® Users Only 34 ...

Quick Setup Guide - English
Page 6
Control Panel Cover 4 Connecting the interface cable is done during the software installation process. 1 Pull out the ADF Document Support. ADF Document Output Support 4 Close the control panel cover. 2 Install the Handset 1 Connect the curled handset cord to the MFC and the other end to the handset. 2 Open the control panel cover by lifting it toward the back. Step 1 Setting Up the MFC Attach the ADF 1 Document Output Support 3 Attach the ADF Document Output Support. Do NOT connect the interface cable.
Control Panel Cover 4 Connecting the interface cable is done during the software installation process. 1 Pull out the ADF Document Support. ADF Document Output Support 4 Close the control panel cover. 2 Install the Handset 1 Connect the curled handset cord to the MFC and the other end to the handset. 2 Open the control panel cover by lifting it toward the back. Step 1 Setting Up the MFC Attach the ADF 1 Document Output Support 3 Attach the ADF Document Output Support. Do NOT connect the interface cable.

Quick Setup Guide - English
Page 13
...Up the MFC Windows® USB Windows® Parallel 9 Select Your Language (Canada only) 1 Press Menu/Set. 2 Press 0. 3 Press 0. 4 Select your language (English or French) by using the On-Line Registration link from the installation CD-ROM or go to www.brother.com/registration... Windows NT® 4.0 Parallel Windows® Network Macintosh® USB Macintosh® Network For Network Users Go to Next page to install the drivers & software 11
...Up the MFC Windows® USB Windows® Parallel 9 Select Your Language (Canada only) 1 Press Menu/Set. 2 Press 0. 3 Press 0. 4 Select your language (English or French) by using the On-Line Registration link from the installation CD-ROM or go to www.brother.com/registration... Windows NT® 4.0 Parallel Windows® Network Macintosh® USB Macintosh® Network For Network Users Go to Next page to install the drivers & software 11
Quick Setup Guide - English
Page 14
... function to automatically repair and re-install the software. *1 The User's Guide on the CD-ROM includes the Software and Network User's Guide for features available when connected to a computer (e.g. Brother Support View contact information for Brother Customer Service and how to the Brother Product Registration Web Page for using your MFC. Documentation*1 View the User's Guide...
... function to automatically repair and re-install the software. *1 The User's Guide on the CD-ROM includes the Software and Network User's Guide for features available when connected to a computer (e.g. Brother Support View contact information for Brother Customer Service and how to the Brother Product Registration Web Page for using your MFC. Documentation*1 View the User's Guide...

Quick Setup Guide - English
Page 15
... the MFC Windows® USB Windows® Parallel Windows NT® 4.0 Parallel Step 2 Installing the Drivers & Software Follow the instructions on this page for your operating system and interface cable. For the latest drivers and to find the best solution for your problem or question, access the Brother Solutions... USB Macintosh® Network For Network Users Go to page 20 (For Parallel Interface Cable Users) Network Interface Cable Users Go to page 22 (MFC-7225N and Optional NC-2200w only) USB Interface Cable Users ■ For Mac OS® 9.1 to 9.2 Go to page 24 ■ For Mac...
... the MFC Windows® USB Windows® Parallel Windows NT® 4.0 Parallel Step 2 Installing the Drivers & Software Follow the instructions on this page for your operating system and interface cable. For the latest drivers and to find the best solution for your problem or question, access the Brother Solutions... USB Macintosh® Network For Network Users Go to page 20 (For Parallel Interface Cable Users) Network Interface Cable Users Go to page 22 (MFC-7225N and Optional NC-2200w only) USB Interface Cable Users ■ For Mac OS® 9.1 to 9.2 Go to page 24 ■ For Mac...

Quick Setup Guide - English
Page 16
...screen appears, select your language. 4 The CD-ROM main menu will automatically start and is followed by the installation of MFL-Pro Suite. 7 When the Brother MFL-Pro Suite Software License Agreement window appears, read the agreement, then click Yes if you must be logged on with Administrator ... close any applications running before installing the MFL-Pro Suite. 1 Turn off and unplug the MFC from the AC outlet and disconnect it from Step 1 "Setting Up the MFC" on pages 4 - 11. Click Install MFL-Pro Suite. 6 The installation of the Brother CD-ROM. 14 (MFC-7225N only) If you have completed...
...screen appears, select your language. 4 The CD-ROM main menu will automatically start and is followed by the installation of MFL-Pro Suite. 7 When the Brother MFL-Pro Suite Software License Agreement window appears, read the agreement, then click Yes if you must be logged on with Administrator ... close any applications running before installing the MFL-Pro Suite. 1 Turn off and unplug the MFC from the AC outlet and disconnect it from Step 1 "Setting Up the MFC" on pages 4 - 11. Click Install MFL-Pro Suite. 6 The installation of the Brother CD-ROM. 14 (MFC-7225N only) If you have completed...

Quick Setup Guide - English
Page 17
... The installation of the screens during this screen appears, connect the USB interface cable to your PC, and then connect it will take a few seconds for all the screens to appear. The screens appear one after another. Brother recommends that you connect the MFC directly ...seconds for the installation screen to appear. A When the On-Line Registration screen is displayed, make your computer. DO NOT connect the MFC to your selection and follow the on-screen instructions. Setting Up the MFC Windows® USB Installing the Drivers & Software 9 When this installation.
... The installation of the screens during this screen appears, connect the USB interface cable to your PC, and then connect it will take a few seconds for all the screens to appear. The screens appear one after another. Brother recommends that you connect the MFC directly ...seconds for the installation screen to appear. A When the On-Line Registration screen is displayed, make your computer. DO NOT connect the MFC to your selection and follow the on-screen instructions. Setting Up the MFC Windows® USB Installing the Drivers & Software 9 When this installation.
Quick Setup Guide - English
Page 18
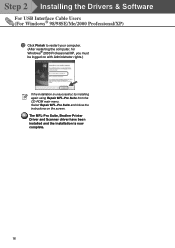
The MFL-Pro Suite, Brother Printer Driver and Scanner driver have been installed and the installation is unsuccessful, try installing again using Repair MFL-Pro Suite from the CD-ROM main menu. Select Repair MFL-Pro Suite and follow the instructions on with Administrator rights.) If the installation is now complete. 16 Step 2 Installing the Drivers & Software For USB Interface Cable Users (For Windows® 98/98SE/Me/2000 Professional/XP) B Click Finish to restart your computer. (After restarting the computer, for Windows® 2000 Professional/XP, you must be logged on the screen.
The MFL-Pro Suite, Brother Printer Driver and Scanner driver have been installed and the installation is unsuccessful, try installing again using Repair MFL-Pro Suite from the CD-ROM main menu. Select Repair MFL-Pro Suite and follow the instructions on with Administrator rights.) If the installation is now complete. 16 Step 2 Installing the Drivers & Software For USB Interface Cable Users (For Windows® 98/98SE/Me/2000 Professional/XP) B Click Finish to restart your computer. (After restarting the computer, for Windows® 2000 Professional/XP, you must be logged on the screen.
Quick Setup Guide - English
Page 19
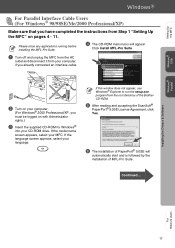
... the instructions from the root directory of the Brother CD-ROM. 5 After reading and accepting the ScanSoft® PaperPort® 9.0SE License Agreement, click Yes. 6 The installation of MFL-Pro Suite. If the model name screen appears, select your MFC. If this window does not appear, use... MFC Windows® USB Windows® Parallel For Parallel Interface Cable Users (For Windows® 98/98SE/Me/2000 Professional/XP) Make sure that you must be logged on with Administrator rights.) 3 Insert the supplied CD-ROM for Windows® into your language. Installing the Drivers & Software...
... the instructions from the root directory of the Brother CD-ROM. 5 After reading and accepting the ScanSoft® PaperPort® 9.0SE License Agreement, click Yes. 6 The installation of MFL-Pro Suite. If the model name screen appears, select your MFC. If this window does not appear, use... MFC Windows® USB Windows® Parallel For Parallel Interface Cable Users (For Windows® 98/98SE/Me/2000 Professional/XP) Make sure that you must be logged on with Administrator rights.) 3 Insert the supplied CD-ROM for Windows® into your language. Installing the Drivers & Software...


