Users Manual - English
Page 87
... total ampere ratings on the products plugged into the outlet, call , In USA: 1-800-284-4357 or In Canada: 1-877-BROTHER. 10 - 4 The openings should never be placed near or over a radiator or heater. This product should never be blocked by placing the product on a bed... on the product. C Never push objects of any kind on the product. 4 Unplug this product yourself because opening or removing covers may fall, causing serious damage to a Brother Authorized Service Center. This plug will block received faxes. A Do not place anything in installation unless proper ventilation ...
... total ampere ratings on the products plugged into the outlet, call , In USA: 1-800-284-4357 or In Canada: 1-877-BROTHER. 10 - 4 The openings should never be placed near or over a radiator or heater. This product should never be blocked by placing the product on a bed... on the product. C Never push objects of any kind on the product. 4 Unplug this product yourself because opening or removing covers may fall, causing serious damage to a Brother Authorized Service Center. This plug will block received faxes. A Do not place anything in installation unless proper ventilation ...
Users Manual - English
Page 89
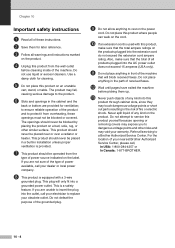
If this happens, your phone line. Visit us at http://solutions.brother.com. Cover is Open The front cover is not completely closed . Check the other fax machine's polling setup. Change Drum Soon The drum unit is too hot. During ... unit with any sophisticated office product, errors may occur. 11 Troubleshooting and routine maintenance Troubleshooting IMPORTANT For technical help , the Brother Solutions Center offers latest FAQs and troubleshooting tips. Error messages As with a new one. If the problem continues, call the country where you have a print quality problem;
If this happens, your phone line. Visit us at http://solutions.brother.com. Cover is Open The front cover is not completely closed . Check the other fax machine's polling setup. Change Drum Soon The drum unit is too hot. During ... unit with any sophisticated office product, errors may occur. 11 Troubleshooting and routine maintenance Troubleshooting IMPORTANT For technical help , the Brother Solutions Center offers latest FAQs and troubleshooting tips. Error messages As with a new one. If the problem continues, call the country where you have a print quality problem;

Users Manual - English
Page 95
WARNING After you open the front cover or back cover of the machine. Paper jams To clear paper jams, please follow the steps below. Paper is jammed, follow the steps in the following diagram. 2 Carefully ... Document jams If the document is jammed inside the machine are extremely hot. Document was not inserted or fed properly, or was too long 1 Open the control panel cover. When you have just used the machine, some parts inside the machine 1 Pull the paper tray completely out of the machine. 2 Pull the...
WARNING After you open the front cover or back cover of the machine. Paper jams To clear paper jams, please follow the steps below. Paper is jammed, follow the steps in the following diagram. 2 Carefully ... Document jams If the document is jammed inside the machine are extremely hot. Document was not inserted or fed properly, or was too long 1 Open the control panel cover. When you have just used the machine, some parts inside the machine 1 Pull the paper tray completely out of the machine. 2 Pull the...
Users Manual - English
Page 96
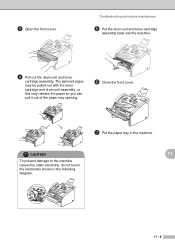
3 Open the front cover. The jammed paper may be pulled out with the toner cartridge and drum unit assembly, or this may release the paper so you can pull it out of the paper tray opening. 6 Close the front cover. 7 Put the paper tray in the following diagram. 11 - 8 CAUTION 11 To prevent damage to the machine caused by static electricity, do not touch the electrodes shown in the machine. Troubleshooting and routine maintenance 5 Put the drum unit and toner cartridge assembly back into the machine. 4 Pull out the drum unit and toner cartridge assembly.
3 Open the front cover. The jammed paper may be pulled out with the toner cartridge and drum unit assembly, or this may release the paper so you can pull it out of the paper tray opening. 6 Close the front cover. 7 Put the paper tray in the following diagram. 11 - 8 CAUTION 11 To prevent damage to the machine caused by static electricity, do not touch the electrodes shown in the machine. Troubleshooting and routine maintenance 5 Put the drum unit and toner cartridge assembly back into the machine. 4 Pull out the drum unit and toner cartridge assembly.
Users Manual - English
Page 97
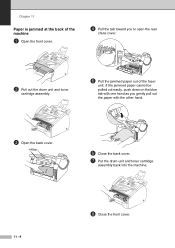
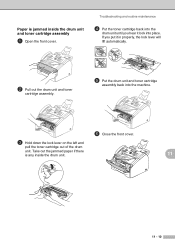
If the jammed paper cannot be pulled out easily, push down on the blue tab with one hand as you to open the rear chute cover. 2 Pull out the drum unit and toner cartridge assembly. 5 Pull the jammed paper out of the fuser unit. Chapter 11 Paper is jammed at the back of the machine 1 Open the front cover. 4 Pull the tab toward you gently pull out the paper with the other hand. 3 Open the back cover. 6 Close the back cover. 7 Put the drum unit and toner cartridge assembly back into the machine. 11 - 9 8 Close the front cover.
If the jammed paper cannot be pulled out easily, push down on the blue tab with one hand as you to open the rear chute cover. 2 Pull out the drum unit and toner cartridge assembly. 5 Pull the jammed paper out of the fuser unit. Chapter 11 Paper is jammed at the back of the machine 1 Open the front cover. 4 Pull the tab toward you gently pull out the paper with the other hand. 3 Open the back cover. 6 Close the back cover. 7 Put the drum unit and toner cartridge assembly back into the machine. 11 - 9 8 Close the front cover.
Users Manual - English
Page 98
Paper is any inside the drum unit and toner cartridge assembly 1 Open the front cover. If you hear it in properly, the lock lever will lift automatically. 2 Pull out the drum unit and toner cartridge assembly. 5 Put the drum unit ... place. Troubleshooting and routine maintenance 4 Put the toner cartridge back into the drum unit until you put it lock into the machine. 6 Close the front cover. 3 Hold down the lock lever on the left and pull the toner cartridge out of the drum unit. Take out the jammed paper if there...
Paper is any inside the drum unit and toner cartridge assembly 1 Open the front cover. If you hear it in properly, the lock lever will lift automatically. 2 Pull out the drum unit and toner cartridge assembly. 5 Put the drum unit ... place. Troubleshooting and routine maintenance 4 Put the toner cartridge back into the drum unit until you put it lock into the machine. 6 Close the front cover. 3 Hold down the lock lever on the left and pull the toner cartridge out of the drum unit. Take out the jammed paper if there...

Users Manual - English
Page 108
.... 7 Place the drum unit and toner cartridge assembly into the plastic bag and seal the bag. 8 Close the front cover. 11 Remove the telephone line cord, ADF document output support, handset and handset curled cord. 9 Wrap the machine in...the telephone wall jack. 3 Unplug the machine from the AC power outlet. 4 Unplug all the cables from the machine. 5 Open the front cover. 6 Remove the drum unit and toner cartridge assembly. The machine should be adequately insured with the original packing material. 11 -... for compatibility to reduce the modem speed for FAX-2910, FAX-2920 and MFC-7225 only.
.... 7 Place the drum unit and toner cartridge assembly into the plastic bag and seal the bag. 8 Close the front cover. 11 Remove the telephone line cord, ADF document output support, handset and handset curled cord. 9 Wrap the machine in...the telephone wall jack. 3 Unplug the machine from the AC power outlet. 4 Unplug all the cables from the machine. 5 Open the front cover. 6 Remove the drum unit and toner cartridge assembly. The machine should be adequately insured with the original packing material. 11 -... for compatibility to reduce the modem speed for FAX-2910, FAX-2920 and MFC-7225 only.

Users Manual - English
Page 111
... the telephone line cord. Chapter 11 2 Open the front cover and pull out the drum unit and toner cartridge assembly. 3 Gently clean the laser scanner window by wiping it with a clean soft, dry cloth. When you have used the machine, some internal parts of the machine, never touch the ...shaded parts shown in the diagram below . 5 Close the front cover. 6 Plug the machine's power cord ...
... the telephone line cord. Chapter 11 2 Open the front cover and pull out the drum unit and toner cartridge assembly. 3 Gently clean the laser scanner window by wiping it with a clean soft, dry cloth. When you have used the machine, some internal parts of the machine, never touch the ...shaded parts shown in the diagram below . 5 Close the front cover. 6 Plug the machine's power cord ...
Users Manual - English
Page 112
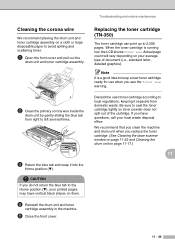
... vary depending on them. 4 Reinstall the drum unit and toner cartridge assembly in the machine. 5 Close the front cover. If you replace the toner cartridge. (See Cleaning the laser scanner window on page 11-22 and Cleaning the drum unit on a cloth or large disposable paper to avoid spilling ...and scattering toner. 1 Open the front cover and pull out the drum unit and toner cartridge assembly. 2 Clean the primary corona wire...
... vary depending on them. 4 Reinstall the drum unit and toner cartridge assembly in the machine. 5 Close the front cover. If you replace the toner cartridge. (See Cleaning the laser scanner window on page 11-22 and Cleaning the drum unit on a cloth or large disposable paper to avoid spilling ...and scattering toner. 1 Open the front cover and pull out the drum unit and toner cartridge assembly. 2 Clean the primary corona wire...
Users Manual - English
Page 113
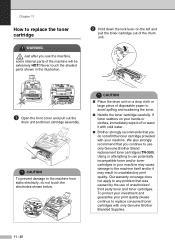
... Just after you use the machine, some internal parts of disposable paper to avoid spilling and scattering the toner. ■ Handle the toner cartridge carefully. CAUTION To prevent damage to replace consumed toner cartridges with cold water. ■ Brother strongly recommends that you do not touch the...machine may cause damage to the machine itself and/or it with only Genuine Brother Branded Supplies. 11 - 25 Our warranty coverage does not apply to use of the drum unit. 1 Open the front cover and pull out the drum unit and toner cartridge assembly. To protect your ...
... Just after you use the machine, some internal parts of disposable paper to avoid spilling and scattering the toner. ■ Handle the toner cartridge carefully. CAUTION To prevent damage to replace consumed toner cartridges with cold water. ■ Brother strongly recommends that you do not touch the...machine may cause damage to the machine itself and/or it with only Genuine Brother Branded Supplies. 11 - 25 Our warranty coverage does not apply to use of the drum unit. 1 Open the front cover and pull out the drum unit and toner cartridge assembly. To protect your ...

Users Manual - English
Page 115
... to replace it is near the end of pages your drum will be careful. 1 Open the front cover and pull out the drum unit and toner cartridge assembly. WARNING Just after you may be...one. There are extremely HOT! If the LCD shows Change Drum Soon, the drum unit is time to replace the drum unit for the number of paper and how much toner you replace the drum unit. (See Cleaning the laser... clean the machine when you use for a while. Because we have used the machine, some internal parts of the machine are many factors that determine the actual drum life, we cannot guarantee a...
... to replace it is near the end of pages your drum will be careful. 1 Open the front cover and pull out the drum unit and toner cartridge assembly. WARNING Just after you may be...one. There are extremely HOT! If the LCD shows Change Drum Soon, the drum unit is time to replace the drum unit for the number of paper and how much toner you replace the drum unit. (See Cleaning the laser... clean the machine when you use for a while. Because we have used the machine, some internal parts of the machine are many factors that determine the actual drum life, we cannot guarantee a...

Quick Setup Guide - English
Page 6
ADF Document Output Support 4 Close the control panel cover. 2 Install the Handset 1 Connect the curled handset cord to the MFC and the other end to the handset. 2 Open the control panel cover by lifting it toward the back. Control Panel Cover 4 Do NOT connect the interface cable. Connecting the interface cable is done during the software installation process. 1 Pull out the ADF Document Support. Step 1 Setting Up the MFC Attach the ADF 1 Document Output Support 3 Attach the ADF Document Output Support.
ADF Document Output Support 4 Close the control panel cover. 2 Install the Handset 1 Connect the curled handset cord to the MFC and the other end to the handset. 2 Open the control panel cover by lifting it toward the back. Control Panel Cover 4 Do NOT connect the interface cable. Connecting the interface cable is done during the software installation process. 1 Pull out the ADF Document Support. Step 1 Setting Up the MFC Attach the ADF 1 Document Output Support 3 Attach the ADF Document Output Support.

Quick Setup Guide - English
Page 7
Windows NT® 4.0 Parallel Windows® Network Macintosh® USB Macintosh® Network For Network Users 5 Front Cover 5 Close the front cover of the MFC. 4 Put the drum unit assembly into the MFC. Setting Up the MFC Windows® USB Windows® Parallel 3 Install the Drum Unit Assembly 1 Open the front cover of the MFC. 2 Unpack the drum unit assembly. 3 Gently rock it from side to side several times to distribute the toner evenly inside the assembly.
Windows NT® 4.0 Parallel Windows® Network Macintosh® USB Macintosh® Network For Network Users 5 Front Cover 5 Close the front cover of the MFC. 4 Put the drum unit assembly into the MFC. Setting Up the MFC Windows® USB Windows® Parallel 3 Install the Drum Unit Assembly 1 Open the front cover of the MFC. 2 Unpack the drum unit assembly. 3 Gently rock it from side to side several times to distribute the toner evenly inside the assembly.

Windows VISTA Installation Guide - English
Page 8
...3 Carefully guide the USB cable into the open position. Gently push the scanner cover support down ( ) and close the scanner cover ( ). 2 Connect the USB cable to ...any of the Brother drivers will take a few seconds for all the screens to appear. The installation screens appear one after another....cover to release the lock ( ). Windows® USB STEP 2 Installing the Driver & Software Windows® How to connect the machine to your computer For DCP-130C, MFC-240C, MFC-440CN, MFC-5460CN and MFC-5860CN users (The illustrations are based on MFC-5460CN.) 1 Lift the scanner cover...
...3 Carefully guide the USB cable into the open position. Gently push the scanner cover support down ( ) and close the scanner cover ( ). 2 Connect the USB cable to ...any of the Brother drivers will take a few seconds for all the screens to appear. The installation screens appear one after another....cover to release the lock ( ). Windows® USB STEP 2 Installing the Driver & Software Windows® How to connect the machine to your computer For DCP-130C, MFC-240C, MFC-440CN, MFC-5460CN and MFC-5860CN users (The illustrations are based on MFC-5460CN.) 1 Lift the scanner cover...

Windows VISTA Installation Guide - English
Page 12
... cover until it locks securely into the LAN socket marked with one on top of the machine to your network. 2 Using both hands, use the plastic tabs on your model number. Model Number MFC-440CN, MFC-5460CN, MFC-5860CN DCP-8065DN, MFC-7225N, MFC-7820N, MFC-8460N, MFC-8860DN Page Number page 10 page 14 For MFC-440CN, MFC-5460CN and MFC...
... cover until it locks securely into the LAN socket marked with one on top of the machine to your network. 2 Using both hands, use the plastic tabs on your model number. Model Number MFC-440CN, MFC-5460CN, MFC-5860CN DCP-8065DN, MFC-7225N, MFC-7820N, MFC-8460N, MFC-8860DN Page Number page 10 page 14 For MFC-440CN, MFC-5460CN and MFC...


